Abstract : This article briefly introduces the development of WiFi car for Hongmeng system + Hi3861
Suitable group : suitable for Runhe Hi3861 development board
All code repositories in this article: https://gitee.com/qidiyun/hihope-3861-smart-home-kit
13.1 Introduction to the car
WiFi car based on Hongmeng system + Hi3861
First of all, we need to have a WiFi car kit, which is actually Hi3861 plus motor, tracking module, ultrasonic and other modules.
After the car is installed, it probably looks like this:

13.2 Motor drive
We will only do the simplest thing here first, driving the motor of the car to make the car run.
The motor driver board is as shown below. The current motor driver chip uses the L9110S chip.

The typical application circuit is as shown below:

We can see that if we want to control the motor, our chip needs at least 2 PWM signals, one for controlling forward rotation and one for controlling reverse rotation.
Then our car has two wheels and needs two motors, so we need 4 PWM signals.
After checking the car information, we can know that the 4-channel PWM currently used by the Hi3861 chip to control the motor are:
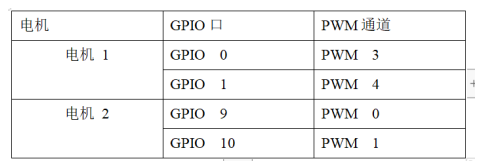
Now that we know the PWM channel and the corresponding GPIO port, we can start programming.
First the PWM initialization part:
void pwm_init(void)
{


	hi_gpio_init();
	//引脚复用
	hi_io_set_func(HI_IO_NAME_GPIO_0, HI_IO_FUNC_GPIO_0_PWM3_OUT);
    hi_io_set_func(HI_IO_NAME_GPIO_1, HI_IO_FUNC_GPIO_1_PWM4_OUT);
	hi_io_set_func(HI_IO_NAME_GPIO_9, HI_IO_FUNC_GPIO_9_PWM0_OUT);
    hi_io_set_func(HI_IO_NAME_GPIO_10, HI_IO_FUNC_GPIO_10_PWM1_OUT);

	//初始化pwm
	hi_pwm_init(HI_PWM_PORT_PWM3);
    hi_pwm_init(HI_PWM_PORT_PWM4);
	hi_pwm_init(HI_PWM_PORT_PWM0);
    hi_pwm_init(HI_PWM_PORT_PWM1);

}
Functions to control the car forward, backward, turn left, turn right, and stop:
//停止
void pwm_stop(void)
{


	//先停止PWM
	hi_pwm_stop(HI_PWM_PORT_PWM3);
    hi_pwm_stop(HI_PWM_PORT_PWM4);
	hi_pwm_stop(HI_PWM_PORT_PWM0);
    hi_pwm_stop(HI_PWM_PORT_PWM1);
}
void car_stop(void)
{


	car_info.cur_status = car_info.go_status;

	printf("pwm_stop \r\n");

	pwm_stop();
}

//前进
void pwm_forward(void)
{


	//先停止PWM
	hi_pwm_stop(HI_PWM_PORT_PWM3);
    hi_pwm_stop(HI_PWM_PORT_PWM4);
	hi_pwm_stop(HI_PWM_PORT_PWM0);
    hi_pwm_stop(HI_PWM_PORT_PWM1);

	//启动A路PWM
	hi_pwm_start(HI_PWM_PORT_PWM3, 750, 1500);
	hi_pwm_start(HI_PWM_PORT_PWM0, 750, 1500);
}
void car_forward(void)
{


	if(car_info.go_status != CAR_STATUS_FORWARD)
	{


		//直接退出
		return ;
	}
	if(car_info.cur_status == car_info.go_status)
	{


		//状态没有变化,直接推出
		return;
	}

	car_info.cur_status = car_info.go_status;

	printf("pwm_forward \r\n");

	pwm_forward();

	step_count_update();
}

//后退
void pwm_backward(void)
{


	//先停止PWM
	hi_pwm_stop(HI_PWM_PORT_PWM3);
    hi_pwm_stop(HI_PWM_PORT_PWM4);
	hi_pwm_stop(HI_PWM_PORT_PWM0);
    hi_pwm_stop(HI_PWM_PORT_PWM1);

	//启动A路PWM
	hi_pwm_start(HI_PWM_PORT_PWM4, 750, 1500);
	hi_pwm_start(HI_PWM_PORT_PWM1, 750, 1500);
}
void car_backward(void)
{


	if(car_info.go_status != CAR_STATUS_BACKWARD)
	{


		//直接退出
		return ;
	}
	if(car_info.cur_status == car_info.go_status)
	{


		//状态没有变化,直接推出
		return;
	}

	car_info.cur_status = car_info.go_status;

	printf("pwm_backward \r\n");

	pwm_backward();

	step_count_update();
}

//左转
void pwm_left(void)
{


	//先停止PWM
	hi_pwm_stop(HI_PWM_PORT_PWM3);
    hi_pwm_stop(HI_PWM_PORT_PWM4);
	hi_pwm_stop(HI_PWM_PORT_PWM0);
    hi_pwm_stop(HI_PWM_PORT_PWM1);

	//启动A路PWM
	hi_pwm_start(HI_PWM_PORT_PWM3, 750, 1500);
}
void car_left(void)
{


	if(car_info.go_status != CAR_STATUS_LEFT)
	{


		//直接退出
		return ;
	}
	if(car_info.cur_status == car_info.go_status)
	{


		//状态没有变化,直接推出
		return;
	}

	car_info.cur_status = car_info.go_status;

	printf("pwm_left \r\n");

	pwm_left();

	step_count_update();
}

//右转
void pwm_right(void)
{


	//先停止PWM
	hi_pwm_stop(HI_PWM_PORT_PWM3);
    hi_pwm_stop(HI_PWM_PORT_PWM4);
	hi_pwm_stop(HI_PWM_PORT_PWM0);
    hi_pwm_stop(HI_PWM_PORT_PWM1);

	//启动A路PWM
	hi_pwm_start(HI_PWM_PORT_PWM0, 750, 1500);
}
void car_right(void)
{


	if(car_info.go_status != CAR_STATUS_RIGHT)
	{


		//直接退出
		return ;
	}
	if(car_info.cur_status == car_info.go_status)
	{


		//状态没有变化,直接推出
		return;
	}

	car_info.cur_status = car_info.go_status;

	printf("pwm_right \r\n");

	pwm_right();

	step_count_update();
}
Finally, to use the pwm function, we need to modify
device/soc/hisilicon/hi3861v100/sdk_liteos/build/config/usr_config.mk
Add these two lines, here is to turn on the PWM function
CONFIG_PWM_SUPPORT=y

CONFIG_PWM_HOLD_AFTER_REBOOT=y

13.3 WiFi control part
We simply write a UDP program on the car to listen to the 50001 port number. The communication format used here is json. After the car receives the UDP data, it parses the json and performs corresponding operations according to the command, such as forward, backward, left turn, right turn, etc. The code is as follows:

On the computer side, use C# to write a test program. You can manually enter the IP address of the car, or you do not need to enter the IP address. In this way, the computer side program will send a broadcast packet to the car, which can also have a control function.

13.4 WiFi hotspot connection
Note that the default SSID of the WiFi car firmware here to connect to the hotspot is:

Readers need to modify it to their own hot spots.
File: sta_entry.c
The source code of the car and the C# control end code are all open source. You can modify them freely and use your imagination to create more powerful and cool DIY products.