Introduction to Protobuf
The full name of Protobuf: Protocol Buffers, is a platform-independent, language-independent, scalable, lightweight and efficient serialized data storage format launched by Google, similar to our commonly used xml and json.
Question: Now that xml and json are available, why does Google launch Protobuf?
There is a reason for existence. Protobuf can be summed up in two words: small and fast. The size after serialization with Protobuf is one-tenth of json and one-twentieth of xml format, and the performance is 5 to 100 times that of them.
Normally, there is no problem when we use xml or json for data communication, but in the case of high-performance and big data communication, if there is a way to compress the data volume and improve the transmission efficiency, it will obviously bring faster and smoother performance to users. experience.
| xml | json | protobuf | |
|---|---|---|---|
| Data storage method | text | text | binary |
| Data save size | big | generally | Small |
| Analytical efficiency | slow | generally | quick |
Protobuf environment configuration
Method 1: Download Protobuf from GitHub and install it.
Method 2: Brew installation
Create Protobuf files using AndroidStudio
1. Create a file with the suffix .proto, as shown below:
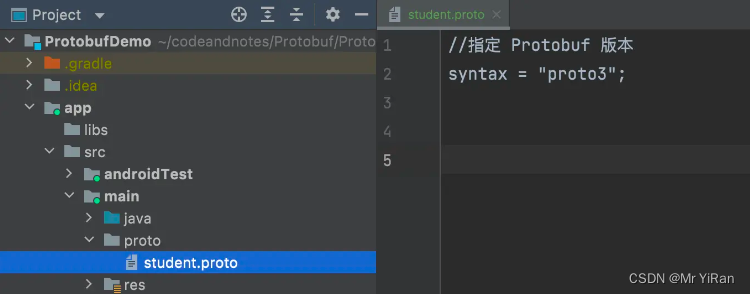
You can see that the icon in front of this file is of text type, and when you write the code, there are no prompts and the keywords are not highlighted. At this time we A plug-in needs to be integrated to support the writing of Protobuf
2. Integrate the Protocol Buffers plug-in
When we integrate this plug-in, we can see changes in file icons and code highlighting, and there will also be syntax prompts
Protobuf syntax basics
Introduction to common keywords in Protobuf
| Keywords | illustrate |
|---|---|
| syntax | Specify the version of Protobuf. Protobuf currently has two commonly used versions, proto2 and proto3. If not declared, the default is proto2. |
| package | Specify file package name |
| import | Import package, similar to Java's import |
| message | Define message classes, similar to Java's class keyword, message classes can be nested |
| repeated | Define a collection, similar to Java collections |
| reserved | Reserved fields. If modified with this keyword, users cannot use this field number or field name. |
| option | Options can be used in the scope of Protobuf, or in the definition of message, enum, and service. The options defined by Protobuf are composed of java_package, java_outer_classname, java_multiple_files, etc. |
| optional | Indicates that the field is optional |
| java_package | Specify the package name of the generated class, which needs to be matched |
| java_outer_classname | Defines the class name of the current file. If not defined, it defaults to the first letter of the file name. |
| java_multiple_files | Specify the number of Java files after compilation. If it is true, then there will be one Java object and one class. If it is false, then the defined Java objects will be included in the same file. |
Basic data types
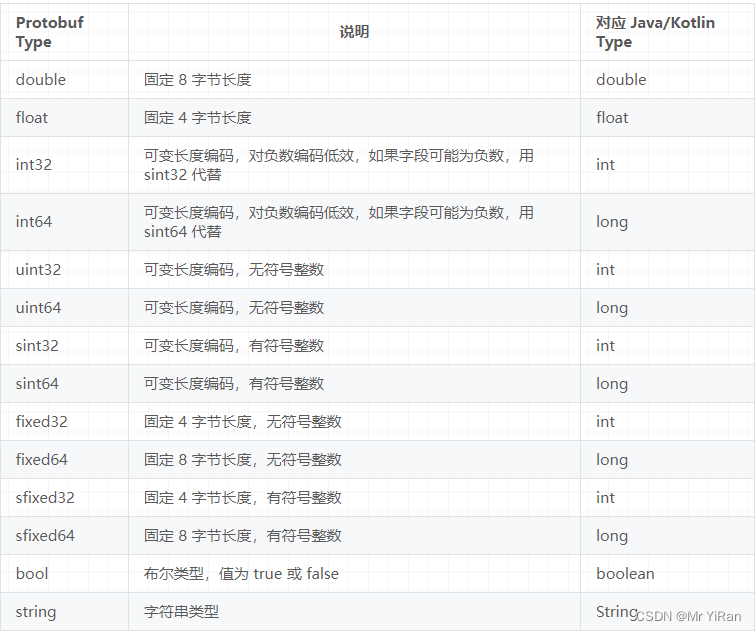
Differences between variable length encoding and fixed length encoding:
//For example, I define the following in Java:
int a = 1;
//Because the int type occupies 4 bytes and 1 byte occupies 8 bits, we list the byte occupancy of 1:
00000000 00000000 00000000 00000001
//You can see that the first three bytes of 1 are all 0, which can be removed in Protobuf, so it becomes:
00000001
//So 1 only occupies one byte in Protobuf. saves space
The above is a variable length encoding. The fixed-length encoding means that even if the previous byte is 0, it cannot be removed. I just want to occupy so many bytes.
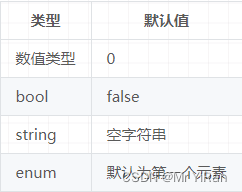
Basic data type default value
Message type definition
In the Protobuf file created above, define a student with a name, age, email address and course
//指定 Protobuf 版本
syntax = "proto3";

//指定包名
package erdai;

//定义一个学生的消息类
message Student{


  //姓名
  string name = 1;
  //年龄
  int32 age = 2;
  //邮箱
  string email = 3;
  //课程
  repeated string course = 4; //相当于 Java 的 List<String>
}
1. Multiple message classes can be added to a Protobuf file, and they can also be nested. 2. The
above 1, 2, 3, and 4 do not assign values to fields, but define a unique number for each field. These numbers are used to identify your fields in binary format and should not change after using your message type.
3. The field numbers 1-15 only occupy one byte for encoding, and the field numbers 16-2047 occupy two bytes, including field number and field type. Therefore, it is recommended to use more field numbers 1-15. 4.
Yes Specify the minimum field number as 1 and the maximum field number as 2^29 - 1 or 536870911. In addition, identification numbers 19000-19999 cannot be used because the protobuf protocol implementation reserves these. Likewise, any previously reserved field numbers cannot be used.
Protobuf enumeration type
message Weather{


  int32 query = 1;

  //季节
  enum Season{


    //允许对枚举常量设置别名
    option allow_alias = true;
    //枚举里面的 = 操作是对常量进行赋值操作
    //春
    SPRING = 0;
    //夏
    SUMMER = 1;
    //秋 如果不设置别名,不允许存在两个相同的值
    FALL = 2;
    AUTUMN = 2;
    //冬
    WINTER = 3;
  }

  //对 season 进行编号
  Season season = 2;
}
1. Use the enum keyword to define the enumeration type
. 2. The value of the first field of the enumeration type must be 0, otherwise the compilation will report an error.
3. The enumeration constant value must be within the range of 32-bit integer values. Because enum values use variable encoding, which is not efficient enough for negative numbers, it is not recommended to use negative numbers in enums.
4. The = operation inside the enumeration is to assign a value to a constant, while the = operation outside the enumeration is to number the current field.
Protobuf collection
repeated string list = 1; //类似 Java 的 List<String>

map<string,string> = 2; //类似 Java 的 Map<String,String>
1. To define a collection in Protobuf, add the repeated keyword in front of the properties you defined.
2. The definition of map in Protobuf is similar to that in Java, except that map is lowercase.
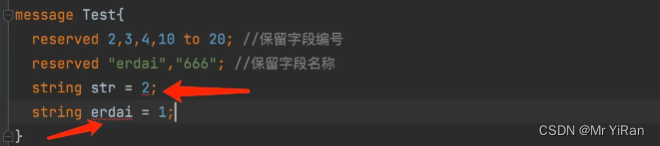
reserved reserved fields
When we use the reserved keyword to specify a field number or field name as a reserved field, we cannot use it, otherwise the compiler will report an error, as follows:
Protobuf to Java file
First of all, we need to understand one thing: Protobuf is a data storage format that is independent of platform and language. Therefore, if we want to use it in other languages such as Java, Kotlin, Dart, etc., we must convert the Protobuf file into the language of the corresponding platform. file to use. Here we convert Java files as an example to introduce two conversion methods:
1. Integrate Protobuf plug-in conversion
2. Use protoc command line conversion.
Before using these two methods for conversion, we need to integrate protobuf-java first. Third-party library, because the functions in this library will be used in the Java files we convert.
"com.google.protobuf:protobuf-java:3.7.1"
Integrated Protobuf plug-in conversion
1. In the root build.gradle file of the project, add the following dependencies
buildscript {


    repositories {


        gradlePluginPortal()
    }
    dependencies {


        classpath 'com.google.protobuf:protobuf-gradle-plugin:0.8.19'
    }
}
2. Apply the plug-in in the app’s build.gradle file
//1、如果使用的是 apply 方式,Android 插件必须在 Protobuf 插件之前,如下:
apply plugin: 'com.android.application'
apply plugin: 'com.google.protobuf'

//2、如果使用的是 Gradle DSL 方式,则与顺序无关
plugins {


    id 'com.google.protobuf'
    id 'com.android.application'
}
3. Configure the protobuf compilation task in the app’s build.gradle file
android {


    //...
}

protobuf {


    //配置 protoc 编译器
    protoc {


        artifact = 'com.google.protobuf:protoc:3.19.2'
    }
    //配置生成目录,编译后会在 build 的目录下生成对应的java文件
    generateProtoTasks {


        all().each {

     task ->
            task.builtins {


                remove java
            }
            task.builtins {


                java {

    }
            }
        }
    }
}
4. Specify the path where the protobuf file is located
android {


    //...

    sourceSets {


        main {


            //实际测试指不指定无所谓,不影响 Java 文件生成
            proto {


                srcDir 'src/main/proto'
            }
        }
    }
}
After the above 4 steps, our plug-in is configured. Next, let’s test it.
5. Recompile the project.
Taking our student.proto above as an example, the contents are as follows:
//指定 Protobuf 版本
syntax = "proto3";

//指定包名
package erdai;

//定义一个学生的消息类
message Student{


  //姓名
  string name = 1;
  //年龄
  int32 age = 2;
  //邮箱
  string email = 3;
  //课程
  repeated string course = 4;

}

//定义一个天气的消息类
message Weather{


  int32 query = 1;

  //季节
  enum Season{


    option allow_alias = true;
    //春
    SPRING = 0;
    //夏
    SUMMER = 1;
    //秋
    FALL = 2;
    AUTUMN = 2;
    //冬
    WINTER = 3;
  }

  Season season = 2;
}
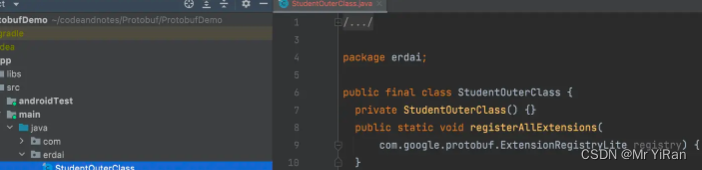
After compilation, the following files will be generated in the app/build/generated/source/proto/ directory:

This method will automatically generate the corresponding Java class for us.
Convert using protoc command line
Execute the following command:
protoc --java_out=${

    "你要生成的 Java 文件目录"} ${

    "Protobuf 文件位置"}

//以我的为例:
protoc --java_out=./app/src/main/java ./app/src/main/proto/student.proto
Generated files:
The advantage of this method is that it is simple to use, but every time you create a new Protobuf file, you need to execute a command
Introduction to generated Java files
1. The generated class StudentOuterClass has 4 subclasses:
Student (implements StudentOrBuilder interface)
Weather (implements WeatherOrBuilder interface)
StudentOrBuilder (interface)
WeatherOrBuilder (interface)
2. Student is a static internal class of StudentOuterClass. The construction method is privatized and the object needs to be created through the Builder mode. In addition, Student provides a get method for attributes but no set method. Builder, as a static internal class of Student, provides get, set, and clear methods for attributes. Clear is to clear an attribute back to its initial value.
3. Weather Same as 2
Protobuf use
Next we use the Java class we just generated
basic call
fun main(){


    //构建 Protobuf 对象
    val student = StudentOuterClass.Student.newBuilder()
        .setName("erdai")
        .setAge(18)
        .setEmail("[email protected]")
        .addAllCourse(mutableListOf("Math", "English", "Computer"))
        .build()
    println(student)
    println()
    println(StudentOuterClass.Weather.Season.SPRING.number)
    println(StudentOuterClass.Weather.Season.SUMMER.number)
    println(StudentOuterClass.Weather.Season.AUTUMN.number)
    println(StudentOuterClass.Weather.Season.WINTER.number)
}

//打印结果
name: "erdai"
age: 18
email: "[email protected]"
course: "Math"
course: "English"
course: "Computer"


0
1
2
3
Serialization and deserialization
fun main(){


    //1、构建 Protobuf 对象
    val student = StudentOuterClass.Student.newBuilder()
        .setName("erdai")
        .setAge(18)
        .setEmail("[email protected]")
        .addAllCourse(mutableListOf("Math", "English", "Computer"))
        .build()
    //2、序列化并返回一个包含其原始字节的字节数组
    val byteArray: ByteArray = student.toByteArray()
    //3、反序列化从字节数组中解析消息
    val parseStudent: StudentOuterClass.Student = StudentOuterClass.Student.parseFrom(byteArray)
}
Convert Protobuf and Json to each other
First we need to add a third-party dependency:
implementation 'com.google.protobuf:protobuf-java-util:3.19.2'
Protobuf to Json
fun main(){


    //1、构建 Protobuf 对象
    val student = StudentOuterClass.Student.newBuilder()
        .setName("erdai")
        .setAge(18)
        .setEmail("[email protected]")
        .addAllCourse(mutableListOf("Math", "English", "Computer"))
        .build()
    //2、Protobuf 转 Json
    val json = JsonFormat.printer().print(student)
    //3、打印 json
    println(json)
}

//打印结果
{


  "name": "erdai",
  "age": 18,
  "email": "[email protected]",
  "course": ["Math", "English", "Computer"]
}
Json to Protobuf
fun main(){


    //1、构建 Protobuf 对象
    val student = StudentOuterClass.Student.newBuilder()
        .setName("erdai")
        .setAge(18)
        .setEmail("[email protected]")
        .addAllCourse(mutableListOf("Math", "English", "Computer"))
        .build()
    //2、Protobuf 对象转 Json
    val json = JsonFormat.printer().print(student)
    //3、Json 转 Protobuf 对象
    val builder = StudentOuterClass.Student.newBuilder()
    JsonFormat.parser().ignoringUnknownFields().merge(json,builder)
    //4、打印 Protobuf 对象
    println(builder.build())
}

//打印结果
name: "erdai"
age: 18
email: "[email protected]"
course: "Math"
course: "English"
course: "Computer"
Convert Protobuf and Java objects to and from each other
After we convert Protobuf to JSON, and then convert JSON into the corresponding Java object, here we first introduce Gson:
implementation 'com.google.code.gson:gson:2.8.9'
Define a data model that receives the current JSON:
data class MyStudent(
    var name: String? = "",
    var age: Int = 0,
    var email: String? = "",
    var course: MutableList<String>? = null
)
Finally do the conversion:
fun main(){


    //1、构建 Protobuf 对象
    val student = StudentOuterClass.Student.newBuilder()
        .setName("erdai")
        .setAge(18)
        .setEmail("[email protected]")
        .addAllCourse(mutableListOf("Math", "English", "Computer"))
        .build()
    //2、将 Protobuf 转换为 Json
    val json = JsonFormat.printer().print(student)

    //3、将 Json 转换为 Java Bean 对象
    val myStudent = Gson().fromJson(json,MyStudent::class.java)
    println(myStudent)
}

//打印结果
MyStudent(name=erdai, age=18, email=erdai666@qq.com, course=[Math, English, Computer])