Python graphical interface basics: creating toolbars
introduction
In Python graphical user interface ( GUI ) applications, the toolbar is an important interface element used to provide shortcuts to commonly used operations. Toolbars typically contain icon buttons, each representing a specific action. In this article, we’ll take a deep dive into how to create a toolbar using Python ’s Tkinter library and demonstrate how to implement this functionality in your application.
Introduction to the Tkinter library
First, let's briefly introduce the Tkinter library. Tkinter is a module in the Python standard library for creating GUI applications. It provides a set of tools and components for building GUI elements such as windows, buttons, labels, and text boxes, and supports event handling mechanisms that can monitor and respond to user interactions.
Step 1: Import the Tkinter module
Before starting, make sure your Python environment has the Tkinter library installed . Then, import the Tkinter module in your Python script to use the functionality of the Tkinter library.
import tkinter as tk
Step 2: Create Tkinter window
When using Tkinter to create a GUI application, you first need to create a Tkinter window object, usually called root. This window will serve as the application's main window.
root = tk.Tk()
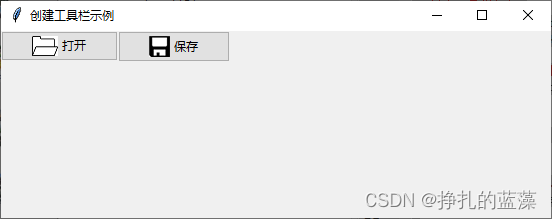
root.title("创建工具栏示例")
In the above code, we create a Tkinter window object rootand set the title of the window to "Create Toolbar Example".
Step 3: Create the toolbar
To create toolbars, we can use Tkinter 's ttk(" themed Tkinter ") module, which provides modern GUI components, including toolbars. First, we need to import ttkthe module.
from tkinter import ttk
Next, we can create a toolbar object and add it to the main window.
# 创建工具栏对象
toolbar = ttk.Toolbar(root)
toolbar.pack(side="top", fill="x")
In the above example, we created a toolbar object toolbarand packadded it to the top of the main window using the method, filling the entire horizontal space.
Step 4: Add tool buttons to the toolbar
The core part of the toolbar is the tool buttons, each button represents an operation. We can add tool buttons using toolbarthe object's methods.add
Here is an example that shows how to add two tool buttons to a toolbar: "Open" and "Save".
# 添加工具按钮 - 打开
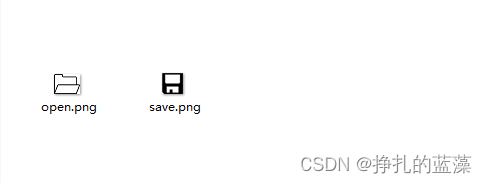
open_icon = tk.PhotoImage(file="open.png") # 使用图标文件创建图标对象
toolbar.add_command(image=open_icon, command=open_file, compound="left", label="打开") # 添加工具按钮
# 添加工具按钮 - 保存
save_icon = tk.PhotoImage(file="save.png") # 使用图标文件创建图标对象
toolbar.add_command(image=save_icon, command=save_file, compound="left", label="保存") # 添加工具按钮
In the above example we do the following:
-
Two icon objects are created using
tk.PhotoImage, representing the icons for the "Open" and "Save" buttons respectively. Please make sure these icon files exist in the current working directory. -
Use
toolbarthe object'sadd_commandmethods to add tool buttons. We specify the icon, the function to be executed when the button is clicked, the button's text label, and the icon position (" left " means the icon is to the left of the label). -
You can add more tool buttons as needed, each representing a different operation.
Step 5: Handle the click event of the tool button
To make a tool button perform the corresponding action when clicked, we need to define the corresponding functions and associate these functions with the tool button.
Here's an example of how to define a function and associate it with a tool button:
# 定义打开文件的函数
def open_file():
    # 这里可以添加打开文件的操作
    pass

# 定义保存文件的函数
def save_file():
    # 这里可以添加保存文件的操作
    pass
In the above example, we defined two functions: open_fileand save_file, which are used to handle the click events of the "Open" and "Save" buttons respectively. These functions can add corresponding operations as needed.
Step 6: Start Tkinter main event loop
The final step is to start Tkinter 's main event loop, which will make the window interactive and allow the user to perform actions using the toolbar.
root.mainloop()
Complete sample code [code adjustment]
Here is a complete sample code that shows how to create a toolbar and handle click events for tool buttons:
import tkinter as tk
from tkinter import ttk

# 创建Tkinter窗口
root = tk.Tk()
root.title("创建工具栏示例")

# 创建工具栏框架
toolbar_frame = ttk.Frame(root)
toolbar_frame.pack(side="top", fill="x")

# 添加工具按钮 - 打开
open_icon = tk.PhotoImage(file="open.png")  # 使用图标文件创建图标对象

def open_file():
    # 这里可以添加打开文件的操作
    pass

open_button = ttk.Button(toolbar_frame, image=open_icon, command=open_file, compound="left", text="打开")
open_button.pack(side="left")

# 添加工具按钮 - 保存
save_icon = tk.PhotoImage(file="save.png")  # 使用图标文件创建图标对象

def save_file():
    # 这里可以添加保存文件的操作
    pass

save_button = ttk.Button(toolbar_frame, image=save_icon, command=save_file, compound="left", text="保存")
save_button.pack(side="left")

# 启动Tkinter主事件循环
root.mainloop()
Two pictures need to be prepared in advance:
renderings:
Code explanation
Let us explain the above code line by line:
-
We imported the Tkinter module and
ttkthe module in order to use the Tkinter library and toolbar components. -
Created a Tkinter window object
rootand set the title of the window to "Create Toolbar Example". -
A toolbar object is created
toolbarandpackadded to the top of the main window using the method, filling the entire horizontal space. -
Two icon objects are created using
tk.PhotoImage, representing the icons for the "Open" and "Save" buttons respectively. Please make sure these icon files exist in the current working directory. -
Use
toolbarthe object'sadd_commandmethods to add tool buttons. We specify the icon, the function to be executed when the button is clicked, the button's text label, and the icon position (" left " means the icon is to the left of the label). -
Two functions are defined:
open_fileandsave_file, which are used to handle the click events of the "Open" and "Save" buttons. These functions can add corresponding operations as needed. -
Finally, Tkinter 's main event loop is started , making the window interactive.
in conclusion
In this article, we learned how to create a toolbar using Python 's Tkinter library and demonstrated how to handle click events for tool buttons. Toolbars are common interface elements in GUI applications and are used to provide shortcuts to commonly used operations. The Tkinter library provides a wealth of tools and components for building interactive and powerful GUI applications to meet the needs of different users. Continuing to learn Tkinter , you will be able to develop more complex and interesting applications that provide a better user experience.