Recommended reading
Hello everyone, I am a Buddhist engineer ☆The Quiet Little Magic Dragon☆ . I update Unity development skills from time to time. If you find it useful, please remember to click three times.
I. Introduction
This article will talk about Qualitythe settings ( Unity版本:2021.3.15f1c1).
QualityMainly used to control graphics quality settings, including anti-aliasing, shadows, resolution, etc.:
Adjust parameters according to the performance of the device to achieve the best gaming experience.
Generally speaking, quality comes at the expense of performance, so it's best not to go for the highest quality for mobile devices or older hardware, as it can have a detrimental effect on gaming.
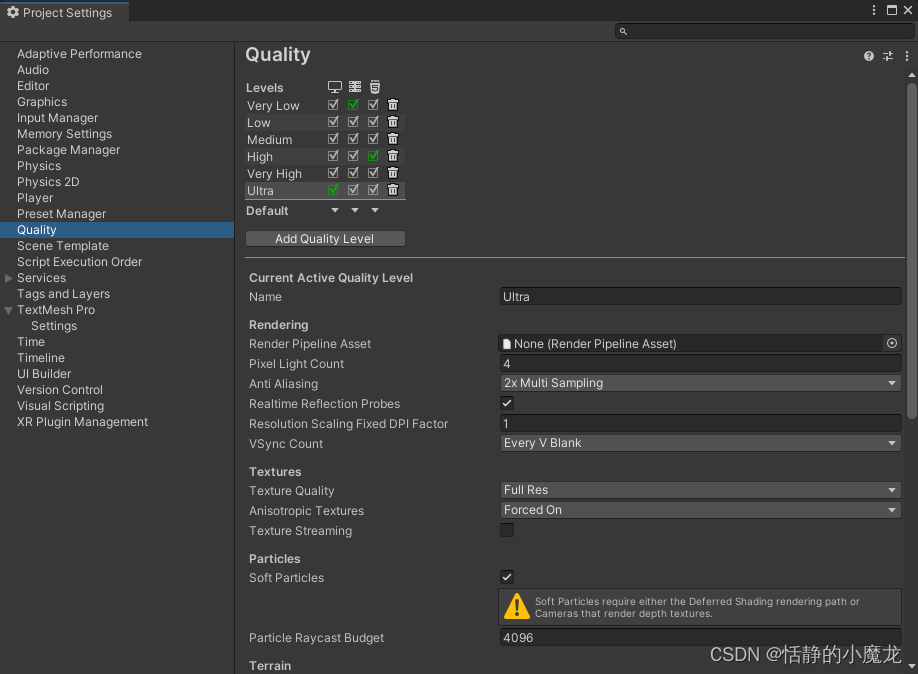
2. Quality settings
2-1. Level of Quality
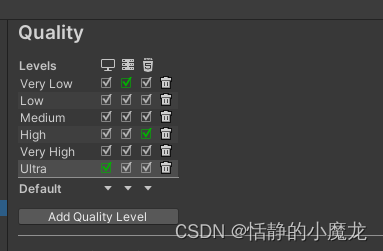
There are 6 levels by default, you can also configure it according to your own needs, and choose different levels for low-end or high-end machines.
| Attributes | introduce |
|---|---|
| Add Quality Level | To define a new quality level, enter the name of the new level in the Name property. |
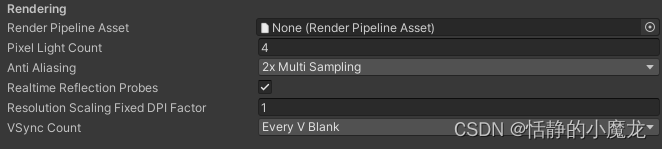
2-2. Rendering settings
| Attributes | introduce |
|---|---|
| Render Pipeline Asset | The resource file of the rendering pipeline, which can be empty. |
| Pixel Light Count | Setting Unity is the maximum number of lights supported during rendering. For example, if there are many lights in a scene, but only a few lights are on after packaging, this parameter is affected. |
| Anti Aliasing | Select the anti-aliasing level, there are 2x, 4x, and 8x sampling rate levels. As the sampling rate increases, the smoothness and GPU performance cost also increase, but the smoothness is also higher. |
| Realtime Refection Probes | Enable this option to update reflection probes during gameplay. |
| Resolution Scaling Fixed DPI Factor | Resolution scaling fixed DPI factor. If the device's native screen DPI is higher than this value, Unity will reduce the application's resolution to match this setting, calculated as:min(Target DPI * Factor / Screen DPI, 1) |
| VSync Count | Vertical sync count, choose whether to synchronize rendering with vertical whitespace or not synchronize Unity at all. Rendering can be synchronized with the refresh rate of the display device to avoid tearing artifacts. Available options include Every V Blank, Don't Sync, and Every Second V Blank. |
2-3. Textures settings

| Attributes | introduce |
|---|---|
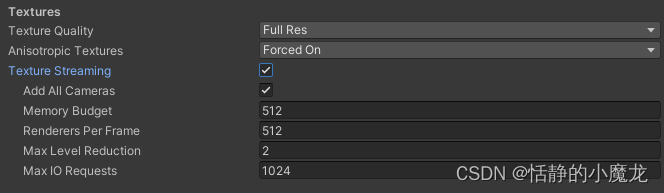
| Texture Quality | Select the maximum level Unity uses when rendering textures. Higher levels have lower resolutions, which means the textures require less GPU memory and less GPU processing time. These options include Full Res, Half Res, Quarter Res and Eighth Res. Regardless of which option is selected, textures without texture maps will be rendered at their full resolution.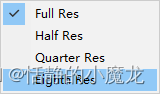 |
| Anisotropic Textures | Set anisotropic texture. Options include Forced On, Per Texture, and Disabled.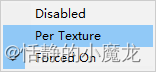 |
| Texture Streaming | Select the anti-aliasing level, there are 2x, 4x, and 8x sampling rate levels. As the sampling rate increases, the smoothness and GPU performance cost also increase, but the smoothness is also higher. |
After checking Texture Streaming:
| Attributes | introduce |
|---|---|
| Add All Cameras | Activate the active camera for all mipmap streams in the project |
| Memory Budget | Memory budget, the total amount of content allocated to all loaded Mipmap streaming systems, default 512MB |
| Renderers Rer Frame | Processing Overhead The mipmap streaming system defaults to 512 mesh renderers per frame for the main thread and associated work |
| Max Level Reduction | Sets the number of mipmaps that can be discarded after the mipmap streaming system reaches the memory budget. |
| Max IO Requests | Set the maximum number of IO requests for texture files. This value will affect the response speed of mipmap. |
Introducing the Mipmap flow:
- It is a means for Unity to optimize the project, allowing Unity to force only the mip levels required to render the current camera position, instead of loading all levels by default, using a small amount of CPU resources to save potentially a large amount of GPU memory.
- A mip level is a version of a texture with a specific resolution. Mips exist in collections called mipmaps. Large maps contain smaller and smaller and lower resolution versions of a single texture. For example, one texture map may contain four versions. textures, from the original texture Mip0 to Mip 1, Mip2 and Mip3:
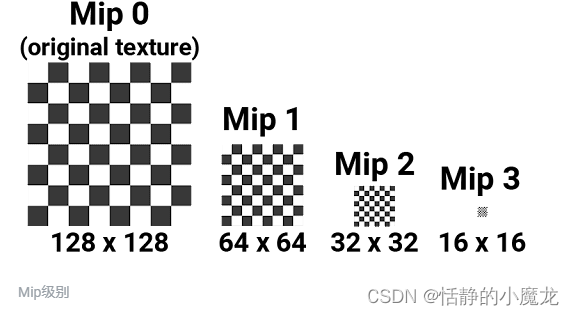
- Texture maps are often used to render objects in 3D scenes, where the textured object will vary in distance from the camera. Higher mip levels are used for objects closer to the camera, lower mip levels are used for objects further away.
2-4. Particles settings

| Attributes | introduce |
|---|---|
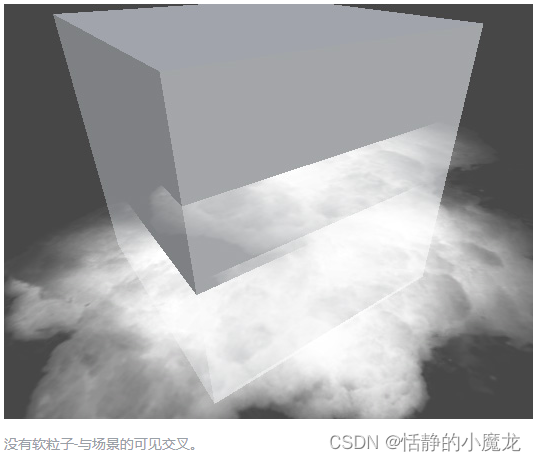
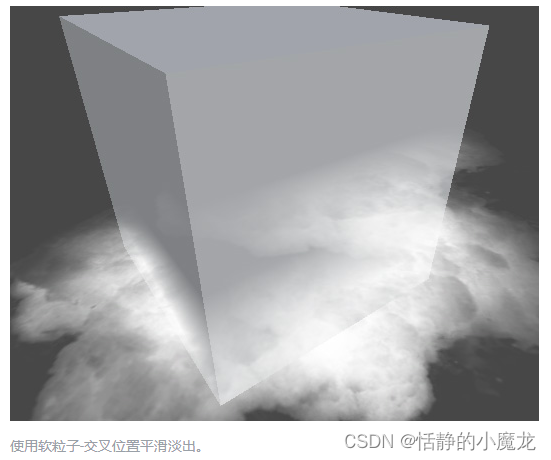
| Soft Particles | Indicates whether to fade particles as they approach the edge of an opaque game object. |
| Particle Raycast Budget | Sets the maximum number of raycasts used to simulate particle system collisions. |
2-6. Terrain settings

| Attributes | introduce |
|---|---|
| Billboards Face Camera Position | Enable this option to force facing the camera instead of the camera plane when rendering. This case produces better, more realistic images, but is more expensive to render. |
2-5. Shadows settings
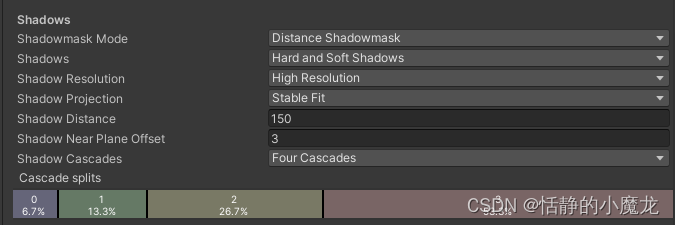
| Attributes | introduce |
|---|---|
| Shadowmask Mode | Set the shadow mask mode |
| Shadows | Set the type of hiding, including hard shadow, soft shadow, and disabled shadow. |
| Shadow Resolution | Sets the resolution at which shadows are rendered. |
| Shadow Projection | Sets the method used when casting shadows from directional lights. |
| Shadow Distance | Sets the maximum distance a shadowed camera will display. |
| Shadow Near Plane Offset | Sets the shadow's near plane offset. |
| Shadow Cascades | Sets the number of cascades of shadows. |
| Cascade splits | Set the vertical line between each cascade of shadows to adjust the cascading shadow split. |
2-6. Async Asset Upload settings

| Attributes | introduce |
|---|---|
| Time Slice | Setting buffered texture and mesh data to the GPU takes time on the CPU. |
| Buffer Size | Sets the buffer size for uploading texture and mesh data to the GPU. |
| Persistent Buffer | Indicates whether the upload coupled with the GPU should remain cached even if there is no content left to upload. |
2-7. Level of Detail settings

| Attributes | introduce |
|---|---|
| LOD Bias | 设置细节层次LOD的偏移。LOD级别是根据对象的屏幕大小来选择的。当大小介于两个LOD级别之间时,可以偏向于两个可用模型中较不详细或较详细的一个。这被设置为从0到+无穷大的一个分数。当它设置在0和1之间时,它倾向于较少的细节。大于1的设置有利于获得更多细节。例如,将LOD偏差设置为2并使其在50%的距离处变化,LOD实际上仅在25%处变化。 |
| Maximum LOD Level | 设置游戏使用的最高LOD。 |
2-8、Meshes设置

| 属性 | 介绍 |
|---|---|
| Skin Weights | 皮肤权重,选择在动画过程中可以影响给定顶点的骨骼数量。比如说4Bones就是4个骨骼。 |
三、后记
总结一下就是,Quality设置是一个很重要的画面质量设置的模块。
调整不同的质量的属性,来实现不同的设备下的流畅运行。
比如高端设备可以设置高一些的渲染效果,比较低端的电脑就可以设置低一些的渲染效果,来提高优化。
如果觉得本篇文章有用别忘了点个关注,关注不迷路,持续分享更多Unity干货文章。
你的点赞就是对博主的支持,有问题记得留言:
博主主页有联系方式。
博主还有跟多宝藏文章等待你的发掘哦:
| 专栏 | 方向 | 简介 |
|---|---|---|
| Unity3D开发小游戏 | 小游戏开发教程 | 分享一些使用Unity3D引擎开发的小游戏,分享一些制作小游戏的教程。 |
| Unity3D从入门到进阶 | 入门 | 从自学Unity中获取灵感,总结从零开始学习Unity的路线,有C#和Unity的知识。 |
| Unity3D之UGUI | UGUI | Unity的UI系统UGUI全解析,从UGUI的基础控件开始讲起,然后将UGUI的原理,UGUI的使用全面教学。 |
| Unity3D之读取数据 | 文件读取 | 使用Unity3D读取txt文档、json文档、xml文档、csv文档、Excel文档。 |
| Unity3D之数据集合 | 数据集合 | 数组集合:数组、List、字典、堆栈、链表等数据集合知识分享。 |
| Unity3D之VR/AR(虚拟仿真)开发 | 虚拟仿真 | 总结博主工作常见的虚拟仿真需求进行案例讲解。 |
| Unity3D之插件 | 插件 | 主要分享在Unity开发中用到的一些插件使用方法,插件介绍等 |
| Daily development of Unity3D | daily records | Mainly used by bloggers in daily development, including methods and techniques, development ideas, code sharing, etc. |
| Unity3D daily BUG | daily records | Record the bugs and pitfalls encountered during project development using the Unity3D editor so that future generations can have some reference. |