Article directory
1. Write in front
Looking back, I have slowly built the JS crawler reverse engineering type articles from 0 to 1. All the cases in the article are real and the content is effective, and the encryption types are rich. We have received a lot of attention and support from fans, thank you very much!
In the future, I will start writing technical articles about the construction of distributed collection platforms in open source intelligence and network public opinion in my spare time , and share my many years of experience and reserves. This is also the article I have always wanted to write. theme!
Analysis goals :
aHR0cHM6Ly93d3cuZ205OS5jb20v
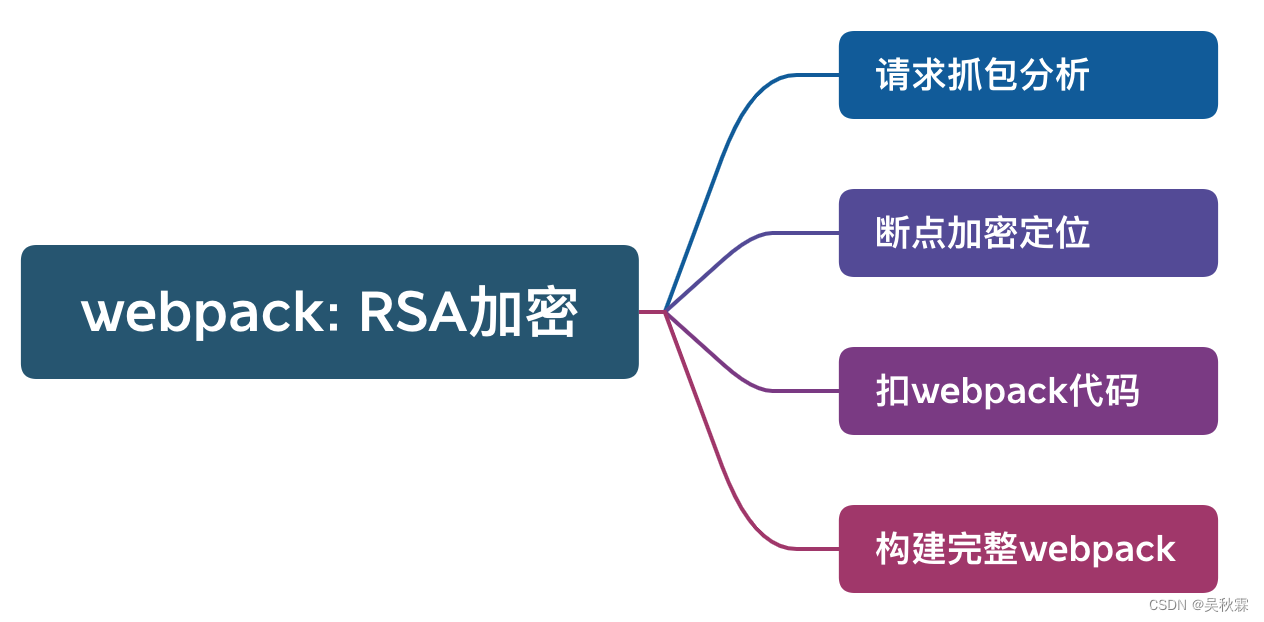
2. Packet capture analysis
This time the target login parameters are encrypted. Use the old rules to construct the username and password and try to log in. Capture the packet and analyze it:
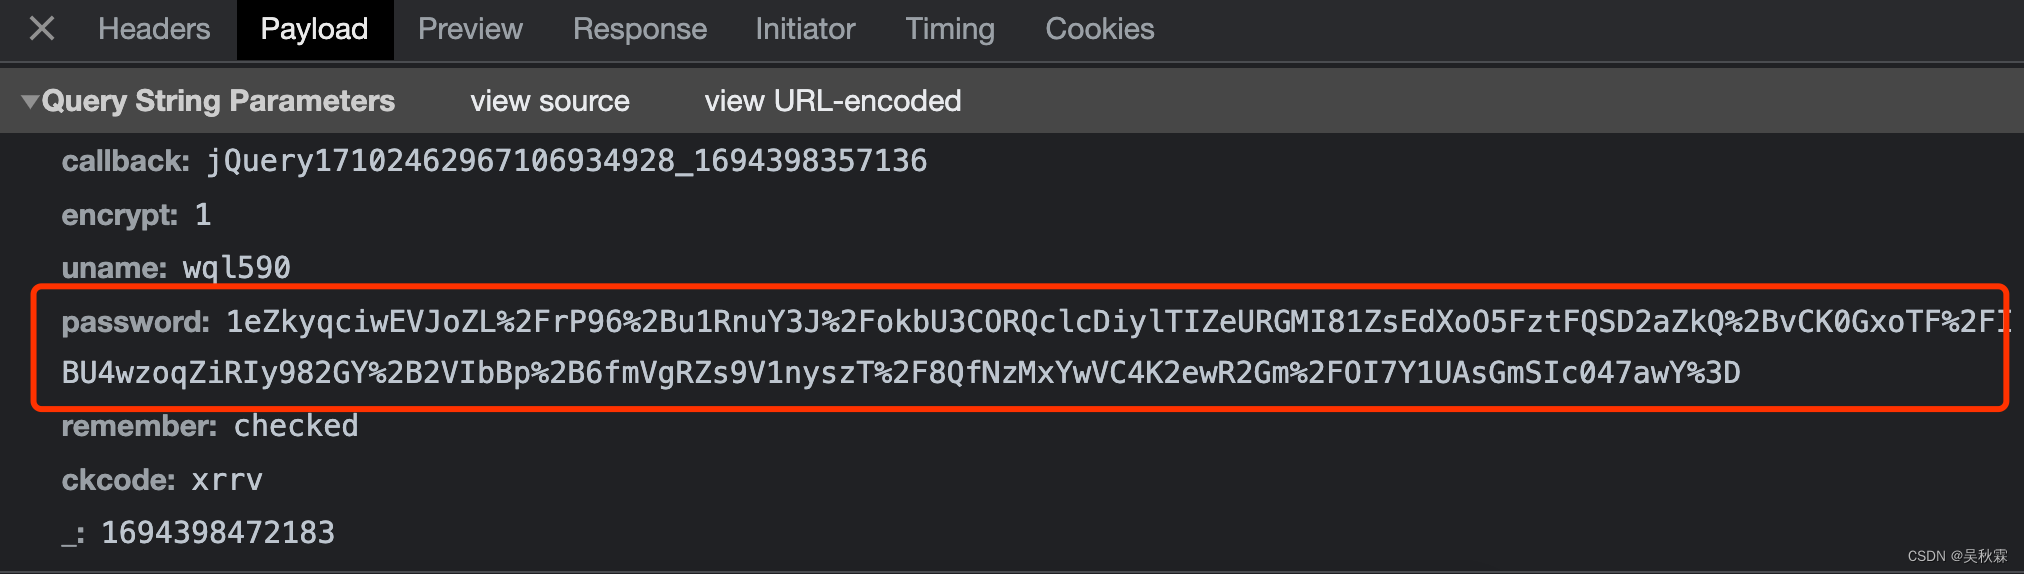
You can see that submitting a login request and re- password are the parameters we need to analyze, ckcode is the verification code, and everything else is irrelevant.
3. Positioning analysis
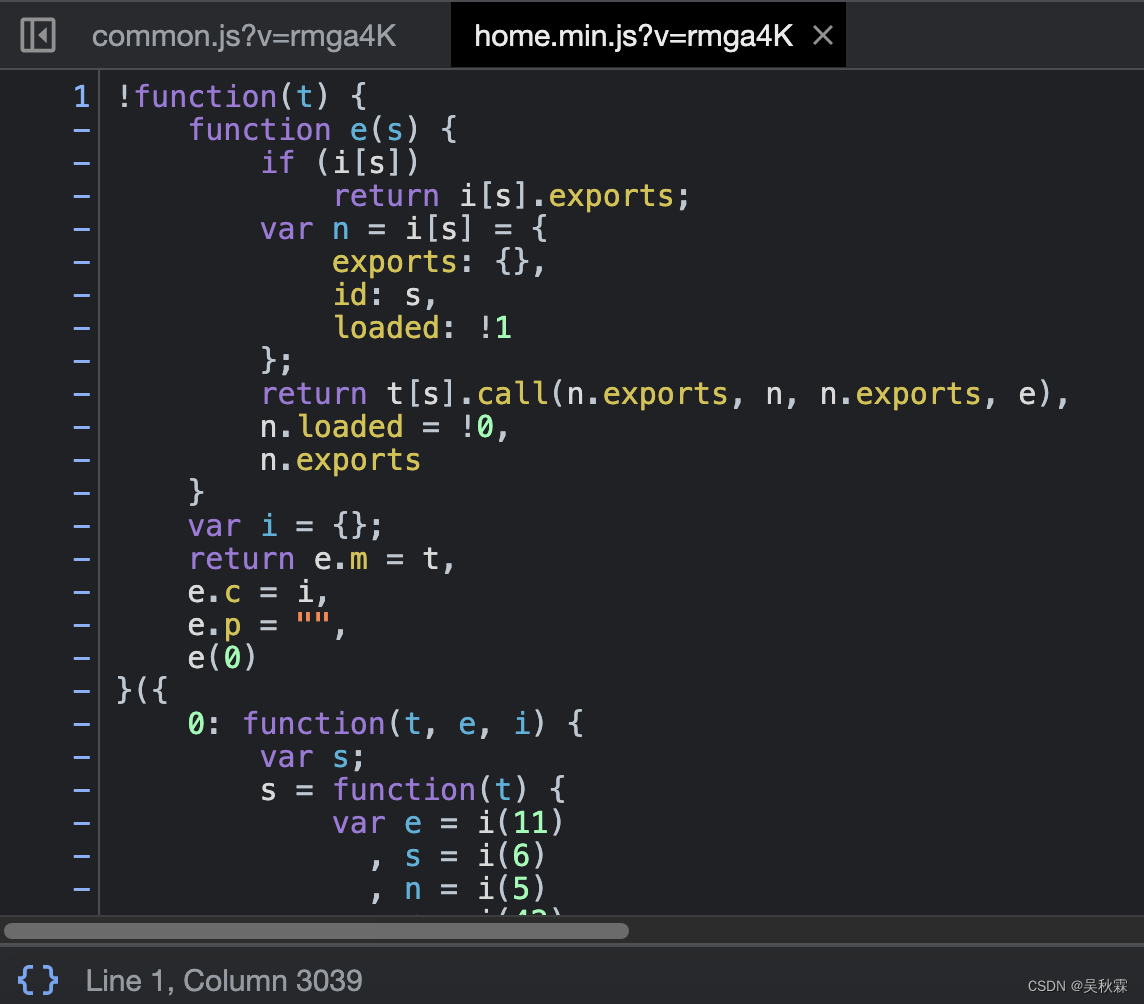
Try using global search to see if the password can be traced back. It is found that the common.js and home.min.js files may have encryption operations and there is not much code. First, I looked through the first file and found a very conspicuous function, as shown below:
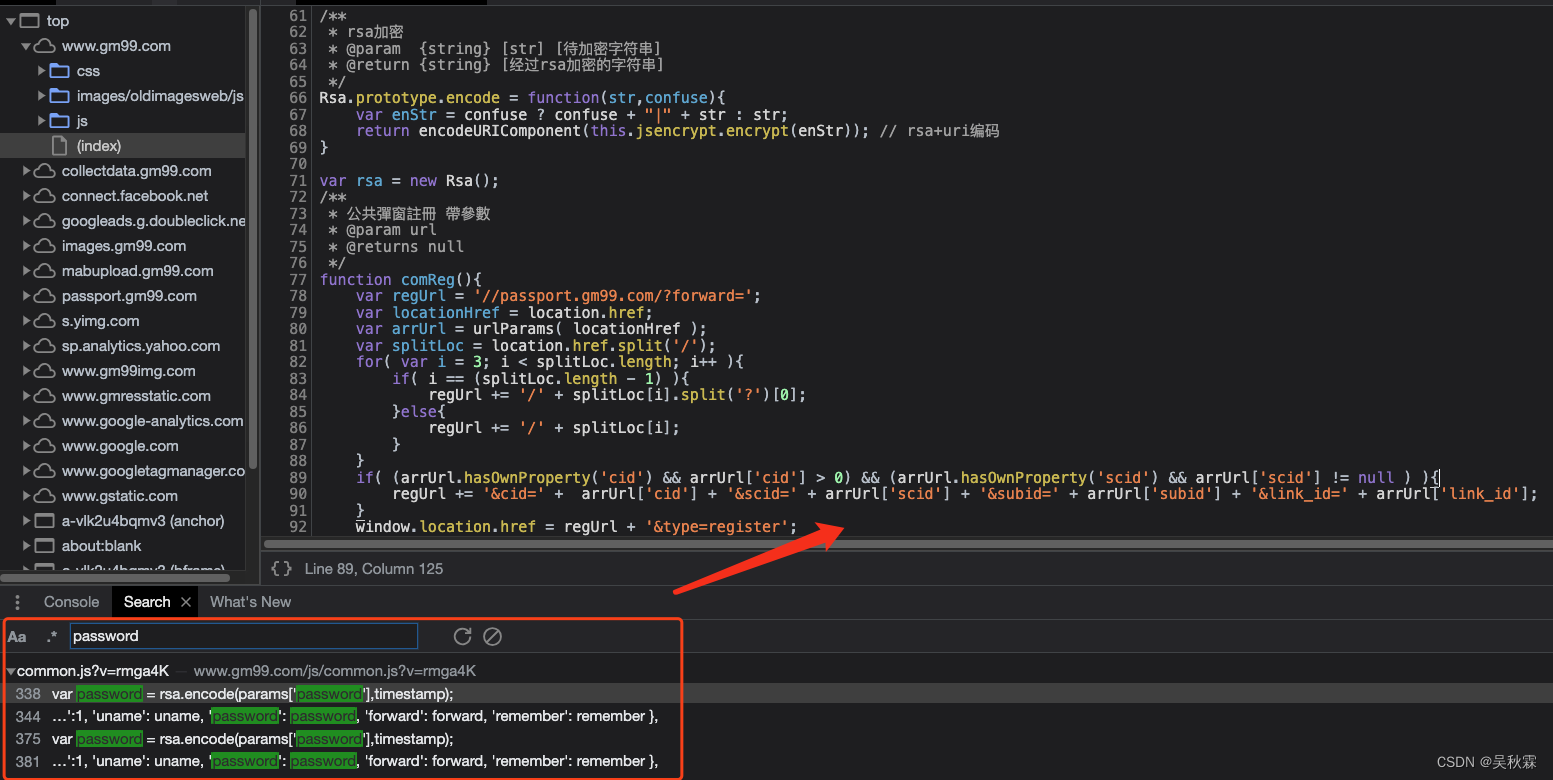
Find the key code from the common.js file as follows:
function Rsa(){


    if(typeof JSEncrypt === 'undefined') return;
    this.jsencrypt = new JSEncrypt();

    // 设置公钥
    this.jsencrypt.setPublicKey("-----BEGIN PUBLIC KEY-----MIGfMA0GCSqGSIb3DQEBAQUAA4GNADCBiQKBgQDq04c6My441Gj0UFKgrqUhAUg+kQZeUeWSPlAU9fr4HBPDldAeqzx1UR92KJHuQh/zs1HOamE2dgX9z/2oXcJaqoRIA/FXysx+z2YlJkSk8XQLcQ8EBOkp//MZrixam7lCYpNOjadQBb2Ot0U/Ky+jF2p+Ie8gSZ7/u+Wnr5grywIDAQAB-----END PUBLIC KEY-----");
}

/**
 * rsa加密
 * @param  {string} [str] [待加密字符串]
 * @return {string} [经过rsa加密的字符串]
 */
Rsa.prototype.encode = function(str,confuse){


    var enStr = confuse ? confuse + "|" + str : str;
    return encodeURIComponent(this.jsencrypt.encrypt(enStr)); // rsa+uri编码
}

var rsa = new Rsa();
// 针对login接口的登录函数(部分官网在调用)
function lessLogin( params ){


    var timestamp = new Date().getTime();
    var uname = params['uname'];
    var password = rsa.encode(params['password'],timestamp);
    var forward = params['forward'];
    var remember = params['remember'];
    $.ajax({


        url : '//passport.gm99.com/login/login',
        type : 'get',
        data:{

     'encrypt':1, 'uname': uname, 'password': password, 'forward': forward, 'remember': remember },
        xhrFields: {


            withCredentials: true
        },
        jsonp: 'callback',
        async : true,
        dataType : 'jsonp',
        success : function(data){


            $('head').append(data);
        }
    });
}
You can see that the above code is a function that encapsulates the RSA encryption function. RSA() actually re-encapsulates the RSA encryption function, and then the website calls this function to send the login form for verification. It is not a real encryption function.
The following line of code was found in the home.min.js file :
o = a.encode(t.password, s)
Breakpoint and resubmit the login, you can find that t.password is the clear text password I submitted. o is the encrypted ciphertext

The code of the home.min.js file can be accessed as soon as it is opened, loading modules in the typical webpack way!
Important point: webpack is not the encryption code, but the method of loading the encryption module! Structural features ()([]), ()({})
Structural difference:: Theparameters passed by ()([]) are arrays, and the parameters passed by ()({}) are objects.
4. Build webpack
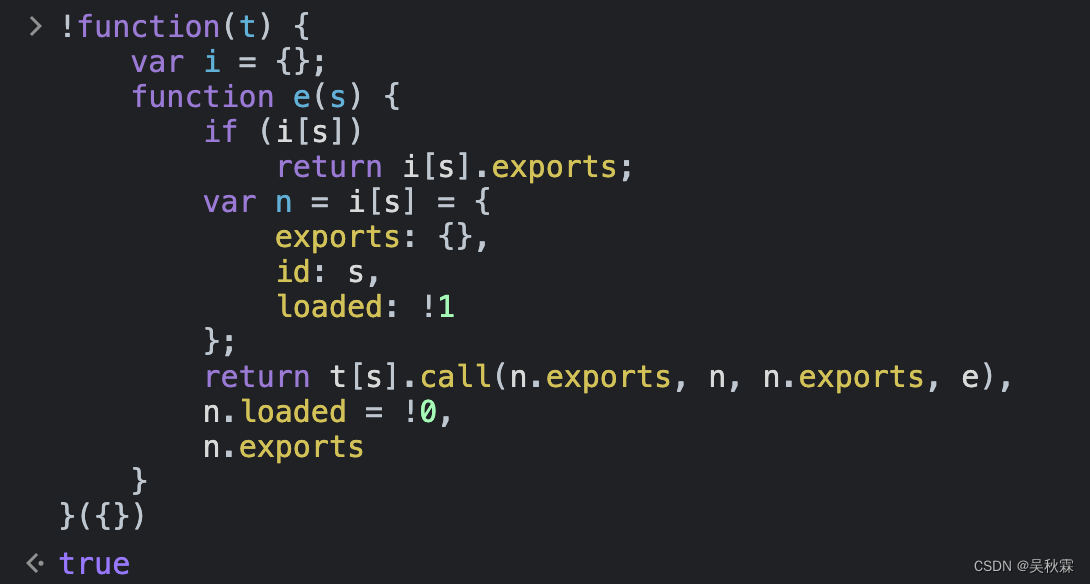
Don't worry about the encryption code first, let's build the structure of webpack first. You can use its own self-executing function directly here:
!function(t) {


	var i = {

    };
	function e(s) {


	    if (i[s])
	        return i[s].exports;
	    var n = i[s] = {


	        exports: {

    },
	        id: s,
	        loaded: !1
	    };
	    return t[s].call(n.exports, n, n.exports, e),
	    n.loaded = !0,
	    n.exports
	}
}({

    /*这里是加载模块*/})
We can test the above code in the console to see if it passes:
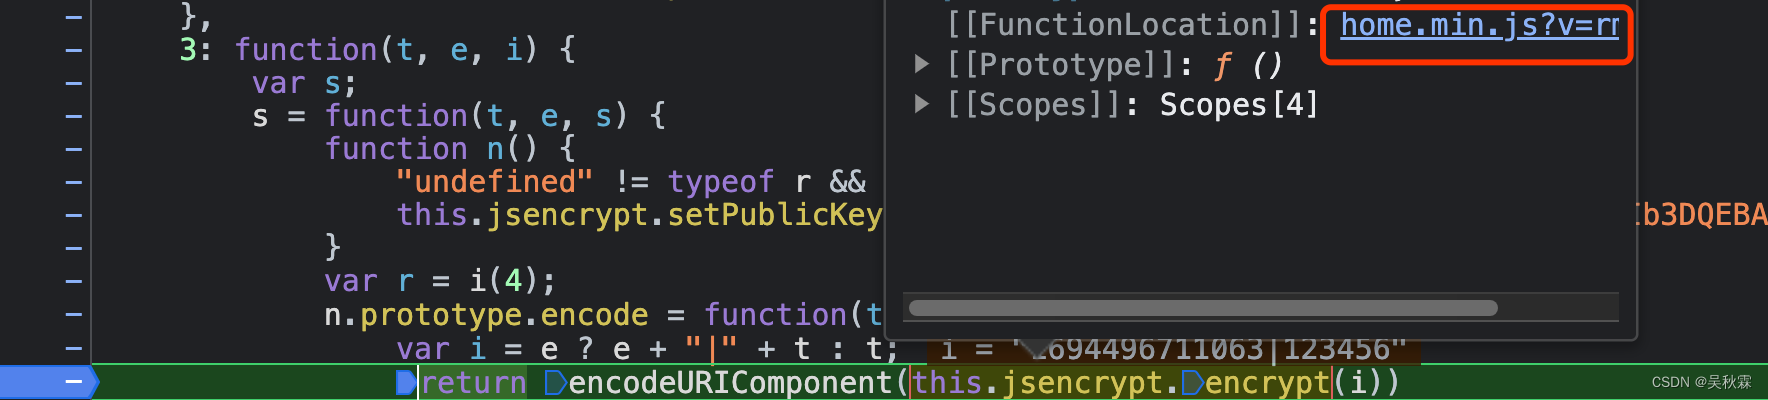
The next thing to do is to find the loading module and go back to t.password . There are only two JS files in total. This place is more like an encrypted location, so we analyze the breakpoints. Use the mouse to view a.encode and click directly to jump.
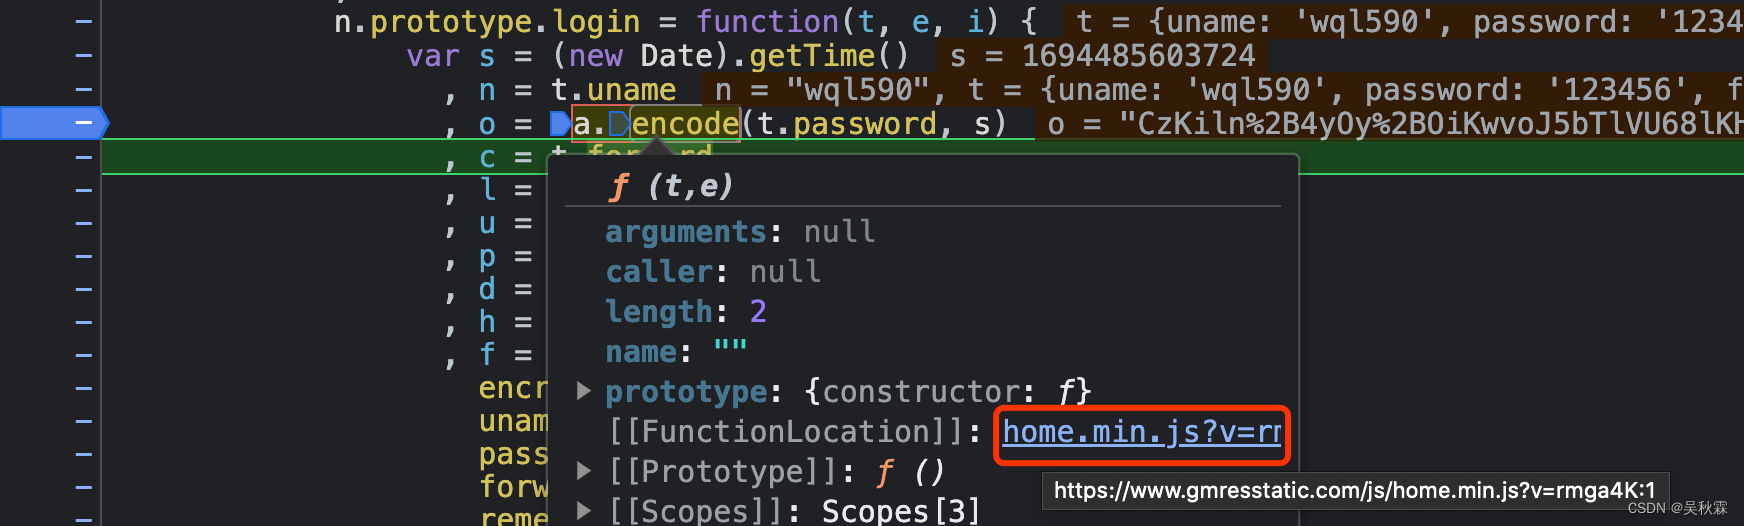
The following code block was located:
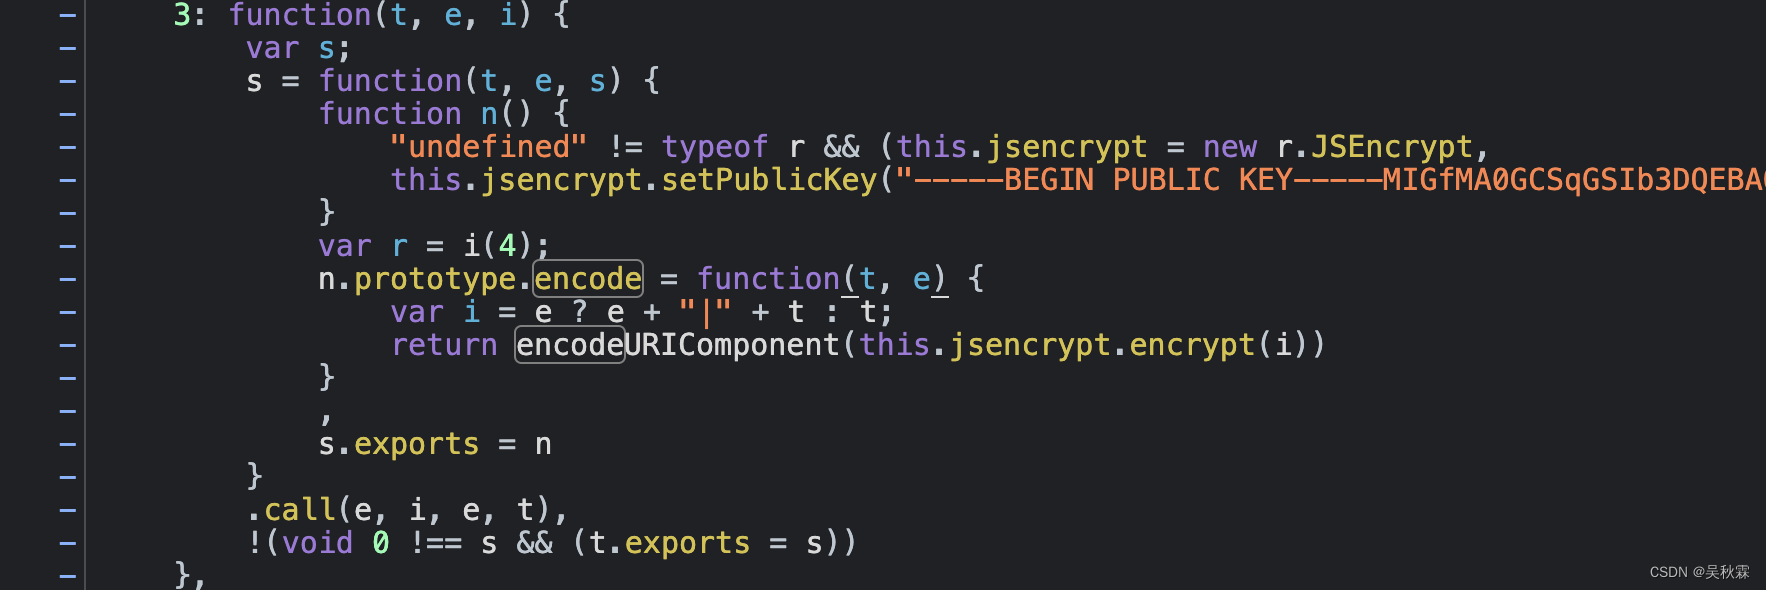
Two key points can be extracted from the above code analysis:
Encryption function instantiation: new r.JSEncrypt
Public key: setPublicKey
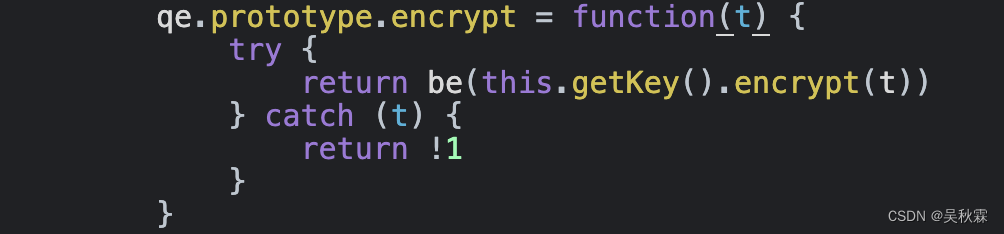
As for this.jsencrypt.encrypt(i), it does not look like the code that implements encryption. It looks like a module that encapsulates the encryption function.
Breakpoint directly under this line and log in again. Find encrypt with your mouse and click to jump.
Jump to the following code block:
The code shown in the picture above is located in the 4: function loading module:
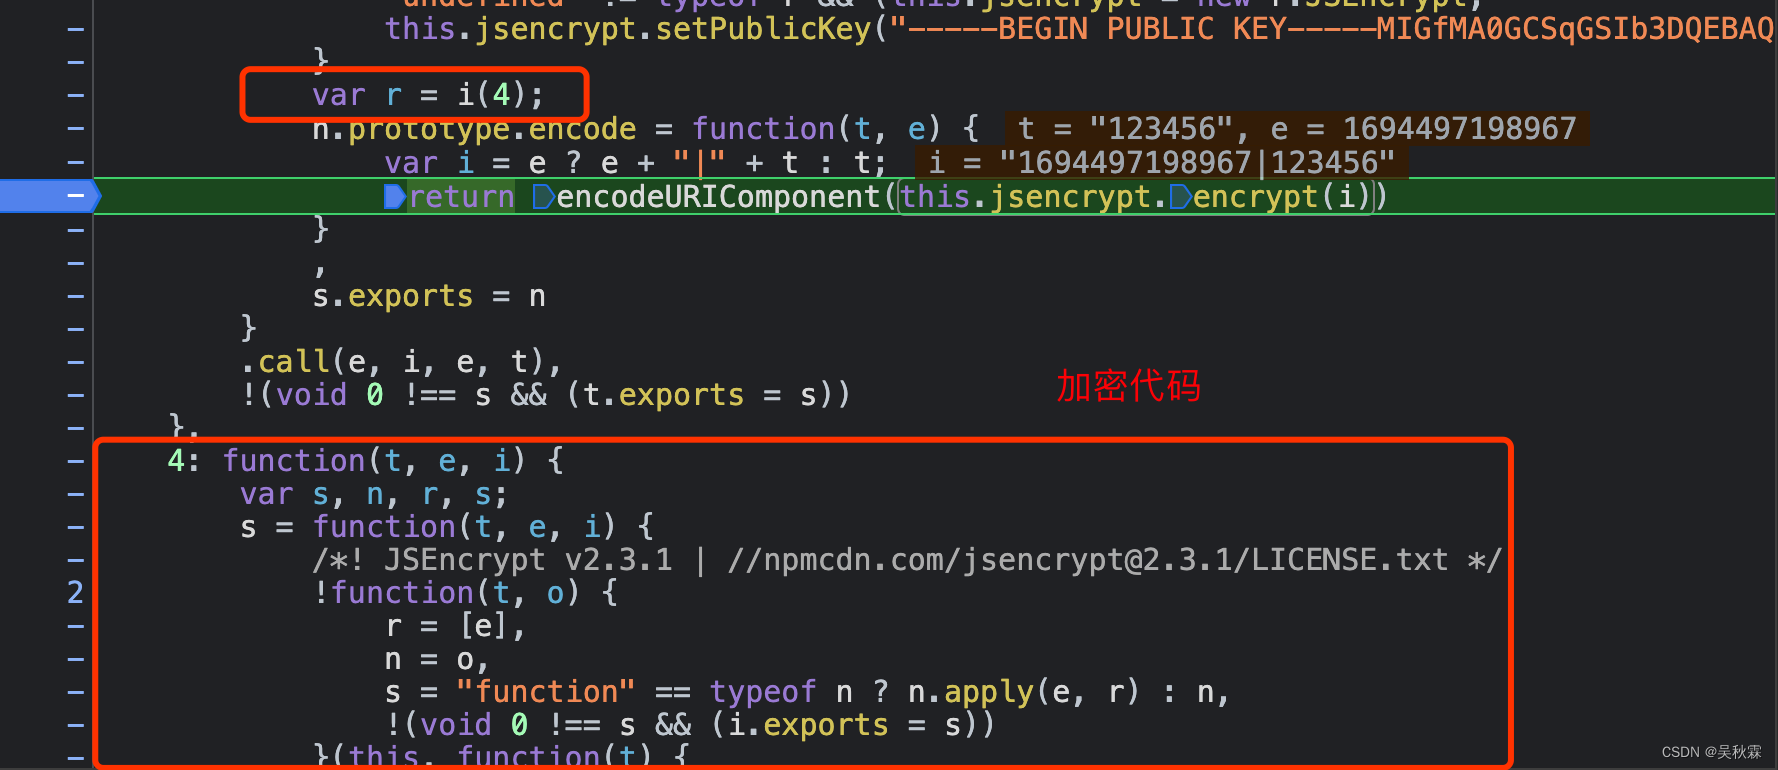
The i function in var r = i(4) corresponds to the parameter i of t[s].call(n.exports, n, n.exports, e) in the loader function, that is, i equals e , and e is the loader Function, so 4: The function loading module is exactly the encryption code!
The final complete and usable webpack structure encryption code structure is as follows:
var _Encryp;
var navigator = {

    };
var window = this;
!function(t) {


    var i = {

    };
    function e(s) {


        if (i[s])
            return i[s].exports;
        var n = i[s] = {


            exports: {

    },
            id: s,
            loaded: !1
        };
        return t[s].call(n.exports, n, n.exports, e),
        n.loaded = !0,
        n.exports
    }
    _Encryp = e;
}({

    3: function模块, 4: function加密模块})
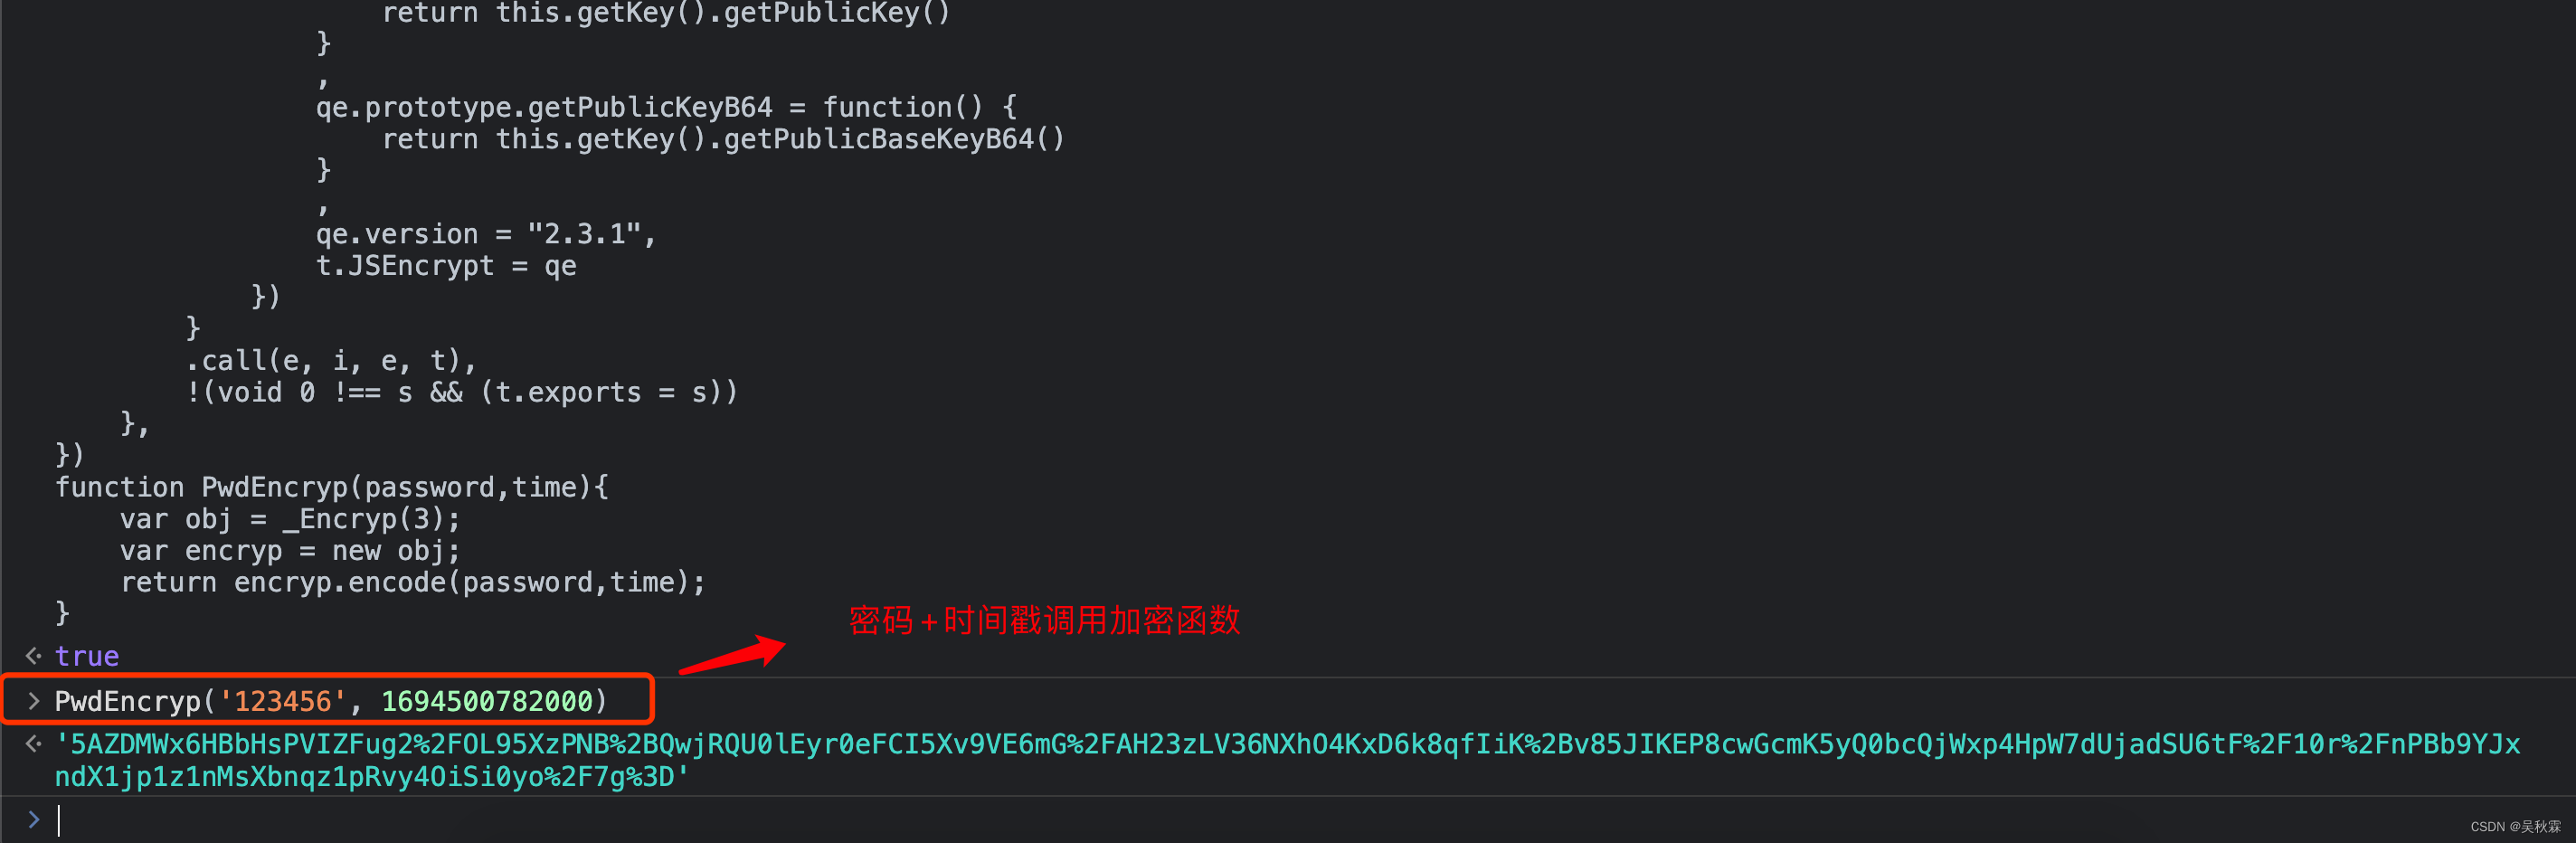
3: function module, 4: function encryption module code, just click it and fill it in above! If you don’t know how to buckle and need to test and learn, you can also send me a private message!
Because the code is nearly 3,000 lines, which is quite huge! I won’t post it here anymore. You can also see the breakpoint information on the parameters required for final encryption, which are passwords and timestamps ! The following is the console test effect:
Okay, here it is time to say goodbye to everyone. Creation is not easy, please give me a thumbs up and leave. Your support is the driving force for my creation. I hope to bring you more high-quality articles.