1. Environment
| master node | CentOS 7.6 | 192.168.111.132 | mysql 5.7 |
| slave node | CentOS 7.6 | 192.168.111.133 | mysql 5.7 |
2. Synchronization time
## 下载ntp
yum -y install ntp
## 启动ntp
systemctl enable --now ntpd
## master节点
在/etc/ntp.conf文件尾部加入以下两段,注意网段。
server 127.127.111.0
fudge 127.127.111.0 stratum 8
## 重启ntp
systemctl restart ntpd


## slave节点
执行命令,IP地址为你master节点的IP地址
ntpdate 192.168.111.133
2. To achieve master-slave replication, there are three principles:
- Add log-bin=mysql-bin to /etc/my.cnf to enable the binary log of the master node. This file will record our additions, deletions, checks, and modifications in the database.
- The slave node copies the SQL statements in the binary file of the master node to its own relay log.
- The salve node will copy the relay log to its own log and execute the sql command again.
1. Enable binary logs on the master node.
[root@master ~]# cat /etc/my.cnf
# For advice on how to change settings please see
# http://dev.mysql.com/doc/refman/5.7/en/server-configuration-defaults.html

[mysqld]
#
# Remove leading # and set to the amount of RAM for the most important data
# cache in MySQL. Start at 70% of total RAM for dedicated server, else 10%.
# innodb_buffer_pool_size = 128M
#
# Remove leading # to turn on a very important data integrity option: logging
# changes to the binary log between backups.
# log_bin
#
# Remove leading # to set options mainly useful for reporting servers.
# The server defaults are faster for transactions and fast SELECTs.
# Adjust sizes as needed, experiment to find the optimal values.
# join_buffer_size = 128M
# sort_buffer_size = 2M
# read_rnd_buffer_size = 2M
datadir=/var/lib/mysql
socket=/var/lib/mysql/mysql.sock

# Disabling symbolic-links is recommended to prevent assorted security risks
symbolic-links=0

log-error=/var/log/mysqld.log
pid-file=/var/run/mysqld/mysqld.pid
log-bin=mysql-bin
server-id=1
2. Create an account for synchronization.
Among them, file and position we will use.
## 创建用户
create user 'repl'@'192.168.111.133' identified by '123456';
## 将创建的repl用户授权给192.168.111.133使用。
GRANT REPLICATION SLAVE ON *.* TO 'repl'@'192.168.111.133';
## 刷新权限
flush privileges;

查看我们的二进制文件
mysql> show master status;
+------------------+----------+--------------+------------------+-------------------+
| File             | Position | Binlog_Do_DB | Binlog_Ignore_DB | Executed_Gtid_Set |
+------------------+----------+--------------+------------------+-------------------+
| mysql-bin.000001 |     1079 |              |                  |                   |
+------------------+----------+--------------+------------------+-------------------+
1 row in set (0.00 sec)
3. Slave node configuration.
[root@slave ~]# cat /etc/my.cnf
# For advice on how to change settings please see
# http://dev.mysql.com/doc/refman/5.7/en/server-configuration-defaults.html

[mysqld]
#
# Remove leading # and set to the amount of RAM for the most important data
# cache in MySQL. Start at 70% of total RAM for dedicated server, else 10%.
# innodb_buffer_pool_size = 128M
#
# Remove leading # to turn on a very important data integrity option: logging
# changes to the binary log between backups.
# log_bin
#
# Remove leading # to set options mainly useful for reporting servers.
# The server defaults are faster for transactions and fast SELECTs.
# Adjust sizes as needed, experiment to find the optimal values.
# join_buffer_size = 128M
# sort_buffer_size = 2M
# read_rnd_buffer_size = 2M
datadir=/var/lib/mysql
socket=/var/lib/mysql/mysql.sock

# Disabling symbolic-links is recommended to prevent assorted security risks
symbolic-links=0

log-error=/var/log/mysqld.log
pid-file=/var/run/mysqld/mysqld.pid
server-id=2
Fourth, initialize the database
Where master_host is the IP address of our master node. master_user is the user we authorized earlier. master_host is the user's password, master_log_file and master_log_pos are the two values that we generated the binary file earlier.
mysql> change master to master_host='192.168.111.132', master_user='repl', master_password='123456',master_log_file='mysql-bin.000001', master_log_pos=1079;
Query OK, 0 rows affected, 2 warnings (0.02 sec)
## 开启从节点.
mysql> start slave;
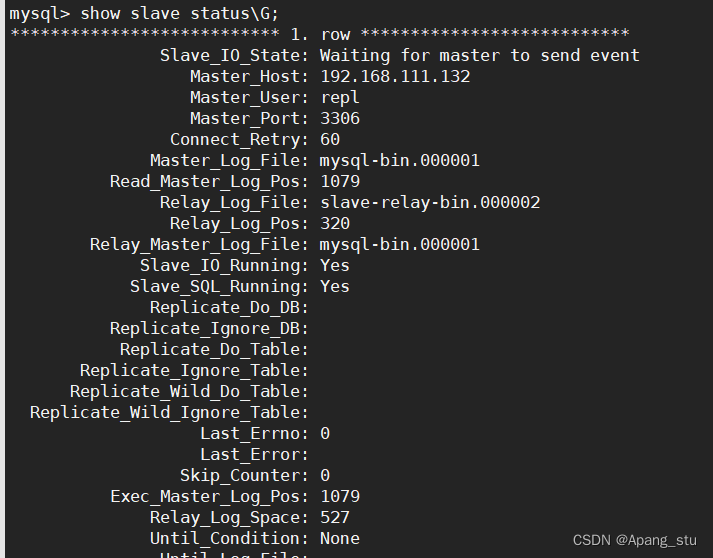
## 查看从数据库的状态
mysql> show slave status\G;Among them, if salve_io_running and slave_sql_running are yes, it will succeed.