Preface
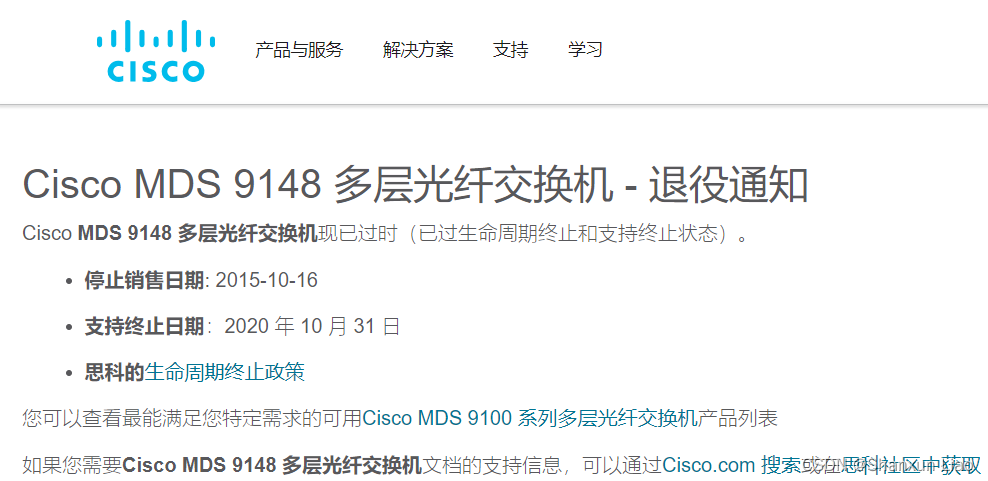
The CISCO MDS 9148 SAN switch has been discontinued, but it is still necessary to master the configuration method:
The upgraded model is followed by 9148S or 9100 series, but the configuration methods are basically the same, just master one:
High Performance and Attractive Value
The Cisco MDS 9148S 16G Multilayer Fabric Switch is the next generation of highly reliable Cisco MDS 9100 Series switches. It includes up to 48 auto-sensing line-rate 16 Gbps Fiber Channel ports in a compact, easy-to-deploy and manage 1 rack unit (1RU) form factor. In summary, the Cisco MDS 9148S is a powerful and flexible switch that delivers high performance and comprehensive enterprise-class features at an affordable price.
Compare Models MDS 9100 Series Multilayer Fabric Switches - Cisco
illustrate:
Before implementation, check the number of modules and insert them into the first 12 ports. If there is no license for port expansion, each switch defaults to
12port activated. Each port expansion license can activate 12 ports, and a fully activated switch with 48 ports requires 3 licenses.
1. Device initialization: Just install the prompt:
Abort Auto Provisioning and continue with normal setup ?(yes/no)[n]: y

//取消自动配置并继续正常设置?

--- System Admin Account Setup ----

//系统管理帐户设置

Do you want to enforce secure password standard (yes/no) [y]: y

// 您想要强制执行安全密码标准吗

  Enter the password for "admin": P@ssw0rd

  Confirm the password for "admin": P@ssw0rd

---- Basic System Configuration Dialog ----           //基本系统配置对话框

This setup utility will guide you through the basic configuration of the system. Setup configures only enough connectivity for management of the system.

// 这个设置实用程序将指导您完成系统的基本配置。设置仅配置系统管理所需的连接性。

Please register Cisco MDS 9000 Family devices promptly with your supplier. Failure to register may affect response times for initial service calls. MDS devices must be registered to receive entitled support services.

// 请立即向您的供应商注册Cisco MDS 9000系列设备。注册失败可能会影响初始服务调用的响应时间。MDS设备必须注册才能获得相应的支持服务。

Press Enter at anytime to skip a dialog. Use ctrl-c at anytime to skip the remaining dialogs.

// 按回车在任何时候跳过一个对话框。在任何时候使用ctrl-c来跳过剩下的对话框。

Would you like to enter the basic configuration dialog (yes/no): y

// 您要输入基本配置对话框吗

Create another login account (yes/no) [n]:                //创建另一个登录帐户

Configure read-only SNMP community string (yes/no) [n]:   //配置只读SNMP共同体字符串

Configure read-write SNMP community string (yes/no) [n]:  //配置读写SNMP共同体字符串

Enter the switch name : MDS9148-1                     //配置交换机名称

Continue with Out-of-band (mgmt0) management configuration? (yes/no) [y]: y

//继续带外(mgmt0)管理配置?

Mgmt0 IPv4 address : 192.168.10.12

Mgmt0 IPv4 netmask : 255.255.255.0

Configure the default gateway? (yes/no) [y]:              //配置网关

Mgmt0 IPv4 gateway :192.168.10.1

Configure advanced IP options? (yes/no) [n]:            //配置高级IP选项?

Enable the ssh service? (yes/no) [y]:                        //启用SSH服务

Type of ssh key you would like to generate (dsa/rsa) [rsa]:   //希望生成的ssh密钥的类型

Number of rsa key bits <1024-2048> [1024]:              // rsa密钥位的数目

Enable the telnet service? (yes/no) [n]: y                    //启用telnet服务

Configure congestion/no_credit drop for fc interfaces? (yes/no)[y]: no

//为fc接口配置拥塞/无信用下降?

Enable the http-server? (yes/no) [y]:                     //启用http服务器

Configure clock? (yes/no) [n]:                               //配置时钟

Configure timezone? (yes/no) [n]:                        //配置时区

Configure summertime? (yes/no) [n]:                   //配置夏季时间

Configure the ntp server? (yes/no) [n]:                  //配置NTP服务器

Configure default switchport interface state (shut/noshut) [shut]:

//配置默认的交换机接口状态

Configure default switchport trunk mode (on/off/auto) [on]: off

//配置默认的交换机端口中继模式

Configure default switchport port mode F (yes/no) [n]:   //配置默认的switchport端口模式F

Configure default zone policy (permit/deny) [deny]:      //配置默认区域策略

Enable full zoneset distribution? (yes/no) [n]:            //启用完整的zoneset分发?

Configure default zone mode (basic/enhanced) [basic]:   //配置默认区域模式

The following configuration will be applied:             //将应用以下配置

password strength-check

switchname MDS9148-1

interface mgmt0

ip address 192.168.10.12 255.255.255.0

gatway 192.168.10.1

no shutdown

ssh key rsa 1024 force

feature ssh

feature telnet

feature http-server

system default switchport shutdown

system default switchport trunk mode off

no system default zone default-zone permit

no system default zone distribute full

no system default zone mode enhanced

Would you like to edit the configuration? (yes/no) [n]:   //您想要编辑配置吗?

Use this configuration and save it? (yes/no) [y]:         //使用此配置并保存它?

[########################################] 100%

Copy complete.
2. Commonly used commands for equipment:
显示当前配置
# show run

显示当前配置的ZONE的信息
# show zone

查看vsan信息
# show vsan

查看 VSAN 下面的端口
# Show vsan 1 membership

查看注册的 pmmw 号
# show fcs database

显示当前配置的ZONESET的信息
# show zoneset

显示端口fc1/1信息
# show interface fc1/1

显示当前活动的ZONE信息
# show zone activate

显示当前活动的ZONESET信息
# show zoneset activate

查看连接的HBA卡的WWN号
# show flogi database detail

查看注册的WWN号
# show fcs database

查询连接的hba卡的wwn的信息
# show flogi database

查看交换机所有端口信息
# show interface brief


查看交换机状态
# show environment

查看交换机整体信息
# show hardware


保存当前配置
# copy run start

显示指定License
# switch# show license fcports.lic

显示全部Licenses
# switch# show license all

显示SN
# switch# show license hostid

# License hostid:VDH=4C0AF664

其他命令

更改交换机名称
# switchname XXX

更改交换机管理ip
# interface mgmt 0
# ip address XXXXX

清除 fcid。
# purge fcdomain fcid vsan 1

从zoneset中移除zone
# conf t
# zoneset name zoneset1 vsan 100
# no member qa    从zoneset移除名为qa的zone

移除zone的member
# conf t
# zone name qa vsan 100
# no member interface fc1/1
# no member interface fc1/10

删除zone
# no zone name qa vsan 100

别名重命名
switch(config-device-alias-db)# device-alias rename Device1 Device2

指定端口为E工作模式
switch(config)# interface fc1/1
switch(config-if)# switchport mode e

安装与清除license
switch# install license bootflash:license-file
switch# clear license license-file
switch# clear license all

下载配置文件
switch# copy <scheme>://<url> system:running-config
switch# copy tftp://172.16.10.1/237.img  bootflash: 237.img

收集日志在#模式下收集
term len 0(不需要手动敲空格)
show tech-support details
show logging onboard error-stats

更改日期
例:
MDS9148S-1# clock set 11:55:00 22 November 2019

清除配置
write erase

执行完命令后,交换机关机,再开机,此时可使用串口线重新初始化。

重启
reload

This command will reboot the system。(y/n)? y

升级ios
使用show version命令查看
# show version

Cisco Nexus Operating System (NX-OS) Software
TAC support: http://www.cisco.com/tac
Documents: http://www.cisco.com/en/US/products/ps9372/tsd_products_support_series_home.html
Copyright (c) 2002-2017, Cisco Systems, Inc. All rights reserved.The copyrights to certain works contained herein are owned byother third parties and are used and distributed under license.Some parts of this software are covered under the GNU Public License. A copy of the license is available athttp://www.gnu.org/licenses/gpl.html.

Software
BIOS:      version 2.1.17
loader:    version N/A
kickstart: version 6.2(19)
system:    version 6.2(19)
BIOS compile time:       01/08/14
kickstart image file is: bootflash:///m9100-s5ek9-kickstart-mz.6.2.19.bin
kickstart compile time:  1/30/2017 23:00:00 [03/10/2017 05:18:49]
system image file is:    bootflash:///m9100-s5ek9-mz.6.2.19.bin
system compile time:     1/30/2017 23:00:00 [03/10/2017 08:12:56]
Hardware
cisco MDS 9148S 16G 48 FC (1 Slot) Chassis ("2/4/8/16 Gbps FC/Supervisor")
Motorola, e500v2, core 0  with 4155776 kB of memory.
Processor Board ID JAE22450LU8
Device name: MDS9148S-1
bootflash: 4018896 kB
Kernel uptime is 1 day(s), 4 hour(s), 43 minute(s), 7 second(s)
Last reset
Reason: Unknown
System version: 6.2(19)
Service:
plugin
Core Plugin

使用TFTP软件上传软件包到bootflash
# copy tftp://<server IP address>/<filename in TFTP> bootflash:<image filename>

例如:

copy ftp://192.168.10.111/m9100-s5ek9-mz.6.2.27.bin bootflash:m9100-s5ek9-mz.6.2.27.bin
copy ftp://192.168.10.111/m9100-s5ek9-kickstart-mz.6.2.27.bin bootflash:m9100-s5ek9-kickstart-mz.6.2.27.bi
说明:需要将下载好的zip文件解压放在FTP目录下,共两个文件,copy命令需要执行两次上传。

查看上传好的文件
# dir bootflash

升级前检查
1)升级前检查是否有特性不兼容问题

Switch# show incompatibility-all system bootflash:文件名

 2)升级前检查硬件冲突

Switch# show install all impact kickstart bootflash:m9500-sf2ek9-kickstart-mz.5.0.8.bin

system bootflash:m9500-sf2ek9-mz.5.0.8.bin

 3)确认业务已经暂停

 4)使用show sprom backplane 1确认要升级的交换机序列号

 5)使用copy running-config startup-config保存当前配置,以防交换机重启后配置丢失

 6)保存当前配置到本地

# copy startup-config tftp://<server IP address>/<startup-config_switchname_date>

 7)收集当前日志信息

# show tech-support details

 8)执行show version确认当前硬件型号和软件版本

 9)执行show module检查交换机组件状态

10)执行show hardware检查交换机是否已经boot up

11)执行show flogi database检查并记录flogi信息和数量

12)执行show system health statistics检查是否都是running

13)执行show vsan检查vsan1是否是active

 执行升级命令
# install all system bootflash:<system image name> kickstart bootflash:<kickstart image name>

例如
#install all system bootflash:m9100-s5ek9-mz.6.2.27.bin kickstart bootflash:m9100-s5ek9-kickstart-mz.6.2.27.bin

Do you want to continue with the installation (y/n)?  [n] y

确认升级

升级完成后
检查交换机组件状态

# Show module

安装许可
说明:

1)Cisco交换机端口扩容license每个可以激活12port,48port全激活的交换机需要3个license。
2)Cisco交换机激活官方网站提供链接,但需要合作伙伴权限,否则只能拨打400客服电话激活。
3)Cisco交换机激活只需要提供交换机SN和激活码PAK。
4)Cisco交换机许可以lic文件形式通过邮件附件下发给工程师。

步骤:

1.上传激活文件
# copy ftp://192.168.10.11/ 20191008145312690.lic bootflash: 20191008145312690.lic

2.查看激活文件
#dir bootflash

3.安装激活文件
#install license bootflash: 20191008145312690.lic

4. 检查已安装的许可证
#show license usage
#show license brief

收集日志
show tech-support details
show logging [logfile|nvram] 查看交换机日志信息,可以查看日志文件内容,或者nvram里面的日志信息。
3. Practical configuration:
创建 VSAN 100
MDS9148-SAN01(config)# vsan database
MDS9148-SAN01(config-vsan-db)# vsan 100 name vsan100

激活端口
MDS9148-SAN01(config-vsan-db)# interface fc1/1,fc1/3,fc1/9,fc1/11
MDS9148-SAN01(config-if)# no shutdown

激活端口添加到VSAN
MDS9148-SAN01(config-if)# vsan database
MDS9148-SAN01(config-vsan-db)# vsan 100 interface fc1/1,fc1/3,fc1/9,fc1/11
Traffic on fc1/1 may be impacted. Do you want to continue? (y/n) [n] y
Traffic on fc1/3 may be impacted. Do you want to continue? (y/n) [n] y
Traffic on fc1/9 may be impacted. Do you want to continue? (y/n) [n] y
Traffic on fc1/11 may be impacted. Do you want to continue? (y/n) [n] y


查看端口在那个 VSAN 里面
MDS9148-SAN01(config-vsan-db)# show interface brief

查看 pwwn FC HBA 的对应 ID
MDS9148-SAN01(config-vsan-db)# show flogi database

设置pwwn对应名称
MDS9148-SAN01(config-vsan-db)# device-alias database
MDS9148-SAN01(config-vsan-db)# device-alias name DELL_EMC_740_VMWARE__ESXI01 pwwn 50:06:01:6a:49:e0:4f:57
MDS9148-SAN01(config-vsan-db)# device-alias name DELL_EMC_740_VMWARE__ESXI02 pwwn 50:06:01:6b:49:e0:4f:57
MDS9148-SAN01(config-vsan-db)# device-alias name DELL_EMC_380_Unisphere_SAPA pwwn 10:00:00:10:9b:9c:da:f2
MDS9148-SAN01(config-vsan-db)# device-alias name DELL_EMC_380_Unisphere_SAPB pwwn 10:00:00:10:9b:9c:da:ce
MDS9148-SAN01(config-vsan-db)# device-alias commit  // 报错没事

设置 ZONE
MDS9148-SAN01(config-vsan-db)# zone name kiddos_EMC_DELL_380__Unisphere vsan 100
MDS9148-SAN01(config-vsan-db)# member device-alias DELL_EMC_740_VMWARE__ESXI01
MDS9148-SAN01(config-vsan-db)# member device-alias DELL_EMC_740_VMWARE__ESXI02
MDS9148-SAN01(config-vsan-db)# member device-alias DELL_EMC_380_Unisphere_SAPA
MDS9148-SAN01(config-vsan-db)# member device-alias DELL_EMC_380_Unisphere_SAPB

MDS9148-SAN01(config-vsan-db)# exit

MDS9148-SAN01(config-vsan-db)# zone name kiddos_EMC_DELL_EMC_740_VMWARE vsan 100
MDS9148-SAN01(config-vsan-db)# member device-alias DELL_EMC_740_VMWARE__ESXI01
MDS9148-SAN01(config-vsan-db)# member device-alias DELL_EMC_740_VMWARE__ESXI02
MDS9148-SAN01(config-vsan-db)# member device-alias DELL_EMC_380_Unisphere_SAPA
MDS9148-SAN01(config-vsan-db)# member device-alias DELL_EMC_380_Unisphere_SAPB

设置zoneset
MDS9148-SAN01(config-vsan-db)# zoneset name zoneset1 vsan 100
MDS9148-SAN01(config-vsan-db)# member kiddos_EMC_DELL_380__Unisphere
MDS9148-SAN01(config-vsan-db)# member kiddos_EMC_DELL_EMC_740_VMWARE

激活zoneset
MDS9148-SAN01(config)#  zoneset activate name zoneset1 vsan 100
WARNING: Specified zoneset already active and unchanged

存档配置
MDS9148-SAN01# copy running-config startup-config
[########################################] 100%
Copy complete.
3.3.1 Check the device model version

3.3.2 View the current configuration:


3.3.3 Configure VSAN:
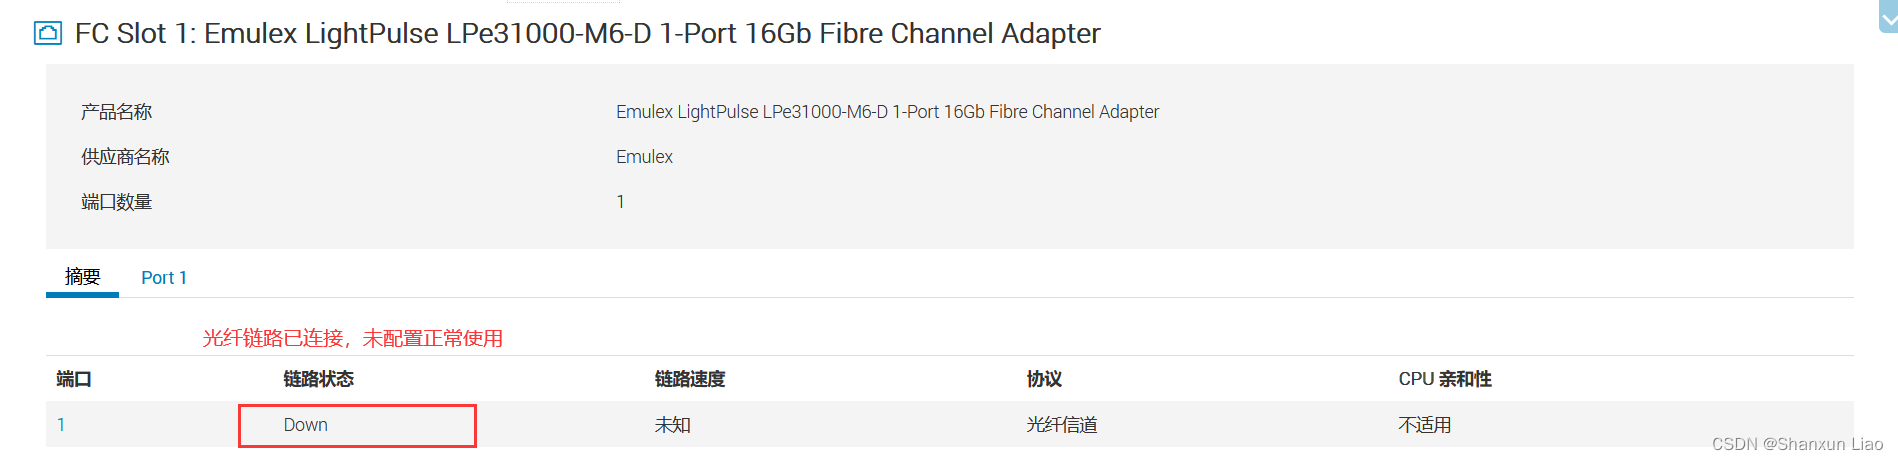
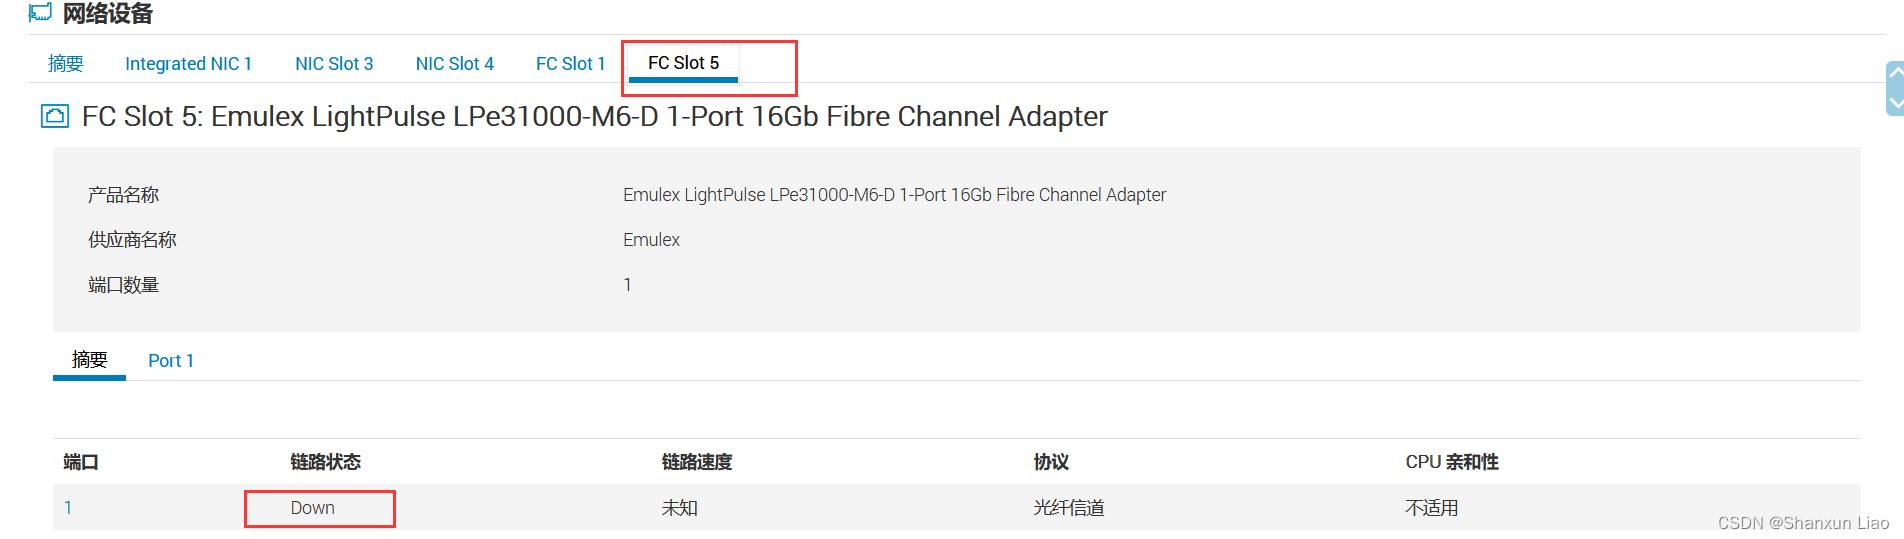
PS: The ports I access here are interface fc1/1, fc1/3 storage interface fc1/9, fc1/11 ESXI
创建 VSAN 100
MDS9148-SAN01(config)# vsan database
MDS9148-SAN01(config-vsan-db)# vsan 100 name vsan100
激活端口
MDS9148-SAN01(config-vsan-db)# interface fc1/1,fc1/3,fc1/9,fc1/11
MDS9148-SAN01(config-if)# no shutdown
激活端口添加到VSAN
MDS9148-SAN01(config-if)# vsan database
MDS9148-SAN01(config-vsan-db)# vsan 100 interface fc1/1,fc1/3,fc1/9,fc1/11
Traffic on fc1/1 may be impacted. Do you want to continue? (y/n) [n] y
Traffic on fc1/3 may be impacted. Do you want to continue? (y/n) [n] y
Traffic on fc1/9 may be impacted. Do you want to continue? (y/n) [n] y
Traffic on fc1/11 may be impacted. Do you want to continue? (y/n) [n] y
PS : You can see that fc1/1, fc1/3, fc1/9, fc1/11 have been assigned to Vsan 100
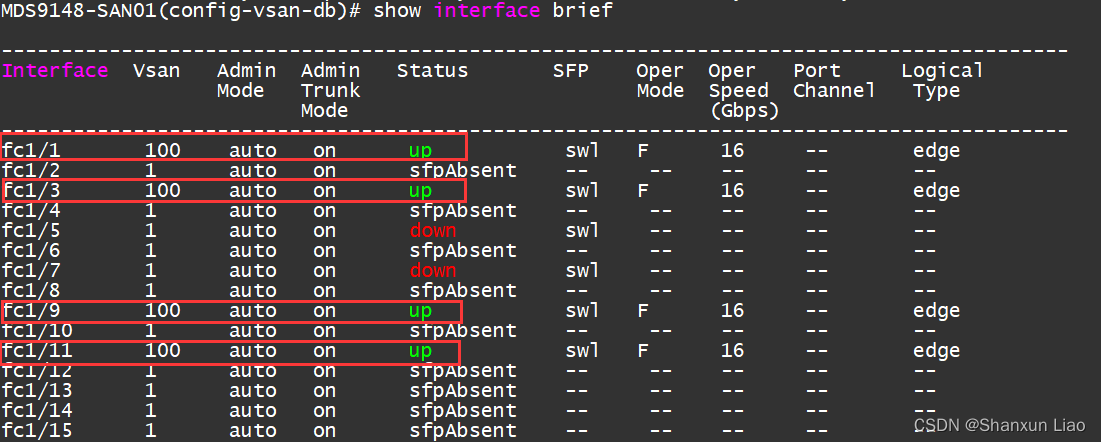
查看端口在那个 VSAN 里面
MDS9148-SAN01(config-vsan-db)# show interface brief

查看 pwwn FC HBA 的对应 ID
MDS9148-SAN01(config-vsan-db)# show flogi database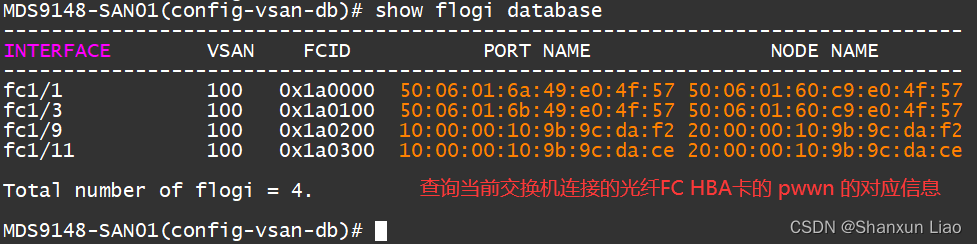
设置pwwn对应名称
MDS9148-SAN01(config-vsan-db)# device-alias database
MDS9148-SAN01(config-vsan-db)# device-alias name DELL_EMC_740_VMWARE__ESXI01 pwwn 50:06:01:6a:49:e0:4f:57
MDS9148-SAN01(config-vsan-db)# device-alias name DELL_EMC_740_VMWARE__ESXI02 pwwn 50:06:01:6b:49:e0:4f:57
MDS9148-SAN01(config-vsan-db)# device-alias name DELL_EMC_380_Unisphere_SAPA pwwn 10:00:00:10:9b:9c:da:f2
MDS9148-SAN01(config-vsan-db)# device-alias name DELL_EMC_380_Unisphere_SAPB pwwn 10:00:00:10:9b:9c:da:ce
MDS9148-SAN01(config-vsan-db)# device-alias commit  // 报错没事
设置 ZONE
MDS9148-SAN01(config-vsan-db)# zone name kiddos_EMC_DELL_380__Unisphere vsan 100
MDS9148-SAN01(config-vsan-db)# member device-alias DELL_EMC_740_VMWARE__ESXI01
MDS9148-SAN01(config-vsan-db)# member device-alias DELL_EMC_740_VMWARE__ESXI02
MDS9148-SAN01(config-vsan-db)# member device-alias DELL_EMC_380_Unisphere_SAPA
MDS9148-SAN01(config-vsan-db)# member device-alias DELL_EMC_380_Unisphere_SAPB
MDS9148-SAN01(config-vsan-db)# exit
MDS9148-SAN01(config-vsan-db)# zone name kiddos_EMC_DELL_EMC_740_VMWARE vsan 100
MDS9148-SAN01(config-vsan-db)# member device-alias DELL_EMC_740_VMWARE__ESXI01
MDS9148-SAN01(config-vsan-db)# member device-alias DELL_EMC_740_VMWARE__ESXI02
MDS9148-SAN01(config-vsan-db)# member device-alias DELL_EMC_380_Unisphere_SAPA
MDS9148-SAN01(config-vsan-db)# member device-alias DELL_EMC_380_Unisphere_SAPB设置zoneset
MDS9148-SAN01(config-vsan-db)# zoneset name zoneset1 vsan 100
MDS9148-SAN01(config-vsan-db)# member kiddos_EMC_DELL_380__Unisphere
MDS9148-SAN01(config-vsan-db)# member kiddos_EMC_DELL_EMC_740_VMWARE 激活zoneset
MDS9148-SAN01(config-vsan-db)# zoneset activate name zoneset1 vsan 100 
3.3.4 Complete the configuration and check the business:


3.3.5 Save the configuration:
MDS9148-SAN01# copy running-config startup-config
[########################################] 100%
Copy complete.
Special thanks to the author: Wang Che Axis who has mastered the configuration of the VSAN switch through his tutorial and can complete the configuration work independently:
References: Author: Wang Che Axle https://www.bilibili.com/read/cv14944647 Source: bilibili