Article directory
foreword
In the development of modern web applications, it is often necessary to deal with many aspects such as user rights, exceptions, and data return formats. The Spring framework provides us with powerful tools and mechanisms to deal with these challenges. This article will focus on the interceptors, unified exception handling and unified data return format in the Spring framework.
1. Spring Interceptor
In web application development, interceptors are a very useful mechanism that allow us to perform some specific actions at different stages of request processing. These operations can be permission verification, logging, data preprocessing, etc. The interceptor-related content in the Spring framework will be discussed in detail below.
1.1 Case of User Login Authority Verification
First introduce a common application case:
- User login permission verification. Usually, in a web application, some resources or functions need to be logged in to be accessed, so it is necessary to verify the login status of the user. In the absence of interceptors, we may use the traditional way to implement this validation logic. Let's look at the initial user login authentication method
1.1.1 Initial User Login Verification
Before using interceptors, let's review the initial method of using user login authentication:
@RestController
public class UserController {


    // 最开始实现用户登录权限验证的方式

    @RequestMapping("/method1")
    public Object method1(HttpServletRequest request){


        // 获取Session,没有不创建
        HttpSession session = request.getSession(false);
        if(session == null || session.getAttribute("userinfo") == null){


            // 没有获取到 session, 此时说明用户未登录
            return false;
        }

        // 此时则说明已经登录了,执行后续业务逻辑

        // ...

        return true;
    }

    @RequestMapping("/method2")
    public Object method2(HttpServletRequest request){


        // 获取Session,没有不创建
        HttpSession session = request.getSession(false);
        if(session == null || session.getAttribute("userinfo") == null){


            // 没有获取到 session, 此时说明用户未登录
            return false;
        }

        // 此时则说明已经登录了,执行后续业务逻辑

        // ...

        return true;
    }

	// 其他方法...
}
When using the original method to add the same login verification logic to each method that requires user login permission verification, it will cause some problems:
-
Code repetition: It is necessary to copy and paste the same verification code in each method that requires verification, which increases code redundancy and is not conducive to maintenance and modification.
-
Poor readability: The same verification logic is included in multiple methods, which reduces the readability of the code and makes it difficult to quickly understand the actual function of each method.
-
Difficult maintenance: If you need to modify the verification logic or add new verification conditions, you need to modify it in multiple places, which is prone to errors.
-
Code coupling: Embedding verification logic directly into each method leads to tight coupling of business logic and verification logic, which is not conducive to code decoupling and unit testing.
-
Poor scalability: If you need to add more verification logic or customize the verification logic in the future, you need to modify multiple methods, which increases the workload and risks.
1.1.2 The problem of using Spring AOP to implement login authentication
In the face of the above problems, it is necessary to consider using a unified user login authentication to solve it. When it comes to unified login verification, we can think of using Spring AOP's aspect-oriented programming to achieve it, but there are other big problems. First, let's review the implementation of Spring AOP code:
// 创建一个切面(类)
@Aspect
@Component
public class UserAspect{


    // 创建切点(方法)定义拦截规则
    @Pointcut("execution(public * com.example.demo.controller.UserController.*(..))")
    public void pointcut() {


    }

    // 前置通知
    @Before("pointcut()")
    public void doBefore() {


        System.out.println("执行了前置通知:" + LocalDateTime.now());
    }

    // 后置通知
    @After("pointcut()")
    public void doAfter() {


        System.out.println("执行了后置通知:" + LocalDateTime.now());
    }

    // 返回后通知
    @AfterReturning("pointcut()")
    public void doAfterReturning() {


        System.out.println("执行了返回后通知:" + LocalDateTime.now());
    }

    // 抛异常后通知
    @AfterThrowing("pointcut()")
    public void doAfterThrowing() {


        System.out.println("抛异常后通知:" + LocalDateTime.now());
    }

    // 环绕通知
    @Around("pointcut()")
    public Object doAround(ProceedingJoinPoint joinPoint) {


        Object proceed = null;
        System.out.println("Around 方法开始执行:" + LocalDateTime.now());
        try {


            // 执行拦截的方法
            proceed = joinPoint.proceed();
        } catch (Throwable e) {


            e.printStackTrace();
        }
        System.out.println("Around 方法结束执行: " + LocalDateTime.now());
        return proceed;
    }
}
If you want to use the notification method of Spring AOP above to implement user login verification, there are two main problems:
1. Get HttpSessionobject problem
- In AOP, advice (Advice) is performed on the connection point (Join Point) matched by the pointcut (Pointcut). However, these connection points are at the method level and cannot directly provide access to related objects such as or
HttpServletRequest.HttpSessionTherefore, objects cannot be directly accessed in AOP aspectsHttpSession.
2. Selective interception problem
- In actual applications, we may only need to verify login permissions for some functions
需要排除一些其他方法,比如用户的注册和登录. 切点表达式It is difficult to achieve this precisely with method-name-based methods, as this may involve complex regular expression matching, and if there are new methods that need to be excluded, the pointcut expression needs to be updated manually .
In order to solve these problems, Spring's interceptor mechanism is more suitable for handling such situations. Interceptors can access request-related objects such as HttpServletRequestand HttpSession, and can more easily configure which paths need to be intercepted and which don't.
1.2 Use of Spring Interceptors
1.2.1 Spring interceptor concept and usage steps
Spring interceptor is an interception mechanism in the Spring framework, which is used to perform specific operations before and after the request enters the controller. Interceptors can be used to implement functions such as login permission verification, logging, and data preprocessing. Using the idea of tangential programming (AOP), the interceptor can insert its own logic at different stages of the request to achieve various functions .
Here are the general steps to use Spring interceptors:
1. Create an interceptor class
First, create a class that implements Spring's HandlerInterceptorinterface and override methods in it. Usually include the following three methods:
preHandle: Executed before the request is processed, and can be used for permission verification and other operations. If returnedfalseinterrupts request processing.postHandle: Executed after the request is processed, but before the view is rendered. Operations such as logging can be performed.afterCompletion: Executed after the view is rendered, some operations such as resource cleanup can be performed.
2. Add and configure interceptors
Configuring and adding interceptors in Spring Boot can be roughly divided into the following two steps:
1) Add the created interceptor class to the Spring container: In Spring Boot, you can use @Componentannotations to mark the created interceptor class and hand it over to the Spring container for management. In this way, Spring Boot will automatically scan and include this interceptor class into the application context.
For example, add annotations on the interceptor class @Componentas follows:
import org.springframework.stereotype.Component;

@Component
public class AuthInterceptor implements HandlerInterceptor {


    // 拦截器的具体实现
}
2) Implement WebMvcConfigurerthe interface and rewrite addInterceptorsthe method to add the interceptor to the system configuration: In Spring Boot, you can implement WebMvcConfigurerthe interface and rewrite addInterceptorsthe method to add the interceptor. This method will add the created interceptor to the system so that it takes effect when the request is processed.
import org.springframework.context.annotation.Configuration;
import org.springframework.web.servlet.config.annotation.InterceptorRegistry;
import org.springframework.web.servlet.config.annotation.WebMvcConfigurer;

@Configuration
public class WebConfig implements WebMvcConfigurer {


    @Autowired
    private AuthInterceptor authInterceptor; // 注入你的拦截器类

    @Override
    public void addInterceptors(InterceptorRegistry registry) {


        // 添加拦截器,并指定拦截的路径
        registry.addInterceptor(authInterceptor)
        		.addPathPatterns("/**")
        		.excludePathPatterns("/user/login")
        		.excludePathPatterns("/user/reg")
        		;
    }
}
In the above code, addInterceptorsthe method will add the interceptor class authInterceptorto the system configuration, and addPathPatternsspecify the path to be intercepted through , and then use excludePathPatternsthe method to specify the specified interface that abandons the interception, such as login and registration functions. In this way, when the program is running, the configured interceptor will automatically take effect.
3. Configure interceptor order
If multiple interceptors are used at the same time, their execution order can be defined through configuration. In Spring MVC, interceptors are executed in the same order as they are declared in the configuration file.
4. Using interceptors
After configuring interceptors, they will execute the corresponding logic before, after or after the request is processed in the rendering phase. In this way, the required functions can be implemented in the interceptor, such as permission verification, logging, etc.
1.2.2 Use interceptors to verify user login permissions
1. Create an interceptor for user login verification:
/**
 * Spring MVC拦截器(LoginInterceptor),用于检查用户是否已登录。
 * 如果用户未登录,则重定向到登录页面。
 */
@Component
public class LoginInterceptor implements HandlerInterceptor {


    @Override
    public boolean preHandle(HttpServletRequest request, HttpServletResponse response, Object handler) throws Exception {


        // 判断用户登录
        HttpSession session = request.getSession(false); // 默认值是true
        if (session != null && session.getAttribute(ApplicationVariable.SESSION_KEY_USERINFO) != null) {


            // 用户已经登录了
            return true;
        }

        // 当代码执行到此次,表示用户未登录
        response.sendRedirect("/login.html");
        return false;
    }
}
2. Add and configure interception rules
/**
 * 配置拦截规则
 */
@Configuration
public class MyConfig implements WebMvcConfigurer {


    @Autowired
    private LoginInterceptor loginInterceptor;

    @Override
    public void addInterceptors(InterceptorRegistry registry) {


        registry.addInterceptor(loginInterceptor)
                .addPathPatterns("/**") // 拦截所有的 url
                // 放开拦截的内容
                .excludePathPatterns("/**/*.js")
				.excludePathPatterns("/**/*.css")
				.excludePathPatterns("/**/*.jpg")
				.excludePathPatterns("/login.html")
                .excludePathPatterns("/user/reg")
                .excludePathPatterns("/user/login")
                // ...
        ;
    }
}
1.3 Implementation Principle of Interceptor
The implementation principle of the interceptor involves the core concept of the Spring framework: aspect-oriented programming (AOP). With the help of AOP, interceptors can be woven into method call chains to perform corresponding actions at different stages of request processing. The following will introduce the implementation principle and workflow of the interceptor.
1. AOP concept review
AOP is a programming paradigm designed to solve the problem of cross-cutting concerns (Cross-cutting Concerns). It allows us to better manage and maintain the code by separating cross-cutting concerns from the main business logic. In Spring, AOP is implemented through proxy mode and dynamic proxy.
In AOP, there are two important concepts: Pointcut and Advice.
-
Pointcut: A pointcut defines on which join points (Join Points) to apply advice. A join point can be a method call, method execution, field access, etc. Pointcuts use expressions to match join points to determine which join points are affected by advice.
-
Advice: Advice defines the code to execute at the pointcut. In Spring, there are various types of advice, including pre-advice (executed before method invocation), post-advice (executed after method invocation), surround advice (executed before and after method invocation), exception advice (executed after method throws Executed when an exception occurs), final notification (executed after the method call ends).
2. The workflow of the interceptor
The interceptor is actually an application of AOP, which realizes the intervention in the request processing process through AOP. The following is the workflow of the interceptor:
-
When a request arrives at DispatcherServlet (front controller), the interceptor will first judge whether to intercept the request according to the configured interception rules (point cut).
-
If the interceptor decides to intercept the request, it will execute the logic of the notification before the cut point, such as pre-notification. In this way, the interceptor can perform some preprocessing operations, such as permission verification, logging, etc., before request processing.
-
Next, the request will continue to be passed to the corresponding controller for processing. The interceptor does not interrupt the flow of the request, it just inserts its own logic before processing.
-
After the controller finishes processing the request, the interceptor will execute the notification logic again, such as post-notification. In this way, the interceptor can perform some subsequent operations after request processing, such as data encapsulation, logging, etc.
-
Finally, the interceptor will execute the logic of the notification after the cut point, such as the final notification. This way, the interceptor can perform some cleanup operations after the request processing is complete.
Through interceptors, we can intervene in different stages of request processing, so as to achieve some cross-cutting concerns. This mechanism enables us to better manage and maintain the code, and improves the maintainability and reusability of the code.
1.4 The difference between Spring interceptor and Spring AOP
Spring Interceptors and Spring AOP (Aspect-Oriented Programming), two mechanisms used in the Spring Framework to handle cross-cutting concerns, are somewhat similar but have some key differences. Here are the main differences between them:
1. Different target areas
-
Spring interceptor: mainly used to process web requests. It performs specific operations at different stages of request processing, such as permission verification, logging, etc. Interceptors are mainly concerned with intervening in the processing flow of web requests and inserting custom logic before and after the request.
-
Spring AOP: For handling cross-cutting concerns in applications, not just limited to web requests. AOP can perform notification on different connection points such as method call, method execution, and field access, so as to realize some functions decoupled from the main business logic, such as transaction management, performance monitoring, etc.
2. The scope of application is different
-
Spring interceptor: mainly used in the web layer to process web requests. It can control the processing flow of the request, but it only acts on the Web layer and will not affect the method call of the business layer.
-
Spring AOP: It can be applied to multiple levels, including business layer, persistence layer, Web layer, etc. AOP can span different layers and realize the processing of common concerns between different layers by intercepting connection points.
3. Different processing methods
-
Spring Interceptor: The interceptor is a mechanism based on Java dynamic proxy, which intervenes in the request by weaving it into the request processing process. The interceptor mainly focuses on the front and back links of request processing, and can perform operations such as preprocessing, postprocessing, and resource release.
-
Spring AOP: AOP is implemented through the proxy mode, which can use JDK dynamic proxy or CGLIB to generate proxy objects. AOP can perform notifications on connection points before and after method calls, when exceptions are thrown, and at the end of method execution, so as to achieve different types of cross-cutting concerns.
4. Principle and flexibility
-
Spring interceptor: The interceptor is a mechanism provided by Spring MVC, which is more aimed at the processing of the Web layer. It has some flexibility, but is relatively limited in dealing with common concerns across layers.
-
Spring AOP: AOP is one of the core features of the Spring framework and can be applied at multiple levels, including the processing of various connection points such as method calls and field access. AOP is more general and suitable for handling various cross-cutting concerns.
In short, both Spring interceptors and Spring AOP are important mechanisms for dealing with cross-cutting concerns, but there are some differences in application scope, processing methods, and flexibility. Choosing the appropriate mechanism depends on the actual requirements and at which level cross-cutting concerns need to be handled.
2. Unified exception handling
2.1 Why Unify Exception Handling
During the development process, the application will inevitably encounter various abnormal situations, such as database connection failure, null pointer exception and so on. In order to provide better user experience and better error message management, it is necessary to adopt a unified exception handling mechanism. Here are some reasons why you should adopt unified exception handling:
-
Friendly user experience: Unified exception handling can catch various exceptions and return a unified error response. In this way, users can get more friendly and understandable error prompts without directly exposing the error details inside the application.
-
Reduce code duplication: In an application, the same type of exception may occur in multiple places. By unifying exception handling, the same error handling logic can be extracted to one place, reducing code duplication and improving code maintainability.
-
Centralized error management: Unified exception handling can centrally manage error information to facilitate logging, monitoring, and error analysis. This helps to quickly locate problems and improve application stability.
2.2 Use of unified exception handling
In the Spring framework, you can use @ControllerAdviceand @ExceptionHandlerannotations to achieve unified exception handling.
Proceed as follows:
-
Create an exception handling class and
@ControllerAdvicemark the class with annotations to indicate that it is a controller notification class for handling global exceptions. -
In the exception handling class, use
@ExceptionHandlerannotations to define exception handling methods. You can write different handlers for different types of exceptions, or use a common method to handle all exceptions. -
In the exception handling method, you can customize the error message, build the error response, and return an appropriate view or JSON response.
Here is a sample code showing how to use unified exception handling:
/**
 * 统一异常处理
 */
@ControllerAdvice
@ResponseBody
public class MyExceptionAdvice {


    /**
     * 处理空指针异常
     * @param e
     * @return
     */
    @ExceptionHandler(NullPointerException.class)
    public HashMap<String, Object> doNullPointerException(NullPointerException e){


        HashMap<String, Object> result = new HashMap<>();
        result.put("code", -300);
        result.put("msg", "空指针: " + e.getMessage());
        result.put("data", null);
        return result;
    }

    /**
     * 默认异常处理(当具体的异常处匹配不到时,会执行此方法)
     * @param e
     * @return
     */
    @ExceptionHandler(Exception.class)
    public HashMap<String, Object> doException(Exception e){


        HashMap<String, Object> result = new HashMap<>();
        result.put("code", -300);
        result.put("msg", "Exception: " + e.getMessage());
        result.put("data", null);
        return result;
    }

}
In this code example, a MyExceptionAdviceglobal exception handling class named is created @ControllerAdviceand marked with an annotation. This class contains two exception handling methods:
-
doNullPointerExceptionmethod for handling null pointer exceptions (NullPointerException). When the application throws a null pointer exception, this method will be called, and then construct a containing error informationHashMapand return. -
doExceptionmethod for handling other types of exceptions. If the exception type thrown by the application does not match the previously defined handling method, this default exception handling method will be executed. It also constructs an error response and returns it.
In this way, customized processing for different types of exceptions is realized, and a unified error response format is provided, thereby improving user experience and code maintainability.
3. Unified data return format
3.1 Why is it necessary to unify the data return format
During development, different interfaces may return different data formats, which may cause the front-end to perform different processing logics according to the return formats of different interfaces when processing data, increasing the complexity of the code and maintenance costs. In order to simplify the front-end processing logic and improve the maintainability of the code, you can consider unifying the data return format.
The advantages of a unified data return format include:
-
Reduce the complexity of front-end logic: the front-end does not need to write different processing logic for different interfaces, and can uniformly process data formats to reduce code complexity.
-
Improve front-end and back-end collaboration efficiency: The front-end and back-end can implement interface development and joint debugging faster and reduce communication costs through clear data format agreements.
-
Standardized error handling: The unified data return format can standardize the error handling method, making it easier for the front end to judge whether the request is successful and obtain error information.
3.2 Implementation of unified data return format
When returning in a unified data format, ResponseBodyAdvicethe interface and annotations provided by the Spring framework are mainly used, and the methods @ControllerAdvicein the interface need to be rewritten . The method indicates whether to use a unified data format to return, and it is to realize the unification of the data format.supportsbeforeBodyWritesupportsbeforeBodyWrite
The following is an example showing how to implement a unified data return format, which stipulates that the returned data format is:
{


	"cede":code,
	"msg":msg,
	"data":data
}
Can be used to organize when returning HashMap. The following is the specific implementation code:
/**
 * 统一数据格式处理
 */
@ControllerAdvice
public class ResponseAdvice implements ResponseBodyAdvice {


    @Autowired
    private ObjectMapper objectMapper;

    @Override
    public boolean supports(MethodParameter returnType, Class converterType) {


        return true;
    }

    /**
     * 返回数据之前进行处理
     */
    @SneakyThrows
    @Override
    public Object beforeBodyWrite(Object body, MethodParameter returnType, MediaType selectedContentType, Class selectedConverterType, ServerHttpRequest request, ServerHttpResponse response) {


        //规定标准格式为:HashMap<String, Object> -> code,msg.data

        if (body instanceof HashMap) {


            // 如果已经是标准格式
            return body;
        }

        // 重写返回结果,让其返回一个统一的数据格式
        HashMap<String, Object> result = new HashMap<>();
        result.put("code", 200);
        result.put("data", body);
        result.put("msg", "");

        return result;
    }
}
The above sample code clearly demonstrates how to use @ControllerAdviceannotations and ResponseBodyAdviceinterfaces to achieve a unified data return format. By rewriting the supportsand beforeBodyWritemethods, the unified processing of the returned data format is realized.
In this example, a unified data format is specified, that is, the returned JSON includes the fields of "code", "msg" and "data". If the returned data is already in the standard format ( HashMap<String, Object>), return it directly; otherwise, build a return object in the standard format and put the original data into it.
3.3 For the problem that the body is a String type error
When dealing with primitive data types, for example:
@RestController
@RequestMapping("/user")
public class UserController {


    @RequestMapping("/login")
    public int login() {


        return 1;
    }
}
Browser access results:
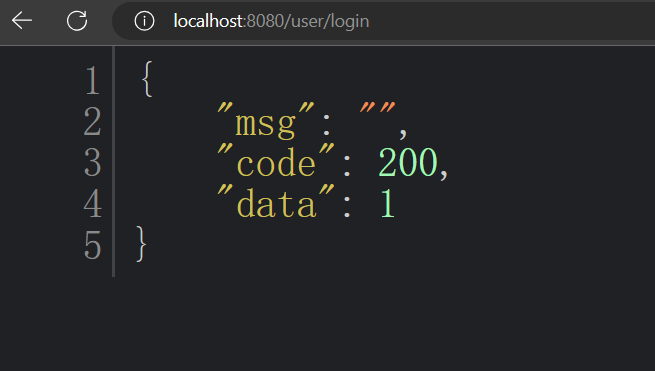
At this time, there is no problem found, and the unified return of the data format has been successfully realized. But what if the return type is String?
@RestController
@RequestMapping("/user")
public class UserController {


	@RequestMapping("/hello")
	public String hello(){


	    return "hello world";
	}
}
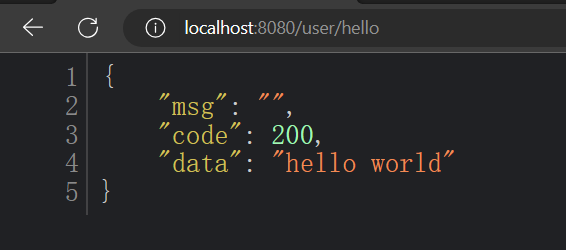
Visit again through the browser:

1. Return String type error cause analysis:
The content of the error is roughly that HashMapthe type cannot be converted into Stringa type. Why is this so? First, you need to understand the execution flow of the data during the return process :
- The controller method returns the String type;
- Perform unified data format processing for the String type, that is, set the as of the String type to
bodythe of of the ;valuekeydataHashMap - Convert
HashMaptoapplication/jsona string and send it over the network to the front end.
It is worth noting that:
- Among them, if
bodythe type of is String type, it will be usedStringHttpMessageConverterfor type conversion;- Otherwise use
HttpMessageConverterfor type conversion.
But the use is for the third step. Since bodyis of String type, it uses StringHttpMessageConvertera class, which can only convert String type data into JSON string, and an error HashMapwill occur if it is converted.
2. Solution:
The solutions can be roughly divided into two types:
- Solution 1: If
bodythe type is String, return the String type directly. You can use string concatenation, or usejacksonthe ObjectMapper in to convert it into JSON format.
1) Splicing to form a String for return:
@SneakyThrows
@Override
public Object beforeBodyWrite(Object body, MethodParameter returnType, MediaType selectedContentType, Class selectedConverterType, ServerHttpRequest request, ServerHttpResponse response) {


    if (body instanceof String) {


        // 返回一个 String 字符串
        return "{\"code\" : 200, \"msg\": \"\", \"data\":\"" + body + "\"}";
    }

    if (body instanceof HashMap) {


        // 如果已经是标准格式
        return body;
    }

    // 重写返回结果,让其返回一个统一的数据格式
    HashMap<String, Object> result = new HashMap<>();
    result.put("code", 200);
    result.put("data", body);
    result.put("msg", "");
    return result;
}
2) Using jacksonin ObjectMapper:
@SneakyThrows
@Override
public Object beforeBodyWrite(Object body, MethodParameter returnType, MediaType selectedContentType, Class selectedConverterType, ServerHttpRequest request, ServerHttpResponse response) {


    if (body instanceof HashMap) {


        // 如果已经是标准格式
        return body;
    }

    // 重写返回结果,让其返回一个统一的数据格式
    HashMap<String, Object> result = new HashMap<>();
    result.put("code", 200);
    result.put("data", body);
    result.put("msg", "");

    if(body instanceof String){


        // 返回一个 String 字符串
        return objectMapper.writeValueAsString(result);
    }
    return result;
}
2. Solution 2: Disable the class directly StringHttpMessageConverter.
configureMessageConvertersIt can be disabled by overriding the method in the configuration class StringHttpMessageConverter:
@Configuration
public class MyConfig implements WebMvcConfigurer {


    /**
     * 移除 StringHttpMessageConverter
     * @param converters
     */
    @Override
    public void configureMessageConverters(List<HttpMessageConverter<?>> converters) {


        converters.removeIf(converter -> converter instanceof StringHttpMessageConverter);
    }
}
where converter -> converter instanceof StringHttpMessageConverteris an Lambdaexpression that checks converterwhether is StringHttpMessageConverteran instance of . If yes, remove the instance.
After selecting any solution, visit the controller method returning the String type again, and the result is as follows:
At this point, the unified data format can be returned correctly.