
In the early days of learning Spring and servlets, when we judged the user's identity, we obtained the session and object in each method. This method was highly redundant, increased code complexity, and had high maintenance costs, so we thought of using AOP. Implement a public method. This public method is specifically used to determine the user's identity. However, the AOP notification method is intercepted by the entire cross-section. Therefore, for some methods that do not need to determine the user's identity, this approach is too violent. , is also illegal. In addition, it is also difficult to obtain parameters using AOP, so it is more appropriate to use the Spring Boot interceptor.
The interceptors are used below to implement three practical functions: (1) unified login verification, (2) unified exception handling, and (3) unified return data format.
1. Unified login verification:
Step 1: Customize the interceptor
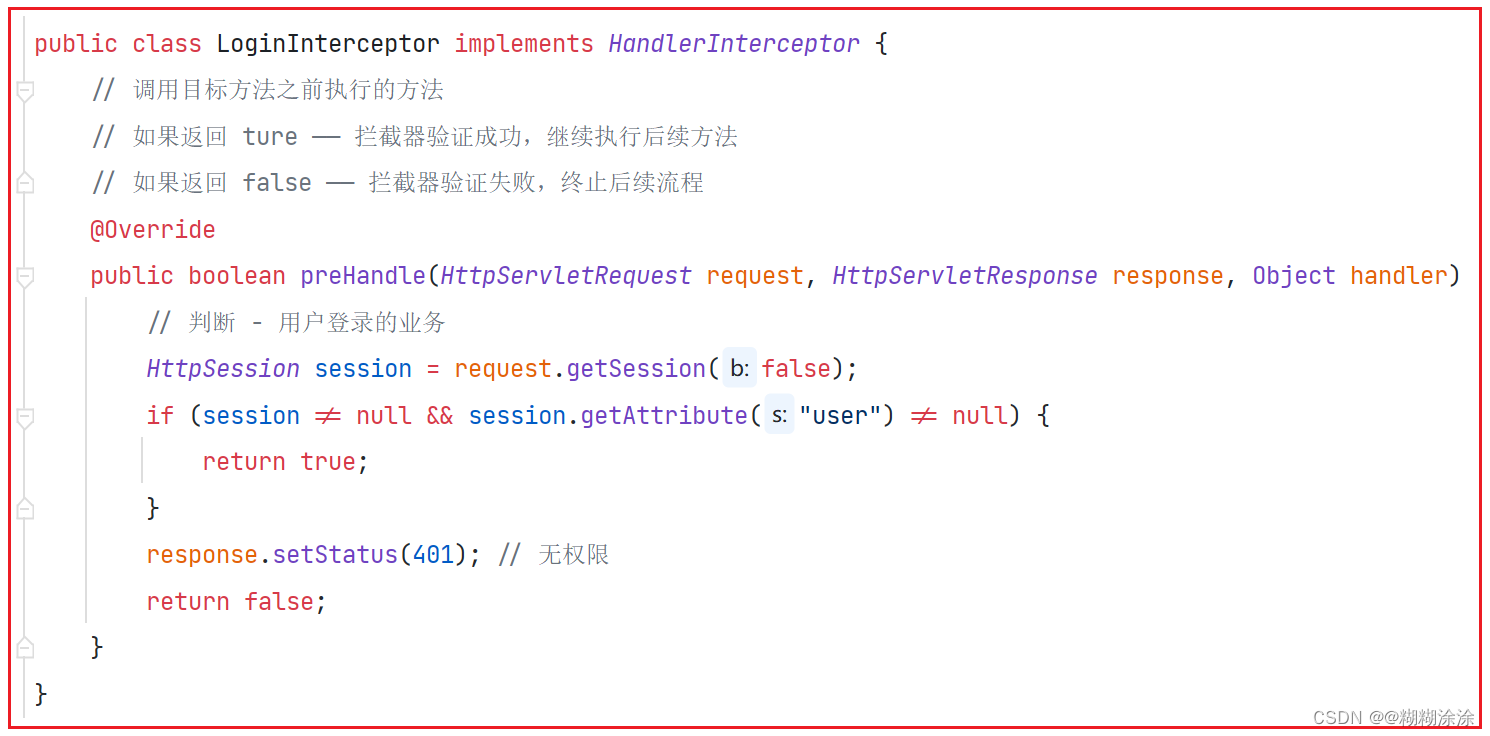
Create a common class, implement the HandlerInterceptor interface, and override the preHandle method. Since interceptors are very commonly used, Spring boot has built-in dependencies on interceptors;
preHandleMethod: Called before the request reaches the Controller. The methods of each interceptor in the interceptor chainpreHandlewill be called in turn. If an interceptorpreHandlemethod returnsfalse, subsequent interceptorpreHandlemethods and Controller methods will not be executed, and the request will be intercepted.
postHandleMethod: Called after the Controller method is executed and before the DispatcherServlet renders the view. The methods of each interceptor in the interceptor chainpostHandlewill be called in turn. You can process ModelAndView or add public model data in this method.
afterCompletionMethod: Called after DispatcherServlet completes view rendering. The methods of each interceptor in the interceptor chainafterCompletionwill be called in turn. You can perform some resource cleanup operations in this method, such as releasing resources, recording logs, etc. This method is called after the entire request processing process is completed.
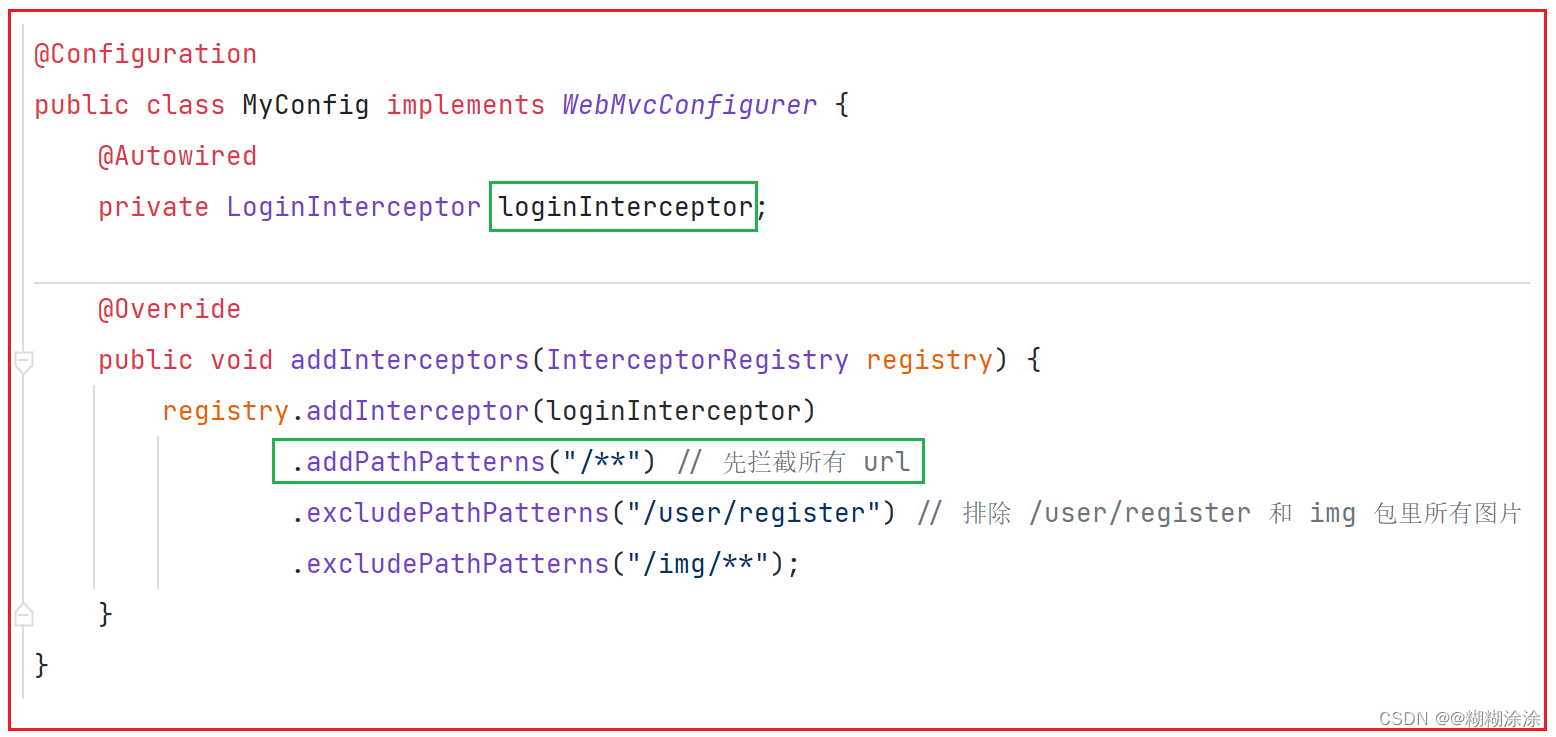
Step 2: Register interception configuration
Write a common method to implement the WebMvcConfigurer interface and override the addInterceptor method: the purpose is to configure the custom interceptor into the system configuration items and set a reasonable interception path.
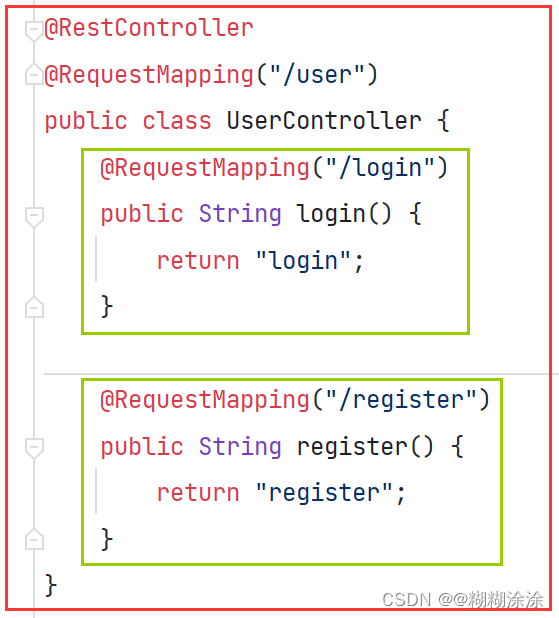
Step 3: Add Controller method
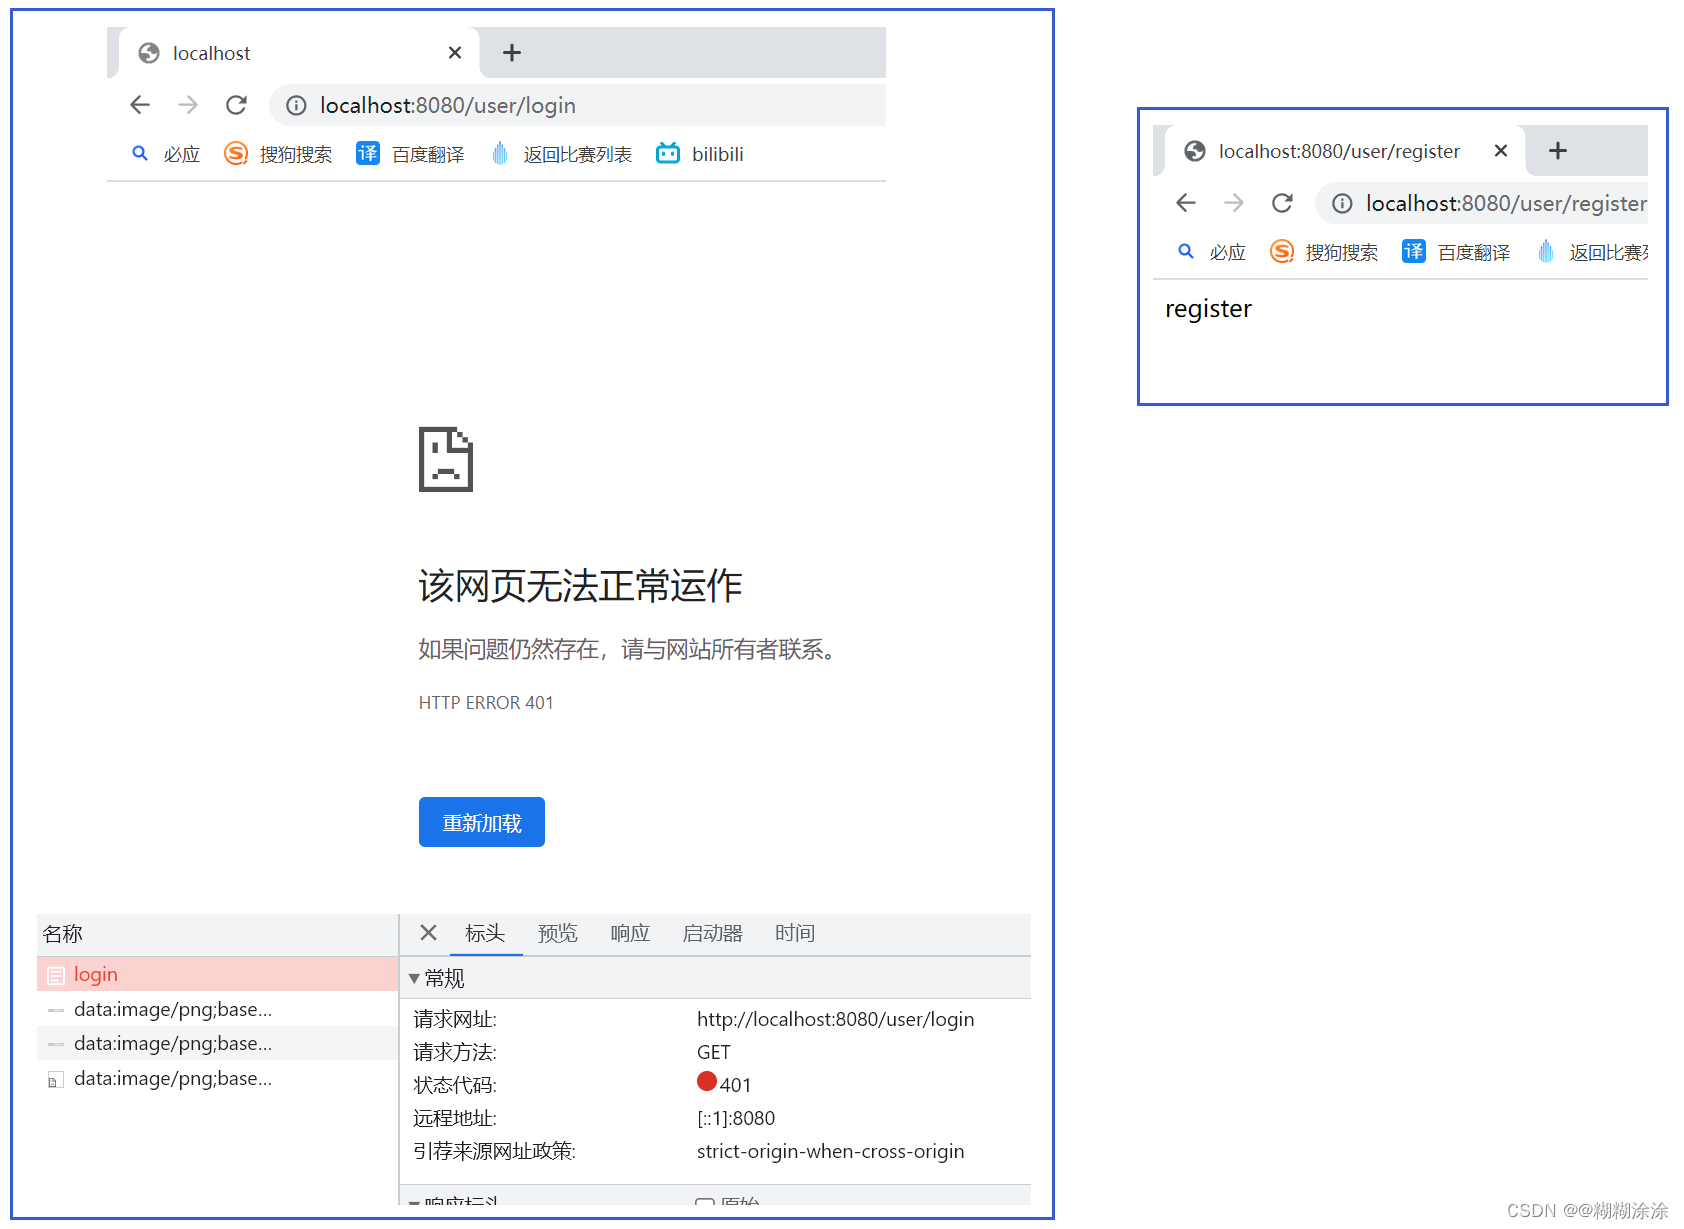
Execution effect: login cannot enter, register can enter
Extension: Add unified access prefix:
Assume a scenario. When multiple projects have URLs with the same name, how to distinguish which project they belong to during the observation process such as testing packet capture?
By adding an access prefix to the request address, the distinction can be achieved.

After adding the prefix, remember to change the interception path:

2. Unified exception handling:
Unified exception handling means that some methods may trigger the same type of exception. We can use interceptors to uniformly intercept and obtain the exceptions and return the required results according to the agreement.
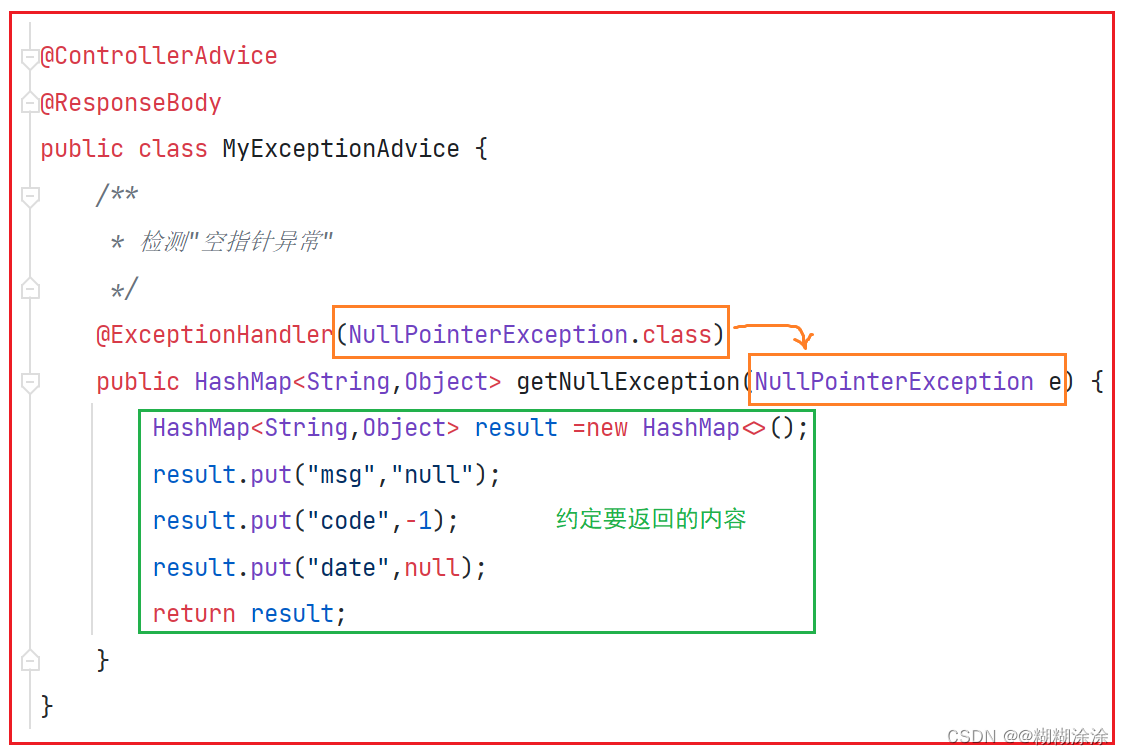
Step 1: Create exception handling classes and methods
Write a common class that contains methods for catching all exception classes. Add the @ControllerAdvice annotation to the processing class and the @ExceptionHandler annotation to the custom interception method . Pass the exception class object to be caught as a parameter within the annotation:
Step 2: Write methods that may cause exceptions
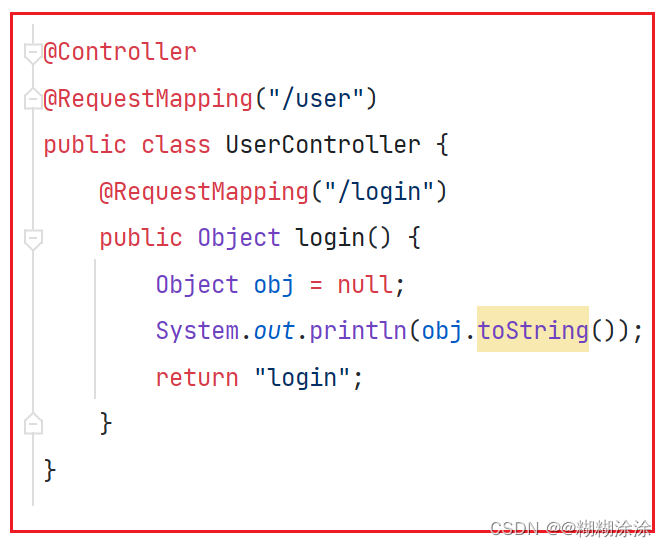
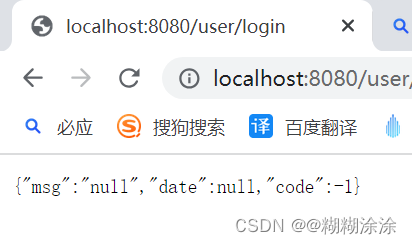
When there is exception detection, if a corresponding exception occurs, the server will still return what should be returned to the front end according to the provisions of the exception handling method:
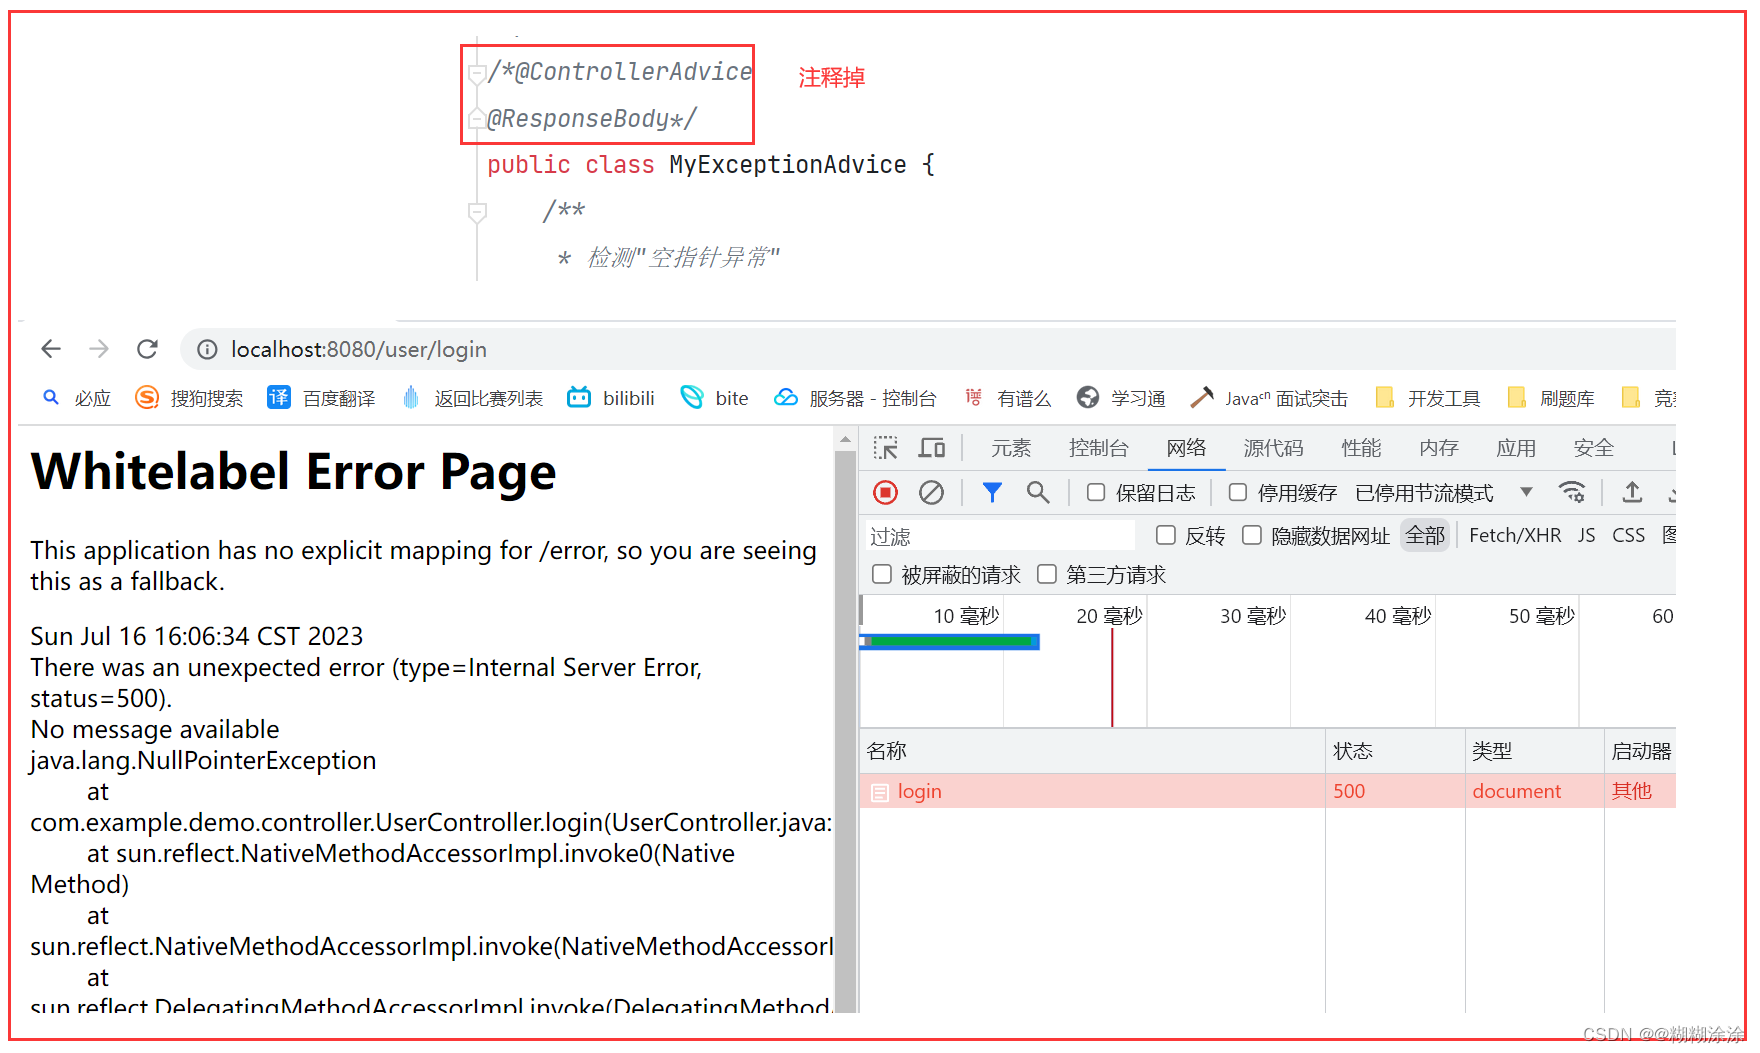
When there is no exception detection, even if a corresponding exception occurs, the server's return has nothing to do with the agreement:
2.1 Father-son anomaly:
In the above case, when there is only one exception in the @ExceptionHandler annotation parameter, only this exception can be captured and processed. If you want to handle many exceptions, you don't need to write a method for each one. You can directly pass the parent class of all exceptions in the parameter. Exception classes such as: Exception.class
If there are child exception and parent exception handling methods at the same time, the child exception detection method will be matched first.

3. Unified data format returns:
In daily development, the data format returned by each back-end business to the front-end must conform to the predetermined format. However, if some people forget the agreed format, or new people do not know the predetermined format, they may return data according to their own ideas, which will Causing business accidents.
Unified data return is implemented using the @ControllerAdvice annotation + ResponseBodyAdvice interface. We can set the return data format that conforms to the agreement in the custom class, and then intercept the data returned by each business to determine whether the data format it returns conforms to the agreement. If it does not match, re-encapsulate the data and return the data format in the interception rule.
Mandatory unified data return, data rewriting before returning data
Step 1: Create a data processing class
Write a common class, implement the ResponseAdvice interface, and override the supports() and beforeBodyWrite() methods.
- supports() method: This method is equivalent to a switch, used to tell the processing method whether to rewrite the intercepted content, and returns true to indicate that it needs to be rewritten;
- beforeBodyWrite() method: intercept the data to be returned by the business method, and rewrite the data in the wrong format before it returns its own data;

Step 2: Create two methods that may produce incorrectly formatted data
The getRet1() method returns a 1, and the getRet2() method returns a hashMap. The
correct format is a hashMap.

Summarize:
There are two problems with this custom interception data format return:
1. The value of the return content set in the processing method is hard-coded;
2. When the String type is returned, it cannot be processed into correct data;
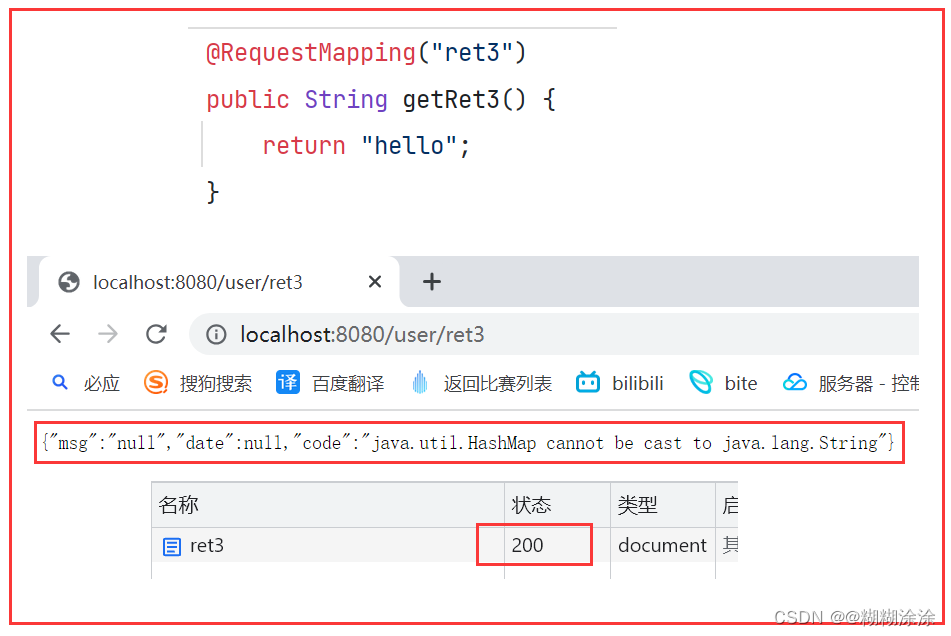
3.1 Extension: Solve the problem of errors in converting String type return values
Let's demonstrate first. The getRer3() method returns a string. The ideal state should be that it is intercepted and converted into an encapsulated hashMap for return. However, this is not done because it cannot be converted, so a class conversion exception occurs and is written before. The exception handling class caught the return exception: HashMap cannot be converted to String
wrong reason:
There must be questions: I am clearly converting String to hashMap, why is the error message the other way around?
Here you need to understand the return execution process:
- The original body returned by the original method is of String type;
- Before returning unified data: Convert String to hashMap;
- The browser will use StringHttpMessageConverter to convert the hashMap into a json string;
The problem lies in the third step. The browser uses the original body to determine whether it is of String type. If so, it uses StringHttpMessageConverter to convert the hashMap into json. It finds that it cannot be converted, so an error is reported.
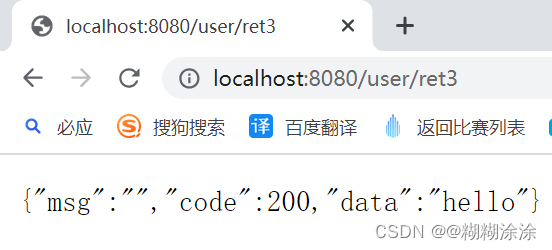
Solution 1:
When rewriting the unified data, the case where the return value is a String type is handled separately and rewritten to return a Json string (which can be spliced and jackson can be used) instead of a HashMap;
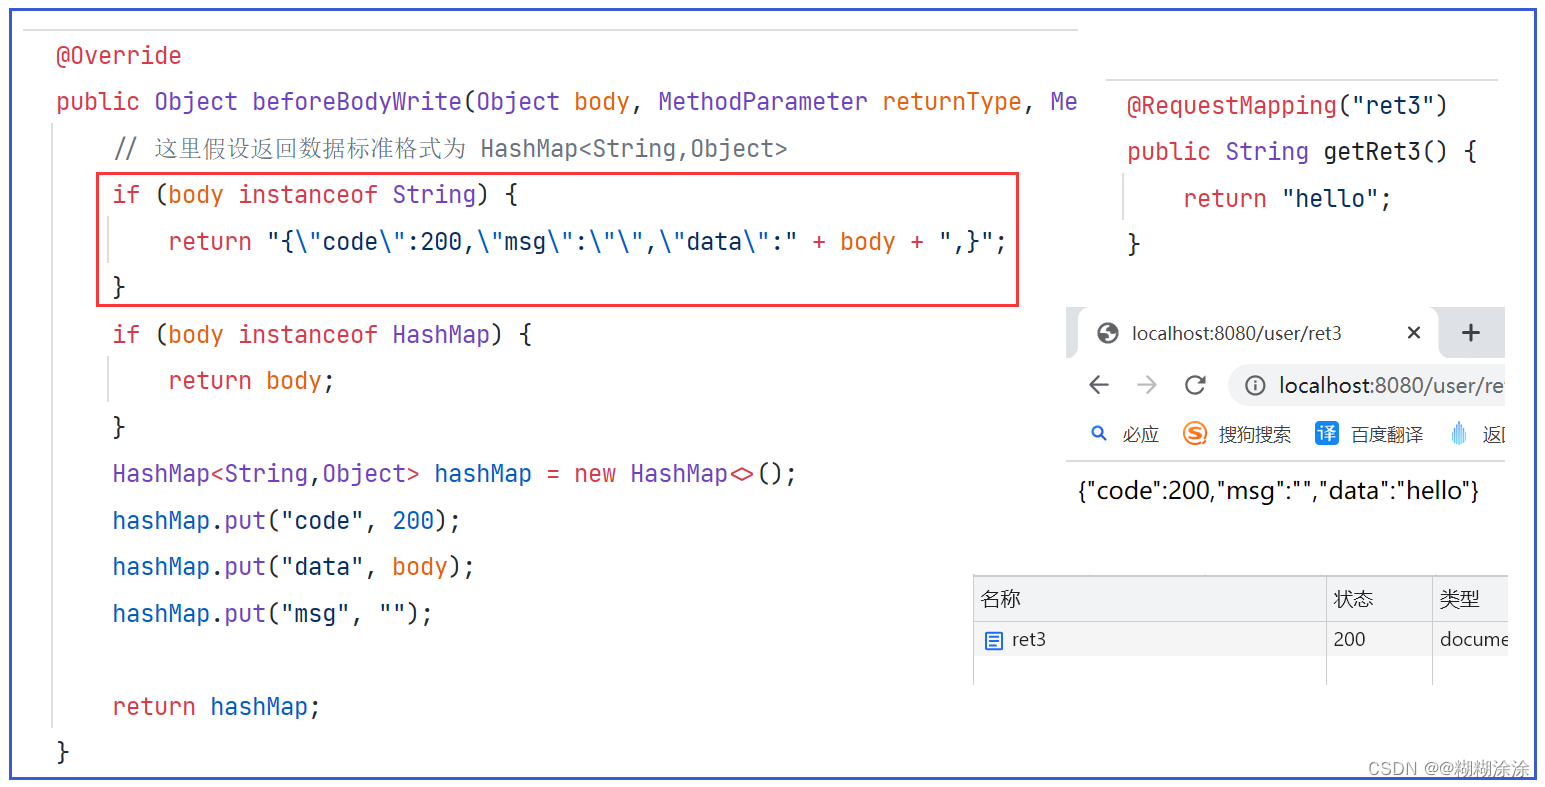
Use Jackson to convert to String:

Solution 2:
Since the problem lies with the browser's converter, then we will find a way not to use this converter;
You can manually remove the StringHttpMessageConverter converter:

This would be fine:
4. Implementation principle of interceptor:
Illustration:

All Controller execution will be implemented through a scheduler DispatcherServlet
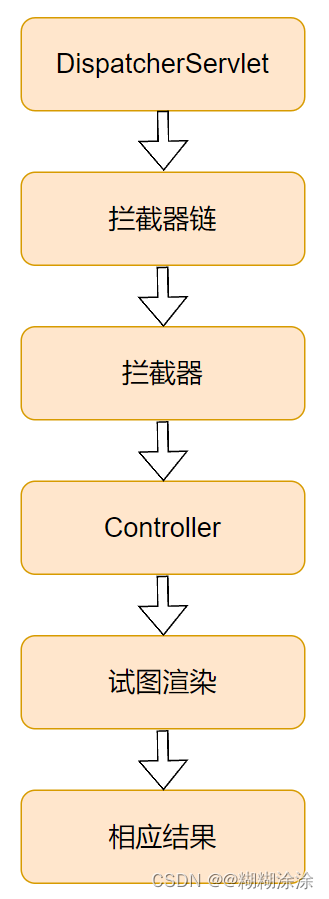
The above figure explains the implementation principle of the interceptor:
The request arrives at DispatcherServlet, which is the front-end controller responsible for receiving requests and distributing them.
DispatcherServlet calls the method of each interceptor in turn according to the configured interceptor chain.
Each interceptor in the interceptor chain implements the HandlerInterceptor interface, and the interceptor's methods will be called at different stages of request processing.
Before and after calling each interceptor method, the return value will be used to decide whether to continue executing the next interceptor or Controller method.
When all interceptor methods are executed, DispatcherServlet will render the view and generate a response result.
Through the implementation of interceptors, request processing can be intercepted and processed at different stages to implement some common functions, such as permission verification, logging, exception handling, etc. The implementation principle of the interceptor is based on Java's reflection mechanism and design pattern, and a proxy object is generated through a dynamic proxy to implement the calling of the interceptor.