This article will learn Spring Boot’s unified function processing module, which is also the actual part of AOP
- The verification of user login permissions implements the interface HandlerInterceptor + WebMvcConfigurer
- Exception handling uses annotations @RestControllerAdvice + @ExceptionHandler
- The data format is returned using the annotation @ControllerAdvice and implementing the interface @ResponseBodyAdvice
1. Unified user login authority verification
The development and improvement process of user login authority
最初用户登录效验:在每个方法中获取 Session 和 Session 中的用户信息,如果存在用户,那么就认为登录成功了,否则就登录失败了
第二版用户登录效验:提供统一的方法,在每个需要验证的方法中调用统一的用户登录身份效验方法来判断
第三版用户登录效验:使用 Spring AOP 来统一进行用户登录效验
第四版用户登录效验:使用 Spring 拦截器来实现用户的统一登录验证
1.1 The initial user login authority verification
@RestController
@RequestMapping("/user")
public class UserController {


    @RequestMapping("/a1")
    public Boolean login (HttpServletRequest request) {


        // 有 Session 就获取,没有就不创建
        HttpSession session = request.getSession(false);
        if (session != null && session.getAttribute("userinfo") != null) {


            // 说明已经登录,进行业务处理
            return true;
        } else {


            // 未登录
            return false;
        }
    }

    @RequestMapping("/a2")
    public Boolean login2 (HttpServletRequest request) {


        // 有 Session 就获取,没有就不创建
        HttpSession session = request.getSession(false);
        if (session != null && session.getAttribute("userinfo") != null) {


            // 说明已经登录,进行业务处理
            return true;
        } else {


            // 未登录
            return false;
        }
    }
}
The code written in this way has the same user login verification authority in each method. The disadvantages are:
每个方法中都要单独写用户登录验证的方法,即使封装成公共方法,也一样要传参调用和在方法中进行判断
添加控制器越多,调用用户登录验证的方法也越多,这样就增加了后期的修改成功和维护成功
这些用户登录验证的方法和现在要实现的业务几乎没有任何关联,但还是要在每个方法中都要写一遍,所以提供一个公共的 AOP 方法来进行统一的用户登录权限验证是非常好的解决办法 。
1.2 Spring AOP unified user login authentication
Unified user login authentication, the first thought of implementation method is to use Spring AOP pre-notification or surround notification to achieve
@Aspect // 当前类是一个切面
@Component
public class UserAspect {


    // 定义切点方法 Controller 包下、子孙包下所有类的所有方法
    @Pointcut("execution(* com.example.springaop.controller..*.*(..))")
    public void  pointcut(){

    }

    // 前置通知
    @Before("pointcut()")
    public void doBefore() {

    }

    // 环绕通知
    @Around("pointcut()")
    public Object doAround(ProceedingJoinPoint joinPoint) {


        Object obj = null;
        System.out.println("Around 方法开始执行");
        try {


            obj = joinPoint.proceed();
        } catch (Throwable e) {


            e.printStackTrace();
        }
        System.out.println("Around 方法结束执行");
        return obj;
    }
}
However, if the function of user login permission verification is only implemented in the aspect of the above code Spring AOP, there are two problems:
没有办法得到 HttpSession 和 Request 对象
我们要对一部分方法进行拦截,而另一部分方法不拦截,比如注册方法和登录方法是不拦截的,也就是实际的拦截规则很复杂,使用简单的 aspectJ 表达式无法满足拦截的需求
1.3 Spring Interceptors
In response to the problem of Spring AOP in the above code, Spring provides a specific implementation interceptor: HandlerInterceptor. The implementation of the interceptor has two steps:
1.创建自定义拦截器,实现 Spring 中的 HandlerInterceptor 接口中的 preHandle方法
2.将自定义拦截器加入到框架的配置中,并且设置拦截规则
	给当前的类添加 @Configuration 注解
	实现 WebMvcConfigurer 接口
	重写 addInterceptors 方法
Note: Multiple interceptors can be configured in a project at the same time
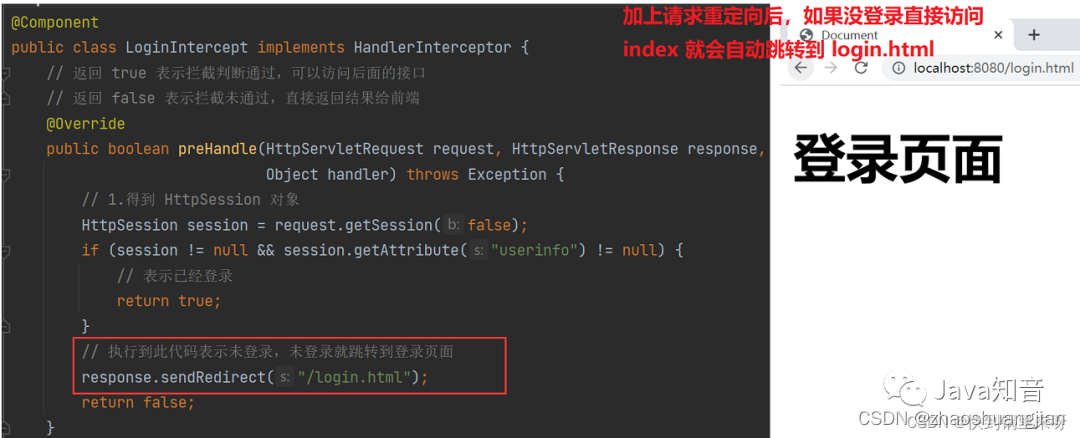
(1) Create a custom interceptor
/**
 * @Description: 自定义用户登录的拦截器
 * @Date 2023/2/13 13:06
 */
@Component
public class LoginIntercept implements HandlerInterceptor {


    // 返回 true 表示拦截判断通过,可以访问后面的接口
    // 返回 false 表示拦截未通过,直接返回结果给前端
    @Override
    public boolean preHandle(HttpServletRequest request, HttpServletResponse response,
                             Object handler) throws Exception {


        // 1.得到 HttpSession 对象
        HttpSession session = request.getSession(false);
        if (session != null && session.getAttribute("userinfo") != null) {


            // 表示已经登录
            return true;
        }
        // 执行到此代码表示未登录,未登录就跳转到登录页面
        response.sendRedirect("/login.html");
        return false;
    }
}
(2) Add the custom interceptor to the system configuration and set the interception rules
addPathPatterns: indicates the URL to be intercepted, ** indicates to intercept all methods
excludePathPatterns: indicates the URL to be excluded
Description: Intercepting rules can intercept URLs used in this project, including static files (image files, JS and CSS files, etc.).
/**
 * @Description: 将自定义拦截器添加到系统配置中,并设置拦截的规则
 * @Date 2023/2/13 13:13
 */
@Configuration
public class AppConfig implements WebMvcConfigurer {


    @Resource
    private LoginIntercept loginIntercept;

    @Override
    public void addInterceptors(InterceptorRegistry registry) {


//        registry.addInterceptor(new LoginIntercept());//可以直接new 也可以属性注入
        registry.addInterceptor(loginIntercept).
                addPathPatterns("/**").    // 拦截所有 url
                excludePathPatterns("/user/login"). //不拦截登录注册接口
                excludePathPatterns("/user/reg").
                excludePathPatterns("/login.html").
                excludePathPatterns("/reg.html").
                excludePathPatterns("/**/*.js").
                excludePathPatterns("/**/*.css").
                excludePathPatterns("/**/*.png").
                excludePathPatterns("/**/*.jpg");
    }
}
1.4 Exercise: Login Interceptor
Require
登录、注册页面不拦截,其他页面都拦截
当登录成功写入 session 之后,拦截的页面可正常访问
In 1.3, a custom interceptor has been created and added to the system configuration, and the rules for interception have been set
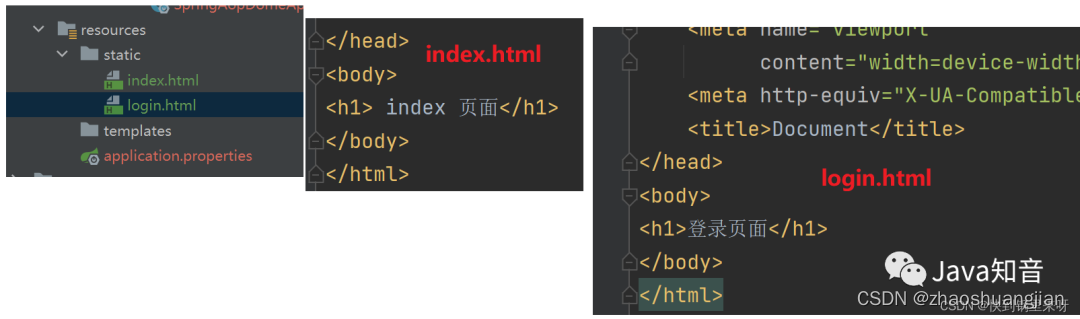
(1) Create the login and home page html below
(2) Create a controller package, create a UserController in the package, and write the business code for the login page and home page
@RestController
@RequestMapping("/user")
public class UserController {
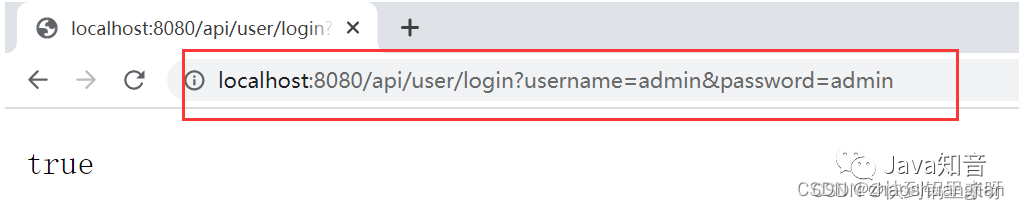
@RequestMapping("/login")
public boolean login(HttpServletRequest request,String username, String password) {
boolean result = false;
if (StringUtils.hasLength(username) && StringUtils.hasLength(password)) {
if(username.equals("admin") && password.equals("admin")) {
HttpSession session = request.getSession();
session.setAttribute("userinfo","userinfo");
return true;
}
}
return result;
}
@RequestMapping("/index")
public String index() {
return "Hello Index";
}
}
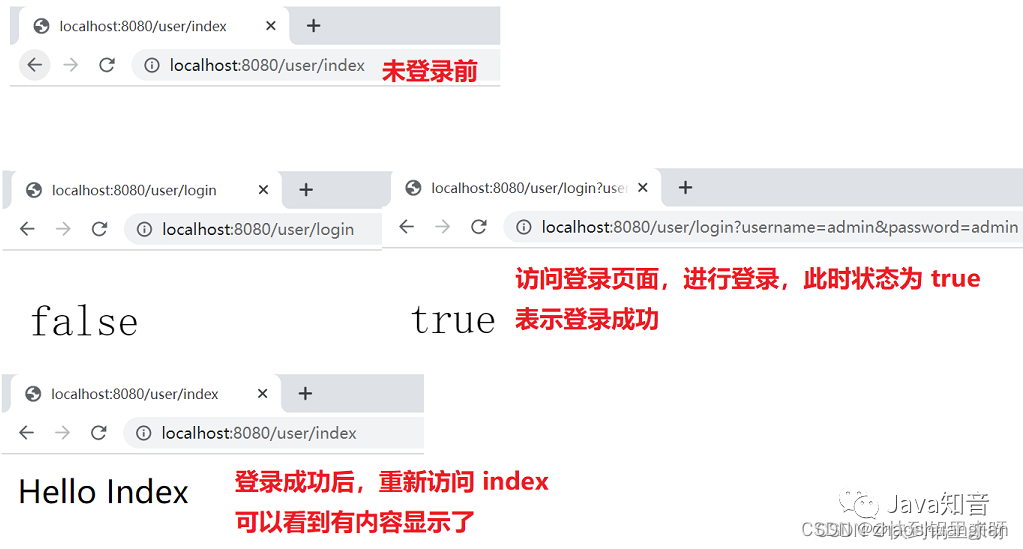
(3) Run the program, visit the page, and compare the effect before and after login
1.5 Implementation Principle of Interceptor
With the interceptor, the corresponding business processing will be performed before calling the Controller. The execution process is shown in the figure below
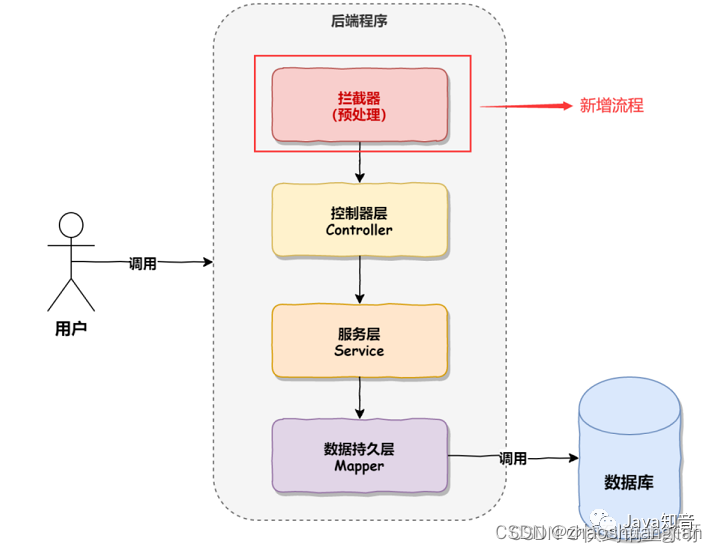
Implementation principle source code analysis
All Controller execution will be implemented through a dispatcher DispatcherServlet

And all methods will execute the doDispatch scheduling method in DispatcherServlet. The source code analysis of doDispatch is as follows:
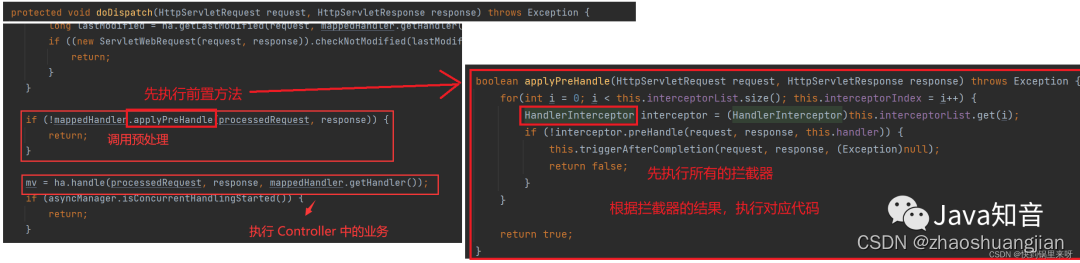
Through source code analysis, it can be seen that the interceptor in Sping is also realized through the idea of dynamic proxy and surround notification
1.6 Adding a unified access prefix
Add api prefix to all request addresses, c means all
@Configuration
public class AppConfig implements WebMvcConfigurer {


    // 所有的接口添加 api 前缀
    @Override
    public void configurePathMatch(PathMatchConfigurer configurer) {


        configurer.addPathPrefix("api", c -> true);
    }
}
2. Unified exception handling
Add @ControllerAdvice to the current class to indicate the controller notification class
Add @ExceptionHandler(xxx.class) to the method to indicate the exception handler, and add the business code returned by the exception
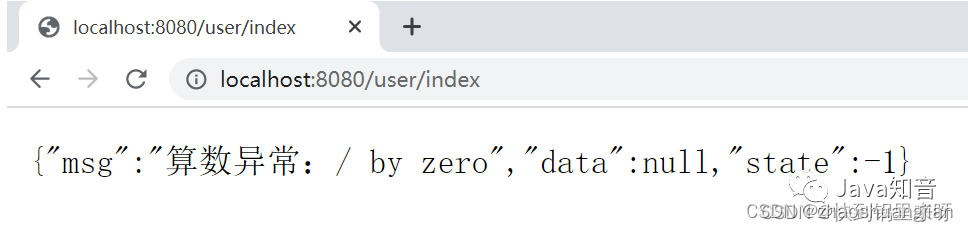
@RestController
@RequestMapping("/user")
public class UserController {


    @RequestMapping("/index")
    public String index() {


        int num = 10/0;
        return "Hello Index";
    }
}
In the config package, create the MyExceptionAdvice class
@RestControllerAdvice // 当前是针对 Controller 的通知类(增强类)
public class MyExceptionAdvice {


    @ExceptionHandler(ArithmeticException.class)
    public HashMap<String,Object> arithmeticExceptionAdvice(ArithmeticException e) {


        HashMap<String, Object> result = new HashMap<>();
        result.put("state",-1);
        result.put("data",null);
        result.put("msg" , "算出异常:"+ e.getMessage());
        return result;
    }
}
You can also write like this, the effect is the same
@ControllerAdvice
public class MyExceptionAdvice {


    @ExceptionHandler(ArithmeticException.class)
    @ResponseBody
    public HashMap<String,Object> arithmeticExceptionAdvice(ArithmeticException e) {


        HashMap<String, Object> result = new HashMap<>();
        result.put("state",-1);
        result.put("data",null);
        result.put("msg" , "算数异常:"+ e.getMessage());
        return result;
    }
}
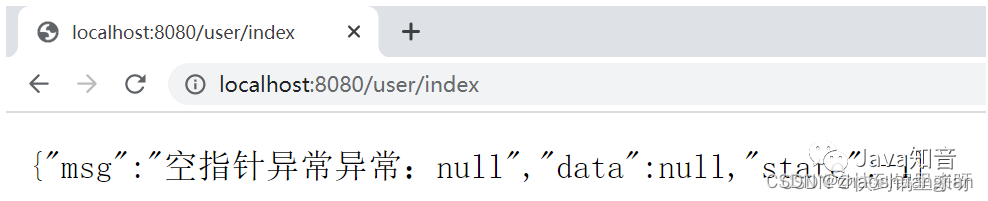
If there is another null pointer exception, then the above code will not work, and a handler for null pointer exceptions must be written
@ExceptionHandler(NullPointerException.class)
public HashMap<String,Object> nullPointerExceptionAdvice(NullPointerException e) {


    HashMap<String, Object> result = new HashMap<>();
    result.put("state",-1);
    result.put("data",null);
    result.put("msg" , "空指针异常异常:"+ e.getMessage());
    return result;
}
@RequestMapping("/index")
public String index(HttpServletRequest request,String username, String password) {


    Object obj = null;
    System.out.println(obj.hashCode());
    return "Hello Index";
}
But one thing to consider is that if every exception is written like this, the workload will be very large, and there are custom exceptions, so it is definitely not good to write like this above. Since it is an exception, just write Exception directly. It is the parent class of all exceptions. If you encounter two exceptions that are not written above, it will directly match Exception
When there are multiple exception notifications, the matching order is for the current class and its subclasses to match upwards
@ExceptionHandler(Exception.class)
public HashMap<String,Object> exceptionAdvice(Exception e) {


    HashMap<String, Object> result = new HashMap<>();
    result.put("state",-1);
    result.put("data",null);
    result.put("msg" , "异常:"+ e.getMessage());
    return result;
}
You can see that the priority match is still the null pointer exception written earlier

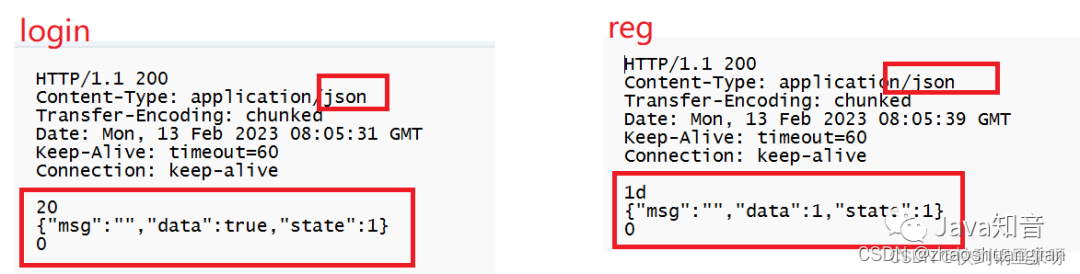
3. Unified data format return
3.1 Realization of unified data format return
1. Add @ControllerAdvice to the current class
2. Implement ResponseBodyAdvice and override its method
supports 方法,此方法表示内容是否需要重写(通过此⽅法可以选择性部分控制器和方法进行重写),如果要重写返回 true
beforeBodyWrite 方法,方法返回之前调用此方法
@ControllerAdvice
public class MyResponseAdvice implements ResponseBodyAdvice {


    // 返回一个 boolean 值,true 表示返回数据之前对数据进行重写,也就是会进入 beforeBodyWrite 方法
    // 返回 false 表示对结果不进行任何处理,直接返回
    @Override
    public boolean supports(MethodParameter returnType, Class converterType) {


        return true;
    }

    // 方法返回之前调用此方法
    @Override
    public Object beforeBodyWrite(Object body, MethodParameter returnType, MediaType selectedContentType, Class selectedConverterType, ServerHttpRequest request, ServerHttpResponse response) {


        HashMap<String,Object> result = new HashMap<>();
        result.put("state",1);
        result.put("data",body);
        result.put("msg","");
        return result;
    }
}
@RestController
@RequestMapping("/user")
public class UserController {


    @RequestMapping("/login")
    public boolean login(HttpServletRequest request,String username, String password) {


        boolean result = false;
        if (StringUtils.hasLength(username) && StringUtils.hasLength(password)) {


            if(username.equals("admin") && password.equals("admin")) {


                HttpSession session = request.getSession();
                session.setAttribute("userinfo","userinfo");
                return true;
            }
        }
        return result;
    }

    @RequestMapping("/reg")
    public int reg() {


        return 1;
    }
}
3.2 @ControllerAdvice source code analysis
Through the analysis of @ControllerAdvice source code, we can know the execution flow of the above unified exception and unified data return
(1) First look at the source code of @ControllerAdvice
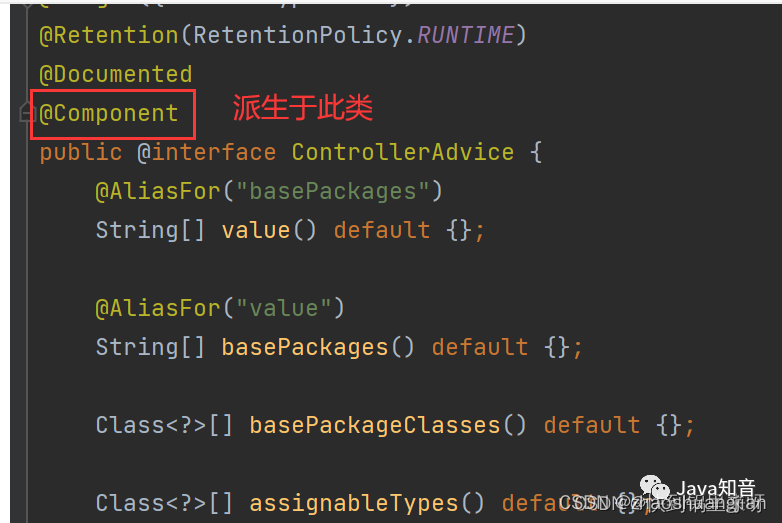
You can see that @ControllerAdvice is derived from the @Component component and all component initialization will call the InitializingBean interface
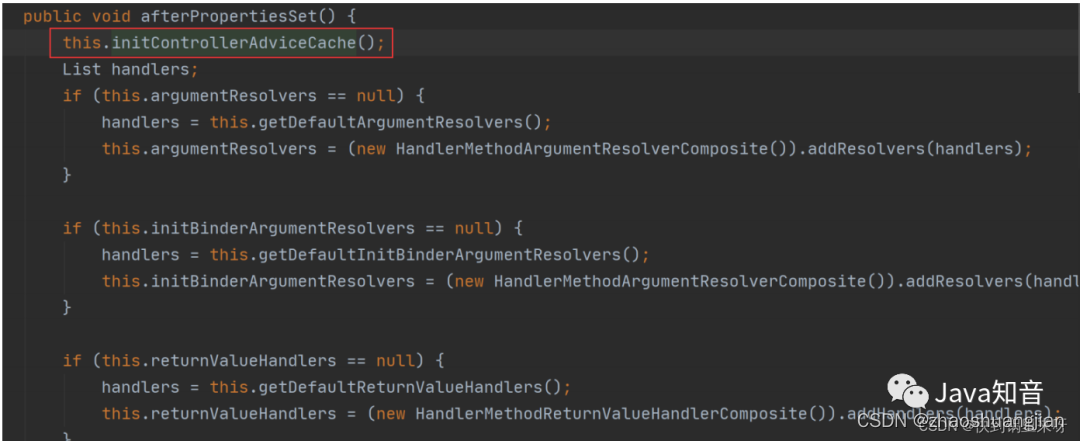
(2) Let's check which implementation classes initializeBean has
During the query process, it was found that the implementation subclass in Spring MVC is RequestMappingHandlerAdapter, which has a method afterPropertiesSet() method, which indicates the method to be executed after all parameter settings are completed.
(3) And there is an initControllerAdviceCache method in this method, query this method
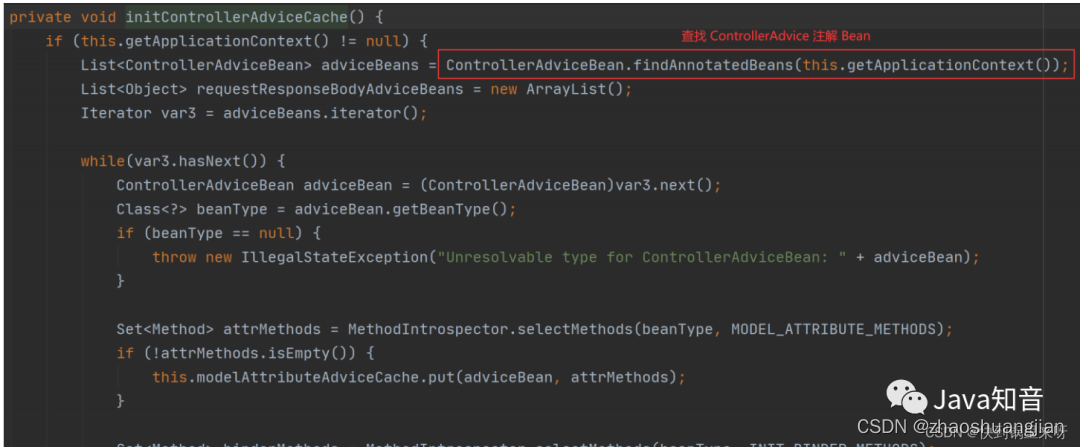
It is found that this method will search and use all @ControllerAdvice classes during execution. When an event is sent, the corresponding Advice method will be called, such as calling unified data encapsulation before returning data. For example, if an exception occurs, it is implemented by calling the abnormal Advice method