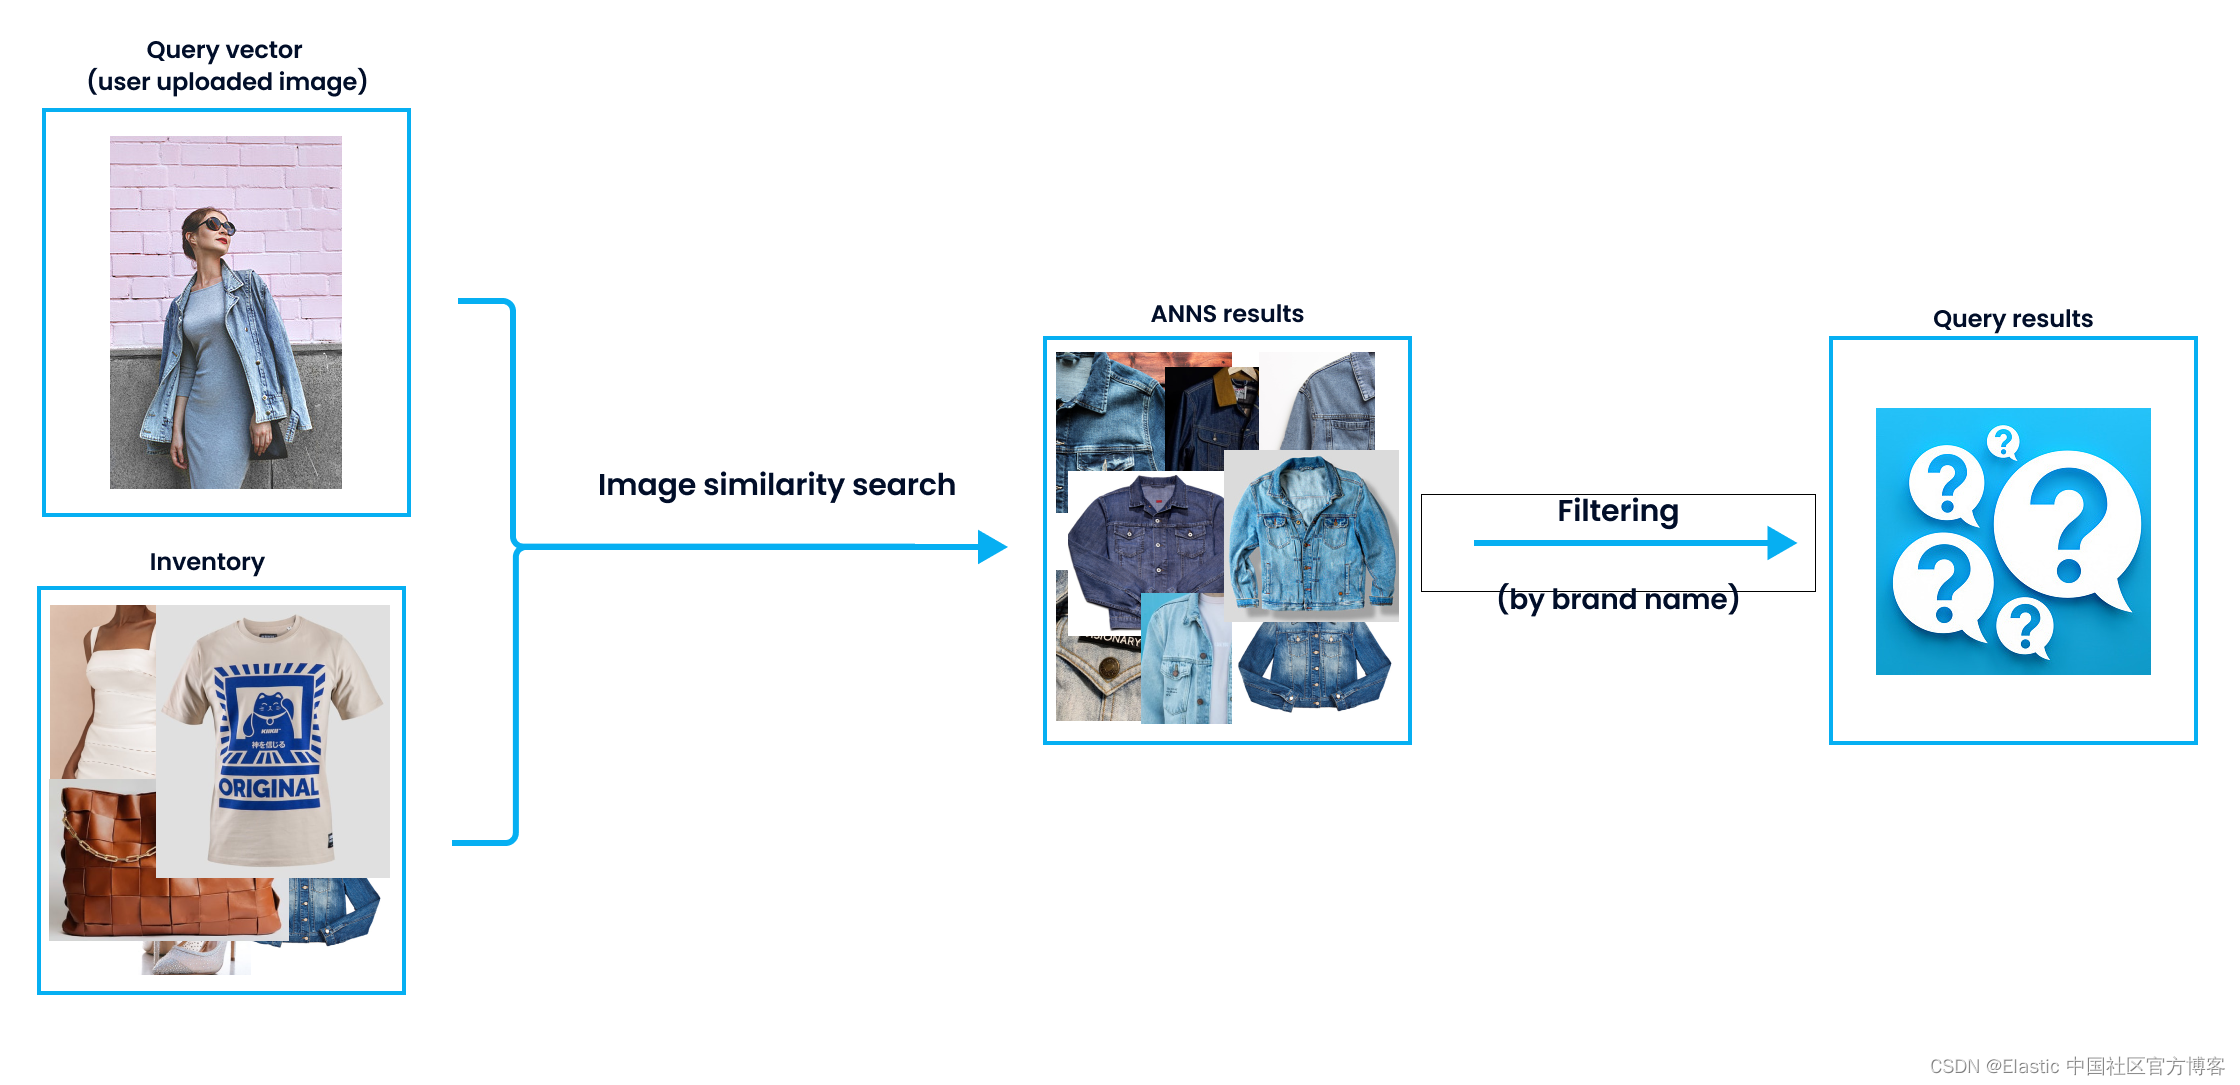
Large language models (LLMs) are being developed every day, a situation that facilitates the scaling of semantic search. LLM is good at analyzing text and revealing semantic similarities. This situation is also reflected in search engines, because semantic search engines can provide users with more satisfactory results.
Although large language models can capture semantically close results, implementing filters in search results is critical to enhancing user experience. For example, incorporating date- or category-based filters can significantly improve a more satisfying search experience. So, how can you effectively combine semantic search with filtering?
In today's presentation, I will use the latest Elastic Stack 8.9.0 to demonstrate. For the convenience of everyone to learn, please download all data at the address https://github.com/liu-xiao-guo/elasticsearch-vector-search/ .
Install
If you have not installed your own Elasticsearch and Kibana, please refer to my previous article:
When installing, we choose the latest Elastic Stack 8.x to install. By default, Elasticsearch comes with HTTPS secure access. When Elasticsearch starts for the first time, we record the username and password of the superuser elastic:
✅ Elasticsearch security features have been automatically configured!
✅ Authentication is enabled and cluster connections are encrypted.
ℹ️ Password for the elastic user (reset with `bin/elasticsearch-reset-password -u elastic`):
p1k6cT4a4bF+pFYf37Xx
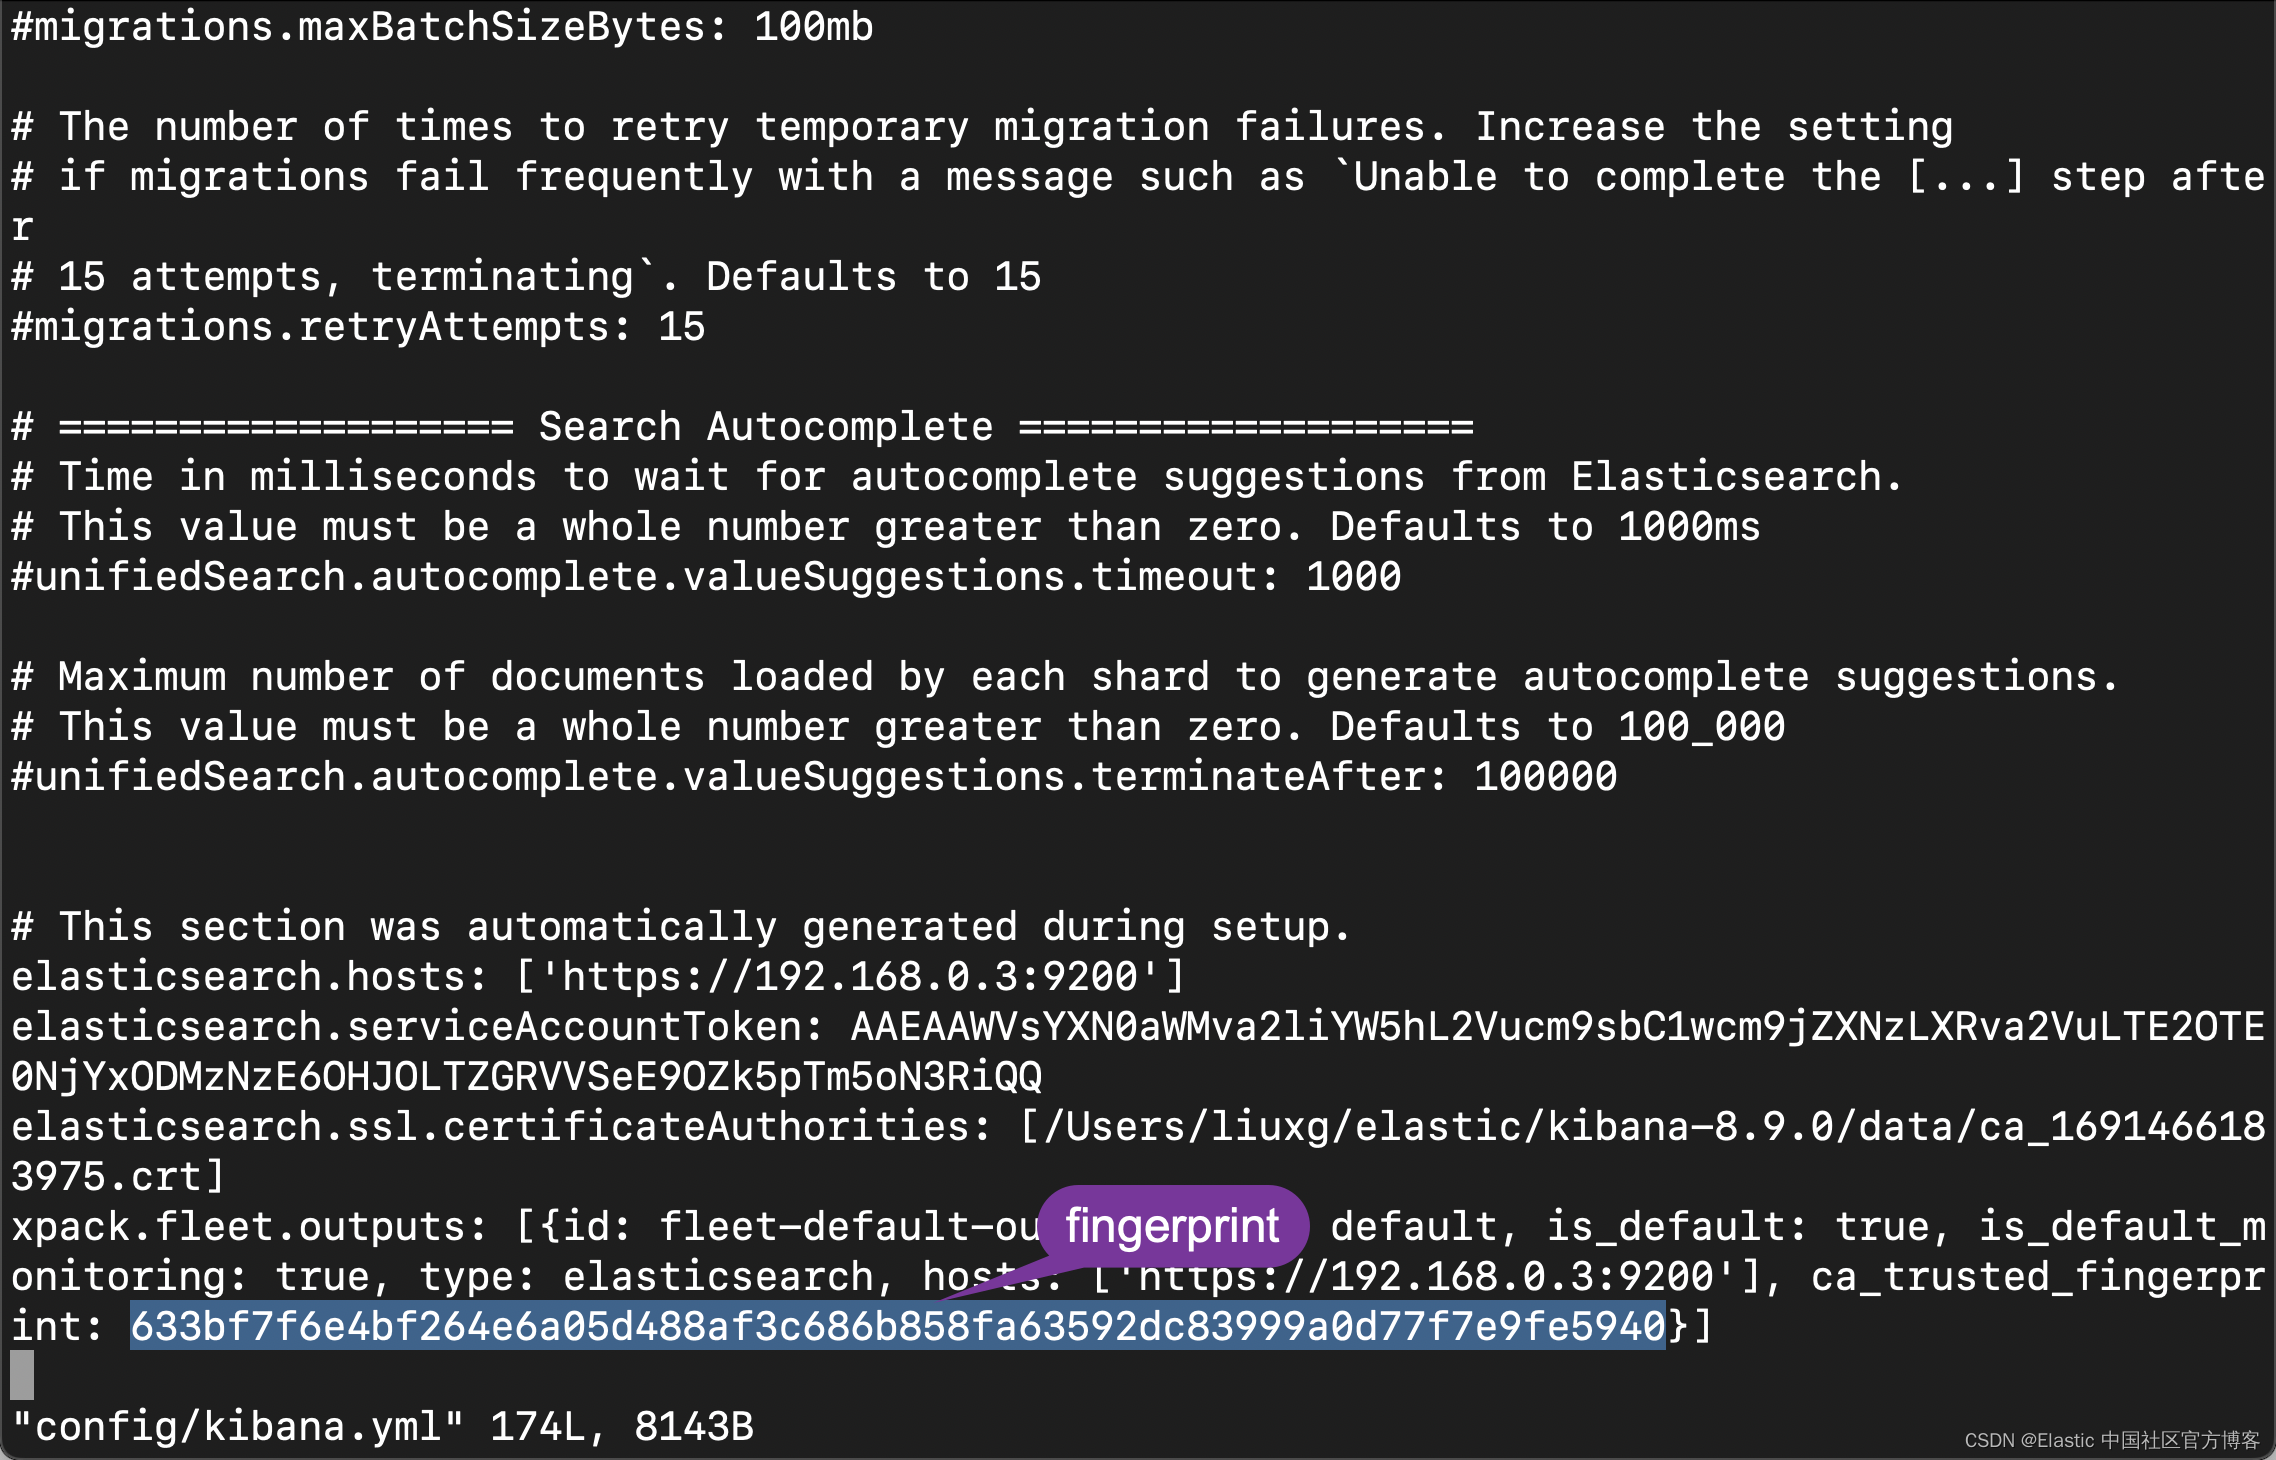
ℹ️ HTTP CA certificate SHA-256 fingerprint:
633bf7f6e4bf264e6a05d488af3c686b858fa63592dc83999a0d77f7e9fe5940
ℹ️ Configure Kibana to use this cluster:
• Run Kibana and click the configuration link in the terminal when Kibana starts.
• Copy the following enrollment token and paste it into Kibana in your browser (valid for the next 30 minutes):
eyJ2ZXIiOiI4LjkuMCIsImFkciI6WyIxOTIuMTY4LjAuMzo5MjAwIl0sImZnciI6IjYzM2JmN2Y2ZTRiZjI2NGU2YTA1ZDQ4OGFmM2M2ODZiODU4ZmE2MzU5MmRjODM5OTlhMGQ3N2Y3ZTlmZTU5NDAiLCJrZXkiOiJ3WEE3MDRrQkxxWTFWWGY0QWRHbDpCa0VZVXZmaFFidWNPOFUxdXJwXzZnIn0=
ℹ️ Configure other nodes to join this cluster:
• On this node:
⁃ Create an enrollment token with `bin/elasticsearch-create-enrollment-token -s node`.
⁃ Uncomment the transport.host setting at the end of config/elasticsearch.yml.
⁃ Restart Elasticsearch.
• On other nodes:
⁃ Start Elasticsearch with `bin/elasticsearch --enrollment-token <token>`, using the enrollment token that you generated.Vocabulary Search - Basic Search
Let's start with an Elasticsearch connection and a basic search query. We use Python for demonstration. We need to install the required Python packages:
pip3 install elasticsearch
pip3 install Config
For a link to Elasticsearch, see " Elasticsearch: Everything You Need to Know About Using Elasticsearch in Python - 8.x ". We modify the following file simple.cfg in the downloaded code:
simple.cfg
ES_PASSWORD: "p1k6cT4a4bF+pFYf37Xx"
ES_FINGERPRINT: "633bf7f6e4bf264e6a05d488af3c686b858fa63592dc83999a0d77f7e9fe5940"
ES_PASSWORD above is the password we displayed when Elasticsearch first started, and the value of ES_FINGERPRINT is the fingerprint of http_ca.crt. We can also see this when Elasticsearch starts up for the first time. If you already can't find this display, then you can refer to the article " Elasticsearch: Everything you need to know about using Elasticsearch in Python - 8.x " to learn how to get this. Another relatively simple method is to open the config/kibana.yml file:
We use jupyter to open the file es-intro.ipynb:
from elasticsearch import Elasticsearch
from config import Config

with open('simple.cfg') as f:
    cfg = Config(f)

print(cfg['ES_FINGERPRINT'])
print(cfg['ES_PASSWORD'])

client = Elasticsearch(
    'https://localhost:9200',
    ssl_assert_fingerprint = cfg['ES_FINGERPRINT'],
    basic_auth=('elastic', cfg['ES_PASSWORD'])
)

client.info()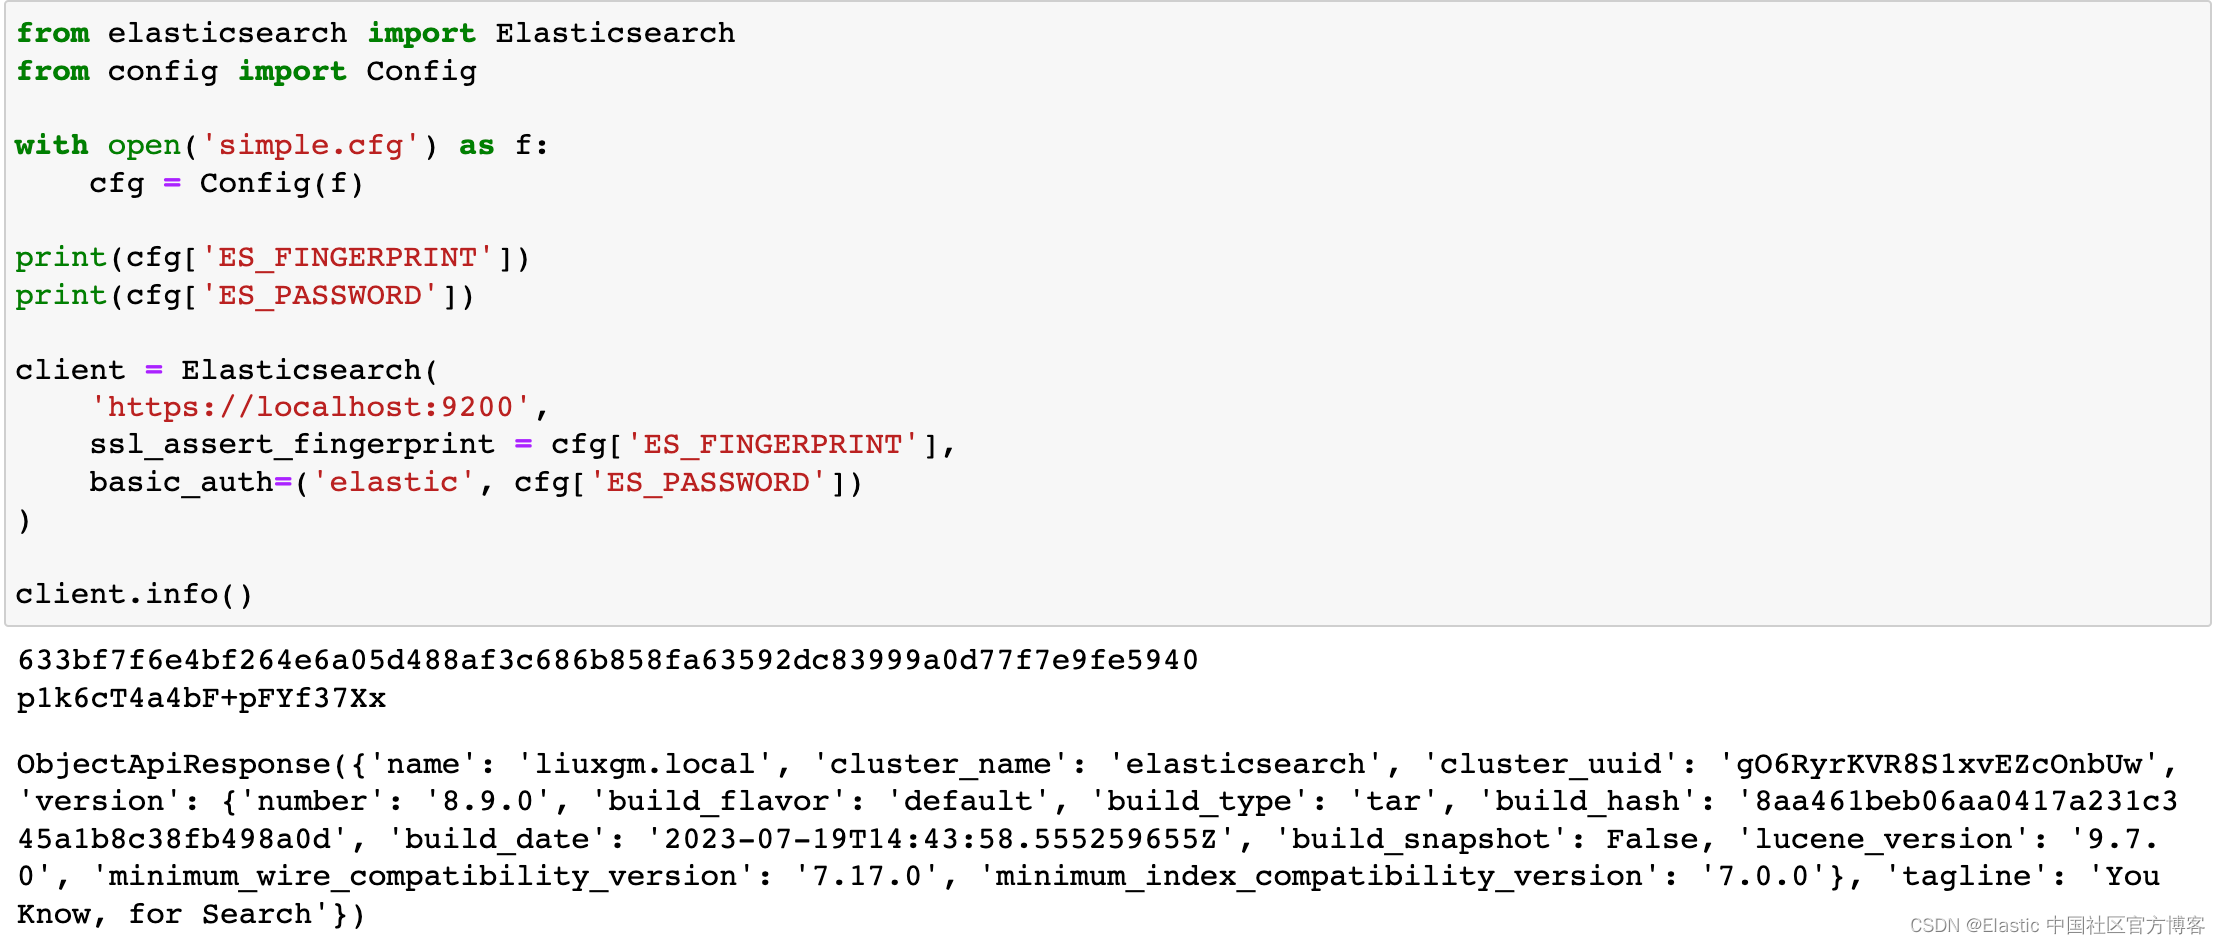
Clearly our code is successfully connecting to Elasticsearch.
We use the following code to read the file:
import json
with open('data.json', 'r') as f:
    data = json.load(f)

for book in data:
    print(book)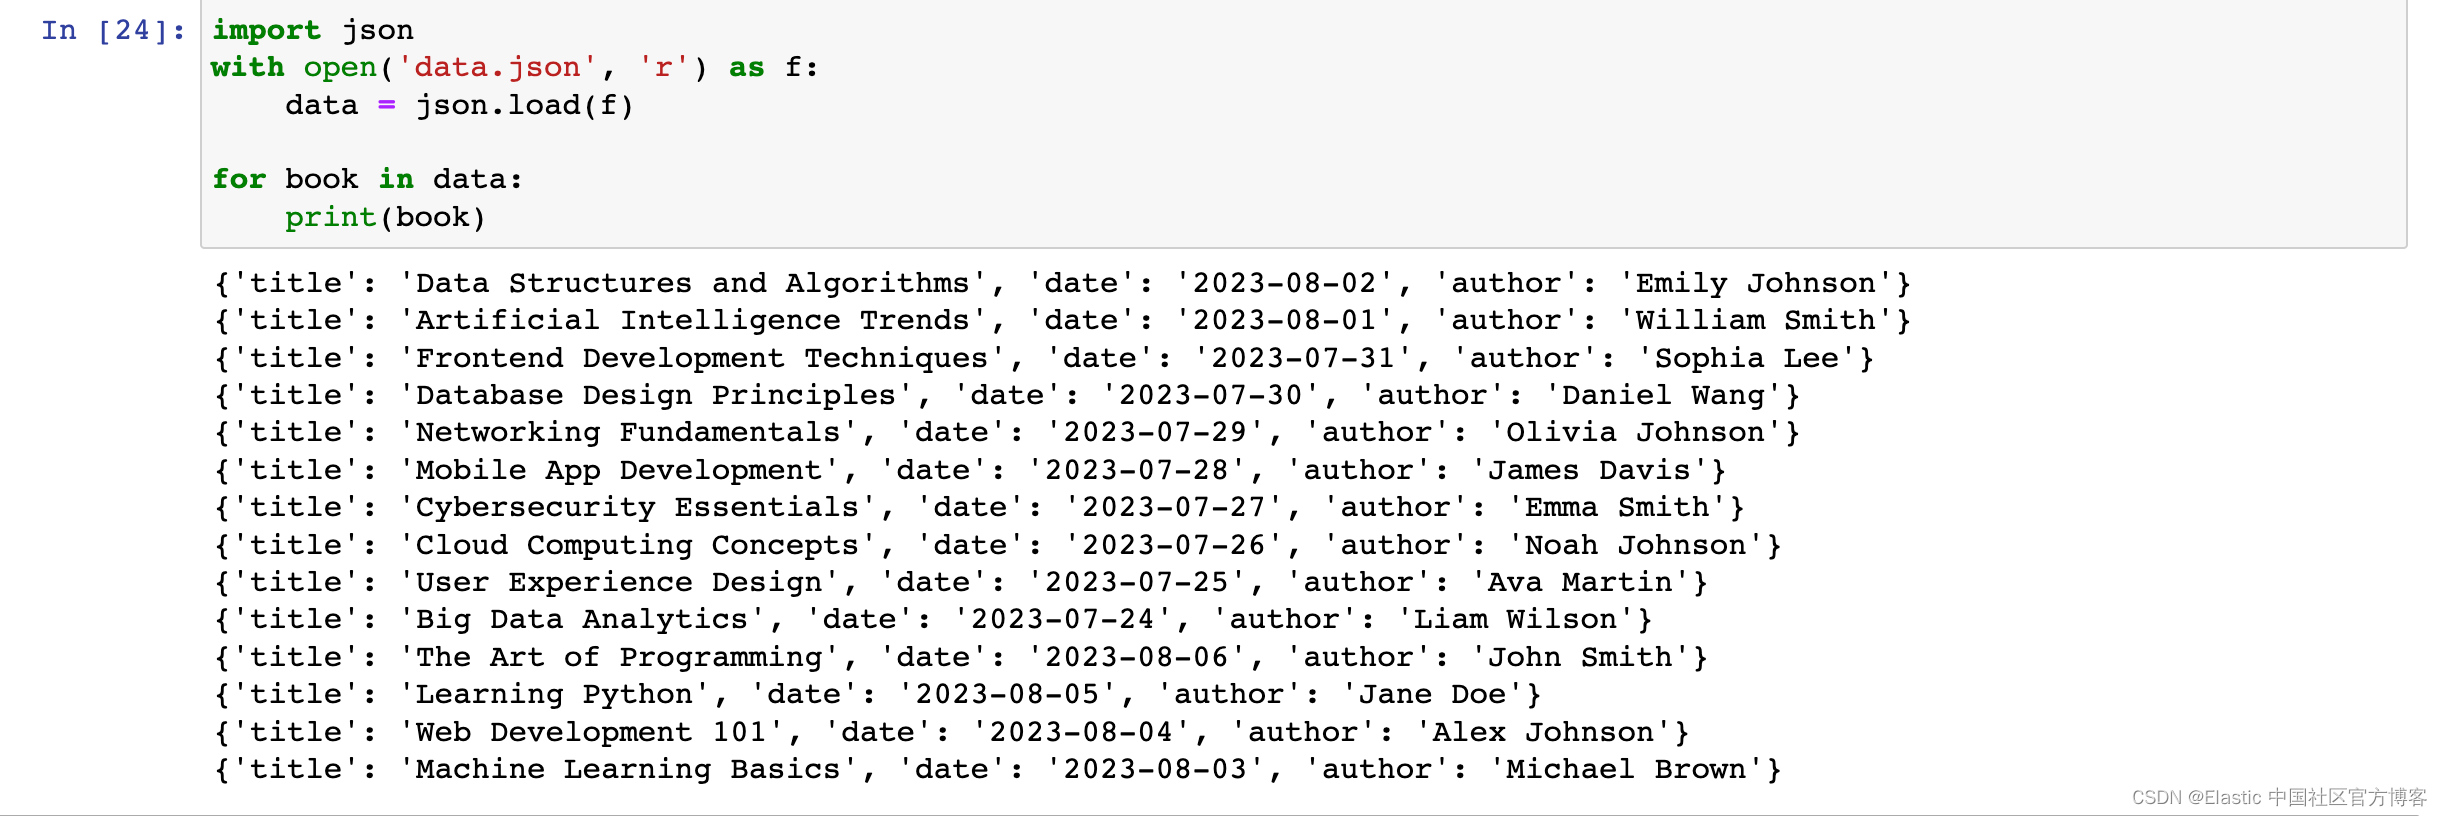
The dataset I will be using in this post was generated by ChatGPT and follows the above format.
We first check to see if the book_index index has been created. If so, delete the index:
INDEX_NAME = "book_index"

if(client.indices.exists(index=INDEX_NAME)):
    print("The index has already existed, going to remove it")
    client.options(ignore_status=404).indices.delete(index=INDEX_NAME)
We use the following code to write data to Elasticsearch:
book_mappings = {
    "properties": {
        "title": {"type": "text"},
        "author": {"type": "text"},
        "date": {"type": "date"}
    }
}

client.indices.create(index = INDEX_NAME, mappings = book_mappings)

for each in data:
    client.index(index = INDEX_NAME, document = each)
client.indices.refresh()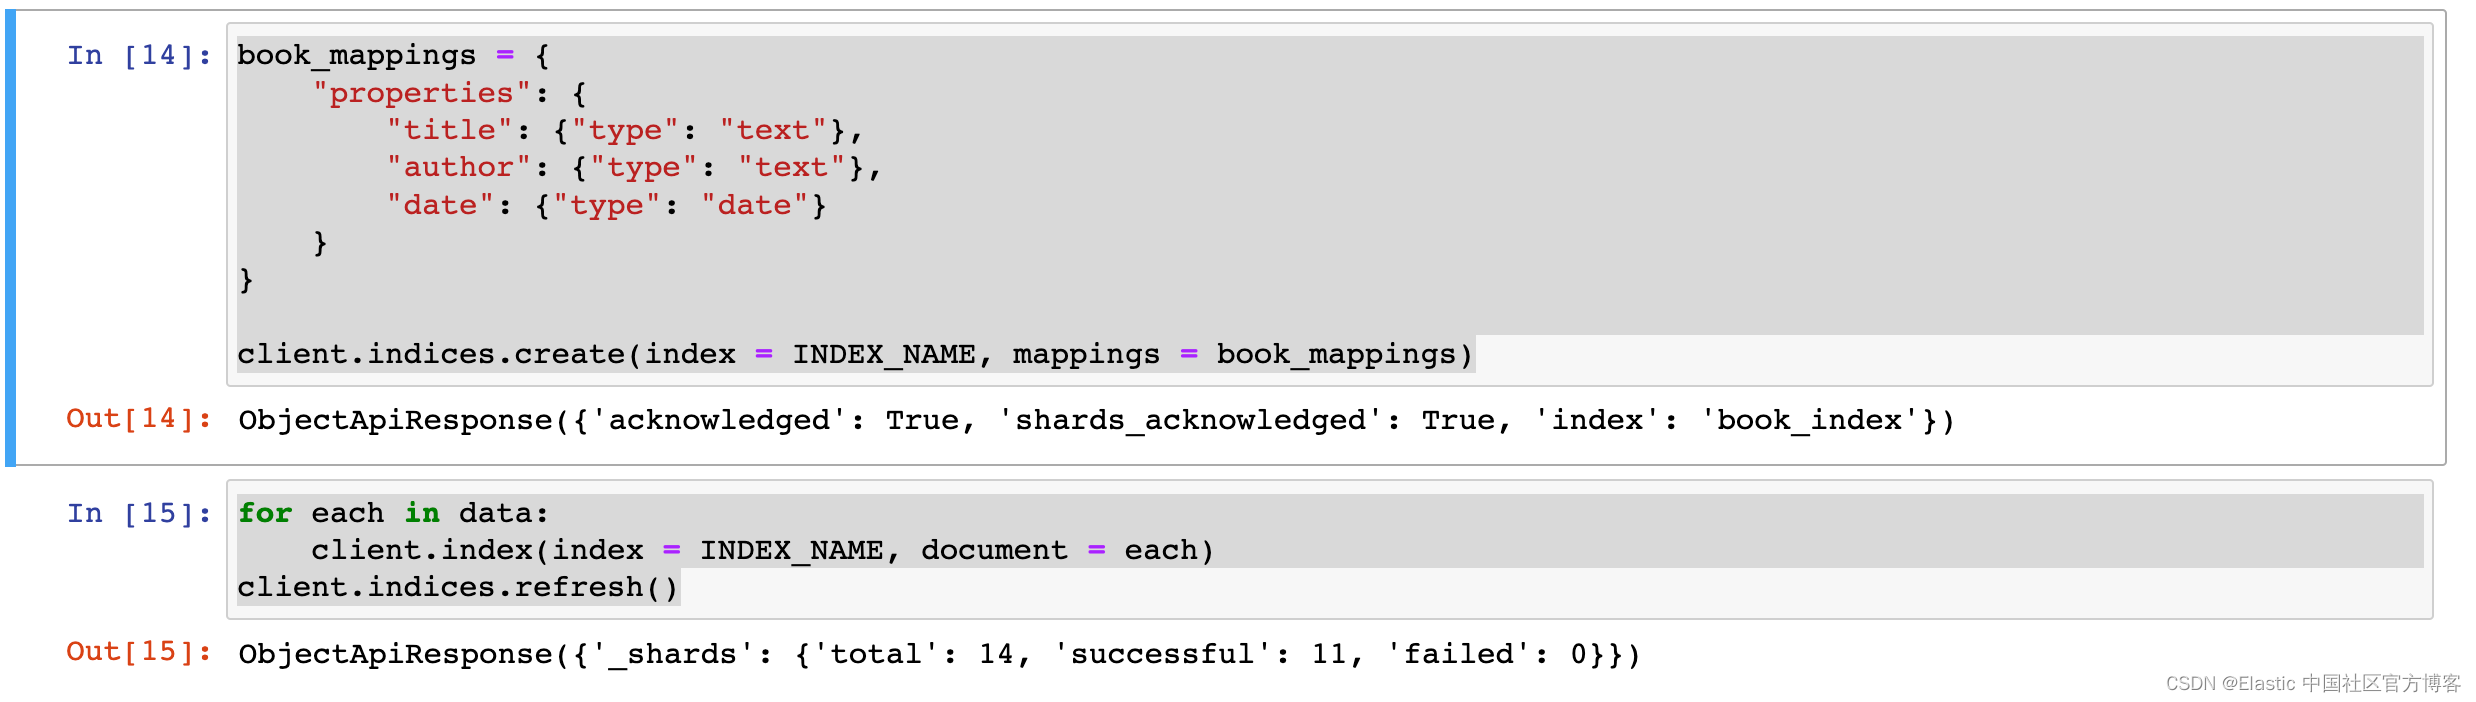
The above shows that 14 documents have been written. We use the following code to display all documents:
# GET ALL DOCUMENTS
resp = client.search(index='book_index', query={"match_all": {}})
for hit in resp['hits']['hits']:
    print(hit['_source'])
In order to apply filtering to documents in the index, we need to modify the "query" parameter. To search for words in text, we'll use the "match" keyword:
# FILTERING - MATCH
resp = client.search(index='book_index',
                     query={
                         "match":
                         {"title": "Data"}
                     })
for hit in resp['hits']['hits']:
    print(hit['_score'], hit['_source'])
We list documents in the index that contain the word "Data" in the "title" field.
If you want to apply filtering across multiple fields, you can use the "bool" operation to do so. If you don't want certain fields to affect the score in the search, you can specify them in the "filter".
# FILTERING - COMBINE FILTERS
resp = client.search(index='book_index',
                     query={
                         "bool": {
                             "must": [
                                #  {"match": {"title": "data"}},
                                 {"match": {"author": "Smith"}},
                                 {"range": {"date": {"gte": "2023-08-01"}}}
                             ]
                         }
                     })
for hit in resp['hits']['hits']:
    print(hit)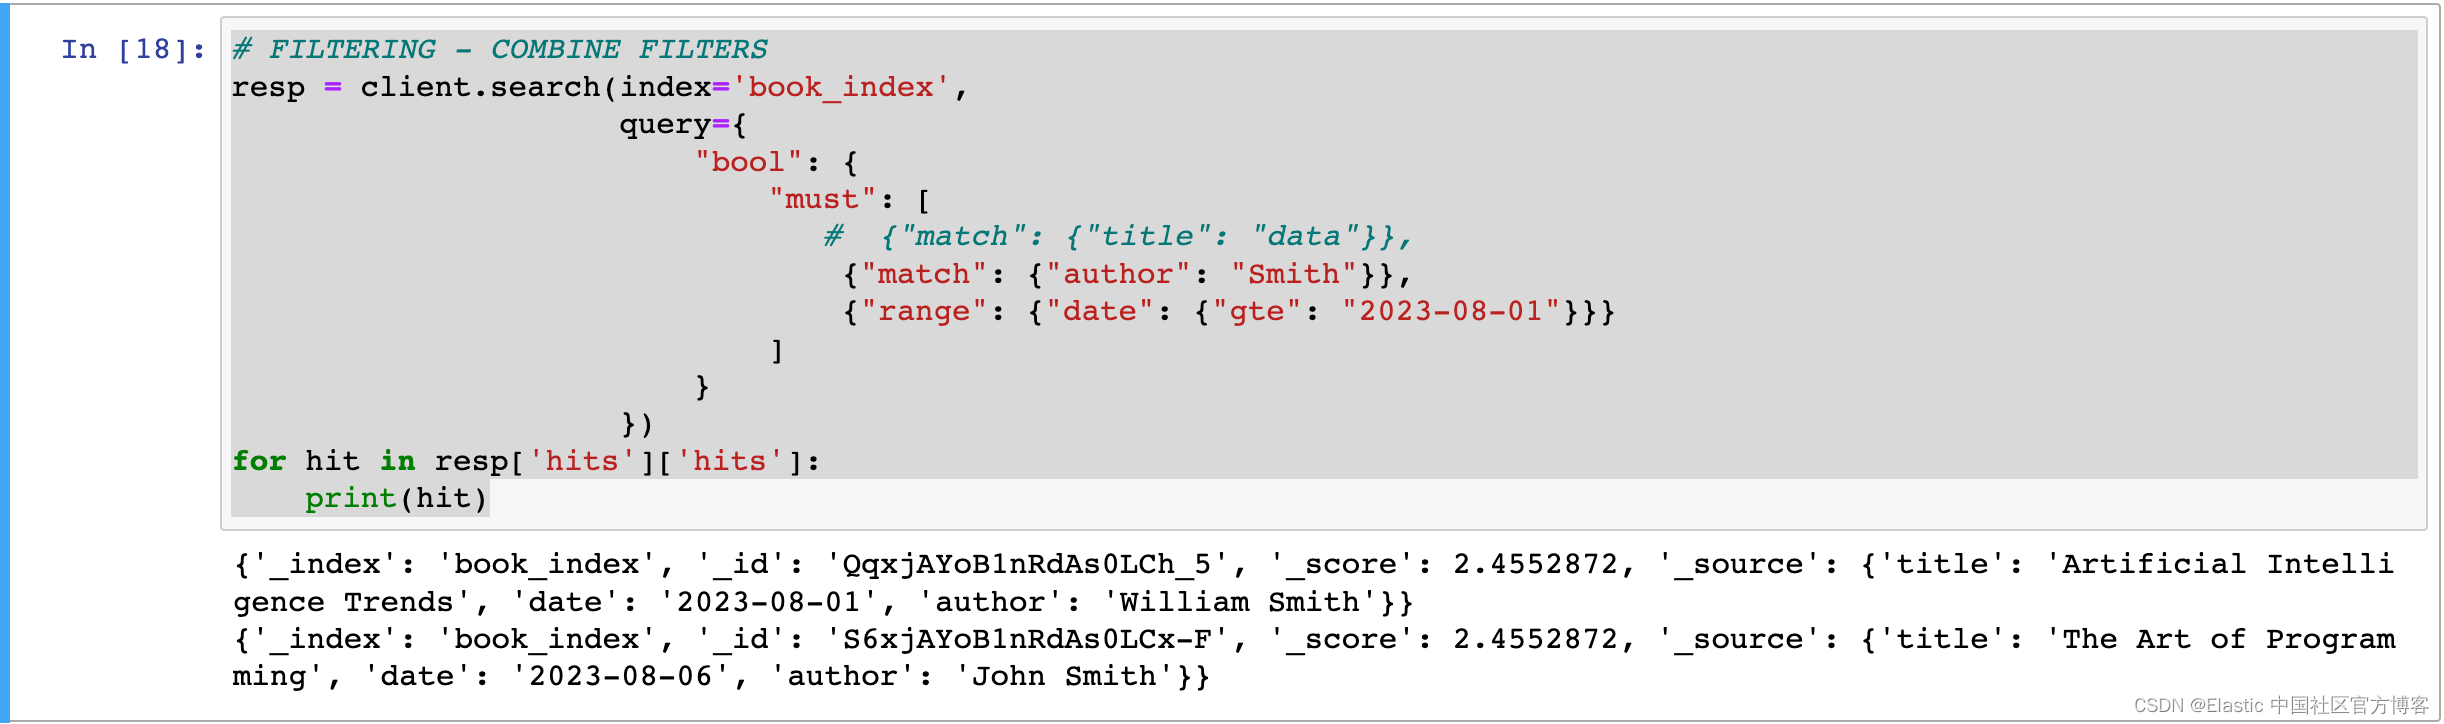
For more information on Elasticsearch queries, you can check here .
Now, let's create the same index containing document vectors. In this post, I will use the Sentence-Transformers library and the "all-mpnet-base-v2" model. There are no restrictions on model usage, so you can choose any model you want. You can explore more models here .
from sentence_transformers import SentenceTransformer

model = SentenceTransformer('all-mpnet-base-v2')
model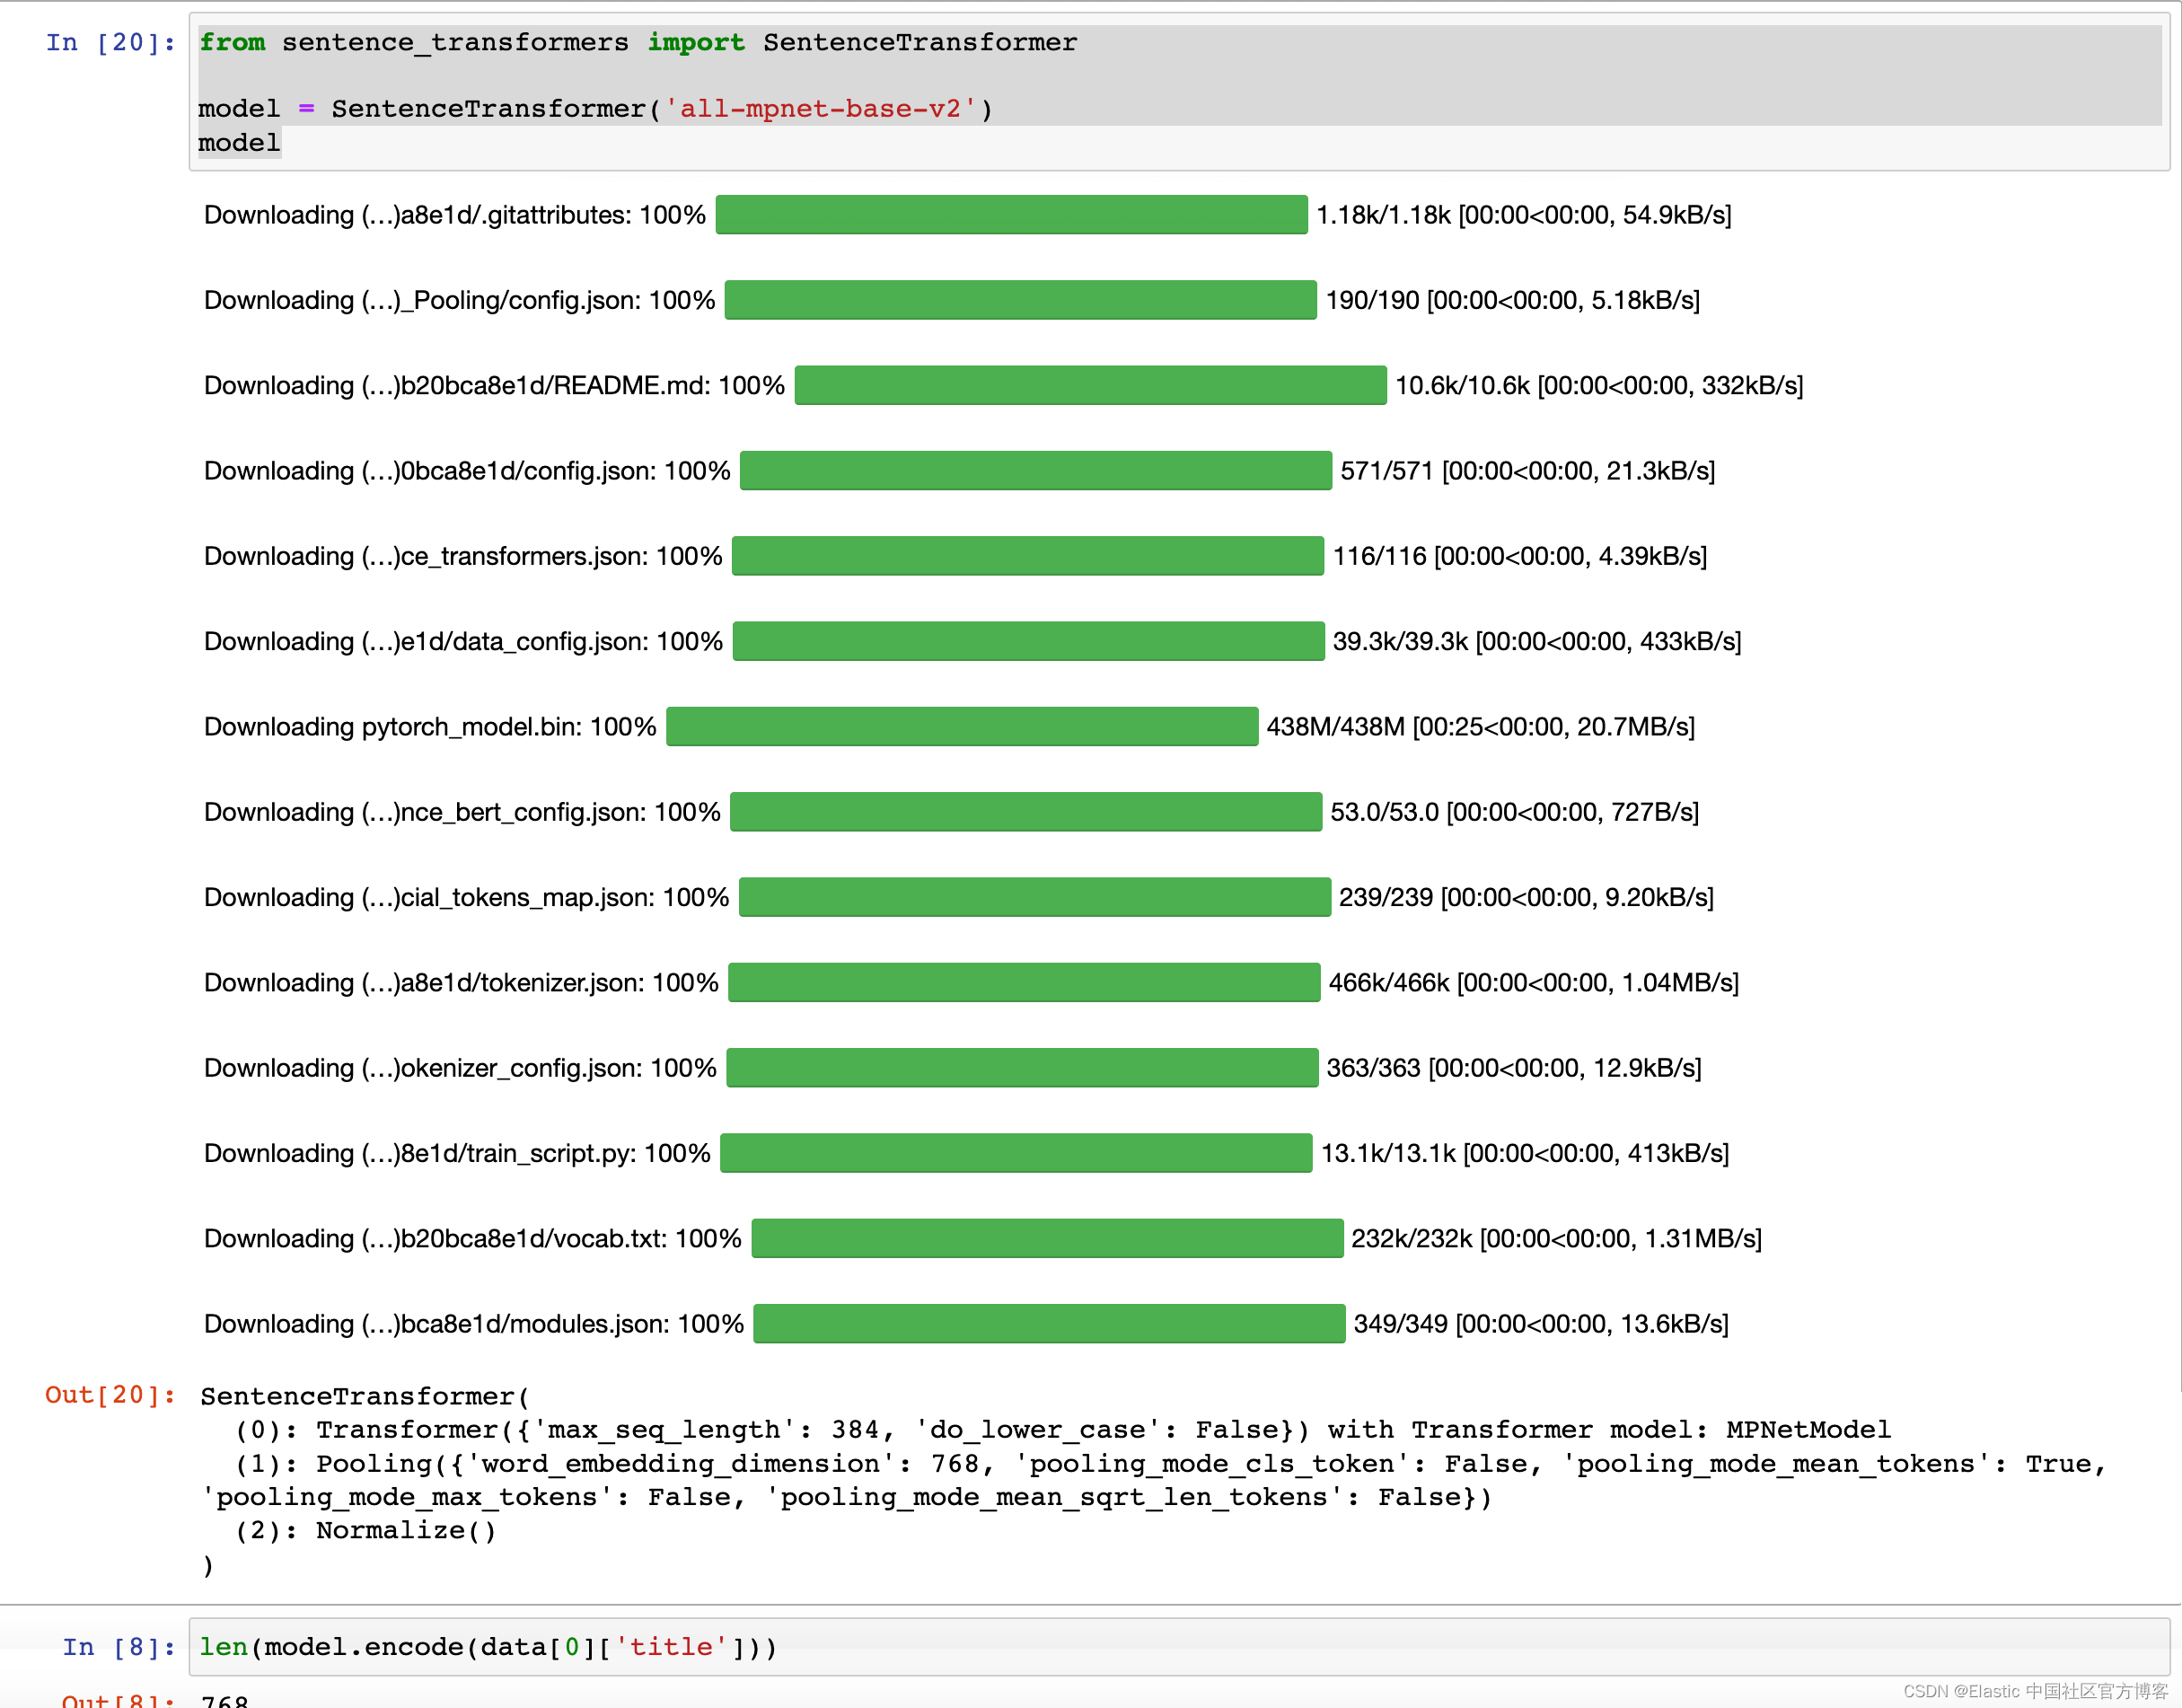
We check the dimension size of the model in the following way:

We use the following code to check whether the index vector_index already exists, and delete it if it has existed for that long:
INDEX_NAME_VECTOR = "vector_index"
if(client.indices.exists(index = INDEX_NAME_VECTOR)):
    print("The index has already existed, going to remove it")
    client.options(ignore_status=404).indices.delete(index = INDEX_NAME_VECTOR)
vector_mapping = {
"properties": {
"title": {"type": "text"},
"author": {"type": "text"},
"date": {"type": "date"},
"vector": {
"type": "dense_vector",
"dims": 768,
"index": True,
"similarity": "dot_product"
}
}
}
client.indices.create(index = INDEX_NAME_VECTOR, mappings = vector_mapping)
When creating "vector_index" this time, we add an additional field of type "dense_vector" and specify the parameters for the vector search: the "dims" parameter indicates the dimensionality of the vector produced as output by the model used. "Similarity" determines how vector similarity is measured. You can explore different "similarity" values here .
for each in data:
    each['vector'] = model.encode(each['title'])
    client.index(index='vector_index', document=each)
client.indices.refresh()
Let's load the model using the Sentence-Transformers library and extract the vectors from the "title" part of the dataset. We then add these vectors to each data entry and continue adding this data to the "vector_index" index.
In order to perform a vector search in Elasticsearch, we first need a query text followed by its corresponding vector representation.
Important : The model used to obtain query vectors should be the same model used when indexing documents; otherwise, it will be very challenging to obtain accurate results.
We can run the following code to see the generated embeddings:
resp = client.search(index = INDEX_NAME_VECTOR, query={"match_all": {}})
for hit in resp['hits']['hits']:
    print(resp)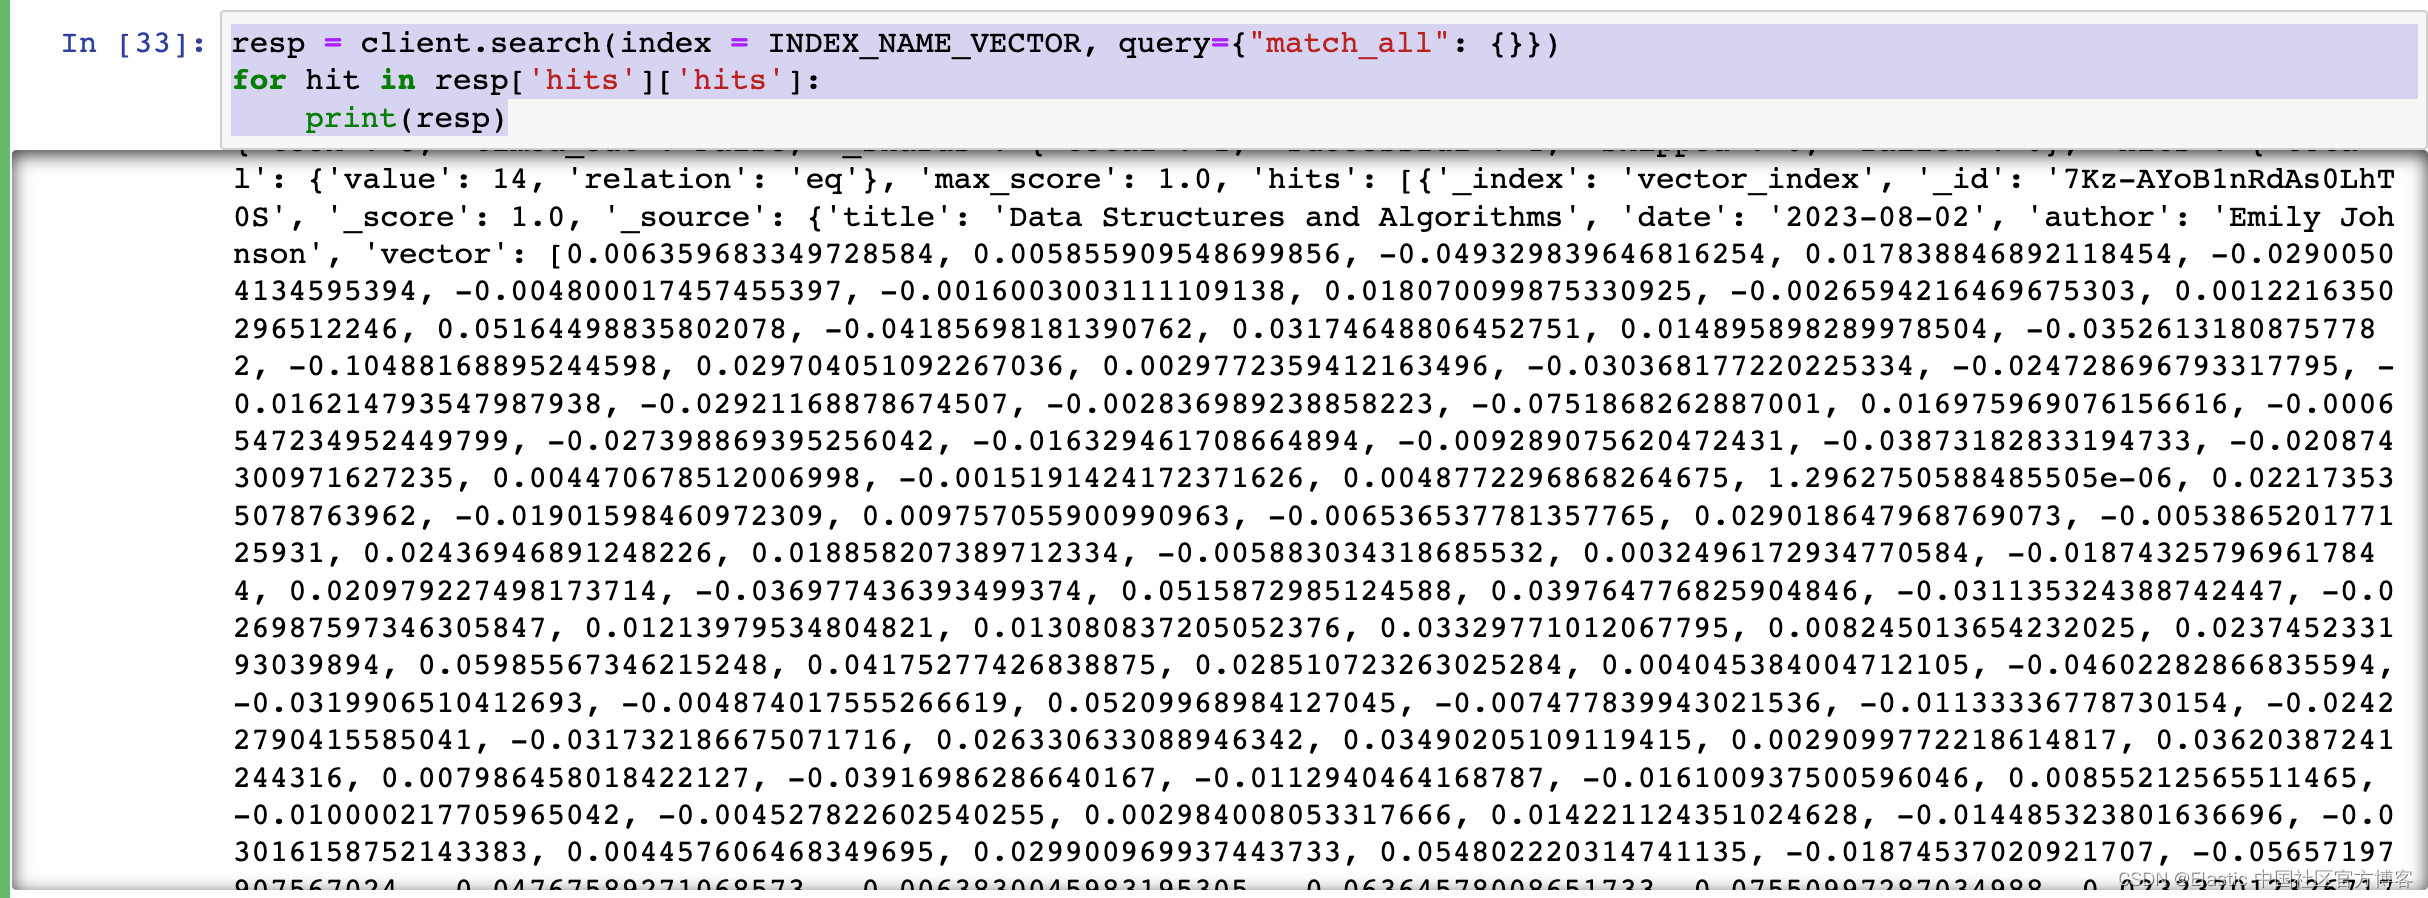
To perform a vector search, the Elasticsearch.search() function takes the "knn" parameter. The following figure shows an example of a "knn" query. The "k" value indicates how many results to retrieve, while "num_candidates" specifies how many candidate documents will be put into the pool for calculation. "query_vector" is a vector representation of the query text (" HTML and CSS programming " in our case ). You can find details about knn query parameters here .
query_text = "HTML and CSS programming"
query_vector = model.encode(query_text)
query = {
    "field": "vector",
    "query_vector": query_vector,
    "k": 5,
    "num_candidates": 14
}

resp = client.search(index='vector_index', knn=query, source=False, fields=['title'])
for hit in resp['hits']['hits']:
    print(hit['_score'], hit['fields'])
The result shown above is:
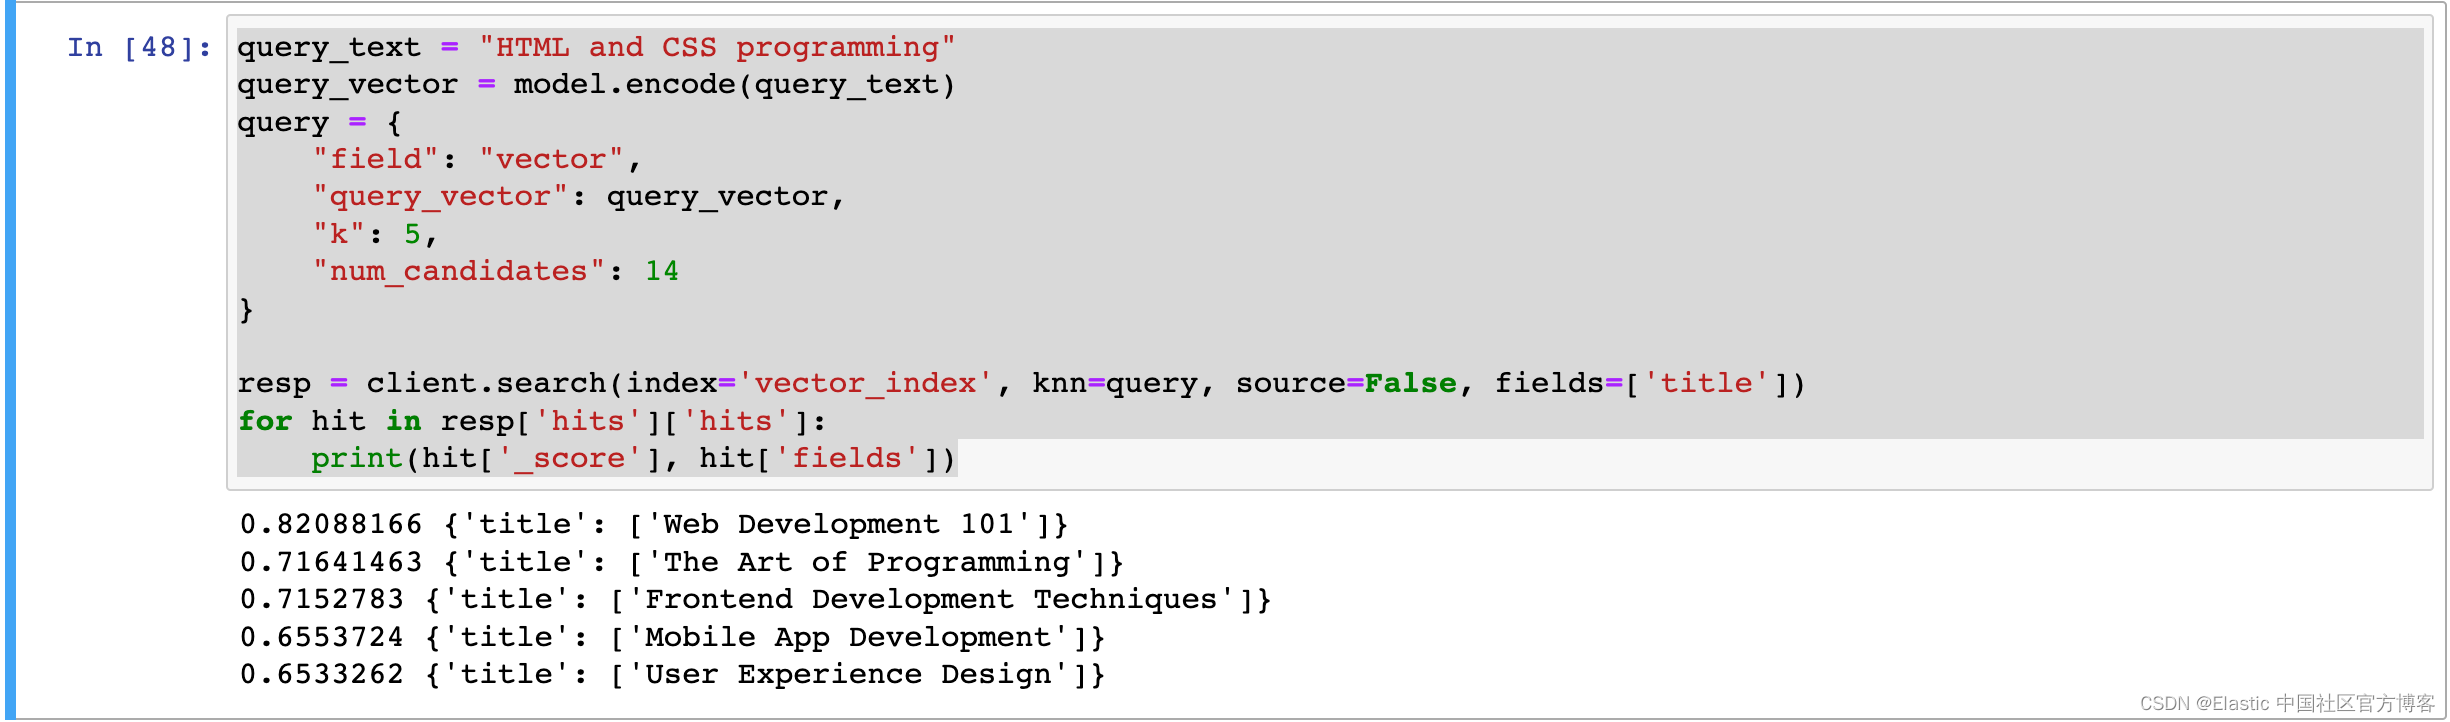
The results returned by the sample query are shown above. Although none of the returned results contain the exact same words, they have successfully captured semantically similar results.
So, how should we prepare knn queries if we also want to use these semantic search results with filtering?
query = {
    "field": "vector",
    "query_vector": query_vector,
    "k": 5,
    "num_candidates": 14,
    "filter":[
        {"range": {"date": {"gte": "2023-07-01"}}},
        {"match": {"title": "Development"}}
    ]
}
resp = client.search(index='vector_index', knn=query, source=False, fields=['title'])
for hit in resp['hits']['hits']:
    print(hit['_score'], hit['fields'])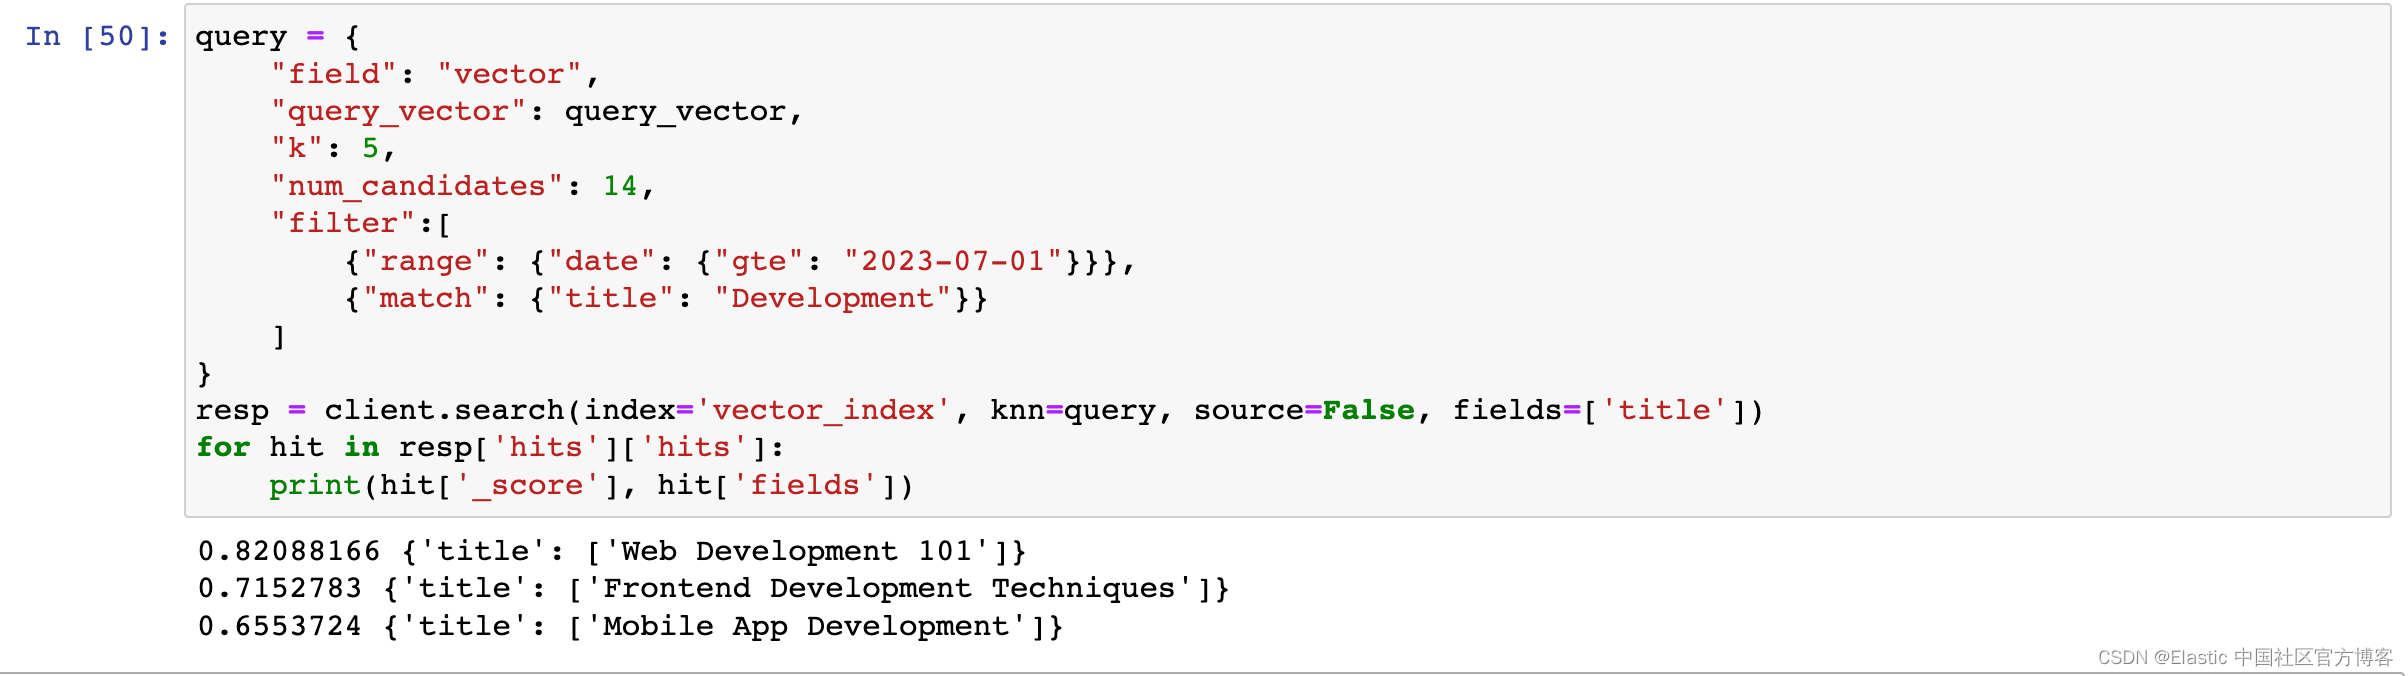
Each filter we apply is provided as filter in the knn parameter. You can add any number of filters here and combine the results based on those filters. In the example above, a date filter and a keyword filter have been added together to list semantically close documents that contain the word Development but are dated after July 1, 2023.
Important note : Elasticsearch performs filtering after the vector search process, so there may be cases where it will not return exactly k results. In the image above, even though the "k" value is set to 5, the query returns 3 documents as results. This is because, in the prepared example dataset, only 3 documents satisfy the specified condition.
For more information about vector search, please refer to the " NLP - Natural Language Processing and Vector Search " chapter in the article " Elastic: A Developer's Guide ".