A brief introduction to nacos
nacos is a very important component in the spring cloud alibaba ecosystem, it has two functions: 1) registration and discovery center; 2) configuration center.
Before continuing to introduce nacos, first introduce a theory, cap theory, in a distributed system, consistency, availability, and partition tolerance cannot be combined. A brief introduction to C, A, and P:
1. C (consistency): Consistency, the instance of the same request at the same time returns the same result, which belongs to strong consistency, that is to say, in the cluster environment, the service information provided externally is completely consistent, but in terms of efficiency There may be some loss;
2. A (availability): Availability. The read and write requests of all instances can get correct responses within a certain period of time. It is weak consistency, and the information obtained by different instances may be inconsistent within a very short period of time. But the service is available and the final data is consistent;
3. P (Partition tolerance): partition fault tolerance, in the case of network abnormality, it can still provide a normal response, which must be guaranteed in the microservice system;
Because P must be guaranteed in distributed services, it is now a combination of CP and AP.
nacos has the function of registration center. Our common configuration center also includes zk and eureka. Their differences are shown in the following table:
| configuration center | CAP theory | console |
| nacos | CP/AP | have |
| zookeeper | CP | none |
| eureka | AP | have |
When nacos starts, the default is AP mode. Nacos can be changed to CP mode by the following command. In the microservices we often use, we choose to use AP mode, and all instances at this time are temporary instances. The most notable difference between temporary instances and persistent instances is that when the health check finds a problem with the service, the persistent instance is marked as unhealthy, while the temporary instance will be removed directly.
curl -X PUT 'IP:8848/nacos/v1/ns/operator/switches?entry=serverMode&value=CP'Two nacos basic use
1 nacos server
Next, let me introduce how to use nacos. Nacos is roughly divided into two parts: nacos server and nacos client. The first is the nacos server. This part does not need to make any changes, just start the service directly. There are two ways, one is to directly download the packaged service and run it directly through the command; the other is to download the nacos source code and start it (nacos is an ordinary spring boot project).
1. Direct download package service
The first step is to go to the nacos official website to download the server project corresponding to the environment. The download address is: Releases alibaba/nacos GitHub , but one thing to note is that currently on the nacos official website ( Nacos Quick Start ), the recommended nacos version is 2.0 .3.

Download different compressed files according to different environments, unzip them after downloading, and enter the bin directory

According to different server environments, select different scripts for execution:
1)linux:
sh startup.sh -m standalone2)windows
startup.cmd -m standaloneIt should be noted that the suffix standalone refers to starting in a single instance.
2. Start in source mode
Git source code address: Nacos source code address , download the git project, then import idea (or other development tools), and then start it. It should be noted that classes under the com.alibaba.nacos.consistency.entity package will appear during the project compilation process If it cannot be found, execute the mvn compile command on the console at this time, and wait for the compilation to complete before starting the project.
D:\nacos>mvn compileThe startup class is under the console module in the source code:

After starting the project, observe the console, and the access address and project startup information will be printed, as follows:

After starting through the above method, access the access address printed by the console, and the following page will appear:

The default username and password of nacos is: nacos/nacos to log in.
2 nacos client
After the nacos server starts normally, the next step is the client's access, which is used to introduce the registration/discovery center and configuration center of nacos. The project uses a common spring boot project.
1. Registration/Discovery Center
First, the following dependencies need to be introduced into the project:
        <dependency>
            <groupId>com.alibaba.cloud</groupId>
            <artifactId>spring-cloud-starter-alibaba-nacos-discovery</artifactId>
        </dependency>
Then add annotations to the project startup class:
@SpringBootApplication
// nacos使用需要使用的注解
@EnableDiscoveryClient
public class SelfNacos9001Application {

    public static void main(String[] args) {
        SpringApplication.run(SelfNacos9001Application.class, args);
    }

}
The next step is to add the corresponding configuration information in the configuration file and configure the relevant address of the nacos server:
spring:
  application:
    name: nacos-provider
  cloud:
    nacos:
      discovery:
        # 注册中心地址
        server-addr: 172.30.10.103:8848
Then start the project, open the console of the nacos server, and you can find the registration information on the registration page:

You can start multiple instances, and you will find that there will be related changes in the number of instances. nacos allows the same service to register multiple instances, which means that a service may have multiple nodes, so how does the nacos client confirm which service to call when a service call occurs? The answer is ribbon, and the nacos client has automatically inherited ribbon (load balancing).
2. Configuration Center
First you need to introduce the following dependencies
        <dependency>
            <groupId> com.alibaba.cloud </groupId>
            <artifactId> spring-cloud-starter-alibaba-nacos-config </artifactId>
        </dependency>
Then add the following configuration in the configuration file
spring:
  profiles:
    # 当前环境,在真实项目中,一般分为多个项目,dev为开发环境
    active: dev
  application:
    # 项目名称
    name: nacos-provider
  cloud:
    nacos:
      config:
        # 注册中心地址
        server-addr: 172.30.10.103:8848
        # 配置文件后缀,即配置文件格式
        file-extension: yaml
        # 命名空间,在后续nacos配置中会出现该参数是如何获取的
        namespace: 4b57e563-2039-42f4-86b1-9c4c7cf58bfc
Write validation code:
@RestController
@RequestMapping("/test")
// 动态刷新配置
@RefreshScope
public class NacosConfigTestController {

    @Value("${nacos.config}")
    private String configInfo;

    public String test(){
        return configInfo;
    }
}
The simple client has been developed, and then related configurations need to be performed on the nacos server. The first is the namespace mentioned in the above code, because we will have multiple environments in real development, and we generally use The nacos namespace is used to divide the environment (it can also be implemented by grouping, but it is generally not recommended). Next, add the namespace first, as shown in the figure below:
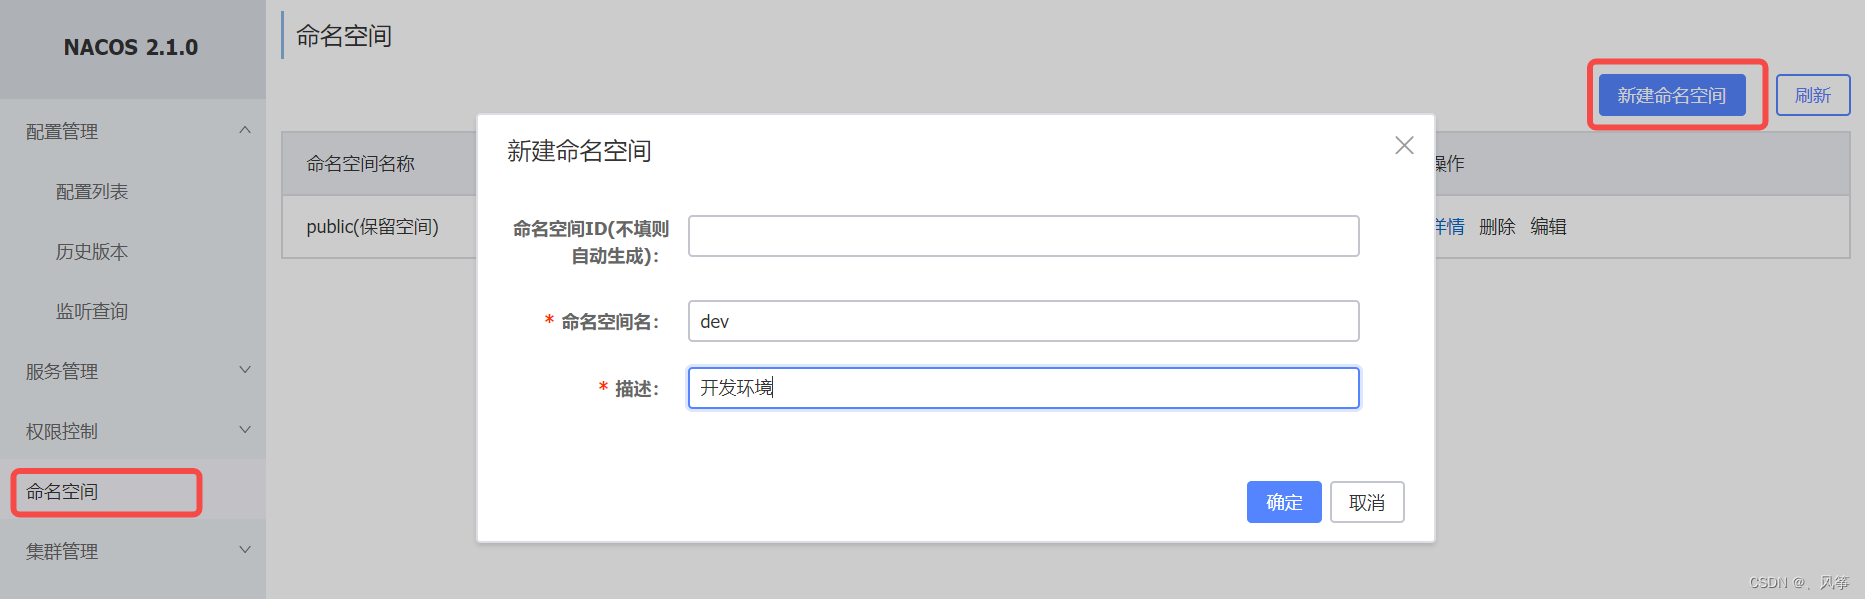
After adding, you can query the ID of the newly added namespace in the namespace column (if the ID is customized, it shall be subject to customization, otherwise it will be automatically generated, and the automatic generation method is used here), as follows The content in the red box in the figure is the content configured to the namespace node

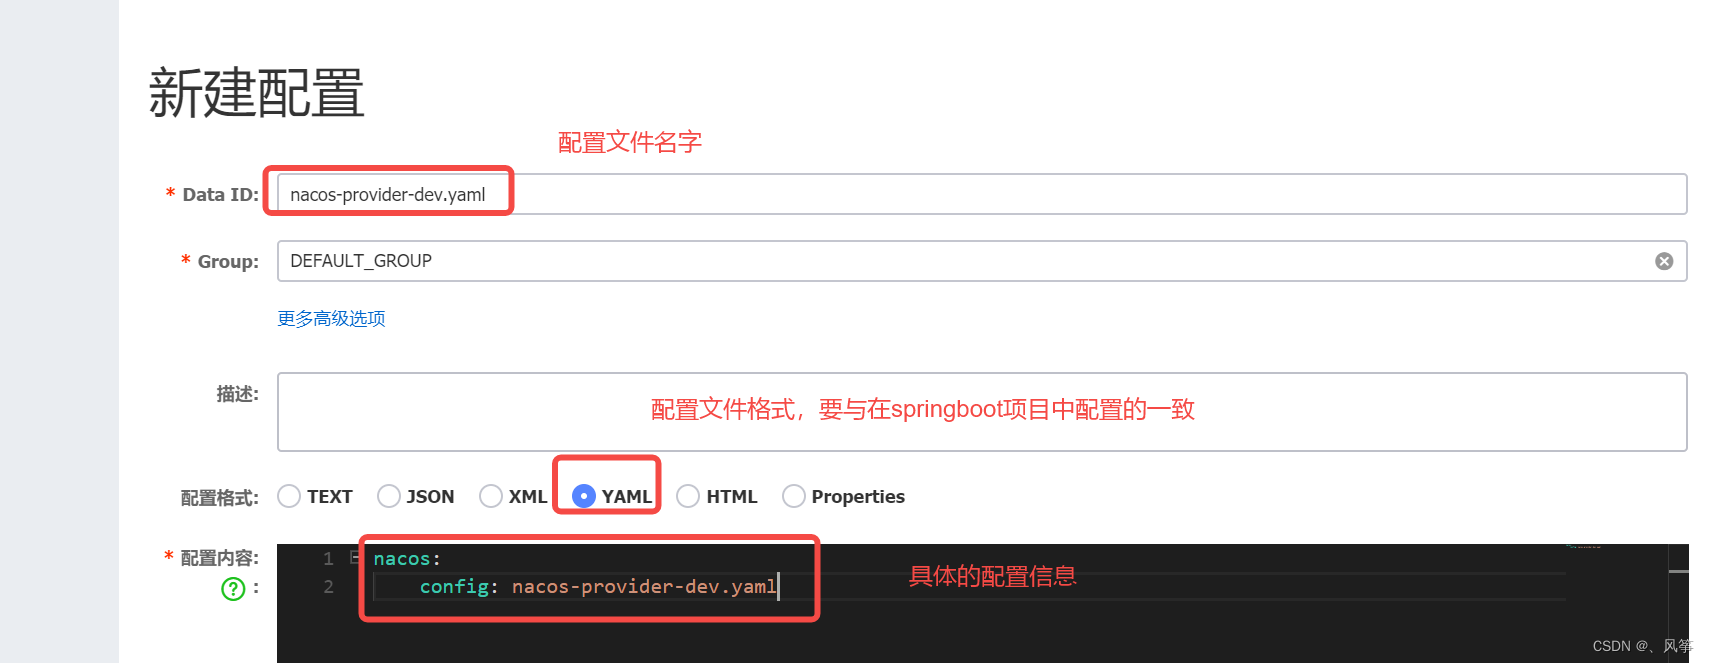
The next step is to create a configuration file in the dev namespace. The name of the configuration file is named according to the above configuration information. The rule is {spring.application.name}-{spring.profiles.active}.{spring.config. file-extension}, if according to the above configuration, then the name of the configuration file is nacos-provider-dev.yaml

Then you can start the project, and then verify it.
Three nacos clusters
Where is the relevant information of nacos configuration saved? We will find that when we restart the nacos service, the information we configured still exists, which proves that nacos does not save the information in memory. By default, nacos persists these data into its embedded database , its embedded database is derby database.
So when we are deploying a nacos cluster, if each nacos node still uses its own embedded database, we will face a problem: data synchronization. In fact, nacos supports external databases. When we use external databases, this can solve the problem of data synchronization between different databases. Let's take a look at how to use an external database:
The first step is to enter the decompressed nacos folder and enter the conf folder. There are two important files in it, one is application.properties, and the other is nacos-mysql.sql

The second step is to execute the nacos-mysql.sql script file in the prepared mysql database, but it should be noted that there is no script for creating a database in the script file, which needs to be created manually, and then execute the above script file in the database.
The third step is to modify the application.properties file, find the location corresponding to the figure below in the configuration file, and then open the comment

After completing the above three steps, start the nacos project, and the relevant configuration information of nacos will be stored in the specified mysql database. When we deploy the nacos cluster, we can store the data of this cluster in a mysql cluster, which solves the problem of data synchronization. Then the cluster model of nacos is as shown in the figure below:

External requests access the slb proxy or nginx cluster, and then configure the load of the nacos cluster in slb/nginx. It should be noted that the nacos cluster is not a master-slave structure, and then the nacos node saves the persistent data in the mysql cluster, and then communicates between each nacos Complete data synchronization between nodes.
The cluster configuration of nacos is very simple, or enter the conf folder, then copy a cluster.conf.example file, name it cluster.conf, and then modify it, as shown below:

It should be noted that the nacos cluster is deployed in the linux system for verification. If the nacos node is deployed to a server during verification, you need to modify the port number in the application.properties configuration file. You also need to pay attention to it. When nacos starts It will occupy port+1000 and port+1001 for grpc communication, so pay attention to the set port value.