The basic use of nacos is introduced above, and nacos will be introduced further in this article.
A nacos cluster data synchronization: distro protocol
In the production environment, in order to ensure the stability of the service, we generally adopt the cluster deployment method. The cluster deployment method was also introduced in the previous article, so how to synchronize data between nacos clusters? It can be seen from the way of nacos cluster deployment in the previous article that nacos has no distinction between master nodes and slave nodes. In the nacos cluster, each node has the same weight and can read and write.
nacos is composed of two functions: configuration center and registration/discovery center. For the configuration center, the cp used by nacos is strongly consistent, so we won’t introduce it much; for the registration/discovery center, the ap used by nacos is implemented by Ali’s self-developed distro protocol. The distro protocol will be further described below introduction.
We know that ap is the final consistency, so how does the distro protocol guarantee the final consistency? It is mainly carried out in the following four aspects.
1 Add distro service node
This scenario refers to the fact that the current distro cluster has running service nodes. At this time, a new distro service node is added. How does the newly added distro service node perform data synchronization?

Each distro service node communicates with each other. When a distro service node is added, it will poll and pull all other service nodes in the current distro service cluster, and perform full pull, and then cache the registry information to the local, and the corresponding service registration will be performed.
2 Data synchronization of distro service nodes
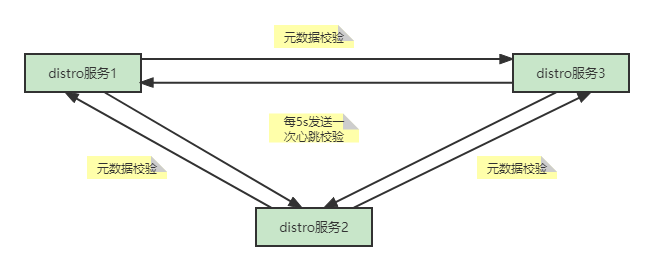
The distro service nodes will send a heartbeat verification every 5s. The verification information is not the registry information but the metadata information. If the registry information is used, the request data in the heartbeat packet will be too large, so the heartbeat verification The request data is metadata information. When it is found that the current heartbeat request data is inconsistent with the local cache data during the verification process, the server will trigger a full pull operation for data synchronization.
3 Data write operation
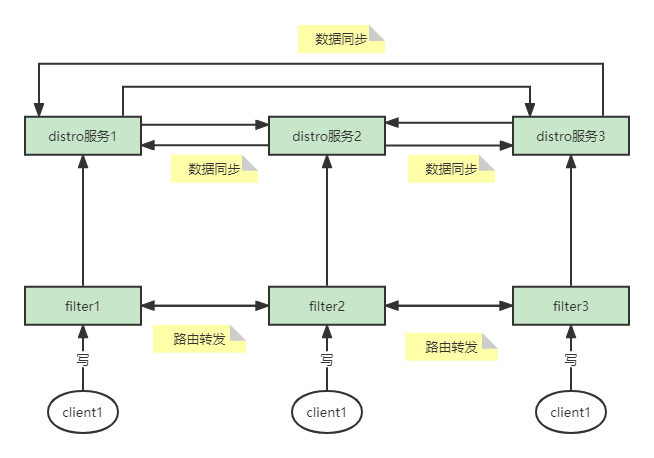
When the client issues a write operation, it will not directly link to the distro service node for the write operation. It will first go to the pre-filter one by one. The filter calculates according to the ip+port, finds the distro service node to which it belongs, and then passes The route is forwarded to the corresponding filter, and then the corresponding distro service node is called to perform the write operation. The write operation only needs to ensure that the writing is completed on this node, and there is no need to wait for synchronous writing to other distro service nodes. The service node performing the write operation will periodically synchronize the change information to other service nodes in an incremental manner.
The routing and forwarding of the filter is a core point of the implementation of the distro service protocol. It ensures that the distro service node to which the client belongs remains unchanged. Every time the client performs read and write operations, the requested distro service is the same.
4 read operations
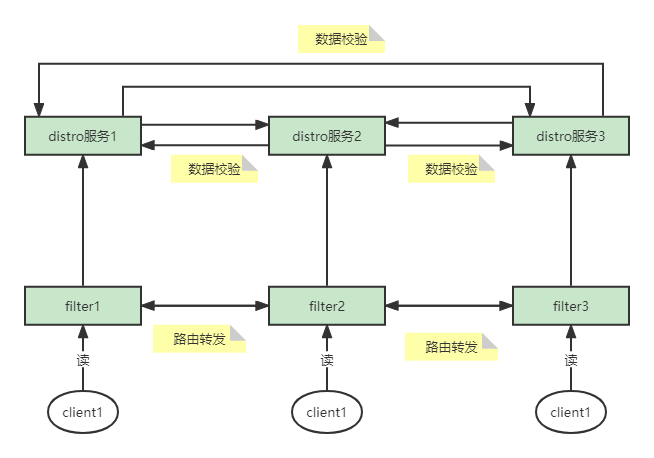
The read operation is actually similar to the write operation. They all go to the pre-filter first, then calculate according to the ip+port, and then route to the distro service node to which it belongs. The above introduction said that the nacos cluster is an ap, so read directly Get the local cache of the distro service and return. What ap guarantees is the final consistency, which can be guaranteed through the data verification heartbeat mechanism mentioned above.
Let's take a look at part of the source code of cluster data synchronization. There are only the source code of the entry and some key steps. Interested students can take a look at it by themselves.
The following is part of the source code for enabling data verification and initializing data:
// 入口 com.alibaba.nacos.core.distributed.distro.DistroProtocol

// 在入口类的构造方法中,调用了startDistroTask()方法,接下来我们看一下这个方法

/**
 *该方法主要是开始两个任务,一个是验证任务,一个是初始化任务
 */
private void startDistroTask() {
    if (EnvUtil.getStandaloneMode()) {
        isInitialized = true;
        return;
    }
    // 验证任务
    startVerifyTask();
    // 初始化任务
    startLoadTask();
}
/**
 * 开启数据验证的定时任务,每5s发起一次
 * DEFAULT_DATA_VERIFY_INTERVAL_MILLISECONDS = 5000L;
 */
private void startVerifyTask() {
    GlobalExecutor.schedulePartitionDataTimedSync(new DistroVerifyTimedTask(memberManager, distroComponentHolder,
                    distroTaskEngineHolder.getExecuteWorkersManager()),
            DistroConfig.getInstance().getVerifyIntervalMillis());
}

/**
 * 初始化任务,通过线程池执行任务,并传入一个回调函数,用来标识是否完成
 */
private void startLoadTask() {
    DistroCallback loadCallback = new DistroCallback() {
        @Override
        public void onSuccess() {
            isInitialized = true;
        }

        @Override
        public void onFailed(Throwable throwable) {
            isInitialized = false;
        }
    };
    GlobalExecutor.submitLoadDataTask(
            new DistroLoadDataTask(memberManager, distroComponentHolder, DistroConfig.getInstance(), loadCallback));
}


// 接下来再看一下DistroLoadDataTask这个类的实现,在它的run方法中主要是执行了一个load方法
// 我们直接看一下这个load()方法

// 这个方法主要是进行了一些条件的判断,需要注意它使用的while循环操作,如果前面的天剑一直满足
// 则会进入死循环中,因此必须打破前面的两个while条件才会进入最终的数据初始化任务
private void load() throws Exception {
    // 除了自身节点以外没有其它节点,则休眠1s
    while (memberManager.allMembersWithoutSelf().isEmpty()) {
        Loggers.DISTRO.info("[DISTRO-INIT] waiting server list init...");
        TimeUnit.SECONDS.sleep(1);
    }
    // 若数据类型为空,说明distroComponent的组件注册还未初始化完毕
    while (distroComponentHolder.getDataStorageTypes().isEmpty()) {
        Loggers.DISTRO.info("[DISTRO-INIT] waiting distro data storage register...");
        TimeUnit.SECONDS.sleep(1);
    }
    // 加载每个类型的数据
    for (String each : distroComponentHolder.getDataStorageTypes()) {
        if (!loadCompletedMap.containsKey(each) || !loadCompletedMap.get(each)) {
            // 调用加载方法,标记已处理
            loadCompletedMap.put(each, loadAllDataSnapshotFromRemote(each));
        }
    }
}


// 本方法就是具体的去拉取各个distro服务节点,并更新数据的方法
private boolean loadAllDataSnapshotFromRemote(String resourceType) {
    // 获取数传输对象
    DistroTransportAgent transportAgent = distroComponentHolder.findTransportAgent(resourceType);
    // 获取数据处理器
    DistroDataProcessor dataProcessor = distroComponentHolder.findDataProcessor(resourceType);
    if (null == transportAgent || null == dataProcessor) {
        Loggers.DISTRO.warn("[DISTRO-INIT] Can't find component for type {}, transportAgent: {}, dataProcessor: {}",
                resourceType, transportAgent, dataProcessor);
        return false;
    }
    // 向每个节点请求数据
    for (Member each : memberManager.allMembersWithoutSelf()) {
        try {
            Loggers.DISTRO.info("[DISTRO-INIT] load snapshot {} from {}", resourceType, each.getAddress());
            // 获取数据
            DistroData distroData = transportAgent.getDatumSnapshot(each.getAddress());
            // 解析数据并且更新数据
            boolean result = dataProcessor.processSnapshot(distroData);
            Loggers.DISTRO
                    .info("[DISTRO-INIT] load snapshot {} from {} result: {}", resourceType, each.getAddress(),
                            result);
            // 如果解析成功,标记此类型数据已经加载完毕
            if (result) {
                distroComponentHolder.findDataStorage(resourceType).finishInitial();
                return true;
            }
        } catch (Exception e) {
            Loggers.DISTRO.error("[DISTRO-INIT] load snapshot {} from {} failed.", resourceType, each.getAddress(), e);
        }
    }
    return false;
}
The following is the source code for incremental data synchronization
// 入口为com.alibaba.nacos.naming.consistency.ephemeral.distro.v2.DistroClientDataProcessor
// 增量数据同步是采用发布订阅的方式进行的数据同步


// 主要关注下面的客户端变更事件即可
@Override
public List<Class<? extends Event>> subscribeTypes() {
    List<Class<? extends Event>> result = new LinkedList<>();
    // 客户端变更的时事件
    result.add(ClientEvent.ClientChangedEvent.class);
    // 客户端断开的事件
    result.add(ClientEvent.ClientDisconnectEvent.class);
    // 服务验证失败的事件
    result.add(ClientEvent.ClientVerifyFailedEvent.class);
    return result;
}
// 当事件触发的时候,会调用该类的onEvent()方法
@Override
public void onEvent(Event event) {
    if (EnvUtil.getStandaloneMode()) {
        return;
    }
    if (!upgradeJudgement.isUseGrpcFeatures()) {
        return;
    }
    if (event instanceof ClientEvent.ClientVerifyFailedEvent) {
        syncToVerifyFailedServer((ClientEvent.ClientVerifyFailedEvent) event);
    } else {
        // 将该事件同步到其它distro服务节点,
        // 延迟1s进行同步,DEFAULT_DATA_SYNC_DELAY_MILLISECONDS = 1000L
        syncToAllServer((ClientEvent) event);
    }
}
2. Advanced usage and principle of configuration center
In the previous article, I made a basic introduction to the simple use of nacos as a configuration center, and this article introduces two advanced uses.
1 Advanced use
Advanced usage is mainly for the configuration of the following two scenarios:
The first scenario is that for some configurations, whether they are in the dev, test or prod environment, their configurations are the same. For this configuration, there is no need to configure it in each environment. You can use public configuration files to configure. It can be achieved by adding the following configuration in the configuration file
spring:
  cloud:
    nacos:
      config:
        server-addr: 172.30.10.103:8848
        file-extension: yaml
        namespace: 4b57e563-2039-42f4-86b1-9c4c7cf58bfc
        # 公共配置文件,可以配置多个
        shared-configs[0]:
          # 公共配置文件名称
          dataId: file.yaml
          # 公共配置文件所属组
          group: DEFAULT_GROUP
          # 公共配置文件是否刷新
          refresh: true
The second scenario is that in a project, in order to distinguish the responsible content of the configuration file, multiple configuration files need to be used, such as order-related configuration and user-related configuration, which can be realized through the following configuration
spring:
  cloud:
    nacos:
      config:
        server-addr: 172.30.10.103:8848
        file-extension: yaml
        namespace: 4b57e563-2039-42f4-86b1-9c4c7cf58bfc
        # 扩展配置文件,允许配置多个
        extension-configs[0]:
          # 扩展配置文件名称
          dataId: order.yaml
          # 扩展配置文件所属组
          group: DEFAULT_GROUP
          # 扩展配置文件动态刷新
          refresh: true
        extension-configs[1]:
          dataId: user.yaml
          group: DEFAULT_GROUP
          refresh: true
2 Configuration center principle
We all know that the client can dynamically obtain the relevant configuration from the configuration center, which is nothing more than the two methods of actively pulling the client or actively pushing the server. Then the nscos client obtains the configuration from the server using pull or push?
The nacos client obtains dynamic configuration by pulling. The client establishes long polling with the server. During the establishment of long polling, if the configuration of the server changes, it tells the client that the configuration has changed, and then the client The terminal initiates a request to obtain the specific content of the configuration; if there is no change, it returns empty. Take a look at the flow chart below:

From the figure above, we can see that the client will establish a long connection with the server, and there are two situations in which the long connection responds: one is that the waiting period exceeds 29.5s; the other is that the configuration content changes. Regarding the timeout time, waiting time, response time and other related content in it, we will reflect it in the source code analysis. Through the above picture, we have a certain understanding of the dynamic configuration acquisition principle of the nacos configuration center, then let's take a brief look at the source code, and students who are interested can learn more about it. The source code content is divided into two parts, one part is for the client to establish a long link to obtain configuration update configuration, and the other part is for the server to receive configuration changes and respond to the client.
2.1 Client source code (nacos-config-2.2.5.release, nacos-client-1.4.1)
The following source code mainly introduces the entry of the client source code and introduces the important class ClientWorker.
// 入口为com.alibaba.cloud.nacos.NacosConfigBootstrapConfiguration
// 通过jar包进入,这个类创建了三个bean,我们主要关注的是第二个bean:NacosConfigManager
// 通过查看该类的构造方法,发现其调用了createConfigService方法,在这个方法中通过工厂的方式创建
// service,最终是通过反射的方式创建:
// Class<?> driverImplClass = Class.forName("com.alibaba.nacos.client.config.NacosConfigService")
// 我们的源码从NacosConfigService的构造方法开始
    public NacosConfigService(Properties properties) throws NacosException {
        // 参数校验
        ValidatorUtils.checkInitParam(properties);
        String encodeTmp = properties.getProperty("encode");
        if (StringUtils.isBlank(encodeTmp)) {
            this.encode = "UTF-8";
        } else {
            this.encode = encodeTmp.trim();
        }
        // 根据配置文件获取namespace
        this.initNamespace(properties);
        this.agent = new MetricsHttpAgent(new ServerHttpAgent(properties));
        this.agent.start();
        // 该构造方法的主要目的就是创建ClientWorker对象,所有的相关操作都是在该对象中实现的
        this.worker = new ClientWorker(this.agent, this.configFilterChainManager, properties);
    }
In the constructor of the ClientWorker class, some key parameters are initialized, including the timeout period, two timed thread pools have been created, and the configuration check task has been started.
    public ClientWorker(final HttpAgent agent, ConfigFilterChainManager configFilterChainManager, Properties properties) {
        this.agent = agent;
        this.configFilterChainManager = configFilterChainManager;
        // 初始化参数
        this.init(properties);
        // 创建第一个线程池,用于启动配置检查任务
        this.executor = Executors.newScheduledThreadPool(1, new ThreadFactory() {
            public Thread newThread(Runnable r) {
                Thread t = new Thread(r);
                t.setName("com.alibaba.nacos.client.Worker." + agent.getName());
                t.setDaemon(true);
                return t;
            }
        });
        // 第二个定时任务线程池,具体功能后续会出现
        this.executorService = Executors.newScheduledThreadPool(Runtime.getRuntime().availableProcessors(), new ThreadFactory() {
            public Thread newThread(Runnable r) {
                Thread t = new Thread(r);
                t.setName("com.alibaba.nacos.client.Worker.longPolling." + agent.getName());
                t.setDaemon(true);
                return t;
            }
        });
        // 启动第一个定时任务线程池,用于检查配置,通过线程池参数可以发现,该任务每10s执行一次
        this.executor.scheduleWithFixedDelay(new Runnable() {
            public void run() {
                try {
                    ClientWorker.this.checkConfigInfo();
                } catch (Throwable var2) {
                    ClientWorker.LOGGER.error("[" + agent.getName() + "] [sub-check] rotate check error", var2);
                }

            }
        }, 1L, 10L, TimeUnit.MILLISECONDS);
    }

    // 根据配置信息,初始化相关参数
    private void init(Properties properties) {
        // 超时时间,properties这个参数是根据配置文件生成的,如果没有配置超时时间,我们可以发现,超时时间为30s
        this.timeout = (long)Math.max(ConvertUtils.toInt(properties.getProperty("configLongPollTimeout"), 30000), 10000);
        this.taskPenaltyTime = ConvertUtils.toInt(properties.getProperty("configRetryTime"), 2000);
        this.enableRemoteSyncConfig = Boolean.parseBoolean(properties.getProperty("enableRemoteSyncConfig"));
    }
The next step is the checkConfigInfo method. In this method, the main task is to group the long polling tasks, and then execute the long polling tasks through the executorService thread pool created above, LongPollingRunnable. Let's directly check the long polling tasks, that is, its run method. In this code, three things are mainly done: the first step is to check the local configuration and assign relevant values according to different situations; the second step is to establish a long link with the server to obtain the changed configuration; the third step , the change information returned in the previous step is not the configuration content, but the changed dataId+group+teanant related information. This step is to call the server to obtain the specific configuration content and perform local updates based on these information:
        public void run() {
            List<CacheData> cacheDatas = new ArrayList();
            ArrayList inInitializingCacheList = new ArrayList();

            try {
                // cacheMap即为缓存的配置信息
                Iterator var3 = ClientWorker.this.cacheMap.values().iterator();
                // 第一个for循环,比较本地配置
                while(var3.hasNext()) {
                    CacheData cacheData = (CacheData)var3.next();
                    if (cacheData.getTaskId() == this.taskId) {
                        cacheDatas.add(cacheData);

                        try {
                            // 第一步,检查本地配置,并根据配置的不同信息,进行相关赋值
                            ClientWorker.this.checkLocalConfig(cacheData);
                            if (cacheData.isUseLocalConfigInfo()) {
                                cacheData.checkListenerMd5();
                            }
                        } catch (Exception var13) {
                            ClientWorker.LOGGER.error("get local config info error", var13);
                        }
                    }
                }

                // 第二步 与服务端建立长轮询,获取变更的配置信息
                List<String> changedGroupKeys = ClientWorker.this.checkUpdateDataIds(cacheDatas, inInitializingCacheList);
                if (!CollectionUtils.isEmpty(changedGroupKeys)) {
                    ClientWorker.LOGGER.info("get changedGroupKeys:" + changedGroupKeys);
                }

                Iterator var16 = changedGroupKeys.iterator();
                // 第二个for循环,根据上面获取到的变更的配置信息集合,更新本地配置
                while(var16.hasNext()) {
                    String groupKey = (String)var16.next();
                    String[] key = GroupKey.parseKey(groupKey);
                    String dataId = key[0];
                    String group = key[1];
                    String tenant = null;
                    if (key.length == 3) {
                        tenant = key[2];
                    }

                    try {
                        // 第三步 调用服务端获取变更的配置信息,根据dataId, group以及tenant,调用地址为/v1/cs/configs
                        String[] ct = ClientWorker.this.getServerConfig(dataId, group, tenant, 3000L);
                        CacheData cache = (CacheData)ClientWorker.this.cacheMap.get(GroupKey.getKeyTenant(dataId, group, tenant));
                        cache.setContent(ct[0]);
                        if (null != ct[1]) {
                            cache.setType(ct[1]);
                        }

                        ClientWorker.LOGGER.info("[{}] [data-received] dataId={}, group={}, tenant={}, md5={}, content={}, type={}", new Object[]{ClientWorker.this.agent.getName(), dataId, group, tenant, cache.getMd5(), ContentUtils.truncateContent(ct[0]), ct[1]});
                    } catch (NacosException var12) {
                        String message = String.format("[%s] [get-update] get changed config exception. dataId=%s, group=%s, tenant=%s", ClientWorker.this.agent.getName(), dataId, group, tenant);
                        ClientWorker.LOGGER.error(message, var12);
                    }
                }

                var16 = cacheDatas.iterator();

                while(true) {
                    CacheData cacheDatax;
                    do {
                        if (!var16.hasNext()) {
                            inInitializingCacheList.clear();
                            ClientWorker.this.executorService.execute(this);
                            return;
                        }

                        cacheDatax = (CacheData)var16.next();
                    } while(cacheDatax.isInitializing() && !inInitializingCacheList.contains(GroupKey.getKeyTenant(cacheDatax.dataId, cacheDatax.group, cacheDatax.tenant)));

                    cacheDatax.checkListenerMd5();
                    cacheDatax.setInitializing(false);
                }
            } catch (Throwable var14) {
                ClientWorker.LOGGER.error("longPolling error : ", var14);
                ClientWorker.this.executorService.schedule(this, (long)ClientWorker.this.taskPenaltyTime, TimeUnit.MILLISECONDS);
            }
        }
Next, look at the content of establishing a long link with the server in the second step
// 在checkUpdateDataIds里面主要是组装了调用服务端时的请求信息,
// 每个配置文件对应的相关信息为dataId++group++md5+(+teaant)
// 组装完请求参数以后,调用checkUpdateConfigStr方法,接下来我们看一下相关代码

    List<String> checkUpdateConfigStr(String probeUpdateString, boolean isInitializingCacheList) throws Exception {
        // 设置请求参数以及请求头
        Map<String, String> params = new HashMap(2);
        params.put("Listening-Configs", probeUpdateString);
        Map<String, String> headers = new HashMap(2);
        // 超时时间在前面的源码中说过,默认为30s
        headers.put("Long-Pulling-Timeout", "" + this.timeout);
        // 如果是第一次请求,不需要进行挂起
        if (isInitializingCacheList) {
            headers.put("Long-Pulling-Timeout-No-Hangup", "true");
        }

        if (StringUtils.isBlank(probeUpdateString)) {
            return Collections.emptyList();
        } else {
            try {
                long readTimeoutMs = this.timeout + (long)Math.round((float)(this.timeout >> 1));
                // 这里的agent就是在最开始的NcaosConfigService的构造方法中创建的agent
                // 开始远程调用服务端的服务,记住这个地址,后面查看服务端源码的时候,即从这个地址入手
                HttpRestResult<String> result = this.agent.httpPost("/v1/cs/configs/listener", headers, params, this.agent.getEncode(), readTimeoutMs);
                if (result.ok()) {
                    this.setHealthServer(true);
                    // 格式化响应信息
                    return this.parseUpdateDataIdResponse((String)result.getData());
                }

                this.setHealthServer(false);
                LOGGER.error("[{}] [check-update] get changed dataId error, code: {}", this.agent.getName(), result.getCode());
            } catch (Exception var8) {
                this.setHealthServer(false);
                LOGGER.error("[" + this.agent.getName() + "] [check-update] get changed dataId exception", var8);
                throw var8;
            }

            return Collections.emptyList();
        }
    }
The source code of the client is analyzed here. If you want to know more about the specific implementation inside, you can check it in detail in the order above.
2.2 Server code (2.1.0)
In the process of analyzing the source code of the client above, we know that the address for polling between the client and the server is: /v1/cs/configs/listener, and the protocol is post. Then we find the corresponding location on the server. In the method, we mainly focus on the inner.doPollingConfig method:
// com.alibaba.nacos.config.server.controller.ConfigController的listener方法
// 然后再改方法中,我们关注的重点是doPollingConfig方法调用
    public String doPollingConfig(HttpServletRequest request, HttpServletResponse response,
            Map<String, String> clientMd5Map, int probeRequestSize) throws IOException {
        .
        // 判断当前请求是否为长轮询,通过对客户端源码的分析,这里走的是长轮询的机制
        if (LongPollingService.isSupportLongPolling(request)) {
            longPollingService.addLongPollingClient(request, response, clientMd5Map, probeRequestSize);
            return HttpServletResponse.SC_OK + "";
        }
        ...
}
Through the analysis of the above code, we know that we are going to go to the branch of long polling. In this branch, three things are mainly done: 1. Obtain the timeout time; 2. Convert synchronous requests to asynchronous requests, reducing the server's load Number of synchronization requests; 3. Start long polling
    public void addLongPollingClient(HttpServletRequest req, HttpServletResponse rsp, Map<String, String> clientMd5Map,
            int probeRequestSize) {
        // 获取超时时间
        String str = req.getHeader(LongPollingService.LONG_POLLING_HEADER);
        // 不允许断开的标记
        String noHangUpFlag = req.getHeader(LongPollingService.LONG_POLLING_NO_HANG_UP_HEADER);
        // 应用名称
        String appName = req.getHeader(RequestUtil.CLIENT_APPNAME_HEADER);
        String tag = req.getHeader("Vipserver-Tag");
        // 延时时间
        int delayTime = SwitchService.getSwitchInteger(SwitchService.FIXED_DELAY_TIME, 500);

        // 提前500s返回一个响应,避免客户端出现超时,超时时间计算为29.5s
        long timeout = Math.max(10000, Long.parseLong(str) - delayTime);
        if (isFixedPolling()) {
            timeout = Math.max(10000, getFixedPollingInterval());
            // Do nothing but set fix polling timeout.
        } else {
            long start = System.currentTimeMillis();
            List<String> changedGroups = MD5Util.compareMd5(req, rsp, clientMd5Map);
            if (changedGroups.size() > 0) {
                generateResponse(req, rsp, changedGroups);
                LogUtil.CLIENT_LOG.info("{}|{}|{}|{}|{}|{}|{}", System.currentTimeMillis() - start, "instant",
                        RequestUtil.getRemoteIp(req), "polling", clientMd5Map.size(), probeRequestSize,
                        changedGroups.size());
                return;
            } else if (noHangUpFlag != null && noHangUpFlag.equalsIgnoreCase(TRUE_STR)) {
                LogUtil.CLIENT_LOG.info("{}|{}|{}|{}|{}|{}|{}", System.currentTimeMillis() - start, "nohangup",
                        RequestUtil.getRemoteIp(req), "polling", clientMd5Map.size(), probeRequestSize,
                        changedGroups.size());
                return;
            }
        }
        // 获取客户端ip
        String ip = RequestUtil.getRemoteIp(req);

        // 把当前请求转换为一个异步请求(意味着tomcat线程被释放,最后需要asyncContext来手动完成响应)
        final AsyncContext asyncContext = req.startAsync();

        asyncContext.setTimeout(0L);
        // 开始执行长轮询,通过线程池创建执行任务,线程池类型为SingleScheduledExecutorService
        ConfigExecutor.executeLongPolling(
                new ClientLongPolling(asyncContext, clientMd5Map, ip, probeRequestSize, timeout, appName, tag));
    }
The next thing we need to pay attention to is this long polling task, which is executed by the thread pool. Next, we need to pay attention to the run() method of ClientLongPolling. This method is mainly divided into two parts, one part starts after a delay of 29.5 seconds Make long link responses; part of that is putting long links into allsubs.
        public void run() {
            // 构建一个异步任务,延后29.5s执行,如果达到29.5秒以后没有做任何配置的修改,则自行触发执行,即进行长链接响应
            asyncTimeoutFuture = ConfigExecutor.scheduleLongPolling(() -> {
                try {
                    getRetainIps().put(ClientLongPolling.this.ip, System.currentTimeMillis());

                    // 获取删除标识,该标识是一个防止重复响应的标识,在前面讲述原理的时候说过,
                    // 长链接的响应有两种情况,一种是超时响应,一种是变更响应,就是使用该标识进行判断
                    boolean removeFlag = allSubs.remove(ClientLongPolling.this);
                    // 如果删除成功,代表的就是超时响应;删除失败,代表是变更响应
                    if (removeFlag) {
                        if (isFixedPolling()) {
                            LogUtil.CLIENT_LOG
                                    .info("{}|{}|{}|{}|{}|{}", (System.currentTimeMillis() - createTime), "fix",
                                            RequestUtil.getRemoteIp((HttpServletRequest) asyncContext.getRequest()),
                                            "polling", clientMd5Map.size(), probeRequestSize);
                            List<String> changedGroups = MD5Util
                                    .compareMd5((HttpServletRequest) asyncContext.getRequest(),
                                            (HttpServletResponse) asyncContext.getResponse(), clientMd5Map);
                            if (changedGroups.size() > 0) {
                                sendResponse(changedGroups);
                            } else {
                                // 没有变更,返回null
                                sendResponse(null);
                            }
                        } else {
                            LogUtil.CLIENT_LOG
                                    .info("{}|{}|{}|{}|{}|{}", (System.currentTimeMillis() - createTime), "timeout",
                                            RequestUtil.getRemoteIp((HttpServletRequest) asyncContext.getRequest()),
                                            "polling", clientMd5Map.size(), probeRequestSize);
                            sendResponse(null);
                        }
                    } else {
                        LogUtil.DEFAULT_LOG.warn("client subsciber's relations delete fail.");
                    }
                } catch (Throwable t) {
                    LogUtil.DEFAULT_LOG.error("long polling error:" + t.getMessage(), t.getCause());
                }

            }, timeoutTime, TimeUnit.MILLISECONDS);
            // 将当前请求放入长轮询队列
            allSubs.add(this);
        }
The above is the source code information about the timeout response in the principle description, so where is the source code about the operation response? Now let's go to the construction method of LongPollingService, in which the subscription event is registered to listen for data changes
    public LongPollingService() {
        allSubs = new ConcurrentLinkedQueue<>();

        ConfigExecutor.scheduleLongPolling(new StatTask(), 0L, 10L, TimeUnit.SECONDS);

        NotifyCenter.registerToPublisher(LocalDataChangeEvent.class, NotifyCenter.ringBufferSize);

        // 注册订阅事件,用来监听配置变化
        NotifyCenter.registerSubscriber(new Subscriber() {

            @Override
            public void onEvent(Event event) {
                if (isFixedPolling()) {
                    // Ignore.
                } else {
                    if (event instanceof LocalDataChangeEvent) {
                        LocalDataChangeEvent evt = (LocalDataChangeEvent) event;
                        ConfigExecutor.executeLongPolling(new DataChangeTask(evt.groupKey, evt.isBeta, evt.betaIps));
                    }
                }
            }

            @Override
            public Class<? extends Event> subscribeType() {
                return LocalDataChangeEvent.class;
            }
        });

    }
Then we follow up DataChangeTask and find the run method, which is the source code of the operation response:
        public void run() {
            try {
                ConfigCacheService.getContentBetaMd5(groupKey);
                // 遍历所有客户端建立的获取配置变化信息的长轮询
                for (Iterator<ClientLongPolling> iter = allSubs.iterator(); iter.hasNext(); ) {

                    ClientLongPolling clientSub = iter.next();
                    // 判断当前的ClientLongPolling中,请求的key是否包含当前修改的groupkey
                    if (clientSub.clientMd5Map.containsKey(groupKey)) {
                        if (isBeta && !CollectionUtils.contains(betaIps, clientSub.ip)) {
                            continue;
                        }
                        if (StringUtils.isNotBlank(tag) && !tag.equals(clientSub.tag)) {
                            continue;
                        }

                        getRetainIps().put(clientSub.ip, System.currentTimeMillis());
                        // 将该长轮询从等待队列中移除,当移除以后,上面源码中的removeFlag则为false
                        iter.remove();
                        LogUtil.CLIENT_LOG
                                .info("{}|{}|{}|{}|{}|{}|{}", (System.currentTimeMillis() - changeTime), "in-advance",
                                        RequestUtil
                                                .getRemoteIp((HttpServletRequest) clientSub.asyncContext.getRequest()),
                                        "polling", clientSub.clientMd5Map.size(), clientSub.probeRequestSize, groupKey);
                        // 响应客户端
                        clientSub.sendResponse(Arrays.asList(groupKey));
                    }
                }

            } catch (Throwable t) {
                LogUtil.DEFAULT_LOG.error("data change error: {}", ExceptionUtil.getStackTrace(t));
            }
        }
Three nacos registration center principle
When nacos is used as the registration center, AP is used to ensure the availability of the project. After version 2.0, the client and the server have established a long link of the grpc protocol. The client sends a heartbeat task to the server every 5s, and the server will regularly check the heartbeat task. Mark the instance as unhealthy or remove the instance.
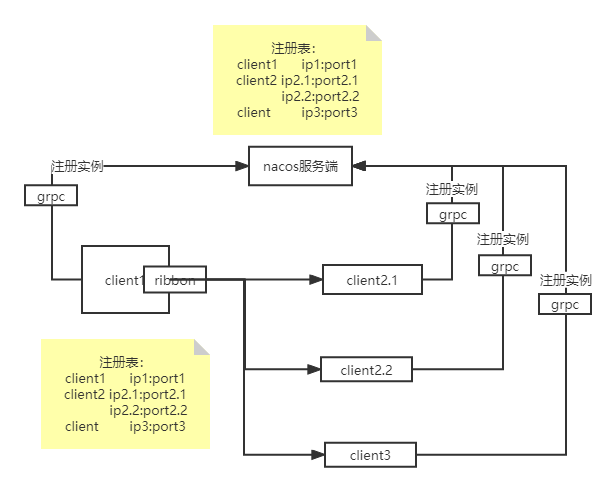
The server and each client will have registry information, and when the clients make service calls, the registry information is read locally instead of being pulled remotely.
The client establishes a long link with the server. Before 2.0, the client sends a heartbeat task to the server. The client sends a heartbeat task to the server every 5s. The server will regularly detect the heartbeat task, and no heartbeat is sent for more than 15s. task, mark the client as an unhealthy instance, and if no heartbeat task is sent for more than 30s, the instance will be removed; however, after 2.0, the grpc long link is used, and the heartbeat is no longer used, and the server actively creates a scheduled task within 3s Execute once, check the client that has not communicated for more than 20s, and then remember to send a probe request, if the response is within 1s, the detection passes, otherwise the link is removed.
When a client voluntarily goes offline or is removed by the server, the server will send a registry change event to each healthy instance, and then the client will pull it again. There will be a scheduled task on the client side, which pulls the registration list from the registration center every 6s, publishes change events, and then the subscribers update the data of the local registry.
3.1 Client
We use the NamingTest class in the nacos source code to simulate client registration. Of course, you can also analyze it through the corresponding nacos jar package in your project. The entry is NacosServiceRegistryAutoConfiguation#nacosServiceRegistry. Interested students can view it through this entry.
The reason why the NamingTest class in the source code is used for analysis is that it is more friendly to students who have no source code reading experience, and the relevant information and steps in it are relatively clear and obvious. In the entrance, the following related things are mainly done: 1. Set the relevant information of the server; 2. Set the instance information to be registered; 3. Obtain and register NacosNamingService.
    public void testServiceList() throws Exception {
        // nacos服务端的地址以及用户名和密码
        Properties properties = new Properties();
        properties.put(PropertyKeyConst.SERVER_ADDR, "127.0.0.1:8848");
        properties.put(PropertyKeyConst.USERNAME, "nacos");
        properties.put(PropertyKeyConst.PASSWORD, "nacos");
        // 客户端实例的相关信息,包含ip,port,原信息等相关数据
        Instance instance = new Instance();
        instance.setIp("1.1.1.1");
        instance.setPort(800);
        instance.setWeight(2);
        // 元数据信息,对客户端的相关描述
        Map<String, String> map = new HashMap<String, String>();
        map.put("netType", "external");
        map.put("version", "2.0");
        instance.setMetadata(map);

        // 通过工厂方法创建namingService,最终是通过反射的方式进行创建,com.alibaba.nacos.client.naming.NacosNamingService
        NamingService namingService = NacosFactory.createNamingService(properties);
        // 进入具体的注册流程
        namingService.registerInstance("nacos.test.1", instance);

        ...


    }
Next, enter the specific registration process and jump to the overloaded method of NacosNamingService#registerInstance. In this method, two things are mainly done: 1. Check the heartbeat time; 2. Register the instance through the proxy. Why use an agent? It is for compatibility with previous versions. Before 2.0, the http protocol was used for registration, and after 2.0, the grpc protocol was used for registration. Our source code analysis is based on the 2.x version, which is the long link version.
    public void registerInstance(String serviceName, String groupName, Instance instance) throws NacosException {
        // 检查心跳,心跳间隔时间以及服务删除时间必须大于心跳间隔,否则抛出异常
        NamingUtils.checkInstanceIsLegal(instance);
        // 通过代理
        clientProxy.registerService(serviceName, groupName, instance);
    }

// 看一下NamingUtils.checkInstanceIsLegal(instance);的相关代码
    public static void checkInstanceIsLegal(Instance instance) throws NacosException {
        // 心跳超时时间以及服务删除时间必须大于心跳时间,否则抛出异常
        // 当我们点击进入心跳时间,心跳超时时间,实例删除时间就会发现,这些时间与上面的原理图上面的时间是对应的
        if (instance.getInstanceHeartBeatTimeOut() < instance.getInstanceHeartBeatInterval()
                || instance.getIpDeleteTimeout() < instance.getInstanceHeartBeatInterval()) {
            throw new NacosException(NacosException.INVALID_PARAM,
                    "Instance 'heart beat interval' must less than 'heart beat timeout' and 'ip delete timeout'.");
        }
    }
// 查看一下心跳的相关时间

    // 心跳间隔时间,默认为5s
    public long getInstanceHeartBeatInterval() {
        return getMetaDataByKeyWithDefault(PreservedMetadataKeys.HEART_BEAT_INTERVAL,
                Constants.DEFAULT_HEART_BEAT_INTERVAL);
    }
    // 心跳超时时间,默认为15s
    public long getInstanceHeartBeatTimeOut() {
        return getMetaDataByKeyWithDefault(PreservedMetadataKeys.HEART_BEAT_TIMEOUT,
                Constants.DEFAULT_HEART_BEAT_TIMEOUT);
    }
    // 删除时间,默认为30s
    public long getIpDeleteTimeout() {
        return getMetaDataByKeyWithDefault(PreservedMetadataKeys.IP_DELETE_TIMEOUT,
                Constants.DEFAULT_IP_DELETE_TIMEOUT);
    }
clientProxy is a proxy. Through the init method in the construction method, we will find that its implementation type is NamingClientProxyDelegate, where we will find the implementation class that is actually responsible for registration
// 通过代理获取到真正进行注册的类
    public void registerService(String serviceName, String groupName, Instance instance) throws NacosException {
        getExecuteClientProxy(instance).registerService(serviceName, groupName, instance);
    }
// 会根据当前的实例类型进行区分,获取到真正的实现类,如果是瞬时对象(也就是注册实例),
// 则会采用grpcClientProxy,这里默认为true
    private NamingClientProxy getExecuteClientProxy(Instance instance) {
        return instance.isEphemeral() ? grpcClientProxy : httpClientProxy;
    }
Through the above code, we found the class that is really responsible for registration, then we continue to follow up, follow up to NamingGrpcClientProxy#registerService, and do two things in this method: 1. Cache the current instance information, 2. Grpc remote call
    public void registerService(String serviceName, String groupName, Instance instance) throws NacosException {
        NAMING_LOGGER.info("[REGISTER-SERVICE] {} registering service {} with instance {}", namespaceId, serviceName,
                instance);
        // 缓存当前注册的实例信息,key为服务信息+组信息,value为服务信息,组信息,实例信息
        redoService.cacheInstanceForRedo(serviceName, groupName, instance);
        // grpc远程调用
        doRegisterService(serviceName, groupName, instance);
    }

    public void doRegisterService(String serviceName, String groupName, Instance instance) throws NacosException {
        InstanceRequest request = new InstanceRequest(namespaceId, serviceName, groupName,
                NamingRemoteConstants.REGISTER_INSTANCE, instance);
        // grpc远程调用
        requestToServer(request, Response.class);
        // 注册完成以后,将缓存中的注册状态变为true
        redoService.instanceRegistered(serviceName, groupName);
    }
The specific source code in the grpc protocol will not be analyzed here temporarily. Interested students can locate rpcClient.start() through the start() method in the NamingGrpcClientProxy constructor, and view the source code through this entry.
3.2 Server
Through the service registration in the Open API guide on the nacous official website, we can find its calling address, which corresponds to the controller in the source code, that is, InstanceController, and find the register method. The most important thing in it is the method of registering instances. The analysis is as follows:
// getInstanceOperator().registerInstance(namespaceId, serviceName, instance);调用实例注册
// getInstanceOperator()方法会根据使用的协议不同,选择不同的service
private InstanceOperator getInstanceOperator() {
    // 现在使用的grpc,因此选择instanceServiceV2,类型为InstanceOperatorClientImpl
    return upgradeJudgement.isUseGrpcFeatures() ? instanceServiceV2 : instanceServiceV1;
}
Next, we enter the specific service registration process, mainly doing two things: first, establish a connection with the client, through the generated clientId; second, register the client instance
public void registerInstance(String namespaceId, String serviceName, Instance instance) {
    // 判断是否为临时实例
    boolean ephemeral = instance.isEphemeral();
    // 获取客户端id,ip:port+#+true
    String clientId = IpPortBasedClient.getClientId(instance.toInetAddr(), ephemeral);
    // 创建与客户端的链接
    createIpPortClientIfAbsent(clientId);
    // 获取服务
    Service service = getService(namespaceId, serviceName, ephemeral);
    // 注册服务实例
    clientOperationService.registerInstance(service, instance, clientId);
}
When registering an instance, a route will be selected based on whether the current instance is a temporary instance or a permanent instance. For service registration, the registered instance is a temporary instance, so the route of the temporary instance will be used. The last instance registration is done in this route
public void registerInstance(Service service, Instance instance, String clientId) {
    Service singleton = ServiceManager.getInstance().getSingleton(service);
    if (!singleton.isEphemeral()) {
        throw new NacosRuntimeException(NacosException.INVALID_PARAM,
                String.format("Current service %s is persistent service, can't register ephemeral instance.",
                        singleton.getGroupedServiceName()));
    }
    Client client = clientManager.getClient(clientId);
    if (!clientIsLegal(client, clientId)) {
        return;
    }
    // 获取实例信息
    InstancePublishInfo instanceInfo = getPublishInfo(instance);
    // 将instance添加到client中
    client.addServiceInstance(singleton, instanceInfo);
    client.setLastUpdatedTime();
    // 建立service与clientId关系
    NotifyCenter.publishEvent(new ClientOperationEvent.ClientRegisterServiceEvent(singleton, clientId));
    NotifyCenter
            .publishEvent(new MetadataEvent.InstanceMetadataEvent(singleton, instanceInfo.getMetadataId(), false));
}
Well, the source code of naocs will be analyzed here for the time being. If there is a chance later, we will analyze the source code related to health detection, service discovery, and publishing and subscription events between the client and the server.