1 Problems after the 3D project is migrated to the URP project
After the 3D project is migrated to the URP project, many rendering problems will occur, such as: material display exception, GL rendering not displaying, multi-pass rendering exception, screen post-processing exception, etc. Some simple solutions to these problems will be given below.
For URP official tutorial and API details, please refer to → Universal RP Documentation , Universal RP API , and for URP project environment construction details, please refer to → Shader Graph Introduction .
For the complete resources of this article, see → Renderer Feature experiment .
1) Built-in material rendering exception
Select the abnormal built-in material in the Assets window, click【Edit→Rendering→Materials→Convert Selected Built-in Materials to URP】in turn, the abnormal material will be automatically converted to the URP built-in material, and the shader corresponding to the converted material is "Universal Render Pipeline/Lit".

2) GL does not render
In a 3D project, execute GL commands in the OnPostRender method of the MonoBehaviour's life cycle (see → Using GL to draw line segments for details ). However, the OnPostRender method in the URP project will not be called back, and we can move the GL command to the OnRenderObject method to achieve GL rendering.
3) Multi-Pass rendering exception
In the URP project, we can modify the LightMode property in the Tag to achieve multi-pass rendering, as follows. However, this solution only allows rendering up to 3 Pass channels.
Tags{ "LightMode" = "SRPDefaultUnlit" }
Tags{ "LightMode" = "UniversalForward" }
Tags{ "LightMode" = "LightweightForward" }
4) After-screen processing exception
In the 3D project, we implement the screen post-processing in the OnRenderImage method of the MonoBehaviour's life cycle (see → adjust screen brightness, saturation, and contrast for details ). However, in URP projects, the OnRenderImage method does not call back. Fortunately, Unity provides us with the Rnederer Feature (see Section 3 for details), which provides a solution for screen post-processing. In addition, post-screen special effects can also be realized through Global Volume.
2 Renderer Objects
2.1 Introduction to Render Objects
RenderObjects is an implementation of ScriptableRendererFeature, which renders the objects of the specified layer through RenderObjectsPass. Select the Universal Renderer Data file in the Assets window, and click [Add Renderer Feature→Render Objects] in the Inspector window, as follows.
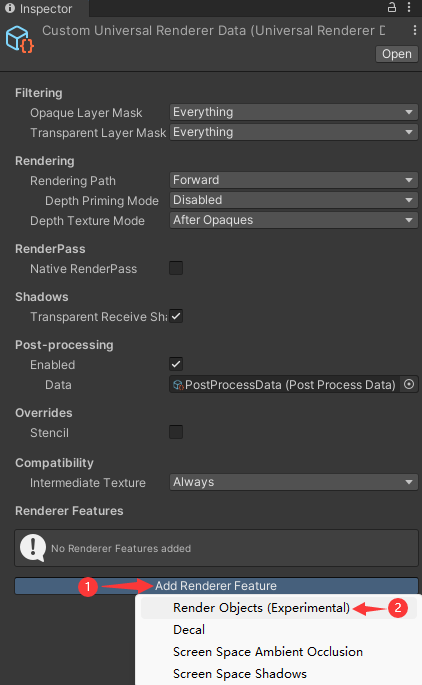
After adding Render Objects, the display is as follows.

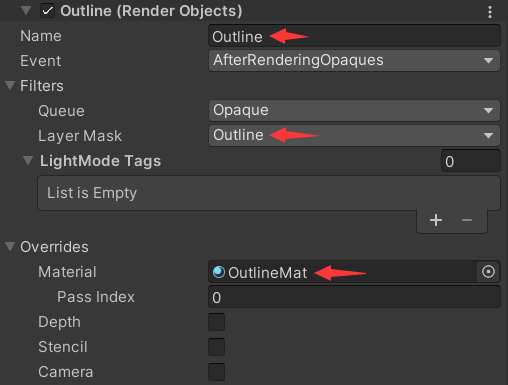
- Name : Render Objects identifier, it is recommended to modify, you can see the identifier in the Frame Debugger window;
- Event : The timing point of rendering, at what timing the rendering event is executed, see RenderPassEvent for details;
- Queue : rendering queue;
- Layer Mask : render the game object of the specified layer;
- LightMode Tags : rendering path, the values are: SRPDefaultUnlit, UniversalForward, LightweightForward;
- Material : the material to be rendered, after dragging the material, you need to set the Pass Index (Pass channel index);
- Depth : Depth test configuration, after opening, you can configure Write Depth (write depth buffer) and Depth Test (depth test, the values are Less, Equal, etc.);
- Stencil : Stencil test configuration. After opening, you can configure Value (stencil reference value), Compare Function (comparison function, values include Less, Equal, etc.), Pass (strategy when both stencil test and depth test pass, and values include Keep, Replace, etc.), Fail (strategy when template test fails, values include Keep, Replace, etc.), ZFail (strategy when template test passes but depth test fails, values include Keep, Replace, etc.),
- Camera : Camera configuration, you can configure Field of View (angle of view) and Position Offset (offset) after it is turned on.
public enum RenderPassEvent {
	BeforeRendering = 0, // 渲染前
	BeforeRenderingShadows = 50, // 渲染阴影前
	AfterRenderingShadows = 100, // 渲染阴影后
	BeforeRenderingPrePasses = 150, // 渲染PrePasses前
	[EditorBrowsable(EditorBrowsableState.Never)]
	[Obsolete("Obsolete, to match the capital from 'Prepass' to 'PrePass' (UnityUpgradable) -> BeforeRenderingPrePasses")]
	BeforeRenderingPrepasses = 151, // 渲染PrePasses前
	AfterRenderingPrePasses = 200, // 渲染PrePasses后
	BeforeRenderingGbuffer = 210, // 渲染Gbuffer前
	AfterRenderingGbuffer = 220, // 渲染Gbuffer后
	BeforeRenderingDeferredLights = 230, // 渲染延时光照前
	AfterRenderingDeferredLights = 240, // 渲染延时光照后
	BeforeRenderingOpaques = 250, // 渲染不透明物体前
	AfterRenderingOpaques = 300, // 渲染不透明物体后
	BeforeRenderingSkybox = 350, // 渲染天空盒子前
	AfterRenderingSkybox = 400, // 渲染天空盒子后
	BeforeRenderingTransparents = 450, // 渲染透明物体前
	AfterRenderingTransparents = 500, // 渲染透明物体后
	BeforeRenderingPostProcessing = 550, // 屏幕后处理前
	AfterRenderingPostProcessing = 600, // 屏幕后处理后
	AfterRendering = 1000 // 渲染前
}
2.2 Render Objects application
This section will introduce the application of Render Objects through a simple stroke effect. For more complex strokes, see→ Selected object stroke effects , stroke methods based on stencil testing and vertex expansion , edge detection effects , based on depth and normal Edge detection method for textures .
1) Create Shader
Outline.shader
Shader "MyShader/Outline" {
    Properties {
        _OutlineColor("_OutlineColor", Color) = (1, 0, 0, 1) // 描边颜色
        _OutlineWidth("Outline Width", Range(0.01, 1)) = 0.1 // 描边宽度
    }

    SubShader {
        Pass {
            Cull Front // 关闭剔除渲染, 取值有: Off、Front、Back, Off表示正面和背面都渲染

            CGPROGRAM
            #include "UnityCG.cginc"

            #pragma vertex vert
            #pragma fragment frag

            fixed4 _OutlineColor; // 描边颜色
            float _OutlineWidth; // 描边宽度

            struct a2v {
                float4 vertex : POSITION; // 模型空间顶点坐标
                float3 normal : NORMAL; // 模型空间法线向量
            };

            struct v2f {
                float4 pos : SV_POSITION; // 裁剪空间顶点坐标
            };

            v2f vert(a2v v) {
                v2f o;
                float3 viewNormal = normalize(mul((float3x3)UNITY_MATRIX_IT_MV, v.normal)); // 观察空间法线向量
                float3 viewPos = UnityObjectToViewPos(v.vertex); // 观察空间顶点坐标
                o.pos = UnityViewToClipPos(viewPos + viewNormal * _OutlineWidth * (-viewPos.z) * 0.1); // 裁剪空间顶点坐标
                return o;
            }

            fixed4 frag(v2f i) : SV_Target {
                return _OutlineColor;
            }

            ENDCG
        }
    }
}
Instructions: Create a material and rename it OutlineMat, drag Outline.shader into OutlineMat.
2) Create Render Objects
Select the Universal Renderer Data file in the Assets window, click Add Renderer Feature in the Inspector window to add Render Objects, and configure Render Objects as follows.
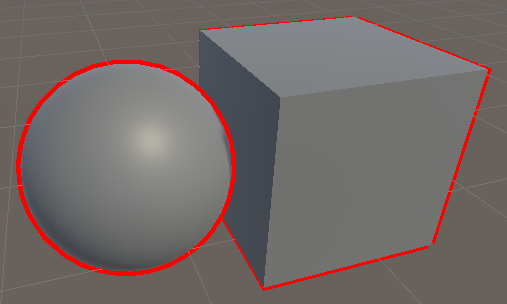
3) Running effect
Set the layer to Outline for the object that needs to be stroked, the effect is as follows.
3 Custom Renderer Feature
To use Renderer Feature, we need to write two classes: Feature class inherited from ScriptableRendererFeature and Pass class inherited from ScriptableRenderPass .
3.1 Introduction to Renderer Feature
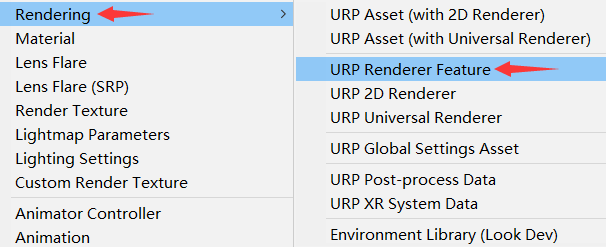
1) Create a Renderer Feature
Right-click on the Assets window, pop up the menu bar, and select [Create→Rendering→URP Renderer Feature] in turn to generate the CustomRenderPassFeature.cs file.
2)CustomRenderPassFeature
Open the CustomRenderPassFeature.cs file as follows, in which the Debug log is added by the author, for the convenience of viewing the Feature life cycle later.
using UnityEngine;
using UnityEngine.Rendering;
using UnityEngine.Rendering.Universal;

public class CustomRenderPassFeature : ScriptableRendererFeature { // 自定义的Feature
    class CustomRenderPass : ScriptableRenderPass { // 自定义的Pass
        public override void OnCameraSetup(CommandBuffer cmd, ref RenderingData renderingData) { // 渲染Pass前回调, 此处可以申请内存
            Debug.Log("CustomRenderPass-OnCameraSetup");
        }

        public override void Execute(ScriptableRenderContext context, ref RenderingData renderingData) { // 渲染执行逻辑
            Debug.Log("CustomRenderPass-Execute");
        }

        public override void OnCameraCleanup(CommandBuffer cmd) { // 渲染Pass后回调, 此处可以清除内存操作
            Debug.Log("CustomRenderPass-OnCameraCleanup");
        }
    }

    CustomRenderPass m_ScriptablePass; // 自定义的Pass

    public override void Create() { // 创建自定义的Pass
        Debug.Log("CustomRenderPassFeature-Create");
        m_ScriptablePass = new CustomRenderPass();
        m_ScriptablePass.renderPassEvent = RenderPassEvent.AfterRenderingOpaques; // 渲染事件注入的时机
    }

    public override void AddRenderPasses(ScriptableRenderer renderer, ref RenderingData renderingData) { // 将Pass添加到渲染队列中
        Debug.Log("CustomRenderPassFeature-AddRenderPasses");
        renderer.EnqueuePass(m_ScriptablePass);
    }
}
3) Add custom Renderer Feature
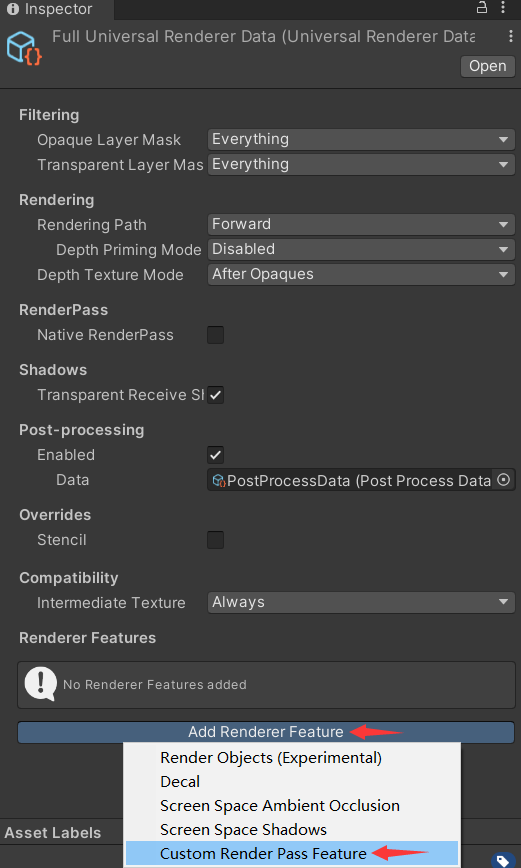
Select the Universal Renderer Data file in the Assets window, and click [Add Renderer Feature→Custom Render Pass Feature] in the Inspector window, as follows.
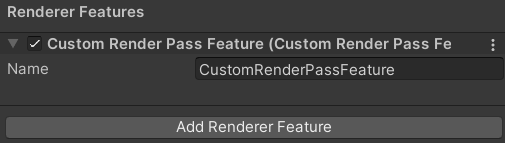
After adding the Custom Render Pass Feature, the display is as follows, the Name is suggested to be modified, and the Name can be seen in the Frame Debugger, which is convenient for debugging.
4) Renderer Feature life cycle
After running the program, the print log is as follows.
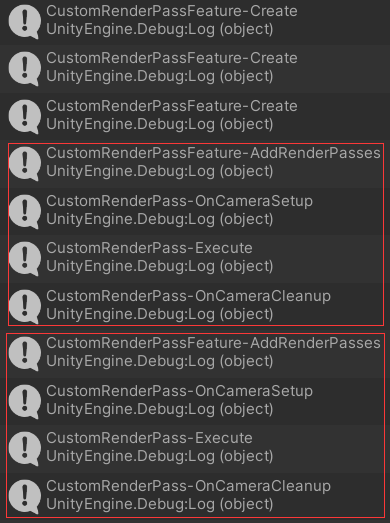
The following conclusions can be drawn from the logs:
- The execution sequence of Render Feature is: Create→AddRenderPasses→OnCameraSetup→Execute→OnCameraCleanup;
- The Create method is only executed several times when the program starts, and will not be executed later;
- AddRenderPasses, OnCameraSetup, Execute, OnCameraCleanup methods will be executed every frame.
3.2 Renderer Feature application
This section introduces the application of Render Feature in screen post-processing through a case of adjusting screen brightness, saturation, and contrast .
1) Create a custom Feature
FullscreenFeature.cs
using UnityEngine.Rendering.Universal;
using UnityEngine;

public class FullscreenFeature : ScriptableRendererFeature {
    public Settings settings = new Settings(); // 设置
    FullscreenPass blitPass; // 后处理的Pass

    public override void Create() { // 创建后处理Pass(自动回调)
        blitPass = new FullscreenPass(name);
    }

    public override void AddRenderPasses(ScriptableRenderer renderer, ref RenderingData renderingData) { // 添加渲染Pass(自动回调)
        if (settings.blitMaterial == null) {
            return;
        }
        blitPass.renderPassEvent = settings.renderPassEvent;
        blitPass.settings = settings;
        renderer.EnqueuePass(blitPass);
    }

    [System.Serializable]
    public class Settings { // 配置项
        public RenderPassEvent renderPassEvent = RenderPassEvent.AfterRenderingOpaques;
        public Material blitMaterial = null;
    }
}
Note: FullscreenFeature is not a single instance, and multiple instances can be configured in Universal Renderer Data (there may be multiple screen post-processing effects).
2) Create a custom Pass
FullscreenPass.cs
using UnityEngine.Rendering.Universal;
using UnityEngine.Rendering;
using UnityEngine;

internal class FullscreenPass : ScriptableRenderPass {
    public FullscreenFeature.Settings settings; // 配置项
    private string profilerTag; // 分析器标签, 在Frame Debugger中可以看到该标签
    private RenderTargetIdentifier source; // 源缓存标识
    private RenderTargetIdentifier destination; // 目标缓存标识
    private int destinationId; // 目标缓存id
    private FilterMode filterMode; // 纹理采样滤波模式, 取值有: Point、Bilinear、Trilinear

    public FullscreenPass(string tag) {
        profilerTag = tag;
        destinationId = Shader.PropertyToID("_TempRT");
    }

    public override void OnCameraSetup(CommandBuffer cmd, ref RenderingData renderingData) { // 渲染前回调
        RenderTextureDescriptor blitTargetDescriptor = renderingData.cameraData.cameraTargetDescriptor;
        blitTargetDescriptor.depthBufferBits = 0;
        ScriptableRenderer renderer = renderingData.cameraData.renderer;
        source = renderer.cameraColorTarget;
        cmd.GetTemporaryRT(destinationId, blitTargetDescriptor, filterMode);
        destination = new RenderTargetIdentifier(destinationId);
    }

    public override void Execute(ScriptableRenderContext context, ref RenderingData renderingData) { // 执行渲染
        CommandBuffer cmd = CommandBufferPool.Get(profilerTag);
        Blit(cmd, source, destination, settings.blitMaterial);
        Blit(cmd, destination, source);
        context.ExecuteCommandBuffer(cmd);
        CommandBufferPool.Release(cmd);
    }

    public override void FrameCleanup(CommandBuffer cmd) { // 渲染后回调
        if (destinationId != -1) {
            cmd.ReleaseTemporaryRT(destinationId);
        }
    }
}
3) Create Shader
BrigSatuCont.shader
Shader "MyShader/BrightnessSaturationContrast" { // 调整亮度、饱和度、对比度
    Properties{
        _MainTex("Base (RGB)", 2D) = "white" {} // 主纹理
        _Brightness("Brightness", Range(0.5, 3)) = 1 // 亮度
        _Saturation("Saturation", Range(0.1, 5)) = 1 // 饱和度
        _Contrast("Contrast", Range(0.4, 3)) = 1 // 对比度
    }

    SubShader{
        Pass {
            // 深度测试始终通过, 关闭深度写入
            //ZTest Always ZWrite Off

            CGPROGRAM
            #pragma vertex vert_img // 使用内置的vert_img顶点着色器
            #pragma fragment frag
            #include "UnityCG.cginc"

            sampler2D _MainTex; // 主纹理
            half _Brightness; // 亮度
            half _Saturation; // 饱和度
            half _Contrast; // 对比度

            fixed4 frag(v2f_img i) : SV_Target { // v2f_img为内置结构体, 里面只包含pos和uv
                fixed4 tex = tex2D(_MainTex, i.uv); // 纹理采样
                fixed3 finalColor = tex.rgb * _Brightness; // 应用亮度_Brightness
                fixed luminance = 0.2125 * tex.r + 0.7154 * tex.g + 0.0721 * tex.b; // 计算亮度
                fixed3 luminanceColor = fixed3(luminance, luminance, luminance); // 饱和度为0、亮度为luminance的颜色
                finalColor = lerp(luminanceColor, finalColor, _Saturation); // 应用饱和度_Saturation
                fixed3 avgColor = fixed3(0.5, 0.5, 0.5); // 饱和度为0、亮度为0.5的颜色
                finalColor = lerp(avgColor, finalColor, _Contrast); // 应用对比度_Contrast
                return fixed4(finalColor, tex.a);
            }

            ENDCG
        }
    }

    Fallback Off
}
Instructions: Create a material and rename it to BrigSatuContMat, drag BrigSatuCont.shader into BrigSatuContMat.
4) Add Features
Select the Universal Renderer Data file in the Assets window, and click [Add Renderer Feature→Fullscreen Feature] in the Inspector window, as follows.

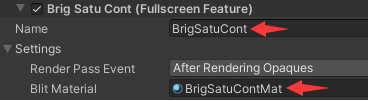
Drag the BrigSatuContMat material to the Renderer Feature, and modify the Name property to BrigSatuCont, as follows.
5) Running effect
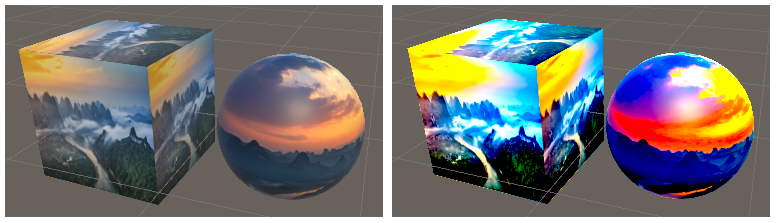
By modifying the properties of Brightness, Saturation and Contrast in BrigSatuContMat, the running effect is as follows. The left side is the original image, and the right side is the rendering effect after adjusting the brightness, saturation, and contrast.
6) Dynamically obtain Feature
If users want to obtain Renderer Feature in MonoBehaviour, they can obtain it through the following code snippet.
private FullscreenFeature GetFeature(string name) { // 获取feature
    UniversalRendererData rendererData = Resources.Load<UniversalRendererData>("Full Universal Renderer Data");
    if (rendererData != null && !string.IsNullOrEmpty(name)) {
        List<FullscreenFeature> features = rendererData.rendererFeatures.OfType<FullscreenFeature>().ToList();
        foreach (FullscreenFeature feature in features) {
            if (name.Equals(feature.name)) {
                return feature;
            }
        }
    }
    return null;
}
Renderer Feature can also be obtained through the following tool classes.
URPFeatureUtils.cs
using UnityEngine.Rendering.Universal;
using UnityEngine.Rendering;
using System.Reflection;

public class URPFeatureUtils {
    private static URPFeatureUtils instance; // 单例
    private UniversalRendererData rendererData; // 渲染数据, 存储了feature列表

    private URPFeatureUtils() {
        rendererData = GetRendererData();
    }

    public static T GetFeature<T>(string name) where T : ScriptableRendererFeature { // 获取feature
        if (instance == null) {
            instance = new URPFeatureUtils();
        }
        if (instance.rendererData != null) {
            return GetFeature<T>(instance.rendererData, name);
        }
        return null;
    }

    private static T GetFeature<T>(UniversalRendererData rendererData, string name) where T : ScriptableRendererFeature { // 获取feature
        if (rendererData != null && !string.IsNullOrEmpty(name)) {
            foreach (ScriptableRendererFeature feature in rendererData.rendererFeatures) {
                if (feature is T && name.Equals(feature.name)) {
                    return (feature as T);
                }
            }
        }
        return null;
    }

    private UniversalRendererData GetRendererData() { // 通过反射获取渲染数据, 也可以通过Resources.Load加载, 但是需要将UniversalRendererData文件放在Resources目录下
        UniversalRenderPipelineAsset urpAsset = GraphicsSettings.renderPipelineAsset as UniversalRenderPipelineAsset;
        FieldInfo propertyInfo = urpAsset.GetType().GetField("m_RendererDataList", BindingFlags.Instance | BindingFlags.NonPublic);
        ScriptableRendererData[] rendererDatas = (ScriptableRendererData[])propertyInfo.GetValue(urpAsset);
        if (rendererDatas != null && rendererDatas.Length > 0 && (rendererDatas[0] is UniversalRendererData)) {
            return rendererDatas[0] as UniversalRendererData;
        }
        return null;
    }
}
Explanation: The reason for using reflection is that the m_RendererDataList property in UniversalRenderPipelineAsset is not public, and there is no interface for obtaining m_RendererDataList for the outside world.