Explain the basics of ssh remote login.
Table of contents
0. Basic concepts
SSH (Secure Shell) is a secure remote login protocol designed to provide better security than traditional unencrypted remote login protocols. The SSH protocol adopts the client-server architecture, and realizes the communication between the client and the server by establishing a secure channel. The SSH protocol has three layers: transport layer, user authentication layer, and connection layer. The transport layer is responsible for ensuring communication security, the user authentication layer is responsible for verifying user identities, and the connection layer provides a mechanism similar to terminal sessions and supports command line operations.
The advantage of the SSH protocol is that it can provide encrypted secure communication, reduce the risk of being attacked by a man-in-the-middle or the risk of password eavesdropping, and can also provide data integrity and authentication mechanisms. The SSH protocol also has many applications, such as remote login, file transfer, secure copy, port forwarding, etc.
For our users, there is no need to know the principle. Just know that SSH communication consists of two parts, namely ssh客户端程序and ssh服务端程序. Before connecting, the ssh server program of the remote target machine must be kept open, and then the local host uses the ssh client program to initiate a connection request, and the login is successful after entering the password.
1. Install the ssh program
The following describes how to install ssh on the linux and windows platforms.
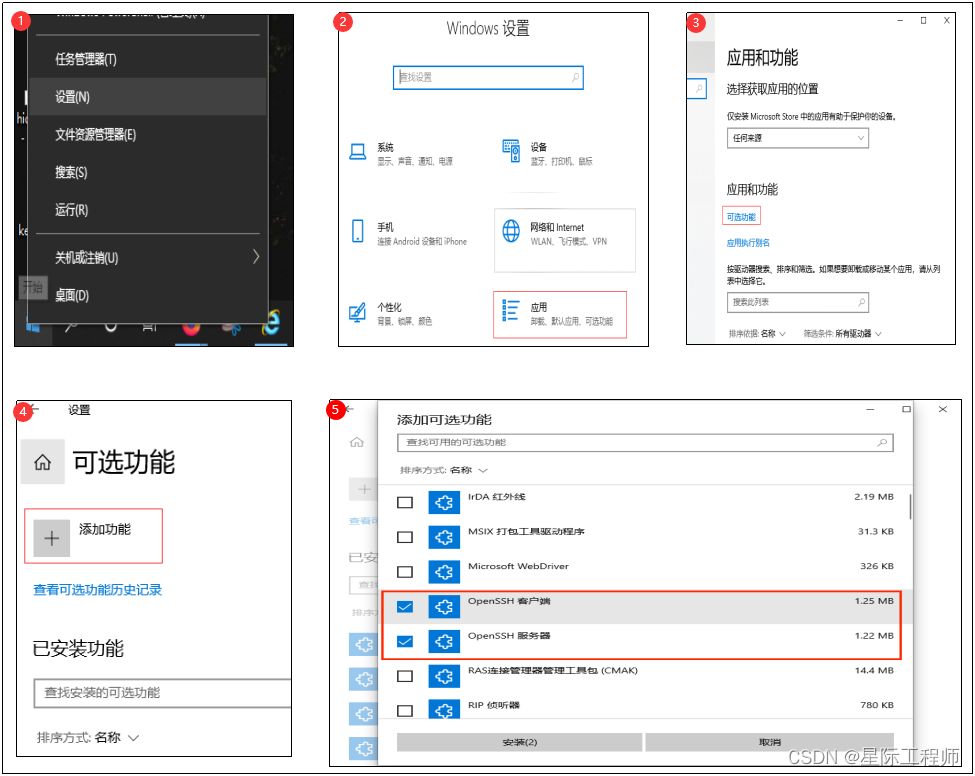
1.1 windows platform (Win10)
1. Install the ssh client and server.
Normally, the system installs the ssh client by default, depending on the specific situation.
2. Start and close the ssh service
Call the cmd or powershell terminal, and then execute the following commands according to the situation
Start the service: net start sshd
Close the service: net stop sshd
1.2 Linux platform (Ubuntu18.04)
1. Install the ssh client and server.
Normally, the system installs the ssh client by default, depending on the specific situation.
sudo apt install openssh-server
sudo apt install openssh-client
2. Open service and close service
#启动服务
sudo systemctl start ssh

#关闭服务
sudo systemctl stop ssh

#重启服务
sudo systemctl restart ssh
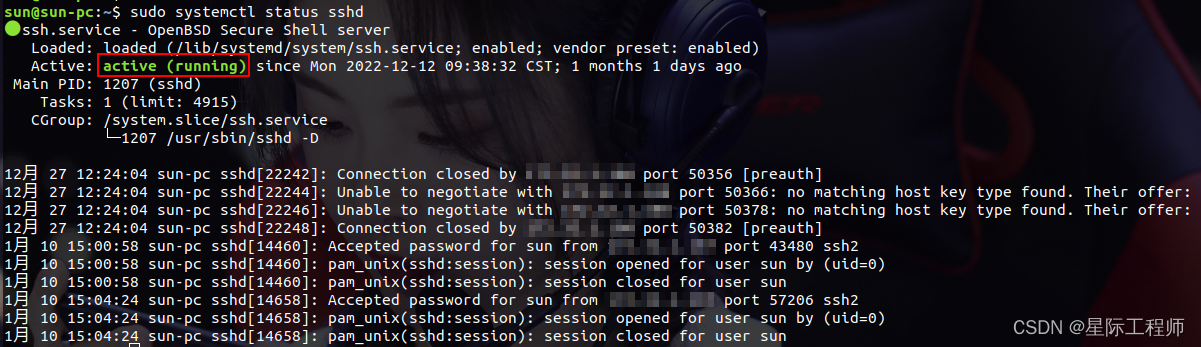
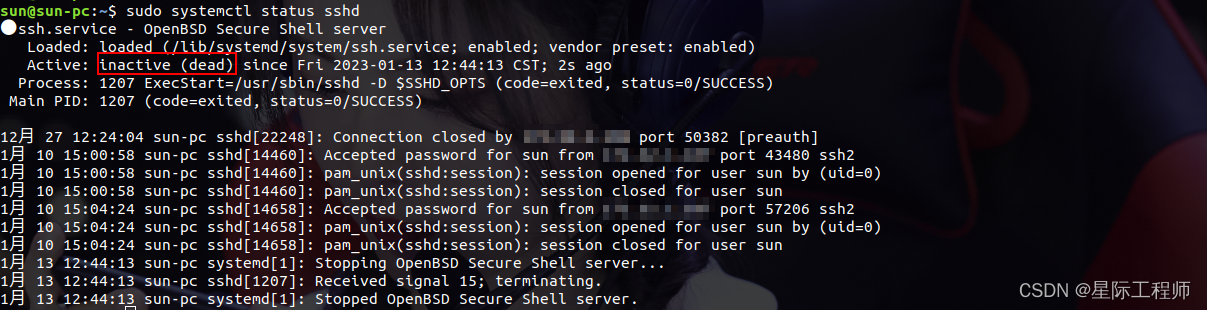
3. View service status
sudo systemctl status sshd
On state:
Disabled:
2. Password remote login
Regardless of whether it is a linux or a windows system, the command format for remote login using the ssh client is the same ssh 用户名@ip地址. It is known that the account sun has been registered in the remote machine and the password has been set. The login example is as follows:
fan@pc:~$ ssh [email protected]
[email protected]'s password:
Welcome to Ubuntu 18.04.5 LTS (GNU/Linux 5.4.0-146-generic x86_64)

 * Documentation:  https://help.ubuntu.com
 * Management:     https://landscape.canonical.com
...
Last login: Mon Apr 24 18:50:03 2023 from 172.32.1.76
sun@pc:~$
After the login is successful, you can use the account (sun) to perform command line operations on this remote machine.
3. Key way remote login
In fact, ssh uses the key to log in by default. One of the advantages of key login is that you don’t need to enter a password when you log in. The principle is probably to verify whether the key and the public key match when you log in. Between each key and the public key are uniquely matched. Let's talk about the preparation work in detail:
3.1 Generate private key public key pair
Execute commands on the local machine ssh-keygen -t rsa -C “邮箱”, for example:
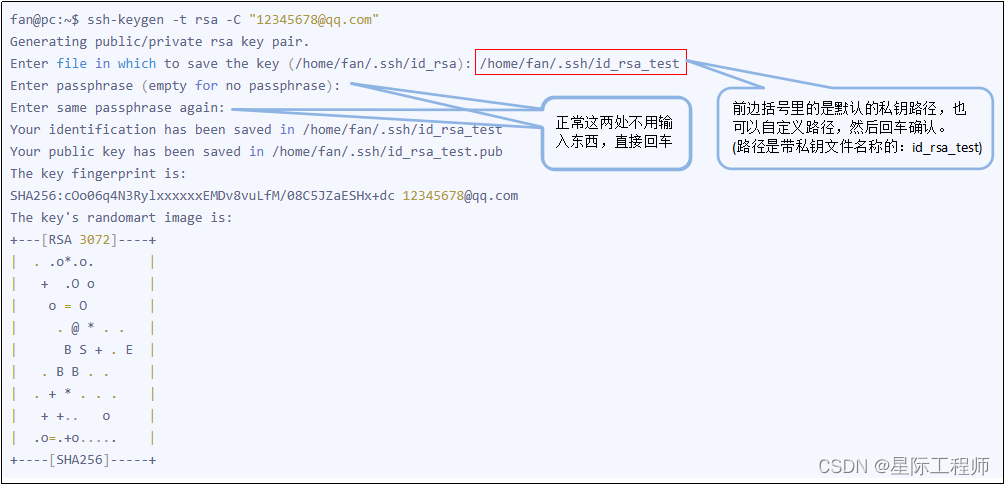
After the above is executed, the id_rsa and id_rsa.pub files will be generated under the /home/fan/.ssh/ path. Among them, id_rsa is the file that records the private key, and id_rsa.pub is the file that records the public key.
3.2 Copy the public key to the remote machine
Copy and append the content of the id_rsa.pub file generated in the previous step to the remote machine /home/用户名/.ssh/authorized_keys.
3.3 Try ssh remote login
After the above two steps are completed, execute the ssh login command. Normally, you should be able to connect without a password. example:
fan@pc:~$ ssh [email protected]
From a theoretical point of view, each private key and public key can be placed on multiple machines, and each private key (public key) has a unique matching public key (private key). However, it is definitely not recommended to do so in terms of security.
4. Frequently Asked Questions
4.1 [email protected]: Permission denied (publickey).
This problem occurs when using git to pull the code, and it has always been easy to use before. Later, because ubuntu was upgraded to 22.04, ssh was also upgraded to OpenSSH_8.9p1. According to the official statement, this version of ssh does not use the rsa algorithm authentication by default, and the local machine and the server have been directly using the rsa encrypted key, so this problem was reported.
Solution: Add the following sentence in /etc/ssh/ssh_config to enable rsa algorithm authentication
PubkeyAcceptedAlgorithms +ssh-rsa
4.2 Received disconnect from 192.168.1.21 port 22:2: Too many authentication failures
When connecting to a remote machine with ssh, the above error was reported. This is because I have created many pairs of keys locally, and the number of times to verify the private key and public key exceeds the maximum number of verifications when connecting, which caused this problem.
Solution 1 (recommended):
Increase the maximum verification times of the remote machine, edit the /etc/ssh/sshd_config file in the remote machine, and add the following content:
# 这个次数可以依照具体情况进行调整
MaxAuthTries 10
Then restart the sshd service of the remote machine, the restart command can be seen above 1. Install the ssh program .
Solution 2:
Use the option when connecting Pubkeyauthentication, so that this login will not use the key authentication login method but the password login method.
ssh [email protected] -o Pubkeyauthentication=no
Solution 3:
If you want to permanently set the login without key authentication. You can directly edit the /etc/ssh/ssh_config file and add it PubkeyAuthentication no.
Note that sshd_config and ssh_config above should not be confused. sshd_config is the server program configuration file, and ssh_config is the client program configuration file.