Project cloud
The coding test of the website has been completed in the early stage, so how to deploy the project to the cloud server? This blog takes Alibaba Cloud Server ECS and PolarDB as examples, follows the principle that pictures are better than text, and explains how to quickly migrate projects to the cloud. It can be called a nanny-level tutorial, teaching you to deploy projects step by step, and play with cloud databases and cloud servers at the same time. Xiaobai can also get started quickly, so don't talk nonsense, just come to practice directly, hoping to help someone who is destined.
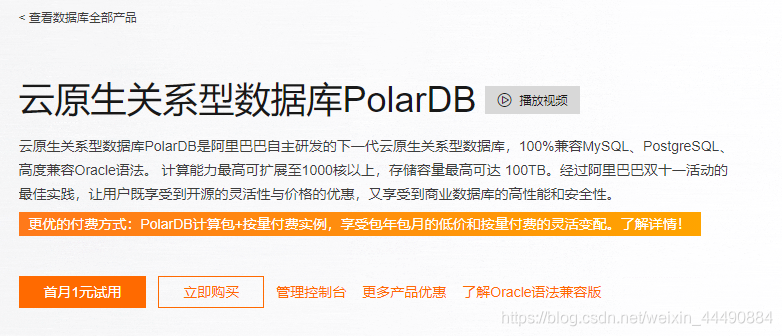
Chapter 1 Cloud Database Construction
Step 1: Enter the official website
Step Two: Start Building
First log in to the account, and then click the first month one-yuan trial as shown below
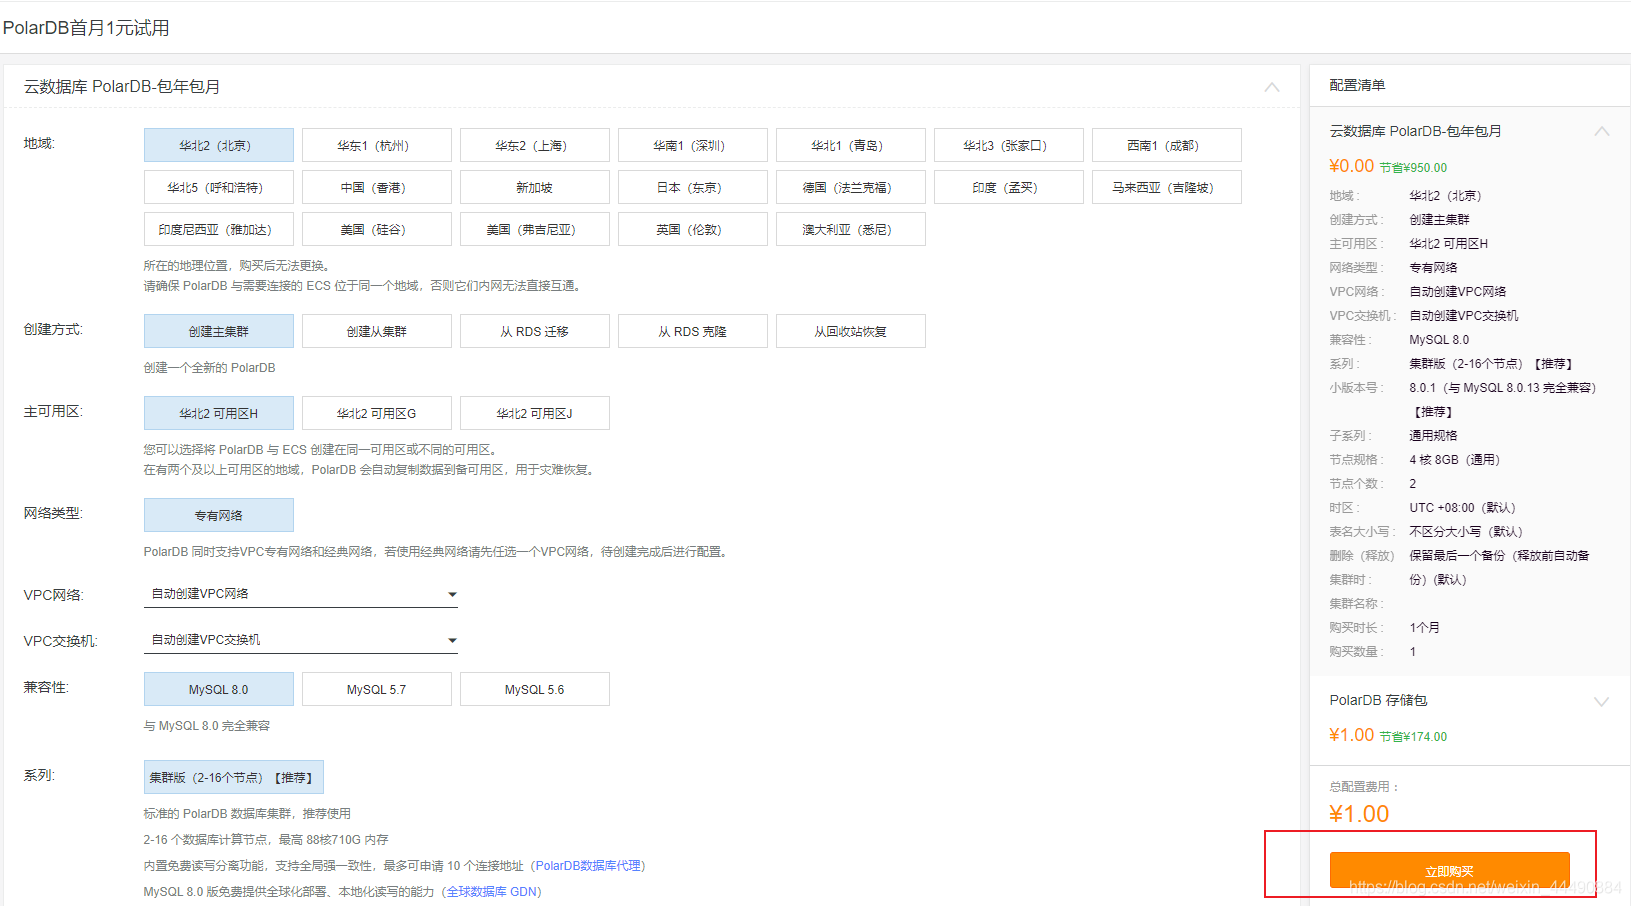
Step 3: Adjust configuration
New users can try 2-core 8G for one month for 1 yuan, as shown in the picture, click to buy now
Step 4: Check the service agreement
Check the service agreement, click to pay, and start a 1 yuan trial.

Step 5: The cluster is built successfully
Click Admin Console to get started. Note: It takes 10-15 minutes to open successfully
![[External link image transfer failed, the source site may have an anti-leeching mechanism, it is recommended to save the image and upload it directly (img-6xCeMT0p-1627959671000)(../Typora/Typora-images/image-20210723160705376.png)]](https://img-blog.csdnimg.cn/50eac3adddba4ceb9e6333797100d100.png?x-oss-process=image/watermark,type_ZmFuZ3poZW5naGVpdGk,shadow_10,text_aHR0cHM6Ly9ibG9nLmNzZG4ubmV0L3dlaXhpbl80NDQ5MDg4NA==,size_16,color_FFFFFF,t_70)
![[External link image transfer failed, the source site may have an anti-leeching mechanism, it is recommended to save the image and upload it directly (img-HSBrRtWr-1627959671003)(../Typora/Typora-images/image-20210723160730145.png)]](https://img-blog.csdnimg.cn/dab8e06b45044106a85785533a9350b0.png?x-oss-process=image/watermark,type_ZmFuZ3poZW5naGVpdGk,shadow_10,text_aHR0cHM6Ly9ibG9nLmNzZG4ubmV0L3dlaXhpbl80NDQ5MDg4NA==,size_16,color_FFFFFF,t_70)
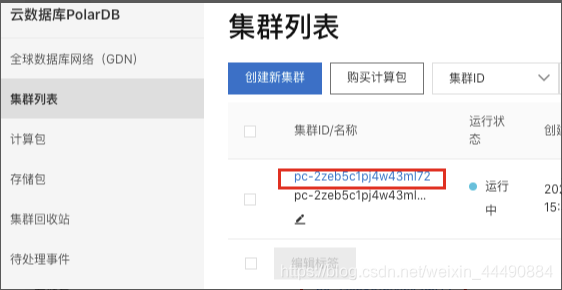
Step 6: Enter the console
Switch to the regional console as shown in the figure, and you can observe the list of database clusters being created
![[External link image transfer failed, the source site may have an anti-leeching mechanism, it is recommended to save the image and upload it directly (img-p7VlFx0v-1627959671004)(../Typora/Typora-images/image-20210723160813912.png)]](https://img-blog.csdnimg.cn/7fae84d61d954b998a368879cead664f.png?x-oss-process=image/watermark,type_ZmFuZ3poZW5naGVpdGk,shadow_10,text_aHR0cHM6Ly9ibG9nLmNzZG4ubmV0L3dlaXhpbl80NDQ5MDg4NA==,size_16,color_FFFFFF,t_70)
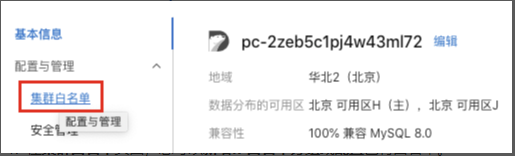
Step 7: Set the cluster whitelist
You need to set the IP whitelist of the cluster and create the initial account of the cluster before you can connect and use the cluster
- Click the cluster ID as shown in the figure.
2. In the left navigation bar, click Configuration and Management > Cluster Whitelist .
3. On the cluster whitelist page, you can add an IP whitelist group or configure an existing whitelist.
![[External link image transfer failed, the source site may have an anti-leeching mechanism, it is recommended to save the image and upload it directly (img-OJK1D3tN-1627959671005)(../Typora/Typora-images/image-20210723161252785.png)]](https://img-blog.csdnimg.cn/da776f96e193423a95c1fe2a0558c816.png?x-oss-process=image/watermark,type_ZmFuZ3poZW5naGVpdGk,shadow_10,text_aHR0cHM6Ly9ibG9nLmNzZG4ubmV0L3dlaXhpbl80NDQ5MDg4NA==,size_16,color_FFFFFF,t_70)
4. Click Add IP Whitelist Group .
In the Add IP whitelist group panel, enter the group name and the IP whitelist addresses that are allowed to be accessed.
The IP address in the white list includes: the IP address of your own computer, the public IP address of the cloud server (it will be mentioned later when deploying the cloud server). The way to obtain the

IP address of your computer is to enter the IP in Baidu.

Step 8: Set up the cluster security group
If there is no optional security group, please skip this step for now
On the Cluster Whitelist page in Step 7 , click the Configure button in the Select Security Group or Target Security Group action bar to change the security group settings. In the pop-up Select Security Group panel, select the target security group and click OK .
![[External link image transfer failed, the source site may have an anti-leeching mechanism, it is recommended to save the image and upload it directly (img-hiQAFJ3I-1627959671007)(../Typora/Typora-images/image-20210723161550059.png)]](https://img-blog.csdnimg.cn/40a0fb6bc2634ade8e23d186c6539acd.png)
Step 9: Create a database high-privilege account
- Go back to the PolarDB console .
- In the upper left corner of the console, select the region where the cluster is located.
- Find the target cluster and click the cluster ID.
- In the left navigation bar, select Configuration and Management > Account Management .
- Click Create Account .
- In the account creation panel, set the following parameters and click OK:

![[External link image transfer failed, the source site may have an anti-theft link mechanism, it is recommended to save the image and upload it directly (img-49J7CrMf-1627959671008)(../Typora/Typora-images/image-20210723161727601.png)]](https://img-blog.csdnimg.cn/edb45b5cb3bd449ebf4b8d62b6214a40.png)
Step 10: Apply for a public network address
- Log in to the PolarDB console .
- In the upper left corner of the console, select the region where the cluster is located.
- Find the target cluster and click the cluster ID.
- In the link address area of the basic information page , click the icon in the upper right corner to switch views. Click Apply . In the displayed dialog box, set the connection address prefix and click OK .
![[External link image transfer failed, the source site may have an anti-leeching mechanism, it is recommended to save the image and upload it directly (img-2D3B4R1B-1627959671010)(../Typora/Typora-images/image-20210723162134327.png)]](https://img-blog.csdnimg.cn/c75fadb4d314463880c7cb0134ed1a11.png?x-oss-process=image/watermark,type_ZmFuZ3poZW5naGVpdGk,shadow_10,text_aHR0cHM6Ly9ibG9nLmNzZG4ubmV0L3dlaXhpbl80NDQ5MDg4NA==,size_16,color_FFFFFF,t_70)
Step 11: Use DMS to connect to the cluster
DMS is a graphical data management tool provided by Alibaba Cloud. It is a data management service that integrates data management, structure management, access security, BI charts, data trends, data traces, performance and optimization, and server management. It supports the management of relational databases (MySQL, SQL Server, PostgreSQL, etc.) and NoSQL databases (MongoDB, Redis, etc.), and also supports Linux server management.
- Log in to the PolarDB console .
- In the upper left corner of the console, select the region where the cluster is located.
- Find the target cluster and click the cluster ID.
- In the upper right corner of the basic information page, click Login Database . In the pop-up dialog box, enter the database account and database password
![[External link image transfer failed, the source site may have an anti-leeching mechanism, it is recommended to save the image and upload it directly (img-N2dFAdJd-1627959671011)(../Typora/Typora-images/image-20210723162410623.png)]](https://img-blog.csdnimg.cn/d3689a9926984c459710f8c17f419c3b.png)
created in the PolarDB MySQL cluster , and click Login . Note: Remember the database account and password, which will be used later. 1. After logging in, click to authorize to authorize. 2. Click the logged-in instance . In the list of logged-in instances , click the name of the target cluster, find and double-click the name of the target database to switch to the target database for management.


![[External link image transfer failed, the source site may have an anti-leeching mechanism, it is recommended to save the image and upload it directly (img-4iK48TMp-1627959671013)(../Typora/Typora-images/image-20210723162547132.png)]](https://img-blog.csdnimg.cn/b399c84911124663920bf30a7b31a0ff.png?x-oss-process=image/watermark,type_ZmFuZ3poZW5naGVpdGk,shadow_10,text_aHR0cHM6Ly9ibG9nLmNzZG4ubmV0L3dlaXhpbl80NDQ5MDg4NA==,size_16,color_FFFFFF,t_70)

Step 12: Create a database
1. Right-click the logged-in instance name and select Database Management
2. Click Create Library
3. Enter the database name and click OK

Step Thirteen: Import Data
Just import the SQL file
other (no action required)
Supports main address links and cluster address (recommended) links, the differences are as follows
- Cluster address and master address

| address type | address description | Supported Network Types |
|---|---|---|
| Cluster address (recommended) | Applications only need to connect to a cluster address to connect to multiple nodes. With the read-write separation function, the write request will be automatically sent to the master node, and the read request will be automatically sent to the master node or read-only node according to the load of each node. Explain that PolarDB includes a default cluster address, and you can also create multiple custom cluster addresses according to business needs. The custom cluster address can be connected to a specified node, and set the read-write mode, etc. For details, see Modifying and releasing cluster addresses . | Private network Public network Private network (classic network) |
| primary address | Always connected to the master node, supports read and write operations. When the master node fails, the master access address will automatically switch to the new master node. |
- Private network address and public network address
| Network Type | illustrate | scenes to be used |
|---|---|---|
| private network | The best performance of PolarDB can be exerted by accessing the connection address of the private network. When creating a cluster, a private network connection address is generated by default. This address supports modification but cannot be released. For how to modify it, see Modifying the connection address and port . | For example, if the ECS and the database cluster are located in the same VPC, then the ECS can access the database cluster through the private network address. Use DMS to access the database cluster through VPC |
| public net | You can apply for or release a connection address of the public network. For details, see Applying for a connection address and releasing a connection address . The public network is the Internet, accessing through the public network will not achieve the best performance of PolarDB. | For example: Access the database cluster through the public network for maintenance operations. |
| Private network (classic network) | You can apply for or release a private network (classic network) connection address. For details, see Applying for a connection address and releasing a connection address . Clusters are not isolated through the network, and can only rely on the whitelist policy of the cluster itself to block illegal access. For details, see Setting the cluster whitelist . | Only when the business is in the classic network, the database cluster can be accessed through the private network address (classic network). |
If you have reached this point, congratulations, you have completed the construction of the cloud database, and let's start to build the Alibaba Cloud server.
Chapter 2 Cloud Server Construction
2.1 URL entry built by the server
-
qualified for trial
Click to enter the Alibaba Cloud Product Trial Center , select the product in the picture below, and click Trial for 30 days.
![[External link image transfer failed, the source site may have an anti-leeching mechanism, it is recommended to save the image and upload it directly (img-8CZVvutF-1627962119900)(../Typora/Typora-images/image-20210723192143735.png)]](https://img-blog.csdnimg.cn/f95fdd09db89402395d774ae33b1fb78.png?x-oss-process=image/watermark,type_ZmFuZ3poZW5naGVpdGk,shadow_10,text_aHR0cHM6Ly9ibG9nLmNzZG4ubmV0L3dlaXhpbl80NDQ5MDg4NA==,size_16,color_FFFFFF,t_70)
-
Click to enter the ecs homepage without trial qualification , click to buy now as shown in the picture below, and the cost is about 0.08 yuan.
![[External link image transfer failed, the source site may have an anti-theft link mechanism, it is recommended to save the image and upload it directly (img-VyA58OqH-1627962119903)(../Typora/Typora-images/image-20210723192227160.png)]](https://img-blog.csdnimg.cn/9a2c5af318974d7885afe55536c1e5fd.png?x-oss-process=image/watermark,type_ZmFuZ3poZW5naGVpdGk,shadow_10,text_aHR0cHM6Ly9ibG9nLmNzZG4ubmV0L3dlaXhpbl80NDQ5MDg4NA==,size_16,color_FFFFFF,t_70)
2.2 Start building
For trial students, please select the trial specification and any image, and then jump to step 3
Step 1: Select the basic configuration
When purchasing, select pay-as-you-go as shown in the figure, select cpu and memory:
![[External link image transfer failed, the source site may have an anti-leeching mechanism, it is recommended to save the image and upload it directly (img-JSWSlzf0-1627962119907)(../Typora/Typora-images/image-20210723192829267.png)]](https://img-blog.csdnimg.cn/9c17c3f9f7184e7896c1ba2871e0236e.png?x-oss-process=image/watermark,type_ZmFuZ3poZW5naGVpdGk,shadow_10,text_aHR0cHM6Ly9ibG9nLmNzZG4ubmV0L3dlaXhpbl80NDQ5MDg4NA==,size_16,color_FFFFFF,t_70)
select any image + high-efficiency cloud disk 40g as shown in the figure below, and then click Next
![[External link image transfer failed, the source site may have an anti-leeching mechanism, it is recommended to save the image and upload it directly (img-XvCHN1aq-1627962119909)(../Typora/Typora-images/image-20210723192924510.png)]](https://img-blog.csdnimg.cn/ddb1f059bfa042819c2e5eb4afb63ab3.png?x-oss-process=image/watermark,type_ZmFuZ3poZW5naGVpdGk,shadow_10,text_aHR0cHM6Ly9ibG9nLmNzZG4ubmV0L3dlaXhpbl80NDQ5MDg4NA==,size_16,color_FFFFFF,t_70)
Step Two: Select a Network and Security Group
Choose to set the usage traffic to 80M, and click to confirm the order.
![[External link image transfer failed, the source site may have an anti-leeching mechanism, it is recommended to save the image and upload it directly (img-LzxJxM8e-1627962119910)(../Typora/Typora-images/image-20210723193044361.png)]](https://img-blog.csdnimg.cn/f454e92307874840876d945ff9c4366f.png?x-oss-process=image/watermark,type_ZmFuZ3poZW5naGVpdGk,shadow_10,text_aHR0cHM6Ly9ibG9nLmNzZG4ubmV0L3dlaXhpbl80NDQ5MDg4NA==,size_16,color_FFFFFF,t_70)
Step 3: Jump to the management console page
Page address: Click to enter , select the geographical location of the server for trial or purchase, and the rendering effect is as shown in the figure below.
![[External link image transfer failed, the source site may have an anti-leeching mechanism, it is recommended to save the image and upload it directly (img-v8XnadTh-1627962119913)(../Typora/Typora-images/image-20210723193143250.png)]](https://img-blog.csdnimg.cn/8d50d86100674523b1c522fc6f1d78c4.png?x-oss-process=image/watermark,type_ZmFuZ3poZW5naGVpdGk,shadow_10,text_aHR0cHM6Ly9ibG9nLmNzZG4ubmV0L3dlaXhpbl80NDQ5MDg4NA==,size_16,color_FFFFFF,t_70)
Step 4: Set up security groups
As shown in the figure, enter the security group page
![[External link picture transfer failed, the source site may have an anti-theft link mechanism, it is recommended to save the picture and upload it directly (img-Bg1fVQpH-1627962119914)(../Typora/Typora-images/image-20210723193637519.png)]](https://img-blog.csdnimg.cn/ae8504cf067b4ead87b25bdfed86c8d0.png?x-oss-process=image/watermark,type_ZmFuZ3poZW5naGVpdGk,shadow_10,text_aHR0cHM6Ly9ibG9nLmNzZG4ubmV0L3dlaXhpbl80NDQ5MDg4NA==,size_16,color_FFFFFF,t_70)
and click on the configuration rules
![[External link image transfer failed, the source site may have an anti-leeching mechanism, it is recommended to save the image and upload it directly (img-m9fgwroE-1627962119916)(../Typora/Typora-images/image-20210723193722622.png)]](https://img-blog.csdnimg.cn/fd37481038e9437084ec44dd1da74bea.png)
as shown in the figure below to release port 8888 (the default port of the pagoda) for your ip. What is a pagoda is not the pagoda of the pagoda town river demon. It will be mentioned later. Then Baidu enters the ip to get the computer ip
![[External link image transfer failed, the source site may have an anti-leeching mechanism, it is recommended to save the image and upload it directly (img-dyIKEIN6-1627962119918)(../Typora/Typora-images/image-20210723194336358.png)]](https://img-blog.csdnimg.cn/e8e8ac0936e64d709ef9dcf2a956c8dc.png?x-oss-process=image/watermark,type_ZmFuZ3poZW5naGVpdGk,shadow_10,text_aHR0cHM6Ly9ibG9nLmNzZG4ubmV0L3dlaXhpbl80NDQ5MDg4NA==,size_16,color_FFFFFF,t_70)
and release the port number 80 (the changed Tomcat port number) to the entrance:
![[External link image transfer failed, the source site may have an anti-leeching mechanism, it is recommended to save the image and upload it directly (img-sM0uwEXE-1627962119919)(../Typora/Typora-images/image-20210723194428629.png)]](https://img-blog.csdnimg.cn/5942ebf2fd564dd9a01f0a3a1d29f388.png?x-oss-process=image/watermark,type_ZmFuZ3poZW5naGVpdGk,shadow_10,text_aHR0cHM6Ly9ibG9nLmNzZG4ubmV0L3dlaXhpbl80NDQ5MDg4NA==,size_16,color_FFFFFF,t_70)
Step Five: Reset the OS and Image
Go back to the console page, page address: click to enter . Then close the server as shown in the figure
![[External link image transfer failed, the source site may have an anti-leeching mechanism, it is recommended to save the image and upload it directly (img-GwGffS7O-1627962119920)(../Typora/Typora-images/image-20210723194524068.png)]](https://img-blog.csdnimg.cn/ea91c9ca37a742faa4463335ad731ff7.png?x-oss-process=image/watermark,type_ZmFuZ3poZW5naGVpdGk,shadow_10,text_aHR0cHM6Ly9ibG9nLmNzZG4ubmV0L3dlaXhpbl80NDQ5MDg4NA==,size_16,color_FFFFFF,t_70)
, select reset system and mirror,
![[External link image transfer failed, the source site may have an anti-leeching mechanism, it is recommended to save the image and upload it directly (img-YBWBYdbG-1627962119921)(../Typora/Typora-images/image-20210723194953174.png)]](https://img-blog.csdnimg.cn/c16b9d75fc8949d281d8f05020f5baad.png?x-oss-process=image/watermark,type_ZmFuZ3poZW5naGVpdGk,shadow_10,text_aHR0cHM6Ly9ibG9nLmNzZG4ubmV0L3dlaXhpbl80NDQ5MDg4NA==,size_16,color_FFFFFF,t_70)
click to select the operating system from the mirror market as shown in the figure
![[External link image transfer failed, the source site may have an anti-leeching mechanism, it is recommended to save the image and upload it directly (img-HJZ8PAEV-1627962119923)(../Typora/Typora-images/image-20210723195035108.png)]](https://img-blog.csdnimg.cn/132858d77fa346fbb5f69101afa2fdeb.png?x-oss-process=image/watermark,type_ZmFuZ3poZW5naGVpdGk,shadow_10,text_aHR0cHM6Ly9ibG9nLmNzZG4ubmV0L3dlaXhpbl80NDQ5MDg4NA==,size_16,color_FFFFFF,t_70)
, select pagoda, the pagoda control panel is a linux server management software, you can use this management tool to build an environment and install programming software.
![[External link image transfer failed, the source site may have an anti-theft link mechanism, it is recommended to save the image and upload it directly (img-x6KYaTUD-1627962119924)(../Typora/Typora-images/image-20210723195113238.png)]](https://img-blog.csdnimg.cn/60add035dcf544bf9d87a921924d2cb2.png?x-oss-process=image/watermark,type_ZmFuZ3poZW5naGVpdGk,shadow_10,text_aHR0cHM6Ly9ibG9nLmNzZG4ubmV0L3dlaXhpbl80NDQ5MDg4NA==,size_16,color_FFFFFF,t_70)
Set a custom password and confirm the order
![[External link image transfer failed, the source site may have an anti-leeching mechanism, it is recommended to save the image and upload it directly (img-rrDDD1S5-1627962119925)(../Typora/Typora-images/image-20210723195154338.png)]](https://img-blog.csdnimg.cn/f9cdc83763c8480da06ed73166408752.png?x-oss-process=image/watermark,type_ZmFuZ3poZW5naGVpdGk,shadow_10,text_aHR0cHM6Ly9ibG9nLmNzZG4ubmV0L3dlaXhpbl80NDQ5MDg4NA==,size_16,color_FFFFFF,t_70)
Step 6: Connect to the server to obtain the initial information of the pagoda
Click Remote Connection, enter the user name and password, click OK, enter: bt default, press Enter, the pagoda interface address, user name, and password will be generated, access this address through Baidu, enter the login interface, enter the user name and password (generated) to proceed Log in.
![[External link image transfer failed, the source site may have an anti-leeching mechanism, it is recommended to save the image and upload it directly (img-Bhk8tFme-1627962119926)(../Typora/Typora-images/image-20210723195224876.png)]](https://img-blog.csdnimg.cn/f7ff74d0e07b4f4295a857e1b25dfa2d.png?x-oss-process=image/watermark,type_ZmFuZ3poZW5naGVpdGk,shadow_10,text_aHR0cHM6Ly9ibG9nLmNzZG4ubmV0L3dlaXhpbl80NDQ5MDg4NA==,size_16,color_FFFFFF,t_70)
Step 7: Set up the server environment
After entering the pagoda control panel, enter the software store, search for tomcat and click install, select tomcat9 version, after installation, search for tomcat as shown in the figure, and set the port number to 80, then restart.
![[External link image transfer failed, the source site may have an anti-leeching mechanism, it is recommended to save the image and upload it directly (img-JTLd5wUc-1627962119928)(../Typora/Typora-images/image-20210723195310304.png)]](https://img-blog.csdnimg.cn/4355afa167b8472db31644a5a80521f0.png?x-oss-process=image/watermark,type_ZmFuZ3poZW5naGVpdGk,shadow_10,text_aHR0cHM6Ly9ibG9nLmNzZG4ubmV0L3dlaXhpbl80NDQ5MDg4NA==,size_16,color_FFFFFF,t_70)
Step 8: Deploy the project
After tomcat is installed, visit: http://public network ip, if the tomcat interface appears, it means the installation is successful.
The public network ip is as follows:

the test success interface is as follows:

Click to enter the folder where tomcat is installed, and enter the webapps folder, clear the contents of the ROOT folder in webapps, and upload the project to ROOT.
Chapter 3 project released and launched
Modify the database information of the configuration file,
mainly including the database ip address and port, user name, password, and database name.

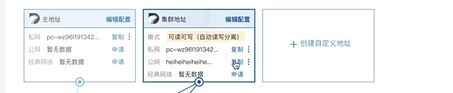
How to obtain the database address?
Go to the cloud database console, click on the basic information , copy the public network address of the cluster address , if not, you can create a custom address, and then obtain it.
Chapter 4 Global Thousand Cities Optimization Acceleration (Optional)
Requirement: Accelerate the website
Technology: Alibaba Cloud—Site Accelerated DCDN
Prerequisite: domain name required
On the basis of providing CDN static acceleration, DCDN further provides dynamic acceleration, TCP/UDP four-layer acceleration, WebSocket acceleration and other capabilities to comprehensively improve the network experience of websites and APPs; at the same time, you can quickly integrate security, edge computing and other capabilities To 2800+ edge nodes around the world.
At this point, your website can be officially launched. If you encounter any problems during the deployment process, please leave a message in the comment area, and the blogger will answer you as soon as possible.