Install required files
Install mysql5.7
- Download MySQL's yum source configuration
wget http://dev.mysql.com/get/mysql57-community-release-el7-11.noarch.rpm
- Install the yum source of MySQL
yum -y install mysql57-community-release-el7-11.noarch.rpm
- Use yum to install MySQL5.7 (it will take some time to download, we can download it in a place with better network speed)
yum -y install mysql-server --nogpgcheck --nogpgcheck #不校验数字签名
- MySQL 5.7 on/off and boot-up commands
systemctl start mysqld.service
systemctl status mysql.service
- Before logging in to mysql, you need to find the default password of mysql cat /var/log/mysqld.log| grep password
cat /var/log/mysqld.log| grep password
# 2022-11-02T15:01:52.976608Z 1 [Note] A temporary password is generated for root@localhost: !Th7<vMBA2w_
- log in to mysql
mysql -uroot -p'!Th7<vMBA2w_'
- Log in to mysql, ask to change the password (the password requires a certain complexity), and authorize other machines to log in to mysql
# 密码要数字、字母大写、小写、特殊字母
ALTER USER USER() IDENTIFIED BY '3133030Liu,';

# (立即刷新配置)
flush privileges;

grant all privileges on . to 'root'@'%' identified by '3133030Liu,' with grant option;

# (立即刷新配置)
flush privileges;
- Modify the MySQL default password policy (so that MySQL can set a simple password)
set global validate_password_policy=0;
set global validate_password_length=1;
flush privileges;
- At this time, we can set a simple password for mysql, and then authorize
alter user 'root'@'localhost' identified by '123456';
# grant all privileges on . to 'root'@'%' identified by '123456' with grant option;
flush privileges;
- login again
exit  #退出MySQL
mysql -uroot -p123456  #使用刚设置的简单密码登录一下MySQL
install nginx
- Install epel-release because Nginx is not in the official yum source and requires a third-party yum source
# 我们在Centos下使用yum安装时往往找不到rpm的情况,官方的rpm repository提供的rpm包也不够丰富,
# 很多时候需要自己编译很痛苦,而EPEL恰恰可以解决这两方面的问题
yum -y install epel-release

# 更新yum源
yum -y update
- Install Nginx
yum install -y nginx
- Verify that nginx is installed successfully
# 查看nginx安装版本,-V可以看到nginx的安装的文件路径
nginx -V

# 查看安装的nginx的版本
rpm -qa | grep nginx
- Nginx start, set boot automatically, view running status, stop command
systemctl start nginx
systemctl enable nginx
systemctl status nginx
systemctl stop nginx
- relative file path
#编辑Nginx配置文件
vim /etc/nginx/nginx.conf

#检测配置文件语法是否正确
nginx -t

#重新加载Nginx配置
nginx -s reload

# 日志路径
/var/log/nginx
install redis
- Install redis database
# 上面已经  yum install epel-release 过了一次,直接就可以安装redis
yum install -y redis
- After the installation is complete, use the following command to start the redis service
# 启动redis
service redis start

# 停止redis
service redis stop

# 查看redis运行状态
service redis status

# 查看redis进程
ps -ef | grep redis
- Set redis to start automatically at boot
chkconfig redis on
- Enter redis service
# 进入本机redis
redis-cli

# 列出所有key
keys *
install java
- Download
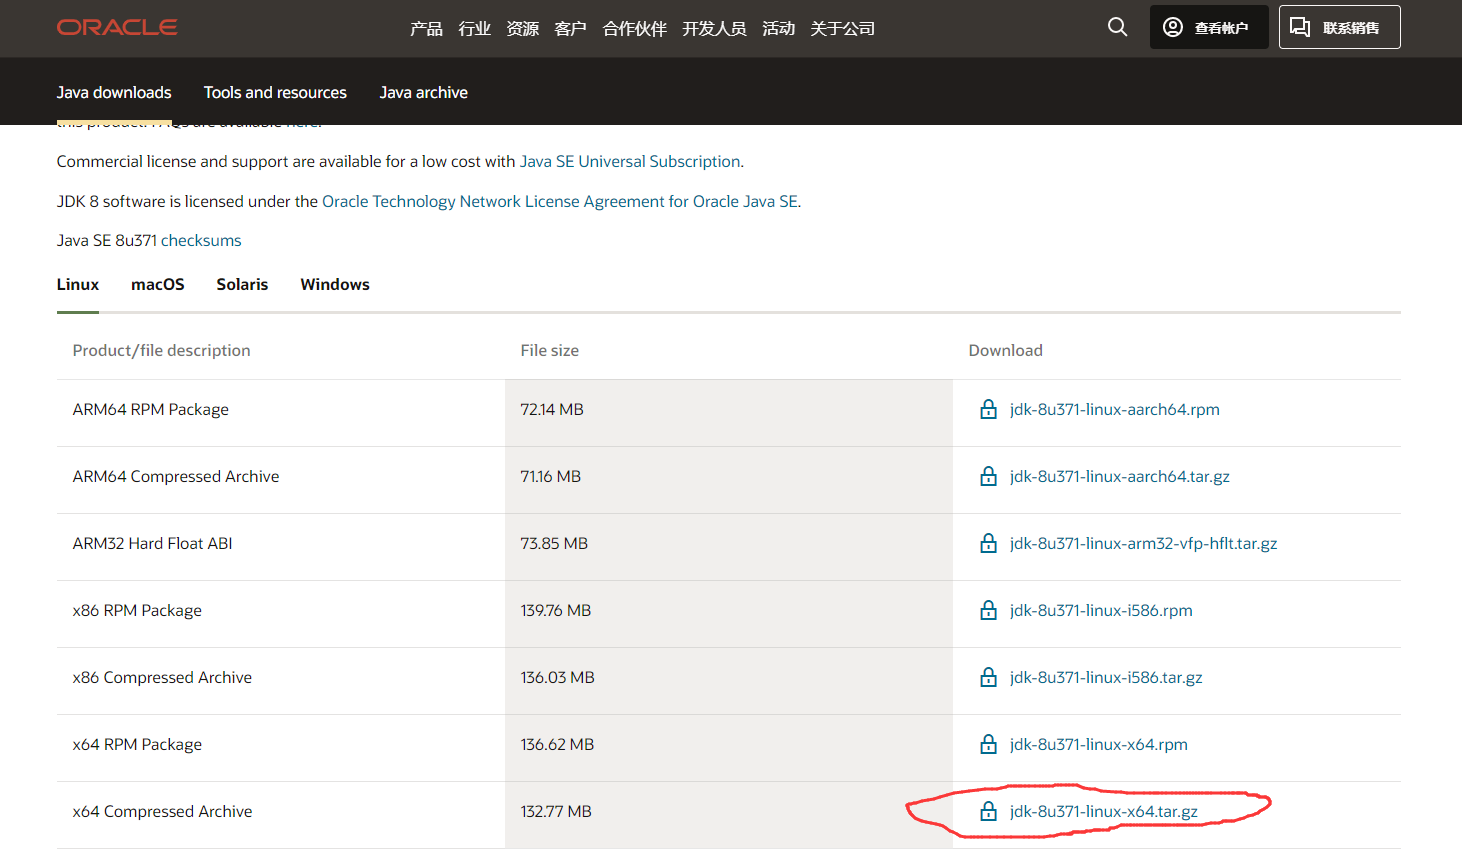
Download jdk address:https://www.oracle.com/cn/java/technologies/downloads/
download account:
// 自己搜:Oracle官网登录用户名密码分享
账号:1971159263@qq.com
密码:Jia19981203
- Upload
Download andFinalShellupload files using the tool - decompress
# 解压
tar -zxvf jdk-8u371-linux-x64.tar.gz

# 移动
mv jdk1.8.0_371 /home/jdk8

# 到此目录下
cd /home/jdk8/bin

# 运行此命令可以查看,刚安装好后的版本号
./java -version
- Configure global environment variables
write configuration file
vim /etc/profile
Add this sentence at the end of the configuration file
JAVA_HOME=/home/jdk8
PATH=$JAVA_HOME/bin:$PATH
Reload the profile file to make the changed configuration take effect immediately
source /etc/profile
- Check if the installation was successful
java -version
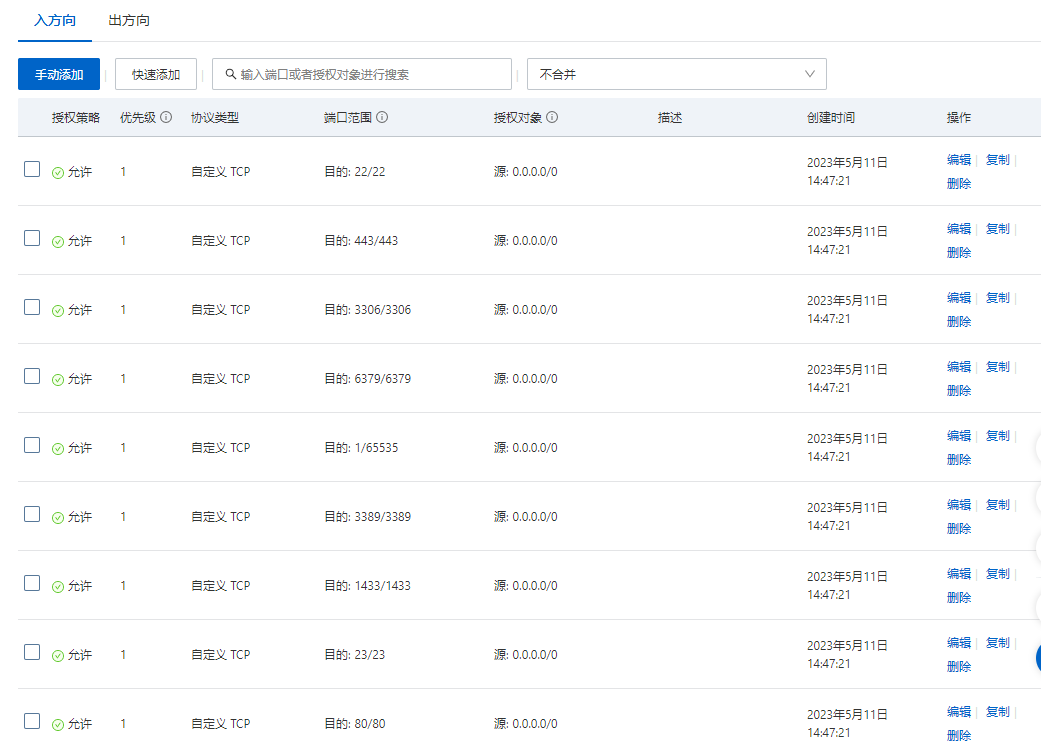
open firewall interface
The port of mysql is 3306
and the port of redis is 6379
CentOS 7.9 firewall open port
- Open a fixed port (I am lazy to close the firewall directly)
# 开放5672端口
firewall-cmd --zone=public --add-port=5672/tcp --permanent

#关闭5672端口
firewall-cmd --zone=public --remove-port=5672/tcp --permanent

# 配置立即生效
firewall-cmd --reload
- View all open ports on the firewall
firewall-cmd --zone=public --list-ports
- firewall operation
# 查看防火墙状态
systemctl status firewalld.service

# 本次访问关闭防火墙
systemctl stop firewalld.service

# 从下次开始关闭防火墙
systemctl disable firewalld.service

# 打开防火墙
systemctl enable firewalld.service

# 重启防火墙
systemctl restart network
Alibaba Cloud Open Security Group Port
ready to configure
nginx
When /etc/nginx/conf.dcreating a subconfiguration file
cd /etc/nginx/conf.d
vim airport.conf
document content
    server {


        listen       80;
        server_name  localhost;

        #charset koi8-r;

        #access_log  logs/host.access.log  main;

        location / {


            root   /mnt/www/airport; # 前端工程文件放置的位置
            index  index.html index.htm;
        }

        #error_page  404              /404.html;

        # redirect server error pages to the static page /50x.html
        #
        error_page   500 502 503 504  /50x.html;
        location = /50x.html {


            root   html;
        }

    }
restart nginx
nginx -s reload
Create a project directory drop folder
cd /mnt
mkdir -p www/airport
cd www/airport
# 随便写点什么,看看是否能访问
vim index.html
Access: http://8.134.93.xxx/(your own Alibaba Cloud address)

redis
vim /etc/redis.conf
bind 127.0.0.1Change to bind 0.0.0.0, so that the external network can be accessed (there is a risk of hacker attacks)
Change notify-keyspace-eventsto notify-keyspace-events Ex(30 minutes unpaid departure payment overdue plan)
Note: Changed the configuration to restart Redis
# redis-server /etc/redis.conf
# 停止redis
service redis stop
# 启动redis
service redis start
mysql
Make the external network accessible
and log in to mysql
mysql -uroot -p123456
# 首先先进入mysql的服务,选择mysql这个库,然后查看user用户的host属性,会发现其host属性值是localhost,意思是只准许本地的连接访问。此时我们要对他修改为谁都可以访问的。
# 修改的sql语句如下:
use mysql;
update user set host="%" where user="root";
flush privileges;
It can be accessed from the Internet
project upload
First create the database table
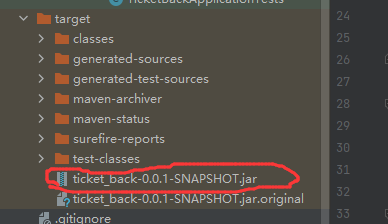
The springboot project is packaged and uploaded
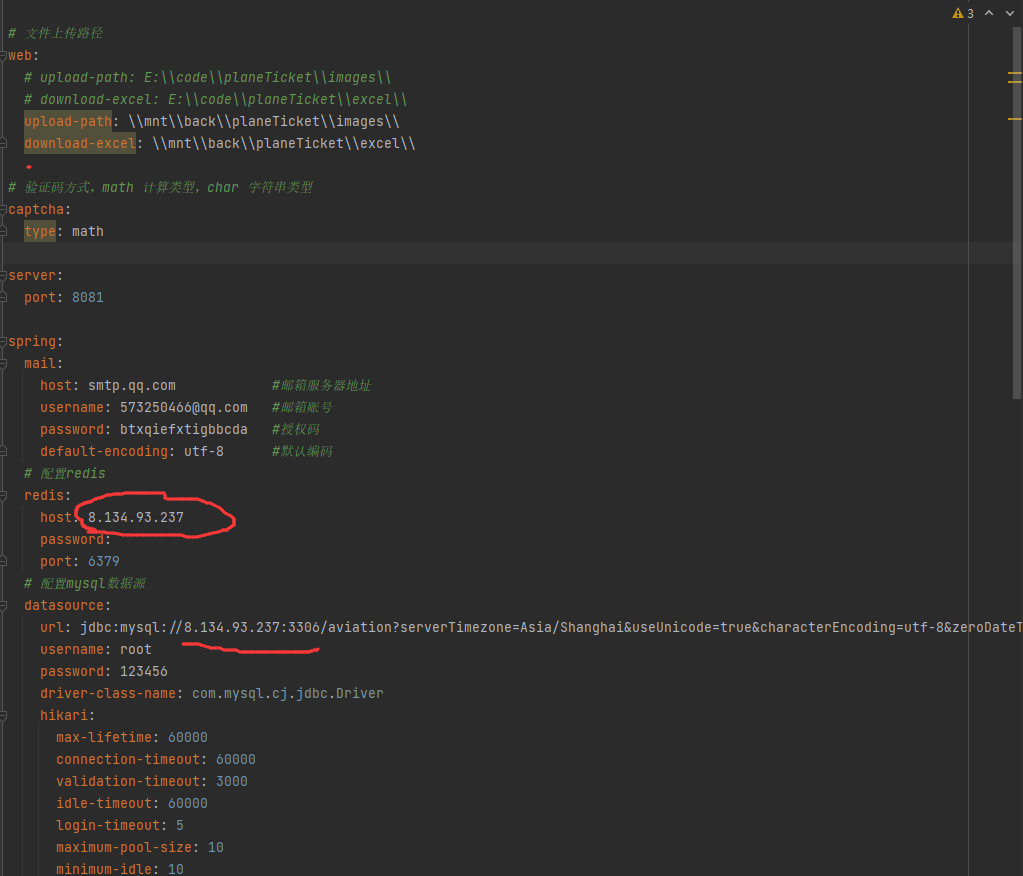
Modify the configuration file (upload file path, mysql address account, redis address password, etc. to be modified)
package

the packaged address
upload the jar package to the Alibaba Cloud server

start the service
nohup java -jar ticket_back-0.0.1-SNAPSHOT.jar > ticket_back.log 2>&1 &
front end
- Project configuration modification
vite.config.js
import {

     defineConfig } from 'vite'
import vue from '@vitejs/plugin-vue'
import path from "path"

import AutoImport from 'unplugin-auto-import/vite'
import Components from 'unplugin-vue-components/vite'
import {

     ElementPlusResolver } from 'unplugin-vue-components/resolvers'

// https://vitejs.dev/config/
export default defineConfig({


  //基本路径 文件打包后放的位置
  publicPath: './',

  //默认输出文件夹为dist,填入的名字为打包后的文件名
  outputDir: 'name',

  // 放置生成的静态资源 (js、css、img、fonts) 的 (相对于 outputDir 的) 目录。资源放的目录
  assetsDir: './static',

  // 指定生成的 index.html 的输出路径 (相对于 outputDir)。也可以是一个绝对路径 index的路劲和名字
  indexPath: './index.html',

  //打包后是否生成map文件,map文件能看到错误代码位置,设置为false不生成map文件,打包体积缩小
  productionSourceMap: false,
  plugins: [
    AutoImport({


      resolvers: [ElementPlusResolver()],
    }),
    Components({


      resolvers: [ElementPlusResolver()],
    }),
    vue()
  ],
  resolve: {


    alias: {


      "~": path.resolve(__dirname, "src")
    }
  },
  server: {


    // host设置为true才可以使用network的形式,以ip访问项目
    host: true,
    // 端口号
    port: 3100,
    // 自动打开浏览器
    open: true,
    // 跨域设置允许
    cors: true,
    // 如果端口已占用直接退出
    strictPort: true,
    // 接口代理
    proxy: {


      '/api': {


        target: 'http://8.134.93.xxx:8081',
        // 允许跨域
        changeOrigin: true,
        // 重写地址
        rewrite: (path) => path.replace('/api/', '/')
      }
    }
  },
  build: {


    // 在生产环境移除console.log
    terserOptions: {


      compress: {


        drop_console: true,
        drop_debugger: true
      },
    },
  },
  css: {


    preprocessorOptions: {


      // 全局样式引入
      scss: {


        additionalData: '@import "./src/assets/scss/common.scss";',
        javascriptEnabled: true
      }
    }
  }
})
- Pack
npm run build - Nginx configuration modification (the main file path and vue proxy are modified)
    server {


        listen       80;
        server_name  localhost;

        #charset koi8-r;

        #access_log  logs/host.access.log  main;

        location / {


            root   /mnt/www/airport/dist;
            index  index.html index.htm;

            # 添加下面的几行 vue项目刷新不会404
            try_files $uri $uri/ @router;
        }

        # 添加下面的几行 vue项目刷新不会404
        location @router {


            rewrite ^.*$ /index.html last;
        }

        # 设置反向代理,因为前台是通过代理访问的  记得加上 最后的/不然无效。
        location /api/ {


            proxy_pass      http://8.134.93.xxx:8081;
            proxy_cookie_path / /api;
            proxy_redirect default;
            rewrite ^/api/(.*) /$1 break;
            client_max_body_size 500m;
        }

        #error_page  404              /404.html;

        # redirect server error pages to the static page /50x.html
        #
        error_page   500 502 503 504  /50x.html;
        location = /50x.html {


            root   html;
        }
    }
reboot
nginx -s reload
can access the project