Article Directory
OpenMV-Code
# Arduino 作为I2C主设备, OpenMV作为I2C从设备。
#
# 请把OpenMV和Arduino按照下面连线:
#
# OpenMV Cam Master I2C Data  (P5) - Arduino Uno Data  (A4)     SDA数据线
# OpenMV Cam Master I2C Clock (P4) - Arduino Uno Clock (A5)     SCL时钟线
# OpenMV Cam Ground                - Arduino Ground             GND地线

import pyb, ustruct # ustruct 用于打包和解压原始数据类型 的 "类"

text = "Hello World!\n"
data = ustruct.pack("<%ds" % len(text), text)
# 使用 "ustruct" 来生成需要发送的数据包
        #ustruct.pack(fmt, v1, v2, ...):根据格式字符串fmt,打包 v1, v2, … 值。返回值为一个解码该值的字节对象
        # "<" 把数据以小端序放进struct中
        # "%ds" 把字符串放进数据流,比如:"13s" 对应的 "Hello World!\n" (13 chars).
# 详见 https://docs.python.org/3/library/struct.html


# READ ME!!!
#
# 请理解,当您的OpenMV摄像头不是I2C主设备,所以不管是使用中断回调,
# 还是下方的轮循,都可能会错过响应发送数据给主机。当这种情况发生时,
# Arduino会获得NAK,并且不得不从OpenMV再次读数据。请注意,
# OpenMV和Arduino都不擅长解决I2C的错误。在OpenMV和Arduino中,
# 你可以通过释放I2C外设,再重新初始化外设,来恢复功能。


# 构造I2C对象
# OpenMV上的硬件I2C总线都是2
bus = pyb.I2C(2, pyb.I2C.SLAVE, addr=0x12)
bus.deinit() # 完全关闭设备
bus = pyb.I2C(2, pyb.I2C.SLAVE, addr=0x12)
print("Waiting for Arduino...")


# 请注意,为了正常同步工作,OpenMV Cam必须 在Arduino轮询数据之前运行此脚本。
# 否则,I2C字节帧会变得乱七八糟。所以,保持Arduino在reset状态,
# 直到OpenMV显示“Waiting for Arduino...”。


while(True):
    try:
        bus.send(ustruct.pack("<h", len(data)), timeout=10000) # 首先发送长度 (16-bits).
        try:
            bus.send(data, timeout=10000) # 然后发送数据
            print("Sent Data!") # 没有遇到错误时,会显示
        except OSError as err: # 如果遇到错误 触发异常
            pass # 不用担心遇到错误,会跳过
            # 请注意,有3个可能的错误。 超时错误(timeout error),
            # 通用错误(general purpose error)或繁忙错误
            #(busy error)。 “err.arg[0]”的错误代码分别
            # 为116,5,16。
    except OSError as err:
        pass # 不用担心遇到错误,会跳过
        # 请注意,有3个可能的错误。 超时错误(timeout error),
        # 通用错误(general purpose error)或繁忙错误
        #(busy error)。 “err.arg[0]”的错误代码分别
        # 为116,5,16。
Arduino-Code
// Arduino Code

#include <Wire.h>
#define BAUD_RATE 19200 // 设置波特率为19200
#define CHAR_BUF 128

void setup()
{


  Serial.begin(BAUD_RATE); //设置波特率
  Wire.begin(); // begin():无输入参数,表示以 Master 形式加入总线。 有输入参数,表示以从机形式加入总线,设备地址为address(7-bit)
  delay(1000); // 给OpenMV一个启动的时间
}

void loop()
{


  int32_t temp = 0; //int32_t:32位int型数据 不同平台下,使用以下名称可以保证固定长度
  char buff[CHAR_BUF] = {

    0};

// requestFrom函数用于实现 Master Read From Slave 操作:主设备请求从设备一个字节,这个字节可以被主设备用 read()或available()接受
  Wire.requestFrom(0x12, 2);  // requestFrom(address, quantity):从 address 设备读取 quantity 个字节,结束后,产生 STOP 信号

//available 函数用于统计 Master Read From Slave 操作后, read 缓存区剩余的字节数 每当缓存区的数据被读走 1 个字节,available 函数的返回值减一
  if (Wire.available() == 2) // 如果成功执行了上面的操作(从0x12设备读取2个字节)
  {


//read 函数用于在 Master Read From Slave 操作后,读取缓存区的数据。
    temp = Wire.read() | (Wire.read() << 8);

    delay(1); // Give some setup time...

    Wire.requestFrom(0x12, temp);

    if (Wire.available() == temp)
    {

     // got full message?
      temp = 0;
      while (Wire.available())
        buff[temp++] = Wire.read();
    }
    else
    {


      while (Wire.available())
        Wire.read(); // Toss garbage bytes.
    }
  }
  else
  {


    while (Wire.available())
      Wire.read(); // Toss garbage bytes.
  }

  Serial.print(buff);
  delay(1); // Don't loop to quickly.
}
ArduinoCommunication
wire.hThe library on Arduino is used
Wire.begin()
Function: Initialize IICthe connection and join IICthe bus as a master or slave device
When no parameters are filled in Wire.begin(), the device will join the bus in host modeIIC ;
When the parameters are filled in Wire.begin(adress), the device joins the bus in slave mode , which can be set to any address in 0~127IICaddress
example
Wire.requesFrom()
Function: The master device requests a byte from the slave device, which can be accepted by the master device with read() or available()
After use Wire.requesFrom(), the slave side can use to onReceive ()register an event to respond to the host's request; the host can read the data through Wire.available()and functionsWire.read()
Wire.requrstFrom(addtess,quantity,stop)
parameter
addtess: 7-bit device addressquantity: the requested quantitystop: Boolean, '1' sends a stop command after the end of the request and releases the bus. '0' will continue to send requests to keep the connection
Wire.beginTransmission()
Function: Send a signal to start transmitting data , set the transmission data to the specified slave device (start a data transmission, send an I2C start character)
wire.beginTransmission(address)
beginTransmission()After the function is called, (recall write()the function to write data), and finally call endTransmission()the function to generate the Start signal and send the Slave Address and communication timing .
Wire.endTransmission()
Function: Send a signal to end data transmission (end a transmission beginTransmission()started by a write()slave and queued by it)
The default parameter is stop: Wire.endTransmission(stop): If it is 1 , endTransmission()a stop message is sent ; if it is 0 , a start message is sent
endTransmission(0): When the input parameter is 0 , no STOP signal will be generated after the communication ends .
endTransmission(!0): When the input parameter is !0 , a STOP signal is generated after the communication ends . (Release the bus)
endTransmission() : When there is no input parameter , a STOP signal will be generated after the communication ends . (release bus)
Wire.write()
Function: write()The function is used to write data to the slave . There are 3 calling forms:
write(value): write a single byte
write(string) : write a string
write(data, length) : write length bytes
example
#include <Wire.h>

byte val = 0;

void setup()
{


   Wire.begin(); // join i2c bus
}

void loop()
{


   Wire.beginTransmission(44); // transmit to device #44 (0x2c)
                               // device address is specified in datasheet
   Wire.write(val);             // sends value byte
   Wire.endTransmission();     // stop transmitting

   val++;        // increment value
   if(val == 64) // if reached 64th position (max)
   {


     val = 0;    // start over from lowest value
   }
   delay(500);
}
Wire.available()
Function: Wire.requestFrom()After requesting slave data, you can use available()receive
Wire.read()
Function: Wire.requestFrom()After requesting slave data, you can use read() to receive it
Wire.onReceive()
Function: This function can register an event on the slave side , and the function will be triggered when the slave receives the data sent by the master
Wire.onRequest()
Function: This function can register an event and trigger when the master receives a data request from the slave
Communication between two Arduino UNO
Example 1: The master device reads the slave device sends
In this example, two development boards will be used to communicate via read I2C通讯协议on master/send from slave .
Using the Wire library, the Arduino UNO master device can request and read 6 bytes of data sent from the uniquely addressed slave device Arduino UNO . After receiving the message, you can check it in the Arduino IDE serial monitor window .
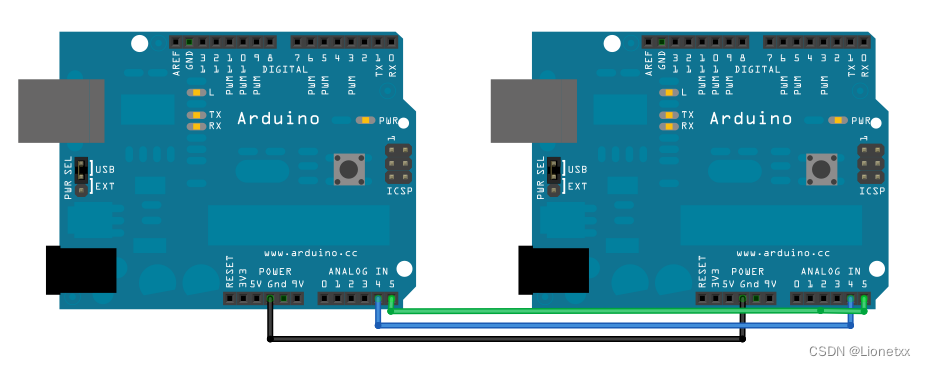
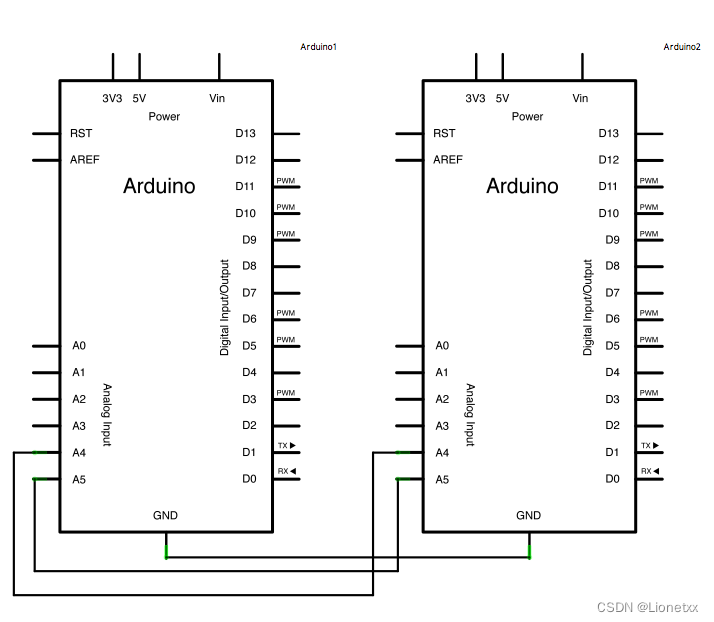
circuit connection
Connect pin 4 (or SDA data pin) and pin 5 (or SCL clock pin) of the master device development board to the corresponding pins of the slave device development board . The illustrated circuit diagram takes two UNO as an example to connect
In order to ensure the operation of serial communication, the development board must be connected to the computer through USB and the power supply of each development board must be guaranteed.
Code
master device read
// 引入Wire库文件
#include <Wire.h>

void setup()
{


    // Wire初始化, 加入i2c总线
    // 如果未指定,则以主机身份加入总线。
    Wire.begin();
    // 初始化串口并设置波特率为9600
    Serial.begin(9600);
}

void loop()
{


    // 向从设备#8请求6个字节
    Wire.requestFrom(8, 6);
    // 当从从设备接收到信息时值为true
    while (Wire.available())
    {


        // 接受并读取从设备发来的一个字节的数据
        char c = Wire.read();
        // 向串口打印该字节
        Serial.print(c);
    }
    // 延时500毫秒
    delay(500);
}
send from device
// 引入Wire库文件
#include <Wire.h>

void setup()
{


    // Wire初始化, 并以从设备地址#8的身份加入i2c总线
    Wire.begin(8);
    // 注册请求响应事件
    Wire.onRequest(requestEvent);
}

void loop()
{


    delay(100);
}

// 每当接收到来自主机的数据时执行的事件函数
// 此函数被注册为事件,调用请见setup()
void requestEvent()
{


    // 用6个字节的消息进行响应
    Wire.write("hello ");
    // 以此回应主设备的请求
}
Effect demonstration The serial port monitor window view opened
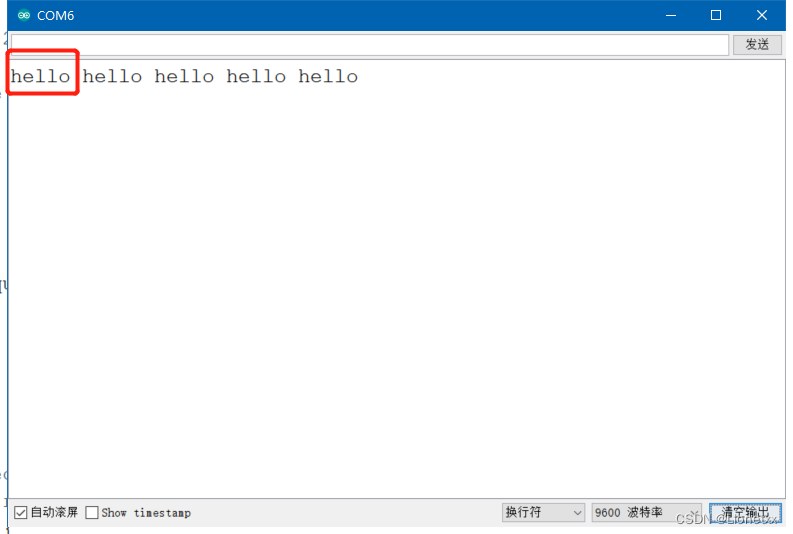
through the main device UNO hardware serial port
Example 2: The master device reads the slave device to send
In this example, two development boards will be used to communicate with each other by I2C同步串行协议master -write-slave-accept .
The Arduino UNO (master) is programmed to send 6 bytes of data to the uniquely addressed slave every half second . After receiving this message from the device , the data can be viewed in the serial monitor window of the Arduino IDE .
circuit connection
Connect pin 4 (or SDA data pin) and pin 5 (or SCL clock pin) of the master device development board to the corresponding pins of the slave device development board . The illustrated circuit diagram takes two UNOs as an example to connect
In order to ensure the operation of serial communication, the development board must be connected to the computer through USB and the power supply of each development board must be guaranteed.


Code
Master sends
// 引入Wire库文件
#include <Wire.h>
void setup()
{
// Wire初始化, 加入i2c总线
// 如果未指定,则以主机身份加入总线。
Wire.begin();
}
// 定义一个byte变量以便串口调试
byte x = 0;
void loop()
{
// 将数据传送到从设备#8
Wire.beginTransmission(8);
// 发送5个字节
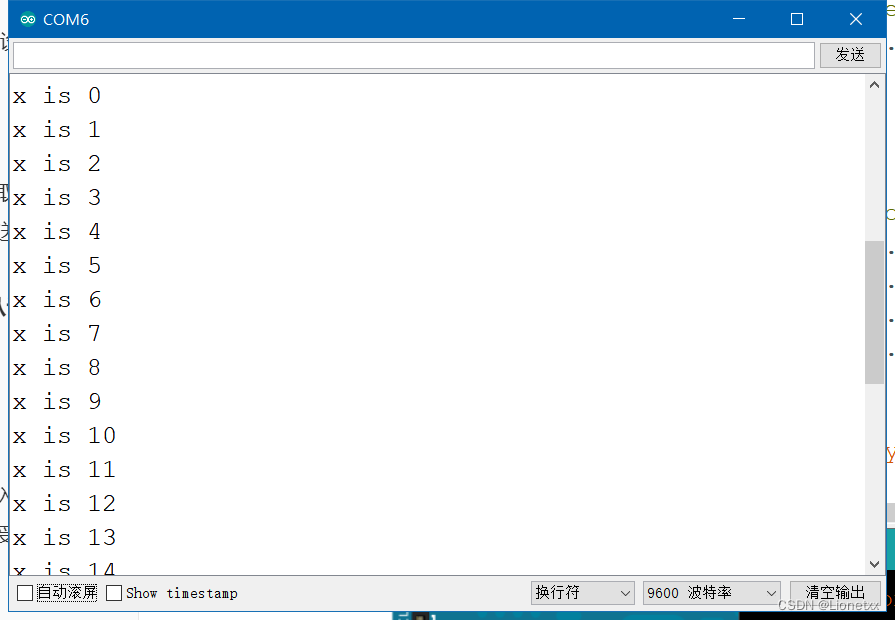
Wire.write("x is ");
// 发送一个字节
Wire.write(x);
// 停止传送
Wire.endTransmission();
x++;
delay(500);
}
accept from device
// 引入Wire库文件
#include <Wire.h>

void setup()
{


    // Wire初始化, 并以从设备地址#8的身份加入i2c总线
    Wire.begin(8);
    // 注册接受事件函数
    Wire.onReceive(receiveEvent);
    // 初始化串口并设置波特率为9600
    Serial.begin(9600);
}

void loop()
{


    delay(100);
}

// 每当接收到来自主机的数据时执行的事件函数
// 此函数被注册为事件,调用请见setup()
void receiveEvent(int howMany)
{


    // 循环读取数据(除了最后一个字符,因为最后一个字符是数字,我们要用int来接收)
    while (Wire.available() > 1)
    {


        // 接收字节数据并赋值给变量c(char)
        char c = Wire.read();

        // 打印该字节
        Serial.print(c);
    }
    // 以int整数的形式接受字节数据并赋值给x(int)
    int x = Wire.read();

    // 打印该int变量x
    Serial.println(x);
}
Effect demo
Article reference: Tai Chi Maker