Article Directory
- 1. Thinking before the start of the project
- 2. Build the project environment
- 3. Design the database model
- 4. Routing and view function framework construction
- 5. Front-end interface design and optimization
- 6. Improve the login view function
- Seven, session session and login view function
- 8. Image verification code
- 9. Email registration
- 10. Others
1. Thinking before the start of the project
Think: register(email registration, mobile phone, WeChat, QQ), login, logout
-
routing configuration
urlpattern = [ path('/register/', views.register), path('/login/', views.login), path('/logout/', views.logout), ] -
View configuration (emphasis)----
-
Database model Model:
class User: id, name, password, email, create_time, update_time last_time(最后一次登录的时间), gender, province -
模板Template: register.html, login.html, index.html
2. Build the project environment
- Create a Django project
![[External link picture transfer failed, the source site may have an anti-theft link mechanism, it is recommended to save the picture and upload it directly (img-3StaWFJy-1686377086681) (reusable registration login system.assets/image-20210306092845721.png)]](https://img-blog.csdnimg.cn/224142e617154c56a66afa87d4bf77c9.png)
-
create app
$ python manage.py startapp login -
Set time zone and language
# filename: loginRegister/settings.py # LANGUAGE_CODE = 'en-us' LANGUAGE_CODE = 'zh-hans' # TIME_ZONE = 'UTC' TIME_ZONE = 'Asia/Shanghai' -
Database table generation
$ python manage.py migrate # 将迁移脚本的内容写入数据库并创建数据库表 $ python manage.py createsuperuser # 创建后台登录的超级用户 -
Start the development server
-
Method 1: command start
$ python manage.py runserver 9999 -
Method 2: Configure Django Server
-

-
Browser access, is the detection successful? (The first step is perfectly done)
- Access URL: http://127.0.0.1:9999/
- Access URL: http://127.0.0.1:9999/admin/
-
Git submits the project code to the local warehouse
git install
git Liao Xuefeng: https://www.liaoxuefeng.com/wiki/896043488029600/896827951938304
Git download and installation and environment configuration, to solve the problem of slow downloading of installation packages (reference: Gu Qia, if there is any infringement, contact to delete): https://blog.csdn.net/mengxiang_/article/details/128193219
$ git init
# 安装插件.ignore, 并生成python上传git项目需要忽略内容的文件.gitignore
$ git add *  # 添加修改到暂存区
$ git commit -m "搭建项目开发环境"  # 将暂存区的代码提交到本地git仓库
$ git log  # 查看历史提交记录
3. Design the database model
As a user login and registration project, all relevant information of various users needs to be saved. Obviously, we need at least one user table User, and the following information needs to be saved in the user table:
- Username (name): Required, up to 128 characters and unique (unique)
- Password (password): Required, up to 256 characters
- Email address (email): Use Django's built-in email type and be unique
- Gender (gender): Gender, use choice, you can only choose male or female or unknown, the default is unknown;
- Create time (create_time): user creation time
- important point:When auto_now_add=True, it is the time when adding, and there will be no change when updating the object.
- Modification time (modify_time): the user's last modification time
- important point:auto_now=True Whether you add or modify the object, the time is the time you added or modified.
- Last login time (last_login_time): Last login time
- ==Note:==null=True, the field in the database is NULL, that is, null values are allowed
- ==Note:==blank=False (default), an error will be thrown if the field is not assigned; it is related to data validation (form validation, etc.).
1. Database model file
# login/models.py

from django.db import models

# Create your models here.

# appname_siteuser
class SiteUser(models.Model):
    """用户的数据库模型,注册/登录需要"""
    gender_choice = (
        (0, "未知"),
        (1, "男"),
        (2, "女"),
    )
    name = models.CharField(max_length=128, unique=True, verbose_name="用户名")
    password = models.CharField(max_length=256, verbose_name="密码")
    email = models.EmailField(unique=True, verbose_name="电子邮箱")
    gender = models.IntegerField(choices=gender_choice, default=0, verbose_name="性别")
    # auto_now_add=True时为添加时的时间,更新对象时不会有变动。
    # auto_now=True无论是你添加还是修改对象,时间为你添加或者修改的时间。
    create_time = models.DateTimeField(auto_now_add=True, verbose_name="创建时间")
    modify_time = models.DateTimeField(auto_now=True, verbose_name="最后一次修改时间")
    # null针对数据库层面的, blank针对表单的
    last_login_time = models.DateTimeField(null=True, blank=True,
                                           verbose_name="最后一次登录时间")
    def __str__(self):
        return  self.name

    class Meta:
        verbose_name = "网站用户管理"
        verbose_name_plural = verbose_name
2. Set up the database backend
Django supports MySQL, Sqlite, oracle and other databases. Here, the default sqlite is selected without modification.
3. Register the app
# loginRegister/settings.py

INSTALLED_APPS = [
    'django.contrib.admin',
    'django.contrib.auth',
    'django.contrib.contenttypes',
    'django.contrib.sessions',
    'django.contrib.messages',
    'django.contrib.staticfiles',
    'login',  # 修改的内容
]
4. Generate the migration script and write it to the database
$ python manage.py makemigrations
$ python manage.py migrate
5. Whether the test is successful
Open the database file db.sqlite3, check whether there is a database table login_siteuser, if there is, the operation is successful.
6. Database model background management
# login/admin.py
from django.contrib import admin
from login.models import SiteUser
# Register your models here.

# 后台管理设置的信息
class SiteUserAdmin(admin.ModelAdmin):
    list_display =  ['name', 'gender', 'email']
    list_display_links = ['name']
    list_filter = ['gender', 'create_time']
    list_per_page = 10

admin.site.register(SiteUser, SiteUserAdmin)
Browser access, is the detection successful? (perfect)
- Access URL: http://127.0.0.1:9999/admin/
4. Routing and view function framework construction
Routing design:
| URL | view views | template | Function |
|---|---|---|---|
| /index/ | login.views.index | index.html | front page |
| /login/ | login.views.login | login.html | log in page |
| /register/ | login.views.register | register.html | Registration interface |
| /logout/ | login.views.logout | no need to go back to page | logout interface |
Access policy:
- For those who have not logged in, whether they visit index or login and logout, all jump to the login interface
- If you have logged in, you will automatically jump to the index page when you visit the login
- Logged-in personnel are not allowed to directly access the register page, they need to logout first
- After logging out, automatically jump to the login interface
1. Routing configuration
-
main routing configuration file
# loginRegister/urls.py from django.contrib import admin from django.urls import path, include urlpatterns = [ path('admin/', admin.site.urls), path('', include('login.urls')) # 添加的行, 如果没有前缀,访问子路由配置文件 ] -
Sub-routing configuration file (login sub-application)
# login/urls.py(新建的文件)
from django.urls import path, include
from login import views

urlpatterns = [
    path('index/', views.index, name='index'),
    path('login/', views.login, name='login'),
    path('register/', views.register, name='register'),
    path('logout/', views.logout, name='logout'),
]
2. View function configuration
# login/views.py
from django.shortcuts import render, redirect

# Create your views here.


def index(request):
    pass
    return render(request, 'login/index.html')

def login(request):
    pass
    return render(request, 'login/login.html')

def register(request):
    pass
    return render(request, 'login/register.html')

def logout(request):
    pass
    # redirect: 重定向(跳转)
    return redirect('/login/')
3. Configuration of the template template
- templates/login/index.html (new)
<!DOCTYPE html>
<html lang="en">
<head>
    <meta charset="UTF-8">
    <title>首页</title>
</head>
<body>
<h1>这是首页的模拟界面</h1>
</body>
</html>
- templates/login/login.html (new)
<!DOCTYPE html>
<html lang="en">
<head>
    <meta charset="UTF-8">
    <title>用户登录</title>
</head>
<body>
<h1>用户登录</h1>
<form>
    用户名: <input type="text" placeholder="username"><br/>
    密码: <input type="password" placeholder="password"><br/>
    <input type="submit" value="登录">
</form>
</body>
</html>
- templates/login/register.html (new)
<!DOCTYPE html>
<html lang="en">
<head>
    <meta charset="UTF-8">
    <title>注册界面</title>
</head>
<body>
<h1>用户注册</h1>
<form>
    用户名: <input type="text" placeholder="username"><br/>
    电子邮箱: <input type="email" placeholder="email"><br/>
    密码: <input type="password" placeholder="password"><br/>
    确认密码: <input type="password" placeholder="password"><br/>
    <input type="submit" value="注册">
</form>
</body>
</html>
4. Whether the test is successful
Browser access, is the detection successful? (The first step is perfectly done)
- Access URL: http://127.0.0.1:9999/index/
- Access URL: http://127.0.0.1:9999/login/
- Access URL: http://127.0.0.1:9999/register/
5. Front-end interface design and optimization
In the era when beauty is justice, but without CSS and JS, the appearance is really unacceptable.
However, most people who use Django do not have a high front-end level, usually without the cooperation of professional front-end engineers, and the CSS and JS they write are often horrible. what to do? It doesn't matter, we have ready-made open source front-end CSS frameworks! Bootstrap4 is one of the best CSS frameworks! click to learn more
Bootstrap core summary:
6. Improve the login view function
-
Perfect interaction between html and view functions
- Modification 1. If there is message information, it will be displayed, if there is no message information, it will not be displayed.
- Modification 2: When submitting login information, submitting it to /login/ with the post method corresponds to the view function processing.
- Modification 3: Django provides a csrf anti-attack mechanism, adding this information can successfully access the login interface
- Modify 4: name="username" specifies the name of the key value stored in the form content, eg: {"username": "the username you filled in", "password": "the password you filled in" }
# templates/login/login.html <div class="col-sm"> <h3 style="text-align: center">用户登录</h3> # 修改1. 有message信息则显示, 没有就不显示。 {% if message %} <div class="alert alert-warning" role="alert"> <strong>登录失败!</strong> { { message }} </div> {% endif %} # 修改2: 提交登录信息时, 以post方法提交给/login/对应的是视图函数处理。 <form action="/login/" method="post"> # 修改3: Django提供了csrf防攻击的机制, 添加该信息则可顺利访问登陆界面 {% csrf_token %} <div class="form-group"> <label>用户名</label> # 修改4:name="username"指定表单内容存储的key值名称, eg: {"username":"你填的用户名"} <input type="text" class="form-control" name="username"> </div> <div class="form-group"> <label>Password</label> <input type="password" class="form-control" name="password"> <small class="form-text text-muted">密码必须是字母、数字或者特殊符号组成</small> </div> <a href="/register/" class="text-success"> <ins>新用户注册</ins> </a> <button type="submit" class="btn btn-primary float-right">登录</button> </form> </div> -
Improvement of view function
# login/views.py def login(request): if request.method == 'POST': username = request.POST.get('username').strip() password = request.POST.get('password').strip() # print(username, password) if username and password: user = SiteUser.objects.filter(name=username, password=password).first() if user: return redirect('/index/') else: message = "用户名或者密码错误" return render(request, 'login/login.html', { 'message':message}) else: message = "非法的数据信息" return render(request, 'login/login.html', { 'message': message}) return render(request, 'login/login.html') -
Browser access, is the detection successful?
- Access URL: http://127.0.0.1:9999/login/
- Fill in the correct username and password/wrong username and password to test whether it is the expected effect.
Seven, session session and login view function
-
The login is successful, and the logged-in user information is stored in the session
# login/views.py def login(request): if request.method == 'POST': username = request.POST.get('username').strip() password = request.POST.get('password').strip() # print(username, password) if username and password: user = SiteUser.objects.filter(name=username, password=password).first() if user: # ------------核心修改的内容开始 request.session['is_login'] = True request.session['user_id'] = user.id request.session['username'] = user.name # --------------核心修改的内容结束 return redirect('/index/') else: message = "用户名或者密码错误" return render(request, 'login/login.html', { 'message':message}) else: message = "非法的数据信息" return render(request, 'login/login.html', { 'message': message}) return render(request, 'login/login.html') -
When logging out, clear the session information
# login/views.py def logout(request): # 如果状态不是登录状态,则无法登出。 if request.session.get('is_login'): request.session.flush() # 清空session信息 return redirect('/login/') -
Add a logout hyperlink on the homepage and test
# templates/login/index.html # 核心代码如下: <h1>你好, { { request.session.username }}, 这是首页的模拟界面</h1> <a href="/logout/"><strong style="font-size: 20px">登出</strong></a> -
Browser access, is the detection successful?
- Access URL: http://127.0.0.1:9999/index/
Project address: https://gitee.com/half-summer/loginregister
8. Image verification code
In order to prevent robots from frequently logging into websites or saboteurs from maliciously logging in, many user login and registration systems provide graphic verification code functions.
It is very simple to implement the image verification code function in Django. There are ready-made third-party libraries that can be used, and we don't have to develop it ourselves (no need to repeat the wheel). This library is called django-simple-captcha.
Specific installation tutorial: click me
Django form
We used to manually write the form element in the HTML file, then receive the user data in the form in the view function of views.py, write the verification code for verification, and finally use the ORM to add, delete, modify and check the database. This is time-consuming and labor-intensive, the whole process is more complicated, and it may not be written properly, and data verification is also more troublesome. Imagine that if our form has dozens or hundreds of data fields with different data characteristics, if we also use manual methods, its efficiency and correctness will not be guaranteed. In view of this, Django has integrated a form function internally, which directly uses Python code to generate HTML form code in an object-oriented manner, specifically to help us quickly process form-related content.
Django's form provides us with the following three main functions:
- Prepare and reconstruct data for page rendering;
- Create HTML form elements for the data;
- Receive and process data sent by the user from the form.
Writing a Django form is very similar to writing a model in the model system. In the model, a field represents a column of the data table, and a field in the form represents an element <form>in the form.<input>
Poke me to learn more about Django form operations
(1) Create a form model
# /login/forms.py(新建的文件)

from captcha.fields import CaptchaField
from django import  forms
class LoginForm(forms.Form):
    username = forms.CharField(label='用户名', required=True,
                               min_length=4, max_length=128)
    password = forms.CharField(label="密码", required=True,
                               min_length=4, max_length=10)
    captcha = CaptchaField(label="验证码")
(2) View logic optimization
# login/views.py
def login(request):
    # 请求方法为POST提交
    if request.method == 'POST':
        # 修改1: 实例化表单对象
        login_form = LoginForm(request.POST)
        # 修改2: 验证表单数据的合法性
        if login_form.is_valid():
            # 修改3:获取表单填写的数据,数据清洗
            username = login_form.cleaned_data.get('username')
            password = login_form.cleaned_data.get('password')
            user = SiteUser.objects.filter(name=username, password=password).first()
            if user:
                request.session['is_login'] = True
                request.session['user_id'] = user.id
                request.session['username'] = user.name
                return  redirect('/index/')
            else:
                message = "用户名或者密码错误"
                # 修改4: locals()以字典方式返回当前所有的变量
                # eg:{'message':'xxxx', 'login_form':'xxx'}
                return  render(request, 'login/login.html', locals())
        else:
            message = "填写的登录信息不合法"
            return render(request, 'login/login.html', locals())
    # 请求方法是GET请求
    login_form = LoginForm()
    return render(request, 'login/login.html', locals())
(3) Template page optimization
# templates/login/login.html(部分修改)

<h3 style="text-align: center">用户登录</h3>
# 修改1: 不同的报错,提示不同的信息
{% if login_form.captcha.errors %}
<div class="alert alert-warning" role="alert">
    <strong>登录失败!</strong> 验证码不正确
</div>
{% elif message %}
<div class="alert alert-warning" role="alert">
    <strong>登录失败!</strong> {

   { message }}
</div>
{% endif %}

<div class="form-group">
    # 修改2:
    <label>{

   { login_form.username.label }}</label>
    <input type="text" class="form-control" name="username">
</div>
<div class="form-group">
    # 修改3:
    <label>{

   { login_form.password.label }}</label>
    <input type="password" class="form-control" name="password">
    <small class="form-text text-muted">密码必须是字母、数字或者特殊符号组成.</small>
</div>

# 修改4: 最重要的,添加验证码表单
<div class="form-group">
    <label>{

   { login_form.captcha.label }}</label>
    {

   { login_form.captcha }}
</div>
(4) Verify that it is correct
![[External link image transfer failed, the source site may have an anti-leeching mechanism, it is recommended to save the image and upload it directly (img-AOQnIXWd-1686377086683) (reusable registration login system.assets/image-20210307102108989.png)]](https://img-blog.csdnimg.cn/bb8d840e49804b8987cfdedbbff3dd44.png)
9. Email registration
1. Send email function test
-
Configure email information
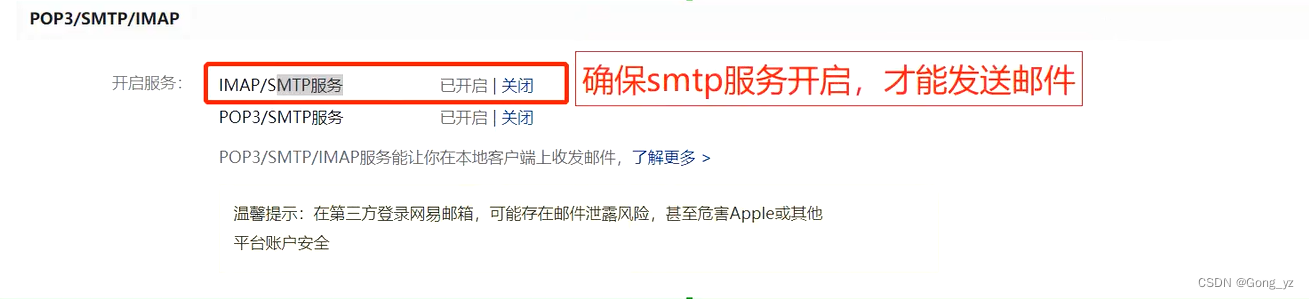
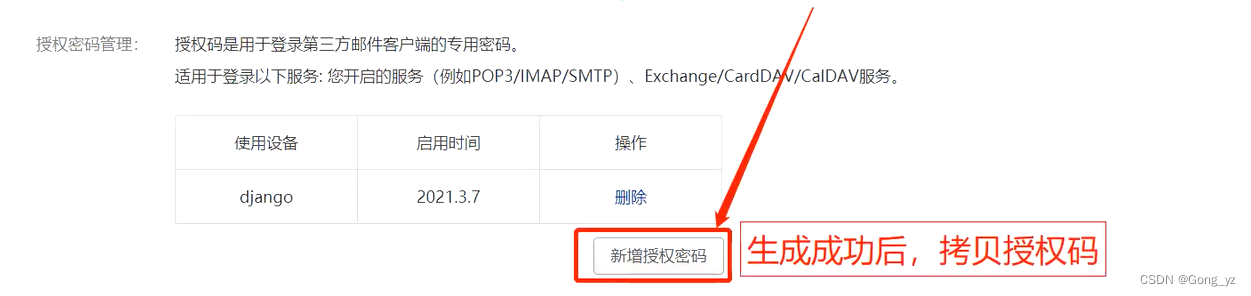
# loginRegister/settings.py # mail configure(添加信息如下) EMAIL_HOST = 'smtp.163.com' # 'smtp.qq.com' EMAIL_PORT = 25 EMAIL_HOST_USER = '[email protected]' # 你的邮箱地址 EMAIL_HOST_PASSWORD = 'NFPOJZLTRPJPANZE' # 不是邮箱的登录密码,而是授权码(如何获取授权码) EMAIL_USE_SSL = False # 不开启ssl -
How to get the authorization code?
![[External link picture transfer failed, the source site may have an anti-leeching mechanism, it is recommended to save the picture and upload it directly (img-vN3uDaoo-1686377086684) (reusable registration login system.assets/image-20210307111227616.png)]](https://img-blog.csdnimg.cn/96c3364f4be648fda61a46223d5ba3df.png)
-
Is the test sending email successful in an interactive environment?
Terminal输入命令> python manage.py shell In [1]: from django.core.mail import send_mail In [2]: from loginRegister.settings import EMAIL_HOST_USER In [3]: send_mail("测试邮件", "content", EMAIL_HOST_USER, ['[email protected]', 'ahalf_summer@126 ...: .com']) -
Is the verification successful? Check whether you have received an email?
2. Basic registration function realization
(1) Registration form
# login/forms.py
class RegisterForm(forms.Form):
    username = forms.CharField(label="用户名", required=True, max_length=128)
    password1 = forms.CharField(label="密码", max_length=256, required=True)
    password2 = forms.CharField(label="确认密码", max_length=256, required=True)
    email = forms.EmailField(label="邮箱地址")
    captcha = CaptchaField(label='验证码')
(2) Realize the registration view
- If the user is already logged in, he cannot register and jump to the home page.
- If it is a GET request, return the html page registered by the user.
- If it is a POST request, first verify whether the submitted data is passed, and clean the data. Next, determine whether the user name and email address have been registered, store the registered information in the database, and jump to the login interface.
- Extra function: When registering for data security, the password is not stored in plain text in the database, but encrypted first and then stored.
# login/views.py
def register(request):
    # 如果用户已经登录,则不能注册跳转到首页。
    if request.session.get('is_login', None):
        return redirect('/index/')
    # 如果是POST请求
    if request.method == 'POST':
        print(request.POST)
        register_form = RegisterForm(request.POST)
        message = "请检查填写的内容!"
        # 先验证提交的数据是否通过
        if register_form.is_valid():
            # 清洗数据
            username = register_form.cleaned_data.get('username')
            password1 = register_form.cleaned_data.get('password1')
            password2 = register_form.cleaned_data.get('password2')
            email = register_form.cleaned_data.get('email')

            print(locals())
            # 接下来判断用户名和邮箱是否已经被注册
            same_name_user = SiteUser.objects.filter(name=username)
            print(same_name_user)
            if same_name_user:
                message = '用户名已经存在'
                return render(request, 'login/register.html', locals())
            same_email_user = SiteUser.objects.filter(email=email)
            if same_email_user:
                message = '该邮箱已经被注册了!'
                return render(request, 'login/register.html', locals())
            # 将注册的信息存储到数据库,跳转到登录界面
            new_user = SiteUser(name=username, password=password1, email=email)
            new_user.save()
            return  redirect('/login/')
    # 如果是GET请求,返回用户注册的html页面。
    register_form = RegisterForm()
    return render(request, 'login/register.html', locals())
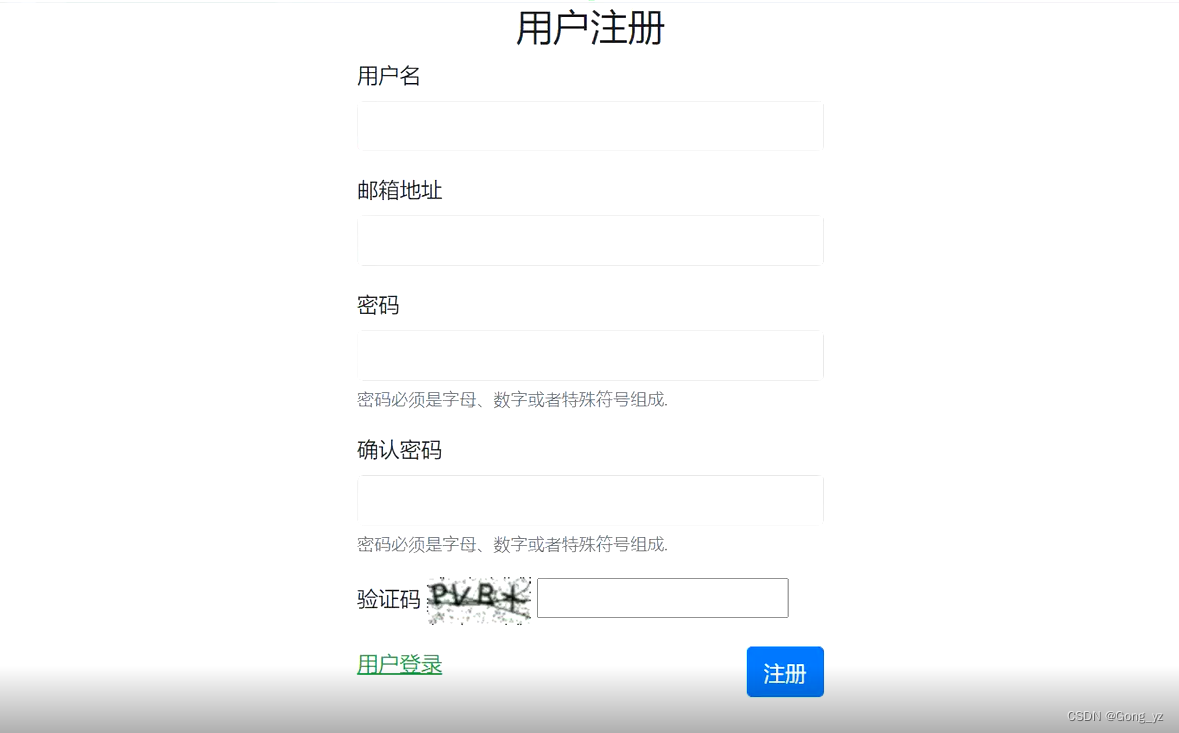
(3) Changes to the Template template
# templates/login/register.html

<h3 style="text-align: center">用户注册</h3>
{% if register_form.captcha.errors %}
<div class="alert alert-warning" role="alert">
    <strong>注册失败!</strong> 验证码不正确
</div>
{% elif message %}
<div class="alert alert-warning" role="alert">
    <strong>注册失败!</strong> {

   { message }}
</div>
{% endif %}


<form action="/register/" method="post">
    {% csrf_token %}
    <div class="form-group">
        <label>{

   { register_form.username.label }}</label>
        <input type="text" class="form-control" name="username">
    </div>
    <div class="form-group">
        <label>{

   { register_form.email.label }}</label>
        <input type="email" class="form-control" name="email">
    </div>
    <div class="form-group">
        <label>{

   { register_form.password1.label }}</label>
        <input type="password" class="form-control" name="password1">
        <small class="form-text text-muted">密码必须是字母、数字或者特殊符号组成.</small>
    </div>
    <div class="form-group">
        <label>{

   { register_form.password2.label }}</label>
        <input type="password" class="form-control" name="password2">
        <small class="form-text text-muted">密码必须是字母、数字或者特殊符号组成.</small>
    </div>
    <div class="form-group">
        <label>{

   { register_form.captcha.label }}</label>
        {

   { register_form.captcha }}
    </div>
    <a href="/login/" class="text-success">
        <ins>用户登录</ins>
    </a>
    <button type="submit" class="btn btn-primary float-right">注册</button>
</form>
(4) Whether the test is successful
3. Register to add password encryption function
There are many different approaches to how to encrypt passwords, with varying levels of security. Here we use Python's built-in hashlib library to encrypt passwords using hash values. The security level may not be high enough, but it is simple enough and easy to use.
-
Write a hash function in
login/utils.py:def hash_code(s, salt='mysite'):# 加点盐 h = hashlib.sha256() s += salt h.update(s.encode()) # update方法只接收bytes类型 return h.hexdigest() -
login/views.pyModify the login and register views indef register(request): # .....省略部分代码 new_user = SiteUser(name=username, password=hash_code(password1), email=email) # .....省略部分代码 def login(request): # .....省略部分代码 user = SiteUser.objects.filter(name=username, password=hash_code(password)).first() # .....省略部分代码
4. Email registration confirmation
Naturally, we would think that if we can use email confirmation to review newly registered users, it is safe and formal, and it is also the current practice of many sites.
(1) Create a model
Since it is necessary to distinguish between users who have passed email confirmation and those who have not passed email confirmation, it is necessary to add an attribute of whether email confirmation has been performed to the user.
In addition, we will create a new table to save the user's confirmation code and the time of registration submission.
# /login/models.py

class SiteUser(models.Model):
    # .......
    has_confirmed = models.BooleanField(default=False, verbose_name="是否邮箱验证")


class ConfirmString(models.Model):
    code = models.CharField(max_length=256, verbose_name="确认码")
    user = models.OneToOneField('SiteUser', on_delete=models.CASCADE)
    create_time = models.DateTimeField(auto_now_add=True, verbose_name="创建时间")

    def __str__(self):
        return self.user.name + ":" + self.code

    class Meta:
        ordering = ["-create_time"]
        verbose_name = "确认码"
        verbose_name_plural = "确认码"
When the database model is changed, the migration script must be generated and written to the database.
python manage.py makemigrations
python manage.py migrate
By the way, modify the admin.py file so that we can modify and observe the data in the background
# login/admin.py
admin.site.register(ConfirmString)
(2) Modify the view
def register(request):
    # ................
    code = make_confirm_string(new_user)
    send_email(email, code)
    message = '请前往邮箱进行确认!'
    # ..................
make_confirm_string()It is a method to create a confirmation code object, the code is as follows:
import datetime

def make_confirm_string(user):
    now = datetime.datetime.now().strftime("%Y-%m-%d %H:%M:%S")
    code = hash_code(user.name, now)
    models.ConfirmString.objects.create(code=code, user=user,)
    return code
send_email(email, code)The method receives two parameters, which are the registered email address and the previously generated hash value. The code is as follows:
def send_email(email, code):
    print('send mail.........')
    subject = '注册确认邮件'
    text_content = '''感谢注册,这里是登录注册系统网站!\
                    如果你看到这条消息,说明你的邮箱服务器不提供HTML链接功能,请联系管理员!'''
    html_content = '''
    <p>感谢注册<a href="http://{}/confirm/?code={}" target=blank>点击验证</a>,\
    这里是登录注册系统网站!</p>
    <p>请点击站点链接完成注册确认!</p>
    <p>此链接有效期为{

    }天!</p>
    '''.format('127.0.0.1:9999', code, settings.CONFIRM_DAYS)

    send_mail(subject, text_content,
              settings.EMAIL_HOST_USER, [email, ], html_message=html_content)
The last valid number of days is set in the settings CONFIRM_DAYS. The following is the mail-related settings configuration:
# 注册有效期天数
CONFIRM_DAYS = 3
Test: Register a user and determine whether the confirmation email can be received.
(3) Processing email confirmation requests
urls.pyAdd a url to the login sub-application :
path('confirm/', views.user_confirm,name='confirm'),
Second, login/views.pyadd a user_confirmview in .
- Obtain confirmation code information
- Does the confirmation code exist in the database? If not, return an invalid request
- Does the confirmation code exist in the database? If so, check whether it has expired? If expired, delete the user information, otherwise update the user information.
def user_confirm(request):
    code = request.GET.get('code', None)
    message = ''
    try:
        confirm = ConfirmString.objects.get(code=code)
    except:
        message = '无效的确认请求!'
        return render(request, 'login/confirm.html', locals())

    create_time = confirm.create_time
    now = datetime.now()
    print(now, create_time, create_time + timedelta(settings.CONFIRM_DAYS))
    if now > create_time + timedelta(settings.CONFIRM_DAYS):
        confirm.user.delete()
        message = '您的邮件已经过期!请重新注册!'
    else:
        confirm.user.is_confirmed = True
        confirm.user.save()
        confirm.delete()
        message = '感谢确认,请使用账户登录!'
    return render(request, 'login/confirm.html', locals())
A confirm.htmlpage is required, we create it /login/templates/login/below:
Through the JS code in the page, it is set to automatically jump to the login page after 2 seconds, which can be removed or beautified according to your needs.
<h1 style="margin-left: 100px;">{

    {

     message }}</h1>

<script>
window.setTimeout("window.location='/login/'",2000);
</script>
(4) Modify the login rules
Since users without email confirmation cannot log in, we must modify the login rules as follows:
if not user.has_confirmed:
    message = '该用户还未经过邮件确认!'
    return render(request, 'login/login.html', locals())
10. Others
-
The final code of the reusable registration and login system project: https://bitbucket.org/lvah/loginregister
-
How to install redis on windows? Click to enter
-
Understand the working principle of Celery and click to enter ----- realize asynchronous tasks and timing tasks