Color space for color images
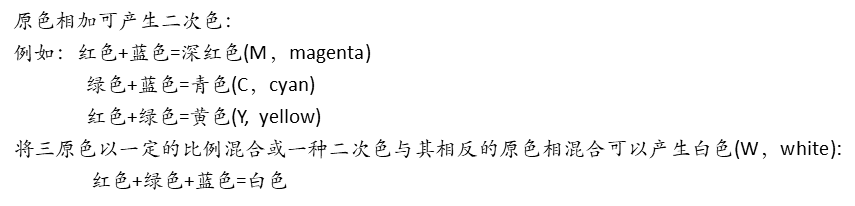
The principle of three primary colors
For the sake of standardization, the International Commission on Illumination (CIE) stipulates that monochromatic light with wavelengths of 700nm, 546.1nm, and 435.8nm is used as the three primary colors of red (R), green (G), and blue (B) respectively . Various colors can be obtained by mixing the three primary colors of red, green and blue in proportion. The color matching equation is: C=aR+bG+cB
Color model (also called color space or color system): Simplified color specification
- Coordinate system - subspace: each color is represented by a single point of the coordinate system
- There are many color models: RGB, CMY (CMYK), HSI, YUv, YCbCr, Lab , etc. are widely used in actual project development and application.
RGB model and color space coordinate system
- A commonly used color information expression method
- Use the brightness of the three primary colors of red, green and blue to quantitatively express the color
- This model is also known as the additive color mixture model
- A method of color mixing by superimposing RGB three-color light on each other
- Suitable for the display of illuminants such as monitors
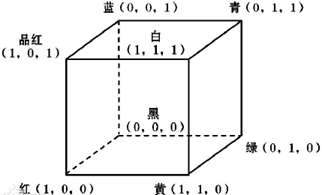
Figure 1 RGB color space coordinate system
- As shown in Figure 1, the RGB color space is based on a three-dimensional Cartesian coordinate system , including three original spectral components of R, G, and B.
- The values of the R, G, and B components in the RGB color space describe the brightness values of red, green, and blue, respectively .
- For the convenience of description, the three components are normalized , so that each value in the triplet represents the ratio of red, green, and blue. In Figure 1, the origin (0, 0, 0) represents black , the point (1, 1, 1) represents white , the point (1, 0, 0) represents red , the point (0, 1, 0) represents green , and the point (0, 0, 1) represents blue .
The size of the RGB image
- Each red, blue, and green image is an 8bit image
- Each pixel of the RGB image contains 24bit bit depth
- A color image with a 24bit bit depth is called a full (true) color image
- The total number of color types of a full-color image is 2 to the 24th power, 16777216
HSI color model and color space
The HSI (Hue-Saturation-Intensity, HSI) model uses three parameters of H, S, and I to describe the color characteristics.
- H (hue) is represented by the angle , and the hue of the color reflects what spectral wavelength the color is closest to;
- S (saturation) indicates the depth of the color , the higher the saturation, the darker the color;
- I (brightness) is determined by the reflectance of the object . The greater the reflection coefficient, the greater the brightness of the object, and vice versa.
- The I component is intensity or brightness independent of the color information of the image ;
- The H and S components are closely related to the color information and the way people perceive colors.
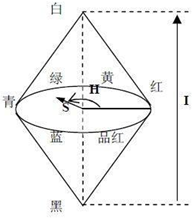
Figure 2 HSI color space
- As shown in Figure 2, the middle cross-section of the cone of the HSI color space is called the color circle , and the color circle shows the two parameters of hue and saturation more clearly .
- If the brightness is regarded as the vertical line of the color circle, then H, S, and I form a cylindrical color space. Three attributes of the HSI model define a three-dimensional color space.
- Hue H is represented by an angle, which reflects which spectral wavelength the color is closest to. In the color circle, 0° represents the red spectrum, 120° represents the green spectrum, and 240° represents the blue spectrum. Saturation S is represented by the radius from the center of the color circle to the color point. The longer the distance, the higher the saturation and the brighter the color.
Conversion between RGB and HSI
Given an image in RGB color space format, normalize the R component, G component, and B component of the image respectively. In the RGB color space, the color of the pixel at the (x, y) spatial position is determined by the R component R (x, y), the G component G (x, y) and the B component B (x, y) of the pixel. represented by three values. In the HSI color space, the H component H (x, y), the S component S (x, y), and the I component I (x, y) of the pixel at the spatial position can be calculated by the following formulas:


(1) When H(x, y) ∈ [00, 1200), the conversion formula is:


(2) When H(x, y) ∈ [1200, 2400), the conversion formula is:


(3) When H(x, y) ∈ [2400, 3600), the conversion formula is:


Writing RGB and HSI color space conversion experiments
For the histogram equalization of color images, it is first necessary to use the HSI function to convert the image to the HSI color space, and then use the designed RGB function to convert the image from the HSI color space to the RGB color space for display. Finally, perform image cutting and detection operations on the color image, such as cutting apples, detecting flames, etc., according to the test results.
the code
RGB to HIS function;
1  # RGB to HSI color space
2  def HSI(self,img): 3      r = img[:,:,0].astype(np.float32) 4      g = img[:,:,1 ].astype(np. float32) 5      b = img[:,:,2 ].astype(np.float32) 6
7      I = (r+g+b)/3
 8      I = I/255
 9      img_min = np.min(img,axis= -1 ) 10      S = 1 - (3/(r+g+b)* img_min) 11      a = 0.5*((rg)+(r- b)) 12      botton = ((rg)**2+(( rb)*(gb))+ sys.float_info.min)**0.5
 13      den =a / botton 14     den[den>1]=1
15     den[den<-1]=-1
16     H = np.arccos(den)
17     index = np.where(g<b)
18     H[index]= 2*m.pi-H[index]
19     H /= 2 * m.pi
20     H[S == 0] = 0
21
22     hsi = np.zeros([img.shape[0],img.shape[1],img.shape[2]],dtype=np.float32)
23     hsi[:,:,0] = H
24     hsi[:,:,1] = S
25     hsi[:,:,2] = I
26     return hsi
HIS to RGB function;
 1 #HSI转RGB颜色空间
 2 def RGB(self,hsi):
 3     #rgb
 4     H = hsi[:,:,0]
 5     S = hsi[:,:,1]
 6     I = hsi[:,:,2]
 7     H *=2*m.pi
 8
 9     rgb = np.zeros(hsi.shape,np.uint8)
10     R = np.zeros(H.shape, dtype=np.float32)
11     G = np.zeros(H.shape, dtype=np.float32)
12     B = np.zeros(H.shape, dtype=np.float32)
13
14     index = np.where((H>=0)&(H<2*m.pi/3))
15     R[index] = I[index] * (1+(S[index]*np.cos(H[index]))/(np.cos(m.pi/3-H[index])))
16     B[index] = I[index]*(1-S[index])
17     G[index] = 3*I[index]-(B[index]+R[index])
18
19     index = np.where((H>=2*m.pi/3)&(H<4*m.pi/3))
20     R[index] = I[index]*(1-S[index])
21     G[index] = I[index] * (1+(S[index]*np.cos(H[index]-2*m.pi/3))/(np.cos(m.pi-H[index])))
22     B[index] = 3*I[index]-(R[index]+G[index])
23
24     index = np.where((H>=4*m.pi/3)&(H<2*m.pi))
25     B[index] = I[index] * (1+(S[index]*np.cos(H[index]-4*m.pi/3))/(np.cos(5*m.pi/3-H[index])))
26     G[index] = I[index]*(1-S[index])
27     R[index] = 3*I[index]-(G[index]+B[index])
28
29     rgb[:,:,0] = (255*R).astype(np.uint8)
30     rgb[:,:,1] = (255*G).astype(np.uint8)
31     rgb[:,:,2] = (255*B).astype(np.uint8)
32     return rgb
cut the apples;
 1 #苹果检测
 2 def appleDetect(self,img):
 3     # img = img.astype(np.float32)
 4     r = img[:,:,0]
 5     g = img[:,:,1]
 6     b = img[:,:,2]
 7     hsi = self.HSI(img)
 8     H = hsi[:,:,0]
 9     H *=2*m.pi
10     print(img.shape)
11     apple = np.zeros(img.shape,dtype=np.uint32)
12     detect_ground = np.where(((H>=0)&(H<=m.pi/3.6))|((H>m.pi*1.3)&(H<=2*m.pi)))
13     apple[:,:,0][detect_ground] = r[detect_ground]
14     apple[:,:,1][detect_ground] = g[detect_ground]
15     apple[:,:,2][detect_ground] = b[detect_ground]
16     apple = apple.astype(np.uint8)
17     cv.imshow("apple_img",apple)
To detect the flame;
 1 #火焰检测
 2 def fireDetect(self,img):
 3
 4     r = img[:,:,0]
 5     g = img[:,:,1]
 6     b = img[:,:,2]
 7     hsi = self.HSI(img)
 8     H = hsi[:,:,0]
 9     S = hsi[:,:,1]
10     I = hsi[:,:,2]
11     S *= 100
12     I *= 255
13     H *=2*m.pi
14     # rgb = self.RGB(hsi)
15     detect_ground = np.where((H >= 2*m.pi/3) & (H< 2 * m.pi) & (S >= 20 )& (I >=100))
16     fire = np.zeros(img.shape,dtype=np.uint32)
17     # print(detect_ground)
18     fire[:,:,0][detect_ground] = r[detect_ground]
19     fire[:,:,1][detect_ground] = g[detect_ground]
20     fire[:,:,2][detect_ground] = b[detect_ground]
21     # print(fire)
22     fire = fire.astype(np.uint8)
23     cv.imshow("fire",fire)
Image display;
 1 #图像显示
 2 def main(self):
 3     img_apple = cv.imread("./data/images/apple.jpg")
 4     img_fire = cv.imread("./data/images/fire.jpg")
 5     hsi = self.HSI(img_apple)
 6     rgb = self.RGB(hsi)
 7     self.appleDetect(img_apple)
 8     self.fireDetect(img_fire)
 9     cv.imshow("orgin_apple",img_apple)
10     # cv.imshow("I",I)
11     # cv.imshow("S",S)
12     # cv.imshow("H",H)
13     cv.imshow("hsi",hsi)
14     cv.imshow("hsi_to_rgb_img",rgb)
program execution;
1 if __name__=="__main__":
2     PicDetect().main()
3     k = cv.waitKey(0)&0xFF
4     if k == 27:
5         cv.destroyAllWindows()
6