Through the previous two articles
https://blog.csdn.net/s_GQY/article/details/106187350
https://blog.csdn.net/s_GQY/article/details/106192109
The communication between server and client has been realized.
However, in the previous communication, strings were directly used for data transmission.
In actual development, the data structure to be transmitted is very complex, and only using strings will inevitably fail to meet basic development needs.
Therefore, this article will explain the serialization tool commonly used in Tcp network communication, Protobuf.
Protobuf is a data serialization tool developed by Google. It uses Tag technology to make data very small when serialized into bytes, and the parsing speed is also very fast. Therefore, many software and game network communication parts usually use Protobuf. Carry out data transmission.
I won’t elaborate too much on the Tag technology and the principle of Protobuf here. If you are interested, you can read this article
Let's start to explain about Protobuf.
1. Install and use protobuf and generate CSharp code
1. Install Python
Download python27, install and add system variables

Execute the "python" command on the command line, and the following figure appears, indicating that the installation is successful

2. Install Protobuf
First download Protobuf here . This is a compiled release version. If you want to compile it yourself, just download the source code. I use 2.5.0
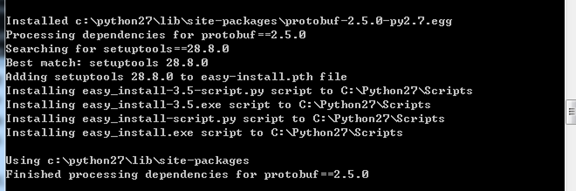
Enter the command line in the directory Protobuf-2.5.0\python, execute the command "python setup.py install" (enter the python path and then shift+right click to open the command line)
The following picture appears, the installation is successful
3. Download Protobuf Net and compile proto gen
Download the source code of Protobuf Net from here , and compile the three projects of ProtoGen, precompile and protobuf-net respectively
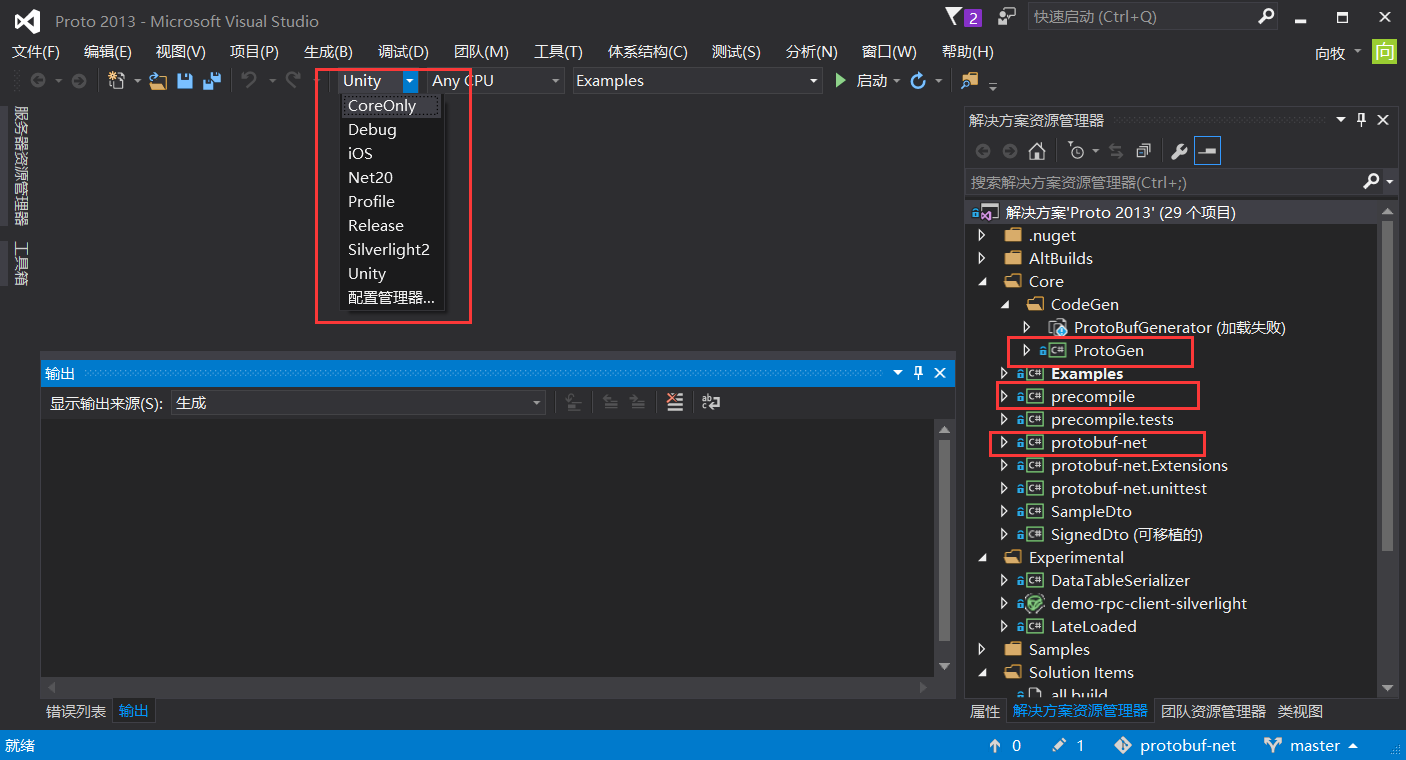
You will get these files, copy them out, and put them in the same directory as Protobuf, here in the proto-gen-cs directory

Since the download speed of this download address is worrying, here is the compiled version, just download and use it directly
4. Write a bat program to convert .proto files in batches
Create an empty txt in the Protobuf same-level directory, and rename it to buildcs.bat (the name is optional), as shown in the figure

Then enter such a line of code in the bat file, save
@echo off

set Path=proto-gen-cs\protogen.exe

for /f "delims=" %%i in ('dir  /b Proto "proto/*.proto"') do %Path% -i:proto/%%i -o:cs/%%~ni.cs

pause
Create a test proto protocol under the proto folder, create a new empty txt, and rename it to test.proto

Open it with an editor such as pad++ or sublime, and enter the following code
package client;

message test {
    optional string content = 1;                    //name
}
If you don't know how to write the proto protocol, you can read this article
Double-click buildcs.bat, you can't think, you will get a converted csharp code in the cs folder, which looks like this
2. Use the generated code to serialize data for Tcp communication
With the proto code, it can be imported into the project for use.
1. Client:
Drag protobuf-net.dll into the plugins folder of unity, and drag the generated test.cs into the scripts folder of unity
First encapsulate a tool class, which is used to serialize and deserialize data
using System;
using ProtoBuf;
using System.IO;


public class ProtoBufUtil
{
    public static byte[] ObjectToBytes<T>(T instance)
    {
        try
        {
            byte[] array;
            if (instance == null)
            {
                array = new byte[0];
            }
            else
            {
                MemoryStream memoryStream = new MemoryStream();
                Serializer.Serialize(memoryStream, instance);
                array = new byte[memoryStream.Length];
                memoryStream.Position = 0L;
                memoryStream.Read(array, 0, array.Length);
                memoryStream.Dispose();
            }

            return array;

        }
        catch (Exception ex)
        {

            return new byte[0];
        }
    }

    public static T BytesToObject<T>(byte[] bytesData, int offset, int length)
    {
        if (bytesData.Length == 0)
        {
            return default(T);
        }
        try
        {
            MemoryStream memoryStream = new MemoryStream();
            memoryStream.Write(bytesData, 0, bytesData.Length);
            memoryStream.Position = 0L;
            T result = Serializer.Deserialize<T>(memoryStream);
            memoryStream.Dispose();
            return result;
        }
        catch (Exception ex)
        {
            return default(T);
        }
    }
}
Then change the code of the client sending data in the second blog post
private void onClick()
{
        if(!SocketMgr.Instance.IsConnected)
	{
            SocketMgr.Instance.Connect("127.0.0.1", 8888);
	    return;
	}

	client.test sendContent = new client.test();//创建protobuf序列化实例
	sendContent.content = inputField.text;//对应字段赋值
	byte[] buffer = ProtoBufUtil.ObjectToBytes<test>(sendContent);//序列化
	SocketMgr.Instance.Send(1, buffer);//发送
}
At this point, just click the button, the client will serialize the data into protobuf format and send it to the server
2. Server:
Add a reference to protobuf-net.dll (the protobuf-net.dll file mentioned above)

Drag the client's ProtobufUtil to the server project directory, and then drag test.cs to the project directory

Then change the code for parsing data on the server side in the second blog post
private void CheckReceiveBuffer(object state)
{
    lock (m_ReceiveQueue)
    {
        if (m_ReceiveQueue.Count < 1) return;
        byte[] buffer = m_ReceiveQueue.Dequeue();
        byte[] msgContent = new byte[buffer.Length - 2];
        ushort msgCode = 0;

        using (MemoryStream ms = new MemoryStream(buffer))
        {
            byte[] msgCodeBuffer = new byte[2];
            ms.Read(msgCodeBuffer, 0, msgCodeBuffer.Length);
            msgCode = BitConverter.ToUInt16(msgCodeBuffer, 0);
            ms.Read(msgContent, 0, msgContent.Length);
        }

        test content = ProtoBufUtil.BytesToObject<test>(msgContent, 0, msgContent.Length);//调用protobuf,把数据反序列化为test对象
        Console.WriteLine("消息编号:" + msgCode + ",内容:" + content.content);
    }
}
At this point, the server has successfully used protobuf to parse the data, let's start the test
3. Test:
Still the old routine, first start the server, then the client connects to the server, successfully

Then the client enters any content and clicks send

The server has successfully parsed the data using Protobuf, and there is still thunderous applause here

3. End
The installation and use of protobuf have been written here, and the heartbeat mechanism will be explained in the next article. Goodbye everyone!