learning target
-
Able to know the web development process
-
Be able to master FastAPI to access multiple specified web pages
-
Know how to crawl pictures through the requests module
-
Know how to crawl GDP data through the requests module
-
Able to implement pie charts with pyecharts
-
Able to know the usage of logging logs
1. Web site development based on FastAPI
FastAPI is a high-performance, easy-to-use, modern web framework for writing APIs quickly. Based on the new features of Python 3.6+ (such as type annotation, asynchronous support, coroutines, etc.), it optimizes performance and development speed, supports asynchronous programming, and can easily create API services with high performance.
Key features of FastAPI include:
1. Fast: The request response speed of FastAPI is very fast, even several times faster than other frameworks.
2. Ease of use: The API design of FastAPI is similar to Flask, providing easy-to-use routing and parameter parsing. At the same time, its type annotation function makes development more reliable and easy to maintain.
3. Asynchronous support: FastAPI fully supports the asynchronous programming mode, and uses the async/await keywords of Python 3.6 or later to make complex I/O operations very simple.
4. Automatically generate API documents: Based on the OpenAPI standard, FastAPI automatically generates and provides beautiful API documents without manual document writing.
5. Security: FastAPI fully supports OpenID Connect and OAuth2 specifications, provides a secure authentication method, and supports JWT and Bearer Token at the same time.
1. Build a Web server based on FastAPI
The specific steps to build a FastAPI-based web server are as follows:
-
Install FastAPI and uvicorn:
pip install fastapi
pip install uvicorn
-
Create a Python file, say main.py, and import the necessary modules:
from fastapi import FastAPI
-
Create a FastAPI application instance:
app = FastAPI()
-
Define a routing handler for handling HTTP requests:
@app.get("/")
def read_root():
return {"Hello": "World"}
-
Start the web server:
if __name__ == "__main__":
uvicorn.run(app, host="0.0.0.0", port=8000)
-
Run the Python file on the command line to start the web server:
python main.py
-
Visit http://localhost:8000/, you should be able to see the returned JSON data {"Hello": "World"}.
The above are the basic steps to build a web server using FastAPI. You can add more routing handlers and business logic as needed. Let's look at a concrete example:
# Import FastAPI module
from fastapi import FastAPI
# Import response message Response module
from fastapi import Response
# Import server uvicorn module
import uvicorn
# Create FastAPI framework object
app = FastAPI()
# Send and receive data through @app routing decorator
# @app.get (parameter) : Accept the request data according to the get method
# The url path of the requested resource
@app.get("/index.html")
def main():
with open("source/html/index.html") as f:
data = f.read()
# return return response data
# Response(content=data, media_type="text/html"
# parameter 1: response data
# parameter 2: data format
return Response(content=data, media_type="text/html ")
# Run server
# Parameter 1: Framework object
# Parameter 2: IP address
# Parameter 3: Port number
uvicorn.run(app, host="127.0.0.1", port=8000)
2. Communication process between Web server and browser
In fact, the communication process between the web server and the browser is not completed at one time. Here, there will also be codes to access the server in the html code, such as requesting image resources. The communication process between the web server and the browser is generally as follows:
-
The browser sends an HTTP request to the web server.
-
After receiving the request, the web server generates a corresponding HTTP response according to the content of the request.
-
The web server returns an HTTP response to the browser.
-
After the browser receives the HTTP response, it parses the response content and renders the page.
-
If the page contains other resources (such as pictures, CSS, JavaScript, etc.), the browser will send a request to the web server to obtain these resources again, and repeat the above process.
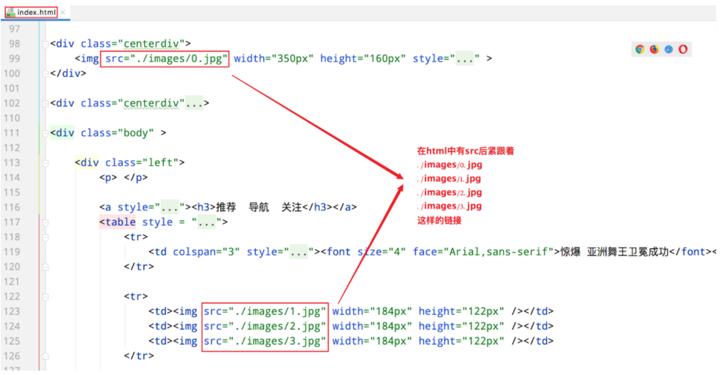
In this process, the HTTP protocol is the basis for the communication between the web server and the browser. Let's look at a concrete example:

Where do visits like 0.jpg, 1.jpg, 2.jpg, 3.jpg, 4.jpg, 5.jpg, 6.jpg come from?
Answer: They come from index.html
3. The communication process of the browser accessing the Web server
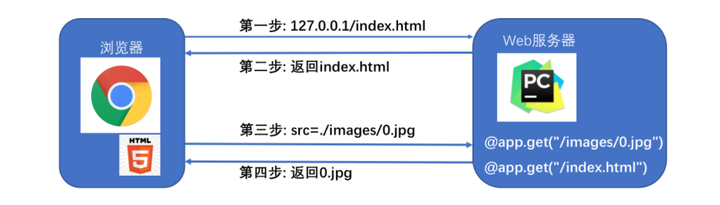
The communication flow of the browser accessing the Web server:
-
Browser (127.0.0.1/index.html) ==> request index.html to the web server
-
Web server (returns index.html) ==> browser
-
The browser parses index.html and finds that 0.jpg is needed ==> sends a request to the web server to request 0.jpg
-
The web server receives the request and returns 0.jpg ==> the browser accepts 0.jpg
The prerequisite for the success of the communication process: The web server can respond to the 0.jpg request sent by the browser, that is, the code is as follows
# When the browser sends a request for image 0.jpg, the function returns the corresponding resource
@app.get("/images/0.jpg")
def func_01():
with open("source/images/0.jpg", "rb") as f:
data = f. read()
print(data)
return Response(content=data, media_type="jpg")
4. Load image resource code
# Import FastAPI module
from fastapi import FastAPI
# Import response message Response module
from fastapi import Response
# Import server uvicorn module
import uvicorn
# Create FastAPI framework object
app = FastAPI()
@app.get("/images/0.jpg")
def func_01():
with open("source/images/0.jpg", "rb") as f:
data = f.read()
print(data)
return Response(content=data, media_type="jpg")
@ app.get("/images/1.jpg")
def func_02():
with open("source/images/1.jpg", "rb") as f:
data = f.read()
return Response(content= data, media_type="jpg")
@app.get("/images/2.jpg")
def func_03():
with open("source/images/2.jpg", "rb") as f:
data = f.read()
return Response(content=data, media_type="jpg")
@app.get("/images/3.jpg")
def func_04():
with open("source/images/3.jpg", "rb") as f:
data = f.read()
return Response(content=data, media_type="jpg")
@app.get("/images/4.jpg")
def func_05():
with open("source/images/4.jpg", "rb") as f:
data = f.read()
return Response(content=data, media_type="jpg")
@app.get("/images/5.jpg")
def func_06():
with open("source/images/5.jpg", "rb") as f:
data = f.read()
return Response(content=data, media_type="jpg")
@app.get("/images/6.jpg")
def func_07():
with open("source/images/6.jpg", "rb") as f:
data = f.read()
return Response(content=data, media_type="jpg")
@app.get("/gdp.html")
def func_08():
with open("source/html/gdp.html") as f:
data = f.read()
return Response(content=data, media_type="text/source")
@app.get("/index.html")
def main():
with open("source/html/ index.html") as f:
data = f.read()
# return return response data
# Response(content=data, media_type="text/source"
# parameter 1: response data
# parameter 2: data format
return Response(content =data, media_type="text/html")
# Run server
# Parameter 1: Frame object
# Parameter 2: IP address
# Parameter 3: Port number
uvicorn.run(app, host="127.0.0.1",port=8000)
This code is a simple web server created using the FastAPI framework. Here is an explanation of the code:
-
First, import the required modules:
-
FastAPI modules are used to create web applications.
-
The Response module is used to build HTTP responses.
-
The uvicorn module is used to run the server.
-
Create the instance object app of FastAPI.
-
Multiple routing processing functions are defined, and each function corresponds to a URL path. In each function, they will open and read the specified image file or HTML file.
-
When accessing the /images/0.jpg path, execute the func_01() function. This function opens the image file named 0.jpg, reads the content of the file, and returns an HTTP response containing the image content.
-
In the same way, the functions corresponding to the paths from /images/1.jpg to /images/6.jpg are defined.
-
When the /gdp.html path is accessed, the func_08() function is executed. This function opens the HTML file named gdp.html, reads the content of the file, and returns an HTTP response containing the HTML content.
-
When the path /index.html is accessed, the main() function is executed. This function opens the HTML file named index.html, reads the content of the file, and returns an HTTP response containing the HTML content.
-
Finally, run the server using the uvicorn.run() method, listening on port number 8000 on IP address 127.0.0.1.
5. Summary
-
The communication flow of the browser accessing the Web server:
-
Browser (127.0.0.1/index.html) ==> request index.html to the web server
-
Web server (returns index.html) ==> browser
-
The browser parses index.html and finds that 0.jpg is needed ==> sends a request to the web server to request 0.jpg
-
The web server receives the request and returns 0.jpg ==> the browser accepts 0.jpg
2. General configuration of FastAPI based on web request
1. There is a problem with the current web server
# 返回0.jpg
@app.get("/images/0.jpg")
def func_01():
with open("source/images/0.jpg", "rb") as f:
data = f.read()
print(data)
return Response(content=data, media_type="jpg")
# 返回1.jpg
@app.get("/images/1.jpg")
def func_02():
with open("source/images/1.jpg", "rb") as f:
data = f.read()
return Response(content=data, media_type="jpg")
# 返回2.jpg
@app.get("/images/2.jpg")
def func_03():
with open("source/images/2.jpg", "rb") as f:
data = f.read()
return Response(content=data, media_type="jpg")
This code is a web application written using Python's FastAPI framework. It creates three routes (or endpoints), which are used to return different image files. Through the @app.get decorator, each function defines a route, specifies the URL path of the route, and the function to be executed when the path is requested.
@app.get("/images/0.jpg")
def func_01():
with open("source/images/0.jpg", "rb") as f:
data = f.read()
return Response(content=data, media_type="jpg")
This function defines a route /images/0.jpg, and the func_01 function will be executed when accessing this route. This function opens and reads the file named source/images/0.jpg, and assigns the read data to the variable data. Then, the function returns a Response object, which contains data as content, and specifies the media type as jpg.
Similarly, the func_02 function defines another route /images/1.jpg that returns a file named source/images/1.jpg. Finally, the func_03 function defines a route /images/2.jpg that returns a file named source/images/2.jpg. These functions use the with open statement to open the file and read its contents. The "rb" mode (open the file in binary mode) was used when opening the file, which means that this is a binary file (such as an image), not a text file.
The Response object returned by these functions specifies the content and media type of the response, so that the client can correctly parse and process the returned image data.
Observing the above code, you will find that each picture 0.jpg, 1.jpg, and 2.jpg needs a function corresponding to it. If we need 1000 pictures, we need 1000 functions corresponding to it. Obviously, the code repeats too much in this way up.
2. General configuration of FastAPI based on web request
# When the request is /images/0.jpg, path ==> 0.jpg
@app.get("/images/{path}")
# Note that the parameters here need to be set to path
# path : str ==> specified path is string data
def get_pic(path: str):
# Here the path of open() is ==> f"source/images/0.jpg"
with open(f"source/images/{path}", "rb") as f:
data = f.read()
# return return response data
# Response(content=data, media_type="jpg")
# parameter 1: response data
# parameter 2: data format
return Response(content=data , media_type="jpg")
Full code:
# Import FastAPI module
from fastapi import FastAPI
# Import response message Response module
from fastapi import Response
# Import server uvicorn module
import uvicorn
# Create FastAPI framework object
app = FastAPI()
# When the request is /images/0.jpg, path = => 0.jpg
@app.get("/images/{path}")
# Note that the parameter here needs to be set to path
# path : str ==> Specify path as data of string type
def get_pic(path: str) :
# The path of open() here is ==> f"source/images/0.jpg"
with open(f"source/images/{path}", "rb") as f:
data = f.read()
# return Return response data
# Response(content=data, media_type="jpg")
# Parameter 1: Response data
# Parameter 2: Data format
return Response(content=data, media_type="jpg")
@app.get("/{path}")
def get_html(path: str):
with open(f"source/html/{path}", 'rb') as f:
data = f.read()
# return returns response data
# Response(content=data, media_type= "text/source"
# Parameter 1: Response data
# Parameter 2: Data format
return Response(content=data, media_type="text/html")
# Running server
# Parameter 1: Framework object
# Parameter 2: IP address
# Parameter 3 : port number
uvicorn.run(app, host="127.0.0.1", port=8000)
This code uses Python's FastAPI framework to create a simple web server. Here is an explanation of the code:
-
Import the necessary modules: The code first imports the FastAPI framework module for creating web applications. Then import the Response module to return the HTTP response message. Finally, the uvicorn module is imported to run the web server.
-
Create FastAPI application object: Use app = FastAPI() to create the application object of the FastAPI framework.
-
Define routing and handler functions:
-
The /images/{path} route matches the request path to /images/0.jpg. The path parameter indicates the file path in the request.
-
The get_pic function is the handler for the /images/{path} route. It reads the content of the image file from the specified path and returns it to the client as binary data. A Response object is created using Response(content=data, media_type="jpg"), and the image data is returned to the client as response data.
-
The /{path} route matches all other request paths. The path parameter indicates the file path in the request.
-
The get_html function is the handler function that handles the /{path} route. It reads the content of the HTML file from the specified path and returns it to the client as binary data. Use Response(content=data, media_type="text/html") to create a Response object, and return HTML data to the client as response data.
4. Run the web server: Use uvicorn.run(app, host="127.0.0.1", port=8000) to run the web server and listen to the address 127.0.0.1:8000. This will start an HTTP server that accepts client requests and responds according to the defined routing and handler functions.
operation result:

3. Summary
General configuration code:
# When the request is /images/0.jpg, path ==> 0.jpg
@app.get("/images/{path}")
# Note that the parameters here need to be set to path
# path : str ==> specified path is string data
def get_pic(path: str):
# Here the path of open() is ==> f"source/images/0.jpg"
with open(f"source/images/{path}", "rb") as f:
data = f.read()
# return return response data
# Response(content=data, media_type="jpg")
# parameter 1: response data
# parameter 2: data format
return Response(content=data , media_type="jpg")
This code is an HTTP server code based on the FastAPI framework. A GET request processing function get_pic is defined in this code, which is used to process requests whose request path is /images/{path}.
When receiving a request, FastAPI will pass the {path} part of the request path as a parameter to the get_pic function. Inside the function, the parameter is declared as path: str, indicating that path is a string type of data.
The open() function is used inside the function to open a file, the file path is source/images/{path}, where {path} is the specific value in the request path. Then use the rb mode to read the file content and assign the content to the variable data.
Finally, use the Response class to create a response object, and use the file content as the response data, and the data format is jpg. The response object is finally returned as an HTTP response.
3. Introduction to Python crawlers
1. What is a reptile
Web Crawler:
Also known as web spider, web robot, is a program or script that automatically grabs network information according to certain rules. Other names that are not commonly used include ants, automatic indexing, simulation programs, or worms.
Popular understanding:
To put it simply, a crawler is a detection machine. Its basic operation is to simulate human behavior to wander around various websites, click buttons, check data, or recite the information it sees. It is like a bug in a building. Climb around tirelessly.
You can simply imagine:
Every crawler is your "double". It's like Sun Wukong plucked a bunch of hairs and blew out a bunch of monkeys

Baidu: In fact, it uses this crawler technology to release countless crawlers to various websites every day, capture their information, and then put on light makeup and line up for you to search. With such a feature, for some small companies with insufficient data in their own companies, if they want to do data analysis at this time, they can use crawlers to obtain data from the same industry and then analyze it to guide the company's policy designation.
2. The basic steps of reptiles
The basic steps:
-
Start URL address
-
Make a request to get the response data
-
Parsing the response data
-
Data storage
3. Install the requests module
-
requests : You can simulate browser requests
-
Official document: http://cn.python-requests.org/zh_CN/latest/
-
Installation: pip install requests
Quick start (requests three steps):
# Import module
import requests
# Send request through requests.get()
# data saves the returned response data (the response data here is not pure html, you need to get html code through content)
data = requests.get("http://www .baidu.com")
# Get html code through data.content
data = data.content.decode("utf-8")
4. Summary
requests in three steps:
# Import module
import requests
# Send request through requests.get()
# data saves the returned response data (the response data here is not pure html, you need to get html code through content)
data = requests.get("http://www .baidu.com")
# Get html code through data.content
data = data.content.decode("utf-8")
5. Crawl photos
☆ View index.html
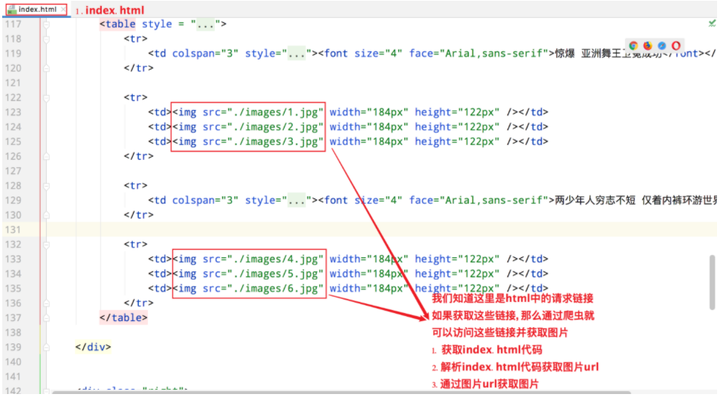
☆ Steps to crawl photos
-
Get index.html code
-
Parse the index.html code to get the image url
-
Get pictures by picture url
☆ Get index.html code
# Send a request to index.html through a crawler
# requests.get(URL): Send a request to a URL, which is the same as entering a URL in a browser
data = requests.get("http://127.0.0.1:8000/ index.html")
# content can get the html content in the return value obtained by requests.get() to
data = data.content.decode("utf-8")
☆ Parse the index.html code to get the image url
# Get the request url of the picture
def get_pic_url():
# Send a request to index.html through a crawler
# requests.get(URL): Send a request to a URL, which is the same as entering a URL in a browser
data = requests.get( "http://127.0.0.1:8000/index.html")
# content can get the html content in the return value obtained by requests.get() to
data = data.content.decode("utf-8")
# Each line of html has "\n", split the html to get a list
data = data.split("\n")
# Create a list to store the url addresses of all pictures (that is, picture URLs)
url_list = []
for url in data:
# Parse all image urls through regularization
result = re.match('.*src="(.*)" width.*', url)
if result is not None:
# Add the parsed image url To url_list in
url_list.append(result.group(1))
return url_list
This code is a function to get the request URL for the image. The specific process is as follows:
1. Use a crawler to send a request to "http://127.0.0.1:8000/index.html" to obtain the content of the web page.
2. Decode the obtained web page content and use utf-8 encoding format.
3. Divide the decoded content by lines to get a list, each element is a line of content of the web page. 4. Create an empty list url_list to store URL addresses of all pictures.
5. Traverse the content of each line, and use regular expressions to parse out all image URLs.
6. If the parsing result is not empty, add the parsed picture URL to url_list.
7. Finally, return url_list, which is the URL address of all pictures.
☆ Get pictures by picture url
# Save the crawled picture to the local
def save_pic(url_list):
# Name the photo by num For example: 0.jpg 1.jpg 2.jpg
num = 0
for url in url_list:
# Get it through requests.get() Each picture
pic = requests.get(f"http://127.0.0.1:8000{url[1:]}")
# save each picture
with open(f"./source/spyder/{num} .jpg", "wb") as f:
f.write(pic.content)
num += 1
This code is a function to save the crawled image locally.
First, the function accepts a parameter url_list, which is a list containing image urls.
Then, each url in url_list is traversed through a loop. Inside the loop, use the requests.get() method to get each image. This method sends an HTTP GET request to the specified url and returns a Response object.
Next, use the open() function to open a file with the file path "./source/spyder/{num}.jpg", where num is an incremental number used to give each picture a unique name.
Then, use the write() method of the file object to write the image content to the file. pic.content is the obtained picture content.
Finally, close the file, increment num, and continue to process the next picture until all urls in the url_list are traversed. Full code:
import requests
import re
# Get the request url of the picture
def get_pic_url():
# Send a request to index.html through a crawler
# requests.get(URL): Send a request to a URL, which is the same as entering a URL in a browser
data = requests.get("http://127.0.0.1:8000/index.html")
# content can get the html content in the return value obtained by requests.get() to
data = data.content.decode("utf8" )
# Each line of html has "\n", split the html to get a list
data = data.split("\n")
# Create a list to store the url addresses of all pictures (that is, picture URLs)
url_list = []
for url in data:
# parse out all the pictures through regularization url
result = re.match('.*src="(.*)" width.*', url)
if result is not None:
# parse out the pictures Add url to url_list
url_list.append(result.group(1))
return url_list
# Save the crawled pictures locally
def save_pic(url_list):
# Name the photo by num For example: 0.jpg 1.jpg 2.jpg
num = 0
for url in url_list:
# Get each picture through requests.get()
pic = requests.get( f"http://127.0.0.1:8000{url[1:]}")
# Save each picture
with open(f"./source/spyder/{num}.jpg", "wb") as f :
f.write(pic.content)
num += 1
if __name__ == '__main__':
url_list = get_pic_url()
save_pic(url_list)
Explain the code in detail. This code implements the following functions:
-
The requests and re modules are imported.
-
A function get_pic_url() is defined to get the request url of the picture.
-
First, get the content of the web page by sending a request to "http://127.0.0.1:8000/index.html" using the requests.get() method.
-
Then, use content.decode("utf8") to decode the obtained content into a string.
-
Next, use split("\n") to split the string into a list by line.
-
Create an empty list url_list to store the url address of the picture.
-
Traverse each element in the list data, use regular expressions to match all image urls, and add them to url_list.
-
Return url_list.
-
A function save_pic(url_list) is defined to save the crawled pictures locally.
-
Initialize a variable num to 0, which is used to name the photo.
-
Iterate over each url in url_list.
-
Use the requests.get() method to get the content of each image.
-
Use the open() method to open a file, write the picture content into the file, the file name is "./source/spyder/{num}.jpg", and increment num.
-
In the main program, first call the get_pic_url() function to obtain the url list of the picture, and then call the save_pic(url_list) function to save the picture locally.
☆ Summary
-
Steps to crawl photos
-
Get index.html code
-
Parse the index.html code to get the image url
-
Get pictures by picture url
Fourth, use Python to crawl GDP data
1、gdp.html

The 2020 world GDP ranking can be obtained by visiting http://127.0.0.1:8080/gdp.html. Here we obtain GDP data through the same process steps as crawling photos.
2. Use of the zip function
zip() function: It is used to take an iterable object as a parameter, pack the corresponding elements in the object into tuples, and then return a list composed of these tuples. The zip() function is a built-in function of Python, used Useful for packing multiple iterables into a list of tuples. The syntax of the zip() function is as follows:
zip(*iterables)
Among them, iterables is one or more iterable objects, which can be lists, tuples, strings or other iterable objects. The working principle of the zip() function is that it will take one element from each iterable object in turn, then pack these elements into a tuple, and then add this tuple to the result list. The zip() function stops packing when any of the iterables run out of elements. Here is a simple example showing the use of the zip() function:
numbers = [1, 2, 3]
letters = ['a', 'b', 'c']
zipped = zip(numbers, letters)
# 打印结果
for item in zipped:
print(item)
Output result:
(1, 'a')
(2, 'b')
(3, 'c')
In this example, the zip() function packs the iterables numbers and letters into a list of tuples. Each tuple consists of elements at corresponding positions in numbers and letters. It should be noted that if the lengths of the incoming iterable objects are inconsistent, the zip() function will pack the shortest iterable objects. If you need to pack based on the longest iterable object, you can use the itertools.zip_longest() function. The zip() function is often used in practical applications to iterate multiple iterable objects at the same time, especially when it is necessary to process or combine elements at their corresponding positions. Here is another example:
a = [1, 2, 3]
b = [4, 5, 6]
c = [4, 5, 6, 7, 8]
# packed as a list of tuples
zipped = zip(a, b)
# Note the use of When you need list conversion
print(list(zipped))
>>> [(1, 4), (2, 5), (3, 6)]
# The number of elements is the same as the shortest list
zipped = zip(a, c)
# Note that list conversion is required when using
print(list(zipped))
>>> [(1, 4), (2, 5), (3, 6)]
3. Crawl GDP data
import requests
import re
# Store the name of the crawled country
country_list = []
# Store the data of the crawled country gdp
gdp_list = []
# Get the gdp data
def get_gdp_data():
global country_list
global gdp_list
# Get the html data of gdp
data = requests.get("http://localhost:8000/gdp.html")
# Decode the obtained data
data = data.content.decode("utf8")
# Split the html data of gdp by row
data_list = data.split("\n")
for i in data_list:
# Parse html to get <country name>
country_result = re.match('.*<a href=""><font>(.*)</font ></a>', i)
# If the match is successful, it will be stored in the list
if country_result is not None:
country_list.append(country_result.group(1))
# parse html to get <gdp data>
gdp_result = re.match(".*¥(.*)100 million", i)
# If the match is successful, it will be stored in the list
if gdp_result is not None:
gdp_list.append(gdp_result.group(1))
# Put the two lists Merge into a list
gdp_data = list(zip(country_list, gdp_list))
print(gdp_data)
if __name__ == '__main__':
get_gdp_data()
The function of this code is to crawl the country name and GDP data on a web page. The specific implementation process is as follows:
-
Import the requests and re modules.
-
Create two empty lists country_list and gdp_list to store the crawled country names and GDP data.
-
Define a function get_gdp_data() to get GDP data.
-
In the function, first use the requests.get() function to get the HTML data of the web page and decode it into utf8 format.
-
Divide the obtained HTML data into rows to obtain a list data_list.
-
Traverse the data_list list and parse the HTML data of each row.
-
Use the re.match() function to match each row of HTML data to get country names and GDP data.
-
If the match is successful, store the country name in the country_list list, and store the GDP data in the gdp_list list.
-
Merge the two lists country_list and gdp_list into one list gdp_data.
-
Finally, print out the gdp_data list.
-
In the main program, call the get_gdp_data() function to perform the crawling operation.
4. Summary
-
Steps to crawl gdp
-
Get gdp.html code
-
Parse gdp.html code to get gdp data