Original text:Python simple and advanced web framework: fastapi usage tutorial - Zhihu
This is the fourth article in a series of simple advanced tutorials. This series of articles mainly introduces advanced libraries that can be used quickly.
I actually studied the Django framework for a while, but gave up halfway. I think a simpler framework might be more suitable for me...
Official tutorial:https://fastapi.tiangolo.com/
Install
Requires python3.6 version and above
pip install fastapi
pip install uvicorn
Tutorial
first step
from fastapi import FastAPI

app = FastAPI() # 创建API实例

@app.get("/")
async def root():
    return {"message": "Hello World"}
Code explanation
@app.get("/")The function of is to define a path operation, which means performing a GET operation when accessing example.com/.
Path, that is, the first slash to the last part of the URL, such as The path ofhttps://example.com/items/foois/items/foo, also commonly called endpoint or Routing
Operations, namely GET, POST, PUT, DELETE and other HTTP methods
in python,@somethingis called decoration, which means that the following function is used for processing.
async defis a way to define an asynchronous function, you can also define it as a normal functiondef
To put it simply, if your program does not require the order of execution (such as accessing the database first and then returning the dictionary), then you can use asynchronous, otherwise you can use ordinary functions.
returnCan return dict, list, str, int, etc.
run
Copy it tomain.py, open cmd, enter uvicorn main:app --reload, and it will run.
Parameter explanation.main:Filemain.py.app: Object created withinmain.pyapp = FastAPI().--reload: Server restart after changing code, for development only.
Open the browser and enter the addresshttp://127.0.0.1:8000, you can see the successful return
{"message": "Hello World"}Enterhttp://127.0.0.1:8000/docs to see the interactive documentation; enter http://127.0.0.1:8000/redoc to see the API documentation.
path parameters
Pass parameters
from fastapi import FastAPI

app = FastAPI()

@app.get("/items/{item_id}")
async def read_item(item_id):
    return {"item_id": item_id}
Use curly brackets to enclose the input parameters to pass the same-named parameters to the following function.
Inputhttp://127.0.0.1:8000/items/foo, Return{"item_id":"foo"}
Parameter Type
@app.get("/items/{item_id}")
async def read_item(item_id: int):
    return {"item_id": item_id}
Use the format of def func(para:type) to define the parameter data type.
This also has the effect of automatically converting the input parameters into types, such ashttp://127.0.0.1:8000/items/3, then the returned value is an int instead of str. Of course, there will also be a friendly error message if the conversion cannot be performed.
For example, entering http://127.0.0.1:8000/items/fool or http://127.0.0.1:8000/items/3.2 will return an error
Create enumeration class
from enum import Enum
from fastapi import FastAPI
class ModelName(str, Enum):
alexnet = "alexnet"
resnet = "resnet"
lenet = "lenet"
app = FastAPI()
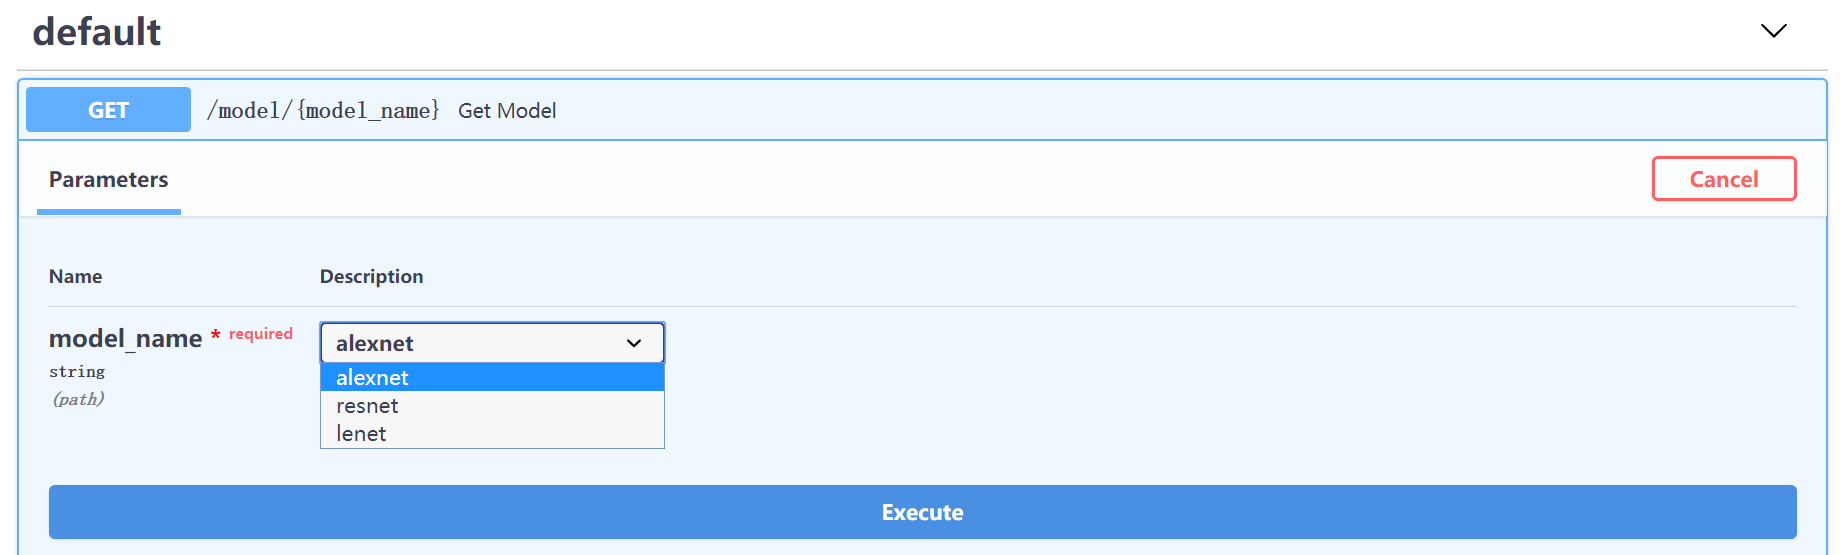
@app.get("/model/{model_name}")
async def get_model(model_name: ModelName):
if model_name == ModelName.alexnet:
return {"model_name": model_name, "message": "Deep Learning FTW!"}
if model_name.value == "lenet":
return {"model_name": model_name, "message": "LeCNN all the images"}
return {"model_name": model_name, "message": "Have some residuals"}
If there are several predefined parameters with the same data type, you can use the enum module and call it through 类名.参数名.
PS: alexnet, resnet, and lenet are all machine learning terms and can be replaced with any parameters.
Its biggest advantage is that it can display the available parameters in the document
query parameters
When you declare other function parameters that are not path parameters, they are automatically interpreted as "query" parameters.
from fastapi import FastAPI

app = FastAPI()

fake_items_db = [{"item_name": "Foo"}, {"item_name": "Bar"}, {"item_name": "Baz"}]

@app.get("/items/")
async def read_item(skip: int = 0, limit: int = 10):
    return fake_items_db[skip : skip + limit]
In the HTTP path, query parameters appear as key-value pairs located after ? in the URL and separated by & characters.
Comparehttp://127.0.0.1:8000/items/?skip=0&limit=1Immediateskip为0,limit为1
return[{"item_name":"Foo"},{"item_name":"Bar"}]
default value
In the above exampleskip: int = 0 sets the skip parameter to 0 by default, then we access http://127.0.0.1:8000/items/, which is equivalent tohttp://127.0.0.1:8000/items/?skip=0&limit=10
Optional parameters
Set the default value toNone, such asq: str = None
Multiple paths and query parameter combinations
from fastapi import FastAPI

app = FastAPI()

@app.get("/users/{user_id}/items/{item_id}")
async def read_user_item(
    user_id: int, item_id: str, q: str = None, short: bool = False
):
    item = {"item_id": item_id, "owner_id": user_id}
    if q:
        item.update({"q": q})
    if not short:
        item.update(
            {"description": "This is an amazing item that has a long description"}
        )
    return item
Request body
Note: To use the request body, you cannot use the GET operation, but use POST (more common), PUT, DELETE or PATCH.
from fastapi import FastAPI
from pydantic import BaseModel

# 将数据模型定义为继承BaseModel的类
class Item(BaseModel):
    name: str
    description: str = None
    price: float
    tax: float = None


app = FastAPI()

@app.put("/items/{item_id}")
async def create_item(item_id: int, item: Item, q: str = None):
    result = {"item_id": item_id, **item.dict()}
    if q:
        result.update({"q": q})
    return result
It seems complicated, but we will know what's going on if we use python to request it.
import requests
import json

body = {
      "name": "yanshu",
      "description": "yanshu's blog",
      "price": 100,
      "tax": 0
    }

body = json.dumps(body) # 需要先解析

response = requests.put('http://127.0.0.1:8000/items/3',data = body)
print(response.text)
return
{"item_id":3,"name":"yanshu","description":"yanshu's blog","price":100.0,"tax":0.0}String validation
This section talks about how to limit the format of the input string, such as the maximum number of input characters, which must contain XXX, etc.
from fastapi import FastAPI, Query

app = FastAPI()

@app.get("/items/")
async def read_items(q: str = Query(None, min_length=3,max_length=50)): # q的最大长度为50,最小长度为3
    results = {"items": [{"item_id": "Foo"}, {"item_id": "Bar"}]}
    if q:
        results.update({"q": q})
    return results
Regular expressions such asq: str = Query(None, min_length=3, max_length=50, regex="^fixedquery$")
The above examples all add a default parameter None to q, which makes it an optional parameter. So how do I make it a required parameter? Very simple:
def read_items(q: str = Query(..., min_length=3)):
Query multiple parameter values
from typing import List
from fastapi import FastAPI, Query

app = FastAPI()

@app.get("/items/")
async def read_items(q: List[str] = Query(None)):
    query_items = {"q": q}
    return query_items
In this wayhttp://localhost:8000/items/?q=foo&q=bar will simultaneously query the situation where q is foo and bar.
Of course, you can also specify a default value
async def read_items(q: List[str] = Query(["foo", "bar"])):
Alias parameters
from fastapi import FastAPI, Query

app = FastAPI()

@app.get("/items/")
async def read_items(q: str = Query(None, alias="item-query")):
    results = {"items": [{"item_id": "Foo"}, {"item_id": "Bar"}]}
    if q:
        results.update({"q": q})
    return results
In this way, you canhttp://127.0.0.1:8000/items/?item-query=foobaritems
Deprecated parameters
deprecated=True, so that this parameter can still be used, but the document will show that this parameter is no longer maintained.
deploy
Use directly
uvicorn main:app --host 0.0.0.0 --port 8000
That’s it
Note that directly after main: app
How to keep running in the background?
Installscreen
yum install screen # centos

apt-get update -y #Debian
apt-get install screen -y
use:
screen -S name # 创建一个名为name的screen窗口
screen -ls # 查看所有窗口
screen -r name # 返回名为name的窗口
exit # 退出当前窗口
Although gunicorn is officially recommended, I just reported it when I use it.
Internal Server Error
Error, we have no choice but to save the country through curves
Want to use your own domain name?
It's very simple, just use Pagoda reverse proxy. If you want to add SSL, you can't use file verification, but use DNS verification.