[Linux] In case of indecision, you can turn on the lights first, the evolution of LED drive---1
1.1 Character device driver framework
1.2.1 Driver (led_drive_simple.c)
1.2.2 Application (led_test_simple.c)
1.3.1 First compile the kernel (if not compiled)
1.3.2 Setting up the cross-compilation toolchain (Ubuntu)
1.3.4 On-machine test (development board)
2.2.2 Driver (board_imx6ull.c)
2.2.4 Application program (led_test.c)
2.3.1 On-machine test (development board)
3.1 Separation of design ideas
3.2.1 Header file (led_resource.h)
3.2.3 Driver (chip_imx6ull_gpio.c)
4. LED driver (bus device driver model)
4.2.1 Header file (led_drive.h)
4.2.4 Driver (chip_imx6ull_gpio.c)
5.1.2 Brief description of the device tree
5.2.1 Device tree dts file (100ask_led.dts)
5.2.2 Driver (chip_imx6ull_gpio.c)
Foreword:
This article shows the process of LED driver evolution and upgrading, and further elaborates the concept of the driver framework from the shallower to the deeper. If you encounter something you don't understand, you might as well light a lamp first.
The road of LED driver evolution: (level progression)
- The simplest LED driver
- LED driver with layered thinking
- Added split-minded LED driver
- LED driver under bus device driver model
- LED driver added to device tree
Reference: Mr. Wei's course, Linux Notes teacher's course (device tree part)
https://blog.csdn.net/qq_33487044/article/details/126325656
After going through the driving framework, I have a general understanding, but further practical experience is needed.
https://blog.csdn.net/weixin_42373086/article/details/130521999
1. The simplest LED driver
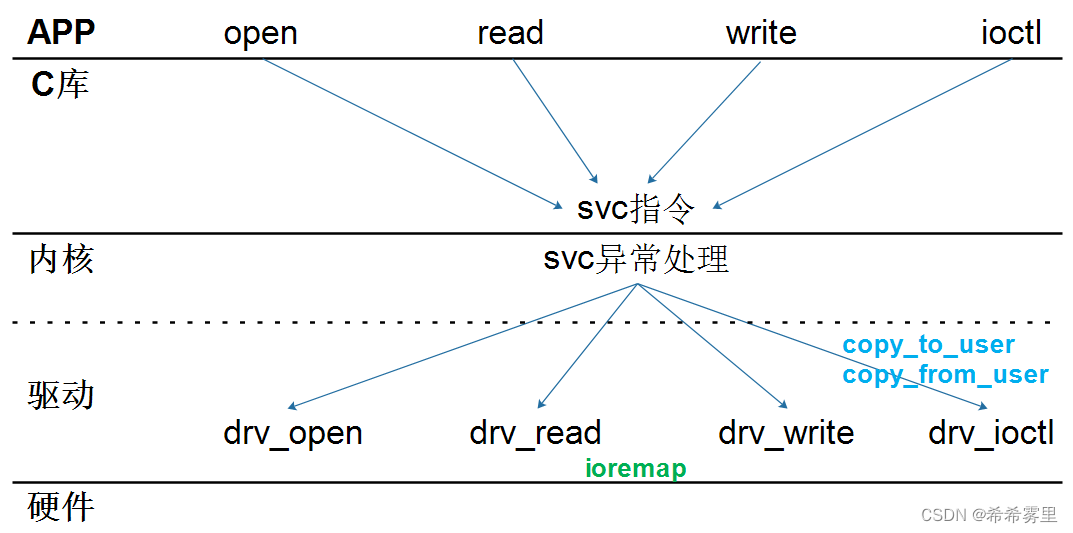
1.1 Character device driver framework
The simplest driver, when a device app calls open, it provides drv_open, read→drv_read, write→drv_write, ioctrl→drv_ioctl in the driver.
Steps to write a driver: exactly the same as the hello driver framework
- Determine the main device number, (you can define it yourself, when it is set to 0, it will be assigned by the kernel)
- Define your own file_operations structure management driver program drv_open/drv_write, etc., and implement the corresponding functions such as drv_open/drv_write. ---Note: file_operations is the core
- Tell the file_operations structure to the kernel: register_chrdev (provide the major device number).
- Implement the entry function. When installing the driver, the entry function calls register_chrdev, and there is a corresponding exit function. When the driver is uninstalled, the exit function calls unregister_chrdev
- Auxiliary functions: provide device information, automatically create device nodes: class_write, device_create
1.2 Program combat
1.2.1 Driver (led_drive_simple.c)
Specific comments and analysis are in the code:
/* 说明:
	*1,本代码是跟学韦老师课程所编写,增加了注释和分析
	*2,采用的是UTF-8编码格式
	*3,简单LED驱动程序 led_drive_simple.c
	*4,参照内核字符设备驱动程序cm4040_cs.c
*/


#include <linux/kernel.h>
#include <linux/module.h>
#include <linux/slab.h>
#include <linux/init.h>
#include <linux/fs.h>
#include <linux/delay.h>
#include <linux/poll.h>
#include <linux/mutex.h>
#include <linux/wait.h>
#include <asm/uaccess.h>
#include <linux/device.h>
#include <asm/io.h>


/*registers*/
//IOMUXC_SNVS_SW_MUX_CTL_PAD_SNVS_TAMPER3:0x02290000 + 0x14
static volatile unsigned int* IOMUXC_SNVS_SW_MUX_CTL_PAD_SNVS_TAMPER3;

//GPIO5_GDIR:0x20AC004
static volatile unsigned int* GPIO5_GDIR;

//GPIO5_DR:0x020AC000
static volatile unsigned int* GPIO5_DR;


static struct class *led_class;
/*第一步:确定主设备号,这里由内核分配*/
static int major = 0;


/*第二步:定义自己的 file_operations 结构体,
实现对应的 drv_open/drv_write 等函数,填入 file_operations 结构体*/
/*

 *函数:		led_drv_open
 *功能:		enable gpio				 使能gpio
 			configure pin as gpio    设置引脚为GPIO
 			configure gpio as output 设置引脚为GPIO输出引脚
 *传入参数:
 			*flip:要打开的文件
*返回参数: 如果成功返回0
*/

static int led_drv_open(struct inode *inode, struct file *filp)
{
	//imx6ull默认使能GPIO5.
	*IOMUXC_SNVS_SW_MUX_CTL_PAD_SNVS_TAMPER3 &= ~0xf;
	*IOMUXC_SNVS_SW_MUX_CTL_PAD_SNVS_TAMPER3 |=  0x5;

	*GPIO5_GDIR |= (1<<3);
	return 0;
}

/*
 *函数:      led_drv_write
 *功能:		copy_from_user:get data form app  获取app的数据,并设置gpio的寄存器
 			set gpio register: out 1/0
 *传入参数:
 			*flip:要写的文件
 			*buf: 写的数据来自于buf
 			*size:写多大的数据
 			*offset:偏移值
*返回参数: 写的数据长度
*/
static ssize_t led_drv_write(struct file *filp, const char __user *buf,
			 size_t count, loff_t *ppos)
{
	char val;
	int err;
	err = copy_from_user(&val, buf, 1);
	if(val)
	{
		*GPIO5_DR &= ~(1<<3);
	}else
	{
		*GPIO5_DR |= (1<<3);
	}
	return -1;

}


static struct file_operations led_fops = {
	.owner		= THIS_MODULE,
	.write		= led_drv_write,
	.open		= led_drv_open,

};


/*第三步:定义一个入口函数, 调用register_chrdev(把 file_operations 结构体告诉内核)*/
/*
 *函数:       led_init
 *功能:		①注册主设备号
 			②获取寄存器物理地址映射过来的虚拟地址
 			③辅助完善:提供设备信息,自动创建设备节点:class_create、device_create
*/

static int __init led_init(void)
{
	/*
	 *printk:判断一下是否调用了入口函数
	 *__FILE__ :表示文件
	 *__FUNCTION__ :当前函数名
	 *__LINE__ :在文件的哪一行
	*/
	printk("%s %s %d\n",__FILE__,__FUNCTION__,__LINE__);

	//ioremap:物理地址映射到虚拟地址
	IOMUXC_SNVS_SW_MUX_CTL_PAD_SNVS_TAMPER3 = ioremap(0x02290000 + 0x14, 4);
	GPIO5_GDIR = ioremap(0x020AC004, 4);
	GPIO5_DR  = ioremap(0x020AC000, 4);


	//0:由内核分配主设备号,名称,指定函数结构体led_fops,返回值为主设备号
	major = register_chrdev(0,"xixiwuli_led", &led_fops);
	led_class = class_create(THIS_MODULE, "led_2345");
	if (IS_ERR(led_class))
		return PTR_ERR(led_class);
	if (major < 0) {
		class_destroy(led_class);
		return major;
	}
	//创建/dev/myled的设备节点
	device_create(led_class, NULL, MKDEV(major, 0), NULL, "myled");
	return 0;
}


/*第四步:定义一个出口函数,出口函数调用unregister_chrdev*/
static void __exit led_exit(void)
{
	iounmap(IOMUXC_SNVS_SW_MUX_CTL_PAD_SNVS_TAMPER3);
	iounmap(GPIO5_GDIR);
	iounmap(GPIO5_DR);

	device_destroy(led_class, MKDEV(major, 0));
	class_destroy(led_class);
	unregister_chrdev(major,"xixiwuli_led");
}


//把函数修饰成入口函数和出口函数
module_init(led_init);
module_exit(led_exit);
//内核遵循GPL协议,所以我们也要遵循GPL协议,才能够使用内核里的一些函数
MODULE_LICENSE("Dual BSD/GPL");
1.2.2 Application (led_test_simple.c)
Specific comments and analysis are in the code:
/* 说明:
	*1,本代码是跟学韦老师课程所编,增加了注释和理解
	*2,采用的是UTF-8编码格式
	*3,简单LED应用程序 led_test_simple.c
*/

#include <sys/types.h>
#include <sys/stat.h>
#include <fcntl.h>
#include <string.h>
#include <unistd.h>
#include <stdio.h>


//led_test_simple /dev/myled on
//led_test_simple /dev/myled off

int main(int argc, char** argv)
{
	int fd;
	char status;

	if(argc != 3)
	{
		printf("usage: %s <dev> <on|off>\n", argv[0]);
		printf("eg: %s /dev/myled on\n", argv[0]);
		printf("eg: %s /dev/myled off\n", argv[0]);
	}

	//open
	fd = open(argv[1], O_RDWR);
	if(fd < 0)
	{
		printf("can not open%s\n",argv[1]);
		return -1;
	}

	//write
	if(strcmp(argv[2], "on") == 0)
	{
		status = 1;
		write(fd, &status, 1);
	}
	if(strcmp(argv[2], "off") == 0)
	{
		status = 0;
		write(fd, &status, 1);
	}
	return 0;

}
1.2.3 Makefile code
Specific comments and analysis are in the code:
# 1. 使用不同的开发板内核时, 一定要修改KERN_DIR
# 2. KERN_DIR中的内核要事先配置、编译, 为了能编译内核, 要先设置下列环境变量:
# 2.1 ARCH,          比如: export ARCH=arm
# 2.2 CROSS_COMPILE, 比如: export CROSS_COMPILE=arm-buildroot-linux-gnueabihf-
# 2.3 PATH,          比如: export PATH=$PATH:/home/book/100ask_imx6ull-sdk/ToolChain/arm-buildroot-linux-gnueabihf_sdk-buildroot/bin
# 注意: 不同的开发板不同的编译器上述3个环境变量不一定相同,
#       请参考各开发板的高级用户使用手册

KERN_DIR = /home/book/100ask_imx6ull-sdk/Linux-4.9.88

all:
	make -C $(KERN_DIR) M=`pwd` modules
	$(CROSS_COMPILE)gcc -o led_test_simple led_test_simple.c

clean:
	make -C $(KERN_DIR) M=`pwd` modules clean
	rm -rf modules.order
	rm -f led_test_simple

obj-m	+= led_drive_simple.o
1.3 Running the tests
1.3.1 First compile the kernel (if not compiled)
Refer to this article https://blog.csdn.net/weixin_42373086/article/details/129796348?spm=1001.2014.3001.5501
1.3.2 Setting up the cross-compilation toolchain (Ubuntu)
export ARCH=arm
export CROSS_COMPILE=arm-buildroot-linux-gnueabihf-
export PATH=$PATH:/home/book/100ask_imx6ull-sdk/ToolChain/arm-buildroot-linux-gnueabihf_sdk-buildroot/bin
1.3.3 Compiler (Free)
After compiling with make, copy the .ko file and led_test_simple to the folder mounted by nfs.
make
cp *.ko led_test_simple ~/nfs_rootfs/
1.3.4 On-machine test (development board)
mount -t nfs -o nolock,vers=3 192.168.5.11:/home/book/nfs_rootfs /mnt
//复制到开发板上
cp /mnt/led_drive_simple.ko ./
cp /mnt/led_test_simple ./
//安装驱动模块
insmod led_drive_simple.ko
//查询是否有我们的hello程序
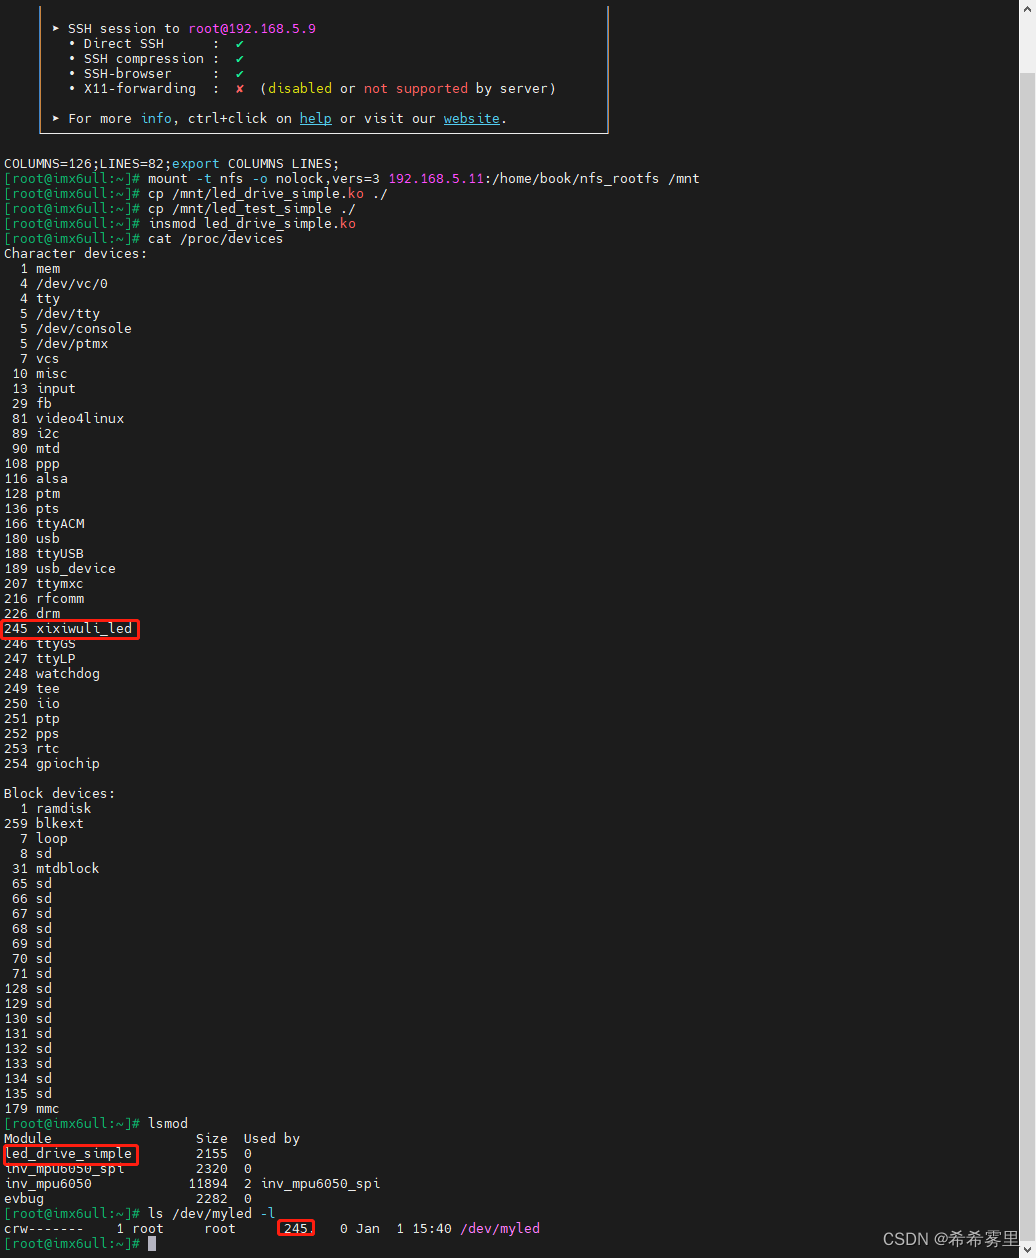
cat /proc/devices
lsmod
//查询是否有我们的设备节点
ls /dev/myled -l//打开
./led_test_simple /dev/myled on
//关闭
./led_test_simple /dev/myled offQuery device results:
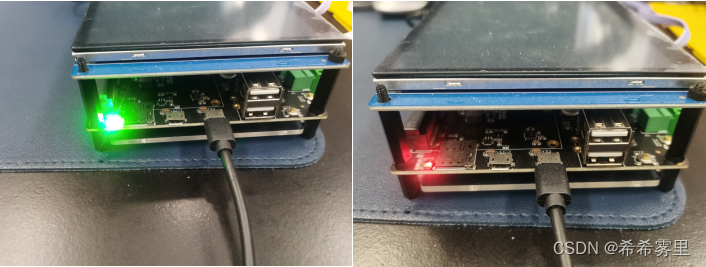
Lights on and off:
2. LED driver (layered)
2.1 Layered Design Ideas
If for multiple boards, to drive the same device (for example, to light a lamp), it is very troublesome to write a corresponding driver program from beginning to end in the above way.
In short, can this LED driver support multiple boards? How?
In view of the above situation, it is necessary to apply the idea of layering. We first need to disassemble the driver into a general framework (leddrv.c) and a specific hardware operation (board_X.c), as shown in the following figure:
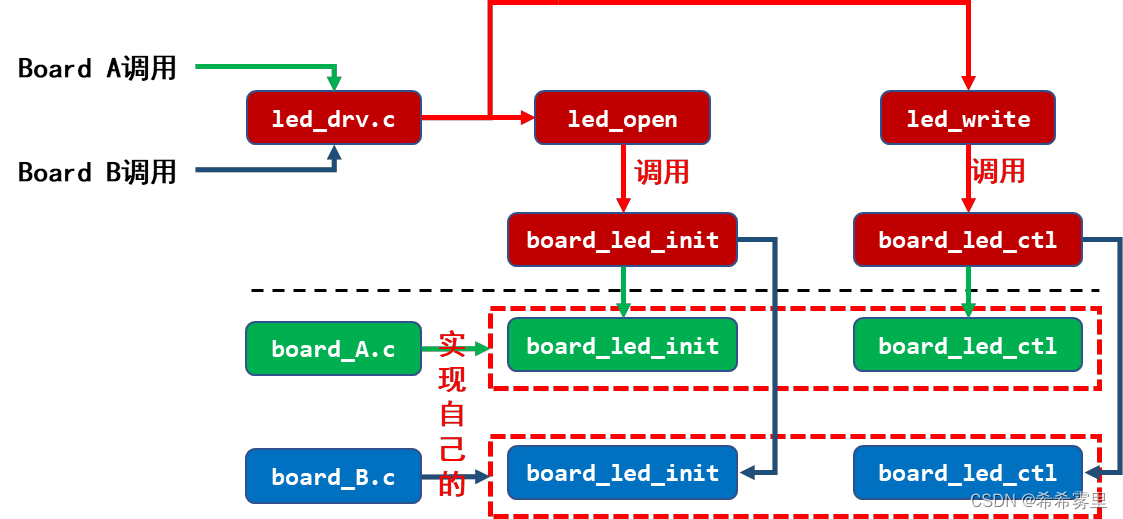
Going a step further here, abstract a structure with the idea of object-oriented, and the boardX.c related to each board realizes its own led_operations structure, which is called by the upper leddrv.c.
struct led_operations
{
	int (*init) (int which); /*初始化LED,which---哪个LED*/
	int (*ctl) (int which, int status);/*控制LED,which-哪个LED,status:1/0亮灭*/
};
2.2 Program combat
Compared with the driver program under the simplest framework, there are differences in the annotations in the code.
2.2.1 Header file (led_opr.h)
This header file is used as a bridge between board_imx6ull.c and led_drive.c.
//定义这个宏,防止二次调用
//例子LED调用LEDA,LEDA调用这个头文件,未加时,会二次调用这个头文件
//加了之后,第二次调用时,就不再其效用了。
#ifndef _LED_OPR_H
#define _LED_OPR_H

struct led_operations
{
	int num;
	int (*init) (int which); /*初始化LED,which---哪个LED*/
	int (*ctl) (int which, char status);/*控制LED,which-哪个LED,status:1/0亮灭*/
};

struct led_operations *get_board_led_opr(void);

#endif
2.2.2 Driver (board_imx6ull.c)
From here we can see that the hardware operations on the corresponding board are all implemented in this program (this layer).
#include <linux/module.h>

#include <linux/fs.h>
#include <linux/errno.h>
#include <linux/miscdevice.h>
#include <linux/kernel.h>
#include <linux/major.h>
#include <linux/mutex.h>
#include <linux/proc_fs.h>
#include <linux/seq_file.h>
#include <linux/stat.h>
#include <linux/init.h>
#include <linux/device.h>
#include <linux/tty.h>
#include <linux/kmod.h>
#include <linux/gfp.h>
#include <asm/io.h>

#include "led_opr.h"


/*registers*/
//CCM_CCGR1:0x20C406C
static volatile unsigned int* CCM_CCGR1;
//IOMUXC_SNVS_SW_MUX_CTL_PAD_SNVS_TAMPER3:0x02290000 + 0x14
static volatile unsigned int* IOMUXC_SNVS_SW_MUX_CTL_PAD_SNVS_TAMPER3;

//GPIO5_GDIR:0x20AC004
static volatile unsigned int* GPIO5_GDIR;

//GPIO5_DR:0x020AC000
static volatile unsigned int* GPIO5_DR;

/*
 *函数:    	board_demo_led_init
 *功能:		enable gpio				 使能gpio
 			configure pin as gpio    设置引脚为GPIO
 			configure gpio as output 设置引脚为GPIO输出引脚
 *传入参数:
 			*which:哪个LED
 *返回参数:如果成功返回0
*/


static int board_demo_led_init(int which)
{
	unsigned int val;
	//printk("%s %s line %d, led %d\n",__FILE__,__FUNCTION__,__LINE__,which);
	if(which == 0)
	{
		if(!CCM_CCGR1)
		{
			//ioremap:物理地址映射到虚拟地址
			CCM_CCGR1 = ioremap(0x20C406C, 4);
			IOMUXC_SNVS_SW_MUX_CTL_PAD_SNVS_TAMPER3 = ioremap(0x02290000 + 0x14, 4);
			GPIO5_GDIR = ioremap(0x020AC004, 4);
			GPIO5_DR  = ioremap(0x020AC000, 4);
		}


		*CCM_CCGR1 |= (3<<30);
		val = *IOMUXC_SNVS_SW_MUX_CTL_PAD_SNVS_TAMPER3;
		val &= ~0xf;
		val |=  0x5;
		*IOMUXC_SNVS_SW_MUX_CTL_PAD_SNVS_TAMPER3 = val;

		*GPIO5_GDIR |= (1<<3);
	}
	return 0;
}


/*
 *函数:    	board_demo_led_init
 *功能:		set gpio register: out 1/0

 *传入参数:
 			*which:哪个LED
 			*status: 状态1/0,亮灭
 *返回参数:如果成功返回0
*/
static int board_demo_led_ctl(int which, char status)
{
	if(which == 0)
	{
		if(status)
		{
			*GPIO5_DR &= ~(1<<3);
		}else
		{
			*GPIO5_DR |= (1<<3);
		}
	}
	return 0;
}


static struct led_operations board_demo_led_opr =
{
	.num  = 1,
	.init = board_demo_led_init,
	.ctl  = board_demo_led_ctl,
};

struct led_operations *get_board_led_opr(void)
{
	return &board_demo_led_opr;
}
2.2.3 Driver (led_drive.c)
The previous framework was to implement device registration and hardware operations here, and now only implement general functions such as registering device drivers.
/* 说明:
	*1,本代码是跟学韦老师课程所编写,增加了注释和分析
	*2,采用的是UTF-8编码格式
	*3,LED驱动程序(分层思想) led_drive.c
*/

#include <linux/module.h>
#include <linux/fs.h>
#include <linux/errno.h>
#include <linux/miscdevice.h>
#include <linux/kernel.h>
#include <linux/major.h>
#include <linux/mutex.h>
#include <linux/proc_fs.h>
#include <linux/seq_file.h>
#include <linux/stat.h>
#include <linux/init.h>
#include <linux/device.h>
#include <linux/tty.h>
#include <linux/kmod.h>
#include <linux/gfp.h>


#include "led_opr.h"


static struct class *led_class;
struct led_operations *p_ledopr;


/*第一步:确定主设备号,这里由内核分配*/
static int major = 0;

/*第二步:定义自己的 file_operations 结构体,
实现对应的 drv_open/drv_write 等函数,填入 file_operations 结构体*/
/*

 *函数:		led_drv_open
 *差异点:      根据次设备号初始化LED
 *传入参数:
 			*flip:要打开的文件
 *返回参数:如果成功返回0
*/

static int led_drv_open(struct inode *inode, struct file *filp)
{
	int minor = iminor(inode);/*次设备号*/

	printk("%s %s line %d\n", __FILE__, __FUNCTION__, __LINE__);
	p_ledopr->init(minor);
	return 0;
}

/*
 *函数:       led_drv_write
 *差异点:		根据次设备号和status控制LED
 *功能:		copy_from_user,从app中获取数据
 *传入参数:
 			*flip:要写的文件
 			*buf: 写的数据来自于buf
 			*size:写多大的数据
 			*offset:偏移值
*返回参数: 写的数据长度
*/
static ssize_t led_drv_write(struct file *filp, const char __user *buf,
			 size_t count, loff_t *ppos)
{
	char status;
	int err;

	printk("%s %s line %d\n", __FILE__, __FUNCTION__, __LINE__);
	err = copy_from_user(&status, buf, 1);

	/*根据次设备号控制LED*/
	struct inode* inode = file_inode(filp);
	int minor = iminor(inode) & 0x0f;
	p_ledopr->ctl(minor, status);
	return -1;

}


static struct file_operations led_fops = {
	.owner		= THIS_MODULE,
	.write		= led_drv_write,
	.open		= led_drv_open,

};


/*第三步:定义一个入口函数, 调用register_chrdev(把 file_operations 结构体告诉内核)*/
/*
 *函数:       led_init
 *差异点:      有多个次设备号
 *功能:		①注册主设备号
 			②辅助完善:提供设备信息,自动创建设备节点:class_create、device_create
*/

static int __init led_init(void)
{
	/*
	 *printk:判断一下是否调用了入口函数
	 *__FILE__ :表示文件
	 *__FUNCTION__ :当前函数名
	 *__LINE__ :在文件的哪一行
	*/
	printk("%s %s %d\n",__FILE__,__FUNCTION__,__LINE__);


	//0:由内核分配主设备号,名称,指定函数结构体led_fops,返回值为主设备号
	major = register_chrdev(0,"xixiwuli_led", &led_fops);
	led_class = class_create(THIS_MODULE, "led_2345_class");
	int i;
	if (IS_ERR(led_class))
		return PTR_ERR(led_class);
	if (major < 0) {
		class_destroy(led_class);
		return major;
	}

	//通过p_ledopr,可以操作调用单板相关的代码
	p_ledopr = get_board_led_opr();

	//创建/dev/myled2的设备节点,多个次设备号控制多个LED
	for(i = 0;i < p_ledopr->num; i++)
	{
		device_create(led_class, NULL, MKDEV(major, i), NULL, "myled%d",i);
	}


	return 0;
}


/*第四步:定义一个出口函数,出口函数调用unregister_chrdev*/
static void __exit led_exit(void)
{

	int i;
	for(i = 0; i < p_ledopr->num; i++)
	{
		device_destroy(led_class, MKDEV(major, i));
	}
	class_destroy(led_class);
	unregister_chrdev(major,"xixiwuli_led");
}


//把函数修饰成入口函数和出口函数
module_init(led_init);
module_exit(led_exit);
//内核遵循GPL协议,所以我们也要遵循GPL协议,才能够使用内核里的一些函数
MODULE_LICENSE("Dual BSD/GPL");
2.2.4 Application program (led_test.c)
#include <sys/types.h>
#include <sys/stat.h>
#include <fcntl.h>
#include <string.h>
#include <unistd.h>
#include <stdio.h>


//led_test /dev/myled0 on
//led_test /dev/myled0 off

int main(int argc, char** argv)
{
	int fd;
	char status = 0;

	if(argc != 3)
	{
		printf("usage: %s <dev> <on|off>\n", argv[0]);
		printf("eg: %s /dev/myled on\n", argv[0]);
		printf("eg: %s /dev/myled off\n", argv[0]);
	}

	//open
	fd = open(argv[1], O_RDWR);
	if(fd < 0)
	{
		printf("can not open %s\n",argv[1]);
		return -1;
	}

	//write
	if (strcmp(argv[2], "on") == 0)
	{
		status = 1;
	}

	write(fd, &status, 1);
	close(fd);
	return 0;

}
2.2.5 Makefile code
Small changes here, compile board_imx6ull.c and led_drive.c together.
# 1. 使用不同的开发板内核时, 一定要修改KERN_DIR
# 2. KERN_DIR中的内核要事先配置、编译, 为了能编译内核, 要先设置下列环境变量:
# 2.1 ARCH,          比如: export ARCH=arm
# 2.2 CROSS_COMPILE, 比如: export CROSS_COMPILE=arm-buildroot-linux-gnueabihf-
# 2.3 PATH,          比如: export PATH=$PATH:/home/book/100ask_imx6ull-sdk/ToolChain/arm-buildroot-linux-gnueabihf_sdk-buildroot/bin
# 注意: 不同的开发板不同的编译器上述3个环境变量不一定相同,
#       请参考各开发板的高级用户使用手册

KERN_DIR = /home/book/100ask_imx6ull-sdk/Linux-4.9.88

all:
	make -C $(KERN_DIR) M=`pwd` modules
	$(CROSS_COMPILE)gcc -o led_test led_test.c

clean:
	make -C $(KERN_DIR) M=`pwd` modules clean
	rm -rf modules.order
	rm -f led_test


#led_drive.c和board_demo.c编译成xixiwuli_led.ko
xixiwuli_led-y := led_drive.o board_imx6ull.o
obj-m	+= xixiwuli_led.o
2.3 Running tests
The first three steps are exactly the same as above, so I won’t repeat them here.
2.3.1 On-machine test (development board)
mount -t nfs -o nolock,vers=3 192.168.5.11:/home/book/nfs_rootfs /mnt
//复制到开发板上
cp /mnt/xixiwuli_led.ko ./
cp /mnt/led_test ./
//安装驱动模块
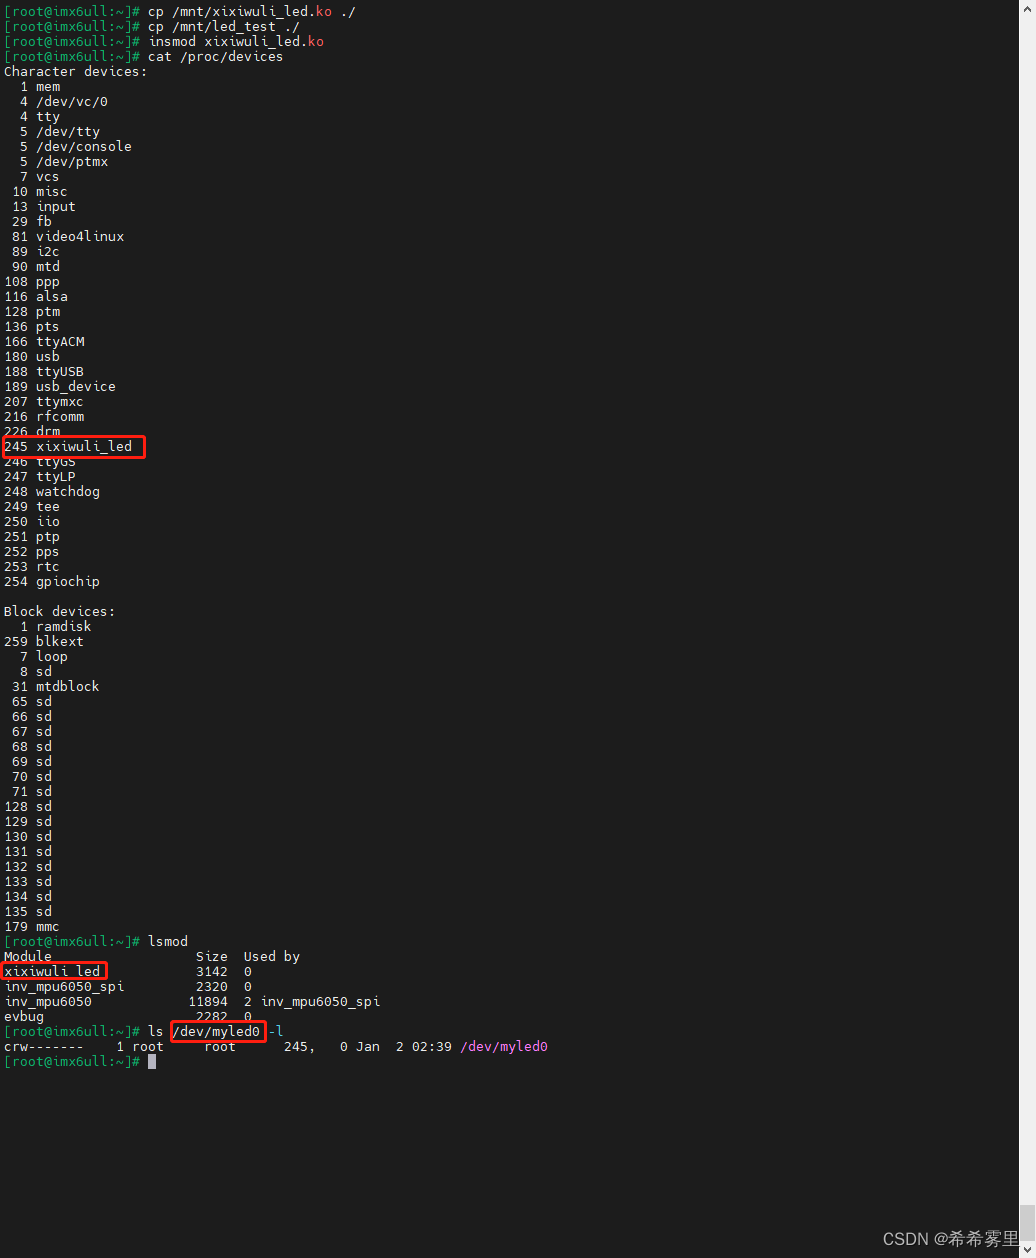
insmod xixiwuli_led.ko
//查询是否有我们的hello程序
cat /proc/devices
lsmod
//查询是否有我们的设备节点
ls /dev/myled0 -l//打开
./led_test /dev/myled0 on
//关闭
./led_test /dev/myled0 off//程序运行完,可以卸载相应的模块
rmmod xixiwuli_led.koQuery device results:
Lights on and off:

2.4 Summary
From the results, compared with the driver program under the simple driver framework, it can also turn on and off the lights very well.
But in terms of structure, he has separated the general function and the hardware operation part, corresponding to led_drive_stra.c and board_imx6ull.c respectively. When adding another device, you only need to create a board_X.c.
Such a driver has better scalability and can support multiple boards. From here, we can better understand the Linux driver = driver framework + hardware operation. I believe everyone will gradually feel the charm of the driver framework .
3. LED driver (separation)
3.1 Separation of design ideas
In the above method, we can find that board_X.c is too tightly bound to the chip hardware. If we want to change the light, we need to modify the code and recompile, so how to solve it?
In short, how to solve the problem of inflexible hardware operation?
In view of the above problems, it is necessary to apply the design idea of separation. For a certain chip , the pin operation is similar. You can write a general-purpose driver, perform a left-right separation, define a resource (board_X.c), and define a general-purpose operation of the hardware (chipY_gpio.c), as shown in the figure below Shown:

Here, a led_resource structure is abstracted to express what a specific resource is like. (follow the object-oriented thinking)
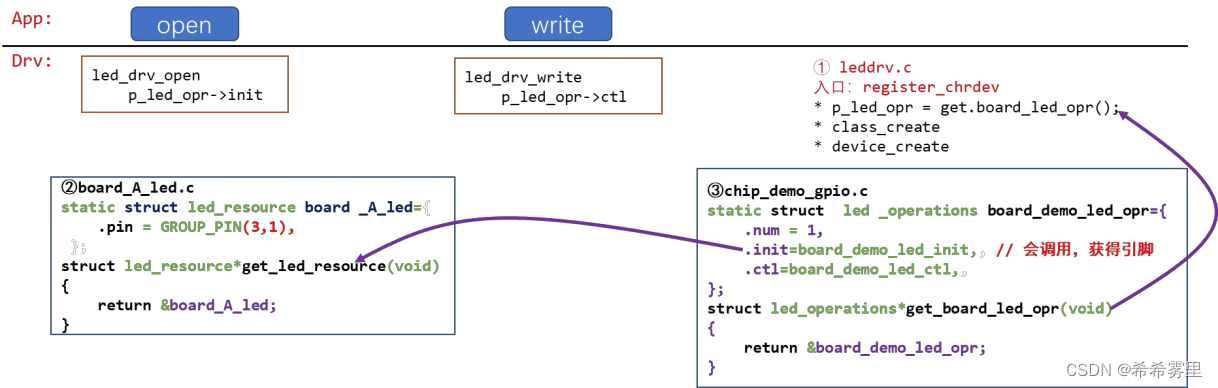
3.2 Program combat
Compared with the program in the second section, the board_imx6ull.c file should be divided into two files board_A_led.c and chip_imx6ull_gpio.c. So here mainly explain led_resource.h, board_A_led.c, chip_imx6ull_gpio.c and Makefile code. The specific implementation framework is as follows:
3.2.1 Header file (led_resource.h)
The structure led_resource in led_resource.h defines resources.
#ifndef _LED_RE_H
#define _LED_RE_H
/*GPIO5*/
/*bit[31:16] = group*/
/*bit[15:0] = pin*/
//可以用以下的宏,表示GPIO引脚
#define GROUP(x) (x>>16)
#define PIN(x) (x&0xFFFF)
#define GROUP_PIN(g,p) ((g<<16) | (p))
struct led_resource
{
int pin;
};
struct led_resource *get_led_resource(void);
#endif3.2.2 Driver (board_A_led.c)
Resources here: GPIO pins, here the initial setting is GPIO5_3.
#include "led_resource.h"
static struct led_resource board_A_led = {
.pin = GROUP_PIN(5,3),
};
struct led_resource * get_led_resource(void)
{
return &board_A_led;
};3.2.3 Driver (chip_imx6ull_gpio.c)
Here, the general hardware operation of GPIO is specifically implemented. Taking GPIO5_3 as an example, it does not involve complicated hardware operations.
#include <linux/module.h>
#include <linux/fs.h>
#include <linux/errno.h>
#include <linux/miscdevice.h>
#include <linux/kernel.h>
#include <linux/major.h>
#include <linux/mutex.h>
#include <linux/proc_fs.h>
#include <linux/seq_file.h>
#include <linux/stat.h>
#include <linux/init.h>
#include <linux/device.h>
#include <linux/tty.h>
#include <linux/kmod.h>
#include <linux/gfp.h>
#include <asm/io.h>
#include "led_opr.h"
#include "led_resource.h"
static struct led_resource *led_rsc;
/*阐述说明:
*现阶段仅以展示分离设计思想
*以下的为GPIO5_3需要设置的寄存器绝对物理地址,后续可以按照基址表示GPIO组内多引脚。
*定义好多个基址,可以实现表示多个GPIO组
*/
/*
//CCM_CCGR1:0x20C406C
static volatile unsigned int* CCM_CCGR1;
//IOMUXC_SNVS_SW_MUX_CTL_PAD_SNVS_TAMPER3:0x02290000 + 0x14
static volatile unsigned int* IOMUXC_SNVS_SW_MUX_CTL_PAD_SNVS_TAMPER3;
//GPIO5_GDIR:0x20AC004
static volatile unsigned int* GPIO5_GDIR;
//GPIO5_DR:0x020AC000
static volatile unsigned int* GPIO5_DR;
*/
/*
*函数: board_demo_led_init
*功能: enable gpio 使能gpio
configure pin as gpio 设置引脚为GPIO
configure gpio as output 设置引脚为GPIO输出引脚
*传入参数:
*which:哪个LED
*返回参数:如果成功返回0
*/
static int board_demo_led_init(int which)
{
unsigned int val;
//printk("%s %s line %d, led %d\n",__FILE__,__FUNCTION__,__LINE__,which);
if(!led_rsc)
{
led_rsc = get_led_resource();
}
printk("init gpio: group %d, pin %d\n", GROUP(led_rsc->pin), PIN(led_rsc->pin));
switch(GROUP(led_rsc->pin))
{
case 0:
{
printk("init pin of group 0 ...\n");
break;
}
case 1:
{
printk("init pin of group 1 ...\n");
break;
}
case 2:
{
printk("init pin of group 2 ...\n");
break;
}
case 3:
{
printk("init pin of group 3 ...\n");
break;
}
}
/*
if(which == 0)
{
if(!CCM_CCGR1)
{
//ioremap:物理地址映射到虚拟地址
CCM_CCGR1 = ioremap(0x20C406C, 4);
IOMUXC_SNVS_SW_MUX_CTL_PAD_SNVS_TAMPER3 = ioremap(0x02290000 + 0x14, 4);
GPIO5_GDIR = ioremap(0x020AC004, 4);
GPIO5_DR = ioremap(0x020AC000, 4);
}
*CCM_CCGR1 |= (3<<30);
val = *IOMUXC_SNVS_SW_MUX_CTL_PAD_SNVS_TAMPER3;
val &= ~0xf;
val |= 0x5;
*IOMUXC_SNVS_SW_MUX_CTL_PAD_SNVS_TAMPER3 = val;
*GPIO5_GDIR |= (1<<3);
}
*/
return 0;
}
/*
*函数: board_demo_led_init
*功能: set gpio register: out 1/0
*传入参数:
*which:哪个LED
*status: 状态1/0,亮灭
*返回参数:如果成功返回0
*/
static int board_demo_led_ctl(int which, char status)
{
printk("set led %s: group %d, pin %d\n", status ? "on" : "off", GROUP(led_rsc->pin), PIN(led_rsc->pin));
switch(GROUP(led_rsc->pin))
{
case 0:
{
printk("set pin of group 0 ...\n");
break;
}
case 1:
{
printk("set pin of group 1 ...\n");
break;
}
case 2:
{
printk("set pin of group 2 ...\n");
break;
}
case 3:
{
printk("set pin of group 3 ...\n");
break;
}
}
/*
if(which == 0)
{
if(status)
{
*GPIO5_DR &= ~(1<<3);
}else
{
*GPIO5_DR |= (1<<3);
}
}
*/
return 0;
}
static struct led_operations board_demo_led_opr =
{
.num = 1,
.init = board_demo_led_init,
.ctl = board_demo_led_ctl,
};
struct led_operations *get_board_led_opr(void)
{
return &board_demo_led_opr;
}
3.2.4 Makefile code
There are small changes here, compile led_drive.c, board_A_led.c and chip_imx6ull_gpio.c together.
# 1. 使用不同的开发板内核时, 一定要修改KERN_DIR
# 2. KERN_DIR中的内核要事先配置、编译, 为了能编译内核, 要先设置下列环境变量:
# 2.1 ARCH, 比如: export ARCH=arm
# 2.2 CROSS_COMPILE, 比如: export CROSS_COMPILE=arm-buildroot-linux-gnueabihf-
# 2.3 PATH, 比如: export PATH=$PATH:/home/book/100ask_imx6ull-sdk/ToolChain/arm-buildroot-linux-gnueabihf_sdk-buildroot/bin
# 注意: 不同的开发板不同的编译器上述3个环境变量不一定相同,
# 请参考各开发板的高级用户使用手册
KERN_DIR = /home/book/100ask_imx6ull-sdk/Linux-4.9.88
all:
make -C $(KERN_DIR) M=`pwd` modules
$(CROSS_COMPILE)gcc -o led_test led_test.c
clean:
make -C $(KERN_DIR) M=`pwd` modules clean
rm -rf modules.order
rm -f led_test
#led_drive.c、board_A_led.c、chip_imx6ull_gpio.c编译成xixiwuli.ko
xixiwuli_led-y := led_drive.o board_A_led.o chip_imx6ull_gpio.o
obj-m += xixiwuli_led.o3.3 Running tests
Basically the same as above.
//打开
./led_test /dev/myled0 on
//关闭
./led_test /dev/myled0 off
dmesgPrint demo:

3.4 Summary
After the practice of the above separation design idea, we will find that when we need to change the pin to be controlled (when another LED is turned on), we only need to modify board_A_led.c.
Compared with the second section, the scalability and flexibility have been further improved.
4. LED driver (bus device driver model)
4.1 Bus device driver model
In the content of the previous section, we can further find that if we deal with multiple different devices, such as LED, LCD, etc., we have to define a corresponding resource.h, which is unrealistic.
Based on the above problems, a bus device driver model is proposed, which is a further realization of the idea of separation.
 In the future, the bus bus will be used to manage platform_device/platform_driver. As shown below:

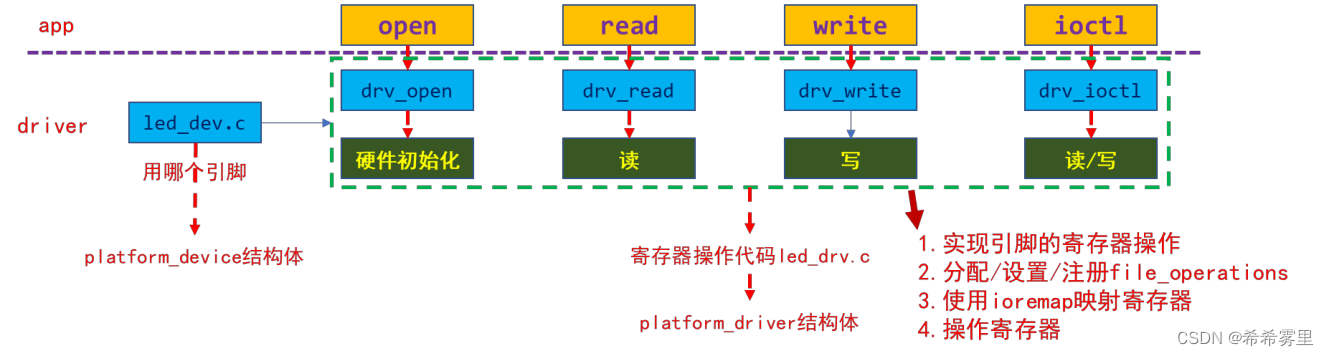
4.2 Program combat
On the basis of the program in the third section, to further advance to the bus device driver framework, it is necessary to abstract the platform_device and platform_driver structures and realize the matching between them.

The specific steps are as follows:
1. Allocate/set/register platform_device structure
- Define the resources used in it and specify the device name
2. Allocate/set/register platform_driver structure
- In the probe function, allocate/set/register the file_operations structure
- And determine the hardware resources used from platform_device, and dynamically implement device_create
- Specify the name of platform_driver
Compared with the content of the third section, the part showing the content changes.
4.2.1 Header file (led_drive.h)
Declare the bottom-to-top registration function.
#ifndef _LEDDRV_H
#define _LEDDRV_H

#include "led_opr.h"

void led_device_create(int minor);
void led_device_destory(int minor);
void register_led_operations(struct led_operations *opr);


#endif /* _LEDDRV_H */
4.2.2 Driver (led_drive.c)
This belongs to the top layer of the driver, for specific explanation and analysis, see the code for details.
/* 说明:
	*1,本代码是跟学韦老师课程所编写,增加了注释和分析
	*2,采用的是UTF-8编码格式
	*3,LED驱动程序(总线设备驱动模型) led_drive.c
*/

#include <linux/module.h>
#include <linux/fs.h>
#include <linux/errno.h>
#include <linux/miscdevice.h>
#include <linux/kernel.h>
#include <linux/major.h>
#include <linux/mutex.h>
#include <linux/proc_fs.h>
#include <linux/seq_file.h>
#include <linux/stat.h>
#include <linux/init.h>
#include <linux/device.h>
#include <linux/tty.h>
#include <linux/kmod.h>
#include <linux/gfp.h>


#include "led_opr.h"

/*第一步:确定主设备号,这里由内核分配*/
static int major = 0;
static struct class *led_class;
struct led_operations *p_ledopr;


/*
 *阐述说明
 *定义给底层(chip_imx6ull_gpio.c)去调用的
*/
void led_device_create(int minor)
{

	device_create(led_class, NULL, MKDEV(major, minor), NULL, "myled%d", minor);
}

void led_device_destory(int minor)
{

	device_destroy(led_class, MKDEV(major, minor));
}


//定义底层向上层注册函数,避免交叉编译
void register_led_operations(struct led_operations *opr)
{
	p_ledopr = opr;
}
EXPORT_SYMBOL(led_device_create);
EXPORT_SYMBOL(led_device_destory);
EXPORT_SYMBOL(register_led_operations);


/*第二步:定义自己的 file_operations 结构体,
实现对应的 drv_open/drv_write 等函数,填入 file_operations 结构体*/
/*

 *函数:		led_drv_open
 *差异点:      根据次设备号初始化LED
 *传入参数:
 			*flip:要打开的文件
 *返回参数:如果成功返回0
*/

static int led_drv_open(struct inode *inode, struct file *filp)
{
	int minor = iminor(inode);/*次设备号*/

	printk("%s %s line %d\n", __FILE__, __FUNCTION__, __LINE__);
	p_ledopr->init(minor);
	return 0;
}

/*
 *函数:       led_drv_write
 *差异点:		根据次设备号和status控制LED
 *功能:		copy_from_user,从app中获取数据
 *传入参数:
 			*flip:要写的文件
 			*buf: 写的数据来自于buf
 			*size:写多大的数据
 			*offset:偏移值
*返回参数: 写的数据长度
*/
static ssize_t led_drv_write(struct file *filp, const char __user *buf,
			 size_t count, loff_t *ppos)
{
	char status;
	int err;

	printk("%s %s line %d\n", __FILE__, __FUNCTION__, __LINE__);
	err = copy_from_user(&status, buf, 1);

	/*根据次设备号控制LED*/
	struct inode* inode = file_inode(filp);
	int minor = iminor(inode) & 0x0f;
	p_ledopr->ctl(minor, status);
	return 1;

}


static struct file_operations led_fops = {
	.owner		= THIS_MODULE,
	.write		= led_drv_write,
	.open		= led_drv_open,

};


/*第三步:定义一个入口函数, 调用register_chrdev(把 file_operations 结构体告诉内核)*/
/*
 *函数:       led_init
 *功能:		①注册主设备号
 			②辅助完善:提供设备信息,自动创建设备节点:class_create、device_create
*/

static int __init led_init(void)
{
	/*
	 *printk:判断一下是否调用了入口函数
	 *__FILE__ :表示文件
	 *__FUNCTION__ :当前函数名
	 *__LINE__ :在文件的哪一行
	*/
	printk("%s %s %d\n",__FILE__,__FUNCTION__,__LINE__);


	//0:由内核分配主设备号,名称,指定函数结构体led_fops,返回值为主设备号
	major = register_chrdev(0,"100ask_led", &led_fops);
	led_class = class_create(THIS_MODULE, "led_2345_class");
	int i;
	if (IS_ERR(led_class))
		return PTR_ERR(led_class);
	if (major < 0) {
		class_destroy(led_class);
		return major;
	}

	return 0;
}


/*第四步:定义一个出口函数,出口函数调用unregister_chrdev*/
static void __exit led_exit(void)
{

	class_destroy(led_class);
	unregister_chrdev(major,"100ask_led");
}

//把函数修饰成入口函数和出口函数
module_init(led_init);
module_exit(led_exit);
//内核遵循GPL协议,所以我们也要遵循GPL协议,才能够使用内核里的一些函数
MODULE_LICENSE("Dual BSD/GPL");
4.2.3 Driver (board_A_led.c)
This program mainly defines some resources, writes and implements the platform_device structure.
#include <linux/module.h>

#include <linux/fs.h>
#include <linux/errno.h>
#include <linux/miscdevice.h>
#include <linux/kernel.h>
#include <linux/major.h>
#include <linux/mutex.h>
#include <linux/proc_fs.h>
#include <linux/seq_file.h>
#include <linux/stat.h>
#include <linux/init.h>
#include <linux/device.h>
#include <linux/tty.h>
#include <linux/kmod.h>
#include <linux/gfp.h>
#include <linux/platform_device.h>


#include "led_resource.h"

static void led_dev_release(struct device *dev)
{
}

//定义一个资源数组
static struct resource resources[] = {
        {
                .start = GROUP_PIN(5,3),
                .flags = IORESOURCE_IRQ,
        },
        {
                .start = GROUP_PIN(3,1),
                .flags = IORESOURCE_IRQ,
        },

};

/*
 *name:平台名称
 *num_resources:资源个数
 *resource:引入资源数组
*/
static struct platform_device board_A_led_dev =
{
	.name = "100ask_led",
	.num_resources = ARRAY_SIZE(resources),
	.resource = resources,
	.dev = {
                .release = led_dev_release,
         },


};
/*入口函数,patform_device
 *功能:注册设备
*/
static int led_dev_init(void)
{
	int err;
	err = platform_device_register(&board_A_led_dev);
	return 0;
}

/*出口函数,platform_device*/
static void led_dev_exit(void)
{
	platform_device_unregister(&board_A_led_dev);
}


module_init(led_dev_init);
module_exit(led_dev_exit);
MODULE_LICENSE("GPL");
4.2.4 Driver (chip_imx6ull_gpio.c)
Here the main body implements the platform_driver structure.
#include <linux/module.h>

#include <linux/fs.h>
#include <linux/errno.h>
#include <linux/miscdevice.h>
#include <linux/kernel.h>
#include <linux/major.h>
#include <linux/mutex.h>
#include <linux/proc_fs.h>
#include <linux/seq_file.h>
#include <linux/stat.h>
#include <linux/init.h>
#include <linux/device.h>
#include <linux/tty.h>
#include <linux/kmod.h>
#include <linux/gfp.h>
#include <linux/platform_device.h>


#include "led_drive.h"
#include "led_opr.h"
#include "led_resource.h"


static int g_ledpins[100];
static int g_ledcnt = 0;


/*阐述说明:
 *现阶段仅以示意总线设备驱动模型框架
*/

/*
 *函数:    	board_imx6ull_led_init
 *功能:		获取gpio引脚信息
 *输入参数:which---哪个引脚
 *返回参数:如果成功返回0
*/
static int board_imx6ull_led_init(int which)
{
	//printk("%s %s line %d, led %d\n",__FILE__,__FUNCTION__,__LINE__,which);
	printk("init gpio: group %d, pin %d\n", GROUP(g_ledpins[which]), PIN(g_ledpins[which]));
	switch(GROUP(g_ledpins[which]))
	{
		case 0:
		{
			printk("init pin of group 0 ...\n");
			break;
		}
		case 1:
		{
			printk("init pin of group 1 ...\n");
			break;
		}
		case 2:
		{
			printk("init pin of group 2 ...\n");
			break;
		}
		case 3:
		{
			printk("init pin of group 3 ...\n");
			break;
		}
	}

	return 0;
}


/*
 *函数:    	board_imx6ull_led_init
 *功能:		打印某个gpio引脚设置信息
 *输入参数:which---哪一个引脚
 			status:LED状态,1/0亮灭
 *返回参数:如果成功返回0
*/
static int board_imx6ull_led_ctl(int which, char status)
{
	printk("set led %s: group %d, pin %d\n", status ? "on" : "off", GROUP(g_ledpins[which]), PIN(g_ledpins[which]));
	switch(GROUP(g_ledpins[which]))
	{
		case 0:
		{
			printk("set pin of group 0 ...\n");
			break;
		}
		case 1:
		{
			printk("set pin of group 1 ...\n");
			break;
		}
		case 2:
		{
			printk("set pin of group 2 ...\n");
			break;
		}
		case 3:
		{
			printk("set pin of group 3 ...\n");
			break;
		}
	}

	return 0;
}


static struct led_operations board_imx6ull_led_opr =
{
	.init = board_imx6ull_led_init,
	.ctl  = board_imx6ull_led_ctl,
};

struct led_operations *get_board_led_opr(void)
{
    return &board_imx6ull_led_opr;
}


/*
 *函数:chip_imx6ull_gpio_led_probe
 *功能:记录引脚
 		创建设备,device_create
*/
static int chip_imx6ull_gpio_led_probe(struct platform_device *dev)
{
	int i = 0;
	struct resource *res;
	while(1)
	{
		//设备、哪一类资源、第几个资源
		res = platform_get_resource(dev,IORESOURCE_IRQ, i++);
		if(!res)
			break;
		g_ledpins[g_ledcnt] = res->start;

		/*创建设备*/
		led_device_create(g_ledcnt);
		g_ledcnt++;

	}
	return 0;
}

/*
 *函数:chip_imx6ull_gpio_led_remove
 *功能:注销设备,device_destory
*/
static int chip_imx6ull_gpio_led_remove(struct platform_device *dev)
{
	int i;
	for(i = 0; i < g_ledcnt; i++)
	{
		led_device_destory(i);
	}
	g_ledcnt = 0;
	return 0;
}


static struct platform_driver chip_imx6ull_gpio_driver = {
    .probe      = chip_imx6ull_gpio_led_probe,
    .remove     = chip_imx6ull_gpio_led_remove,
    .driver     = {
        .name   = "100ask_led",
    },
};


/*入口函数,platform_driver
 *功能:注册设备
 		底层到上层的注册
*/
static int chip_imx6ull_gpio_drv_init(void)
{
	int err;
	err = platform_driver_register(&chip_imx6ull_gpio_driver);
	register_led_operations(&board_imx6ull_led_opr);
	return 0;
}

/*出口函数,paltform_driver*/
static void chip_imx6ull_gpio_drv_exit(void)
{
	platform_driver_unregister(&chip_imx6ull_gpio_driver);
}


module_init(chip_imx6ull_gpio_drv_init);
module_exit(chip_imx6ull_gpio_drv_exit);
MODULE_LICENSE("Dual BSD/GPL");
4.2.5 Makefile code
For the changes in the above procedures, the Makefile also has certain changes.
# 1. 使用不同的开发板内核时, 一定要修改KERN_DIR
# 2. KERN_DIR中的内核要事先配置、编译, 为了能编译内核, 要先设置下列环境变量:
# 2.1 ARCH,          比如: export ARCH=arm
# 2.2 CROSS_COMPILE, 比如: export CROSS_COMPILE=arm-buildroot-linux-gnueabihf-
# 2.3 PATH,          比如: export PATH=$PATH:/home/book/100ask_imx6ull-sdk/ToolChain/arm-buildroot-linux-gnueabihf_sdk-buildroot/bin
# 注意: 不同的开发板不同的编译器上述3个环境变量不一定相同,
#       请参考各开发板的高级用户使用手册

KERN_DIR = /home/book/100ask_imx6ull-sdk/Linux-4.9.88

all:
	make -C $(KERN_DIR) M=`pwd` modules
	$(CROSS_COMPILE)gcc -o led_test led_test.c

clean:
	make -C $(KERN_DIR) M=`pwd` modules clean
	rm -rf modules.order
	rm -f led_test

# 参考内核源码drivers/char/ipmi/Makefile
# 要想把a.c, b.c编译成ab.ko, 可以这样指定:
# ab-y := a.o b.o
# obj-m += ab.o

obj-m	+= led_drive.o chip_imx6ull_gpio.o board_A_led.o
4.3 Test run
//复制到开发板上
cp /mnt/board_A_led.ko ./
cp /mnt/chip_imx6ull_gpio.ko ./
cp /mnt/led_drive.ko ./
cp /mnt/led_test ./

//安装驱动模块
insmod board_A_led.ko
insmod led_drive.ko
insmod chip_imx6ull_gpio.ko
//GPIO5_3
./led_test /dev/myled0 on
./led_test /dev/myled0 off
//GPIO3_1
./led_test /dev/myled1 on
./led_test /dev/myled1 off
dmesg
Print result:

4.4 Summary
Compared with the code changes in the third section, you can feel the advantages of the bus device driver model framework, and further realize the separation of device and driver on the original basis.
This allows for better management when dealing with different devices.
5. LED Driver (Device Tree)
5.1 Device Tree
5.1.1 Device tree background
We found from the fourth section that if we modify the GPIO pins used by the LED, we need to modify the board_A_led.c code, and then recompile and load the driver.
With the popularity of ARM chips, a large number of similar, non-technical files are stored in the kernel for development by different manufacturers.
So for the above problems, is there a good solution?
The core of the above problem lies in the use of .c files to configure resources. A special configuration file is introduced here, and the device tree is used here to achieve this.
After adopting the device tree, many hardware details can be passed directly to Linux through it, without a lot of redundant coding in the kernel. It transfers hardware resources to the kernel through the bootloader, making the kernel and file resource descriptions relatively independent.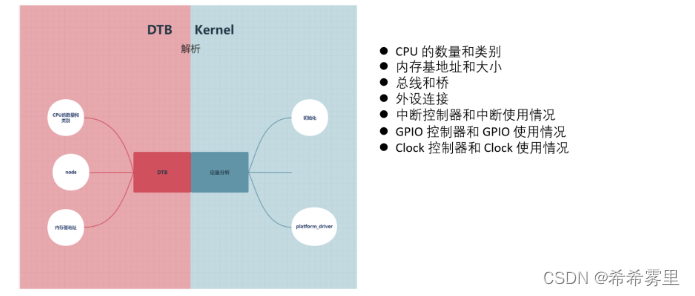
The final effect is that the device is in the script and the driver is in c.
5.1.2 Brief description of the device tree
The device tree includes DTC (device tree compiler), DTS (device tree source) and DTB (device tree blob).

The relationship between dtc, dts/dtsi and dtb:
The dts and dtsi source files will be compiled into dtb binary files by the dtc compiler, and the dtb files will be put into the system to be parsed by the kernel.

For specific syntax and device tree analysis, please refer to:
https://blog.csdn.net/qq_33487044/article/details/126325656
How to use device tree to write driver?
Note:
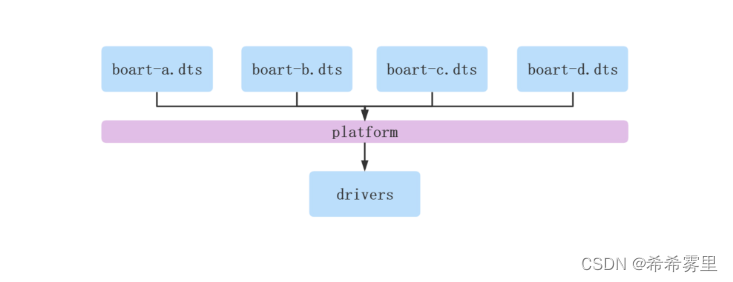
- 1. The device tree node can match the platform_driver
- 2. The device tree node specifies resources, and platform_driver obtains resources
5.2 Program combat
The content of the device tree is complicated and will not be elaborated here. The program here implements simple functions and walks through the entire process.
The following part mainly shows the modified part of the program, the device tree file, the driver (chip_imx6ull_gpio.c), and the board_A_led.c file is not needed.
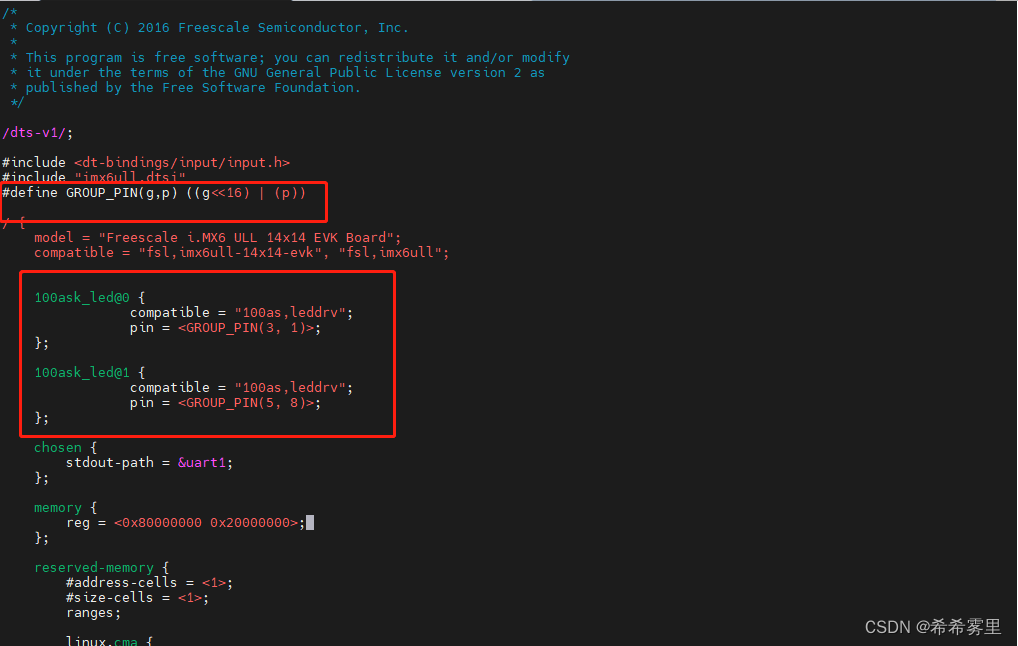
5.2.1 Device tree dts file (100ask_led.dts)
Modify the device tree and add device nodes 100ask_led@0 and 100ask_led@1.
#define GROUP_PIN(g,p) ((g<<16) | (p))

/ {
	100ask_led@0 {
		compatible = "100as,leddrv";
		pin = <GROUP_PIN(3, 1)>;
	};

	100ask_led@1 {
		compatible = "100as,leddrv";
		pin = <GROUP_PIN(5, 8)>;
	};

};
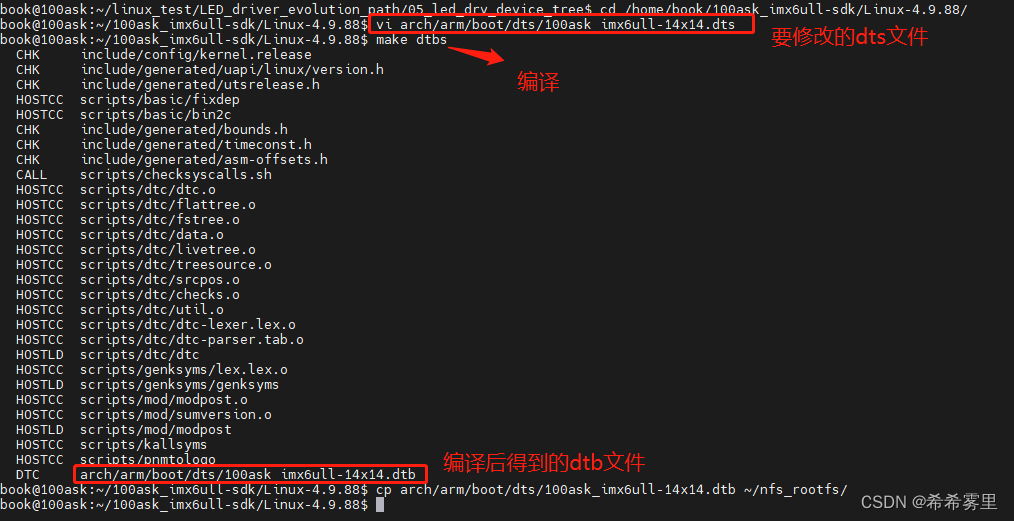
In the kernel source directory of the imx6ull pro development board, arch/arm/boot/dts/100ask_imx6ull-14x14.dts is modified and compiled to obtain arch/arm/boot/dts/100ask_imx6ull-14x14.dtb.
Detailed steps: (PC side)
5.2.2 Driver (chip_imx6ull_gpio.c)
Here, the of_match_table member is mainly set, which is used after the device tree node matches the platform_driver. The method of obtaining resources in the probe function changes, and resources are obtained by reading the device tree file.
#include <linux/module.h>

#include <linux/fs.h>
#include <linux/errno.h>
#include <linux/miscdevice.h>
#include <linux/kernel.h>
#include <linux/major.h>
#include <linux/mutex.h>
#include <linux/proc_fs.h>
#include <linux/seq_file.h>
#include <linux/stat.h>
#include <linux/init.h>
#include <linux/device.h>
#include <linux/tty.h>
#include <linux/kmod.h>
#include <linux/gfp.h>
#include <linux/platform_device.h>


#include "led_drive.h"
#include "led_opr.h"
#include "led_resource.h"


static int g_ledpins[100];
static int g_ledcnt = 0;


/*阐述说明:
 *现阶段仅以示意总线设备驱动模型框架
*/

/*
 *函数:    	board_imx6ull_led_init
 *功能:		获取gpio引脚信息
 *输入参数:which---哪个引脚
 *返回参数:如果成功返回0
*/
static int board_imx6ull_led_init(int which)
{
	//printk("%s %s line %d, led %d\n",__FILE__,__FUNCTION__,__LINE__,which);
	printk("init gpio: group %d, pin %d\n", GROUP(g_ledpins[which]), PIN(g_ledpins[which]));
	switch(GROUP(g_ledpins[which]))
	{
		case 0:
		{
			printk("init pin of group 0 ...\n");
			break;
		}
		case 1:
		{
			printk("init pin of group 1 ...\n");
			break;
		}
		case 2:
		{
			printk("init pin of group 2 ...\n");
			break;
		}
		case 3:
		{
			printk("init pin of group 3 ...\n");
			break;
		}
	}

	return 0;
}


/*
 *函数:    	board_imx6ull_led_init
 *功能:		打印某个gpio引脚设置信息
 *输入参数:which---哪一个引脚
 			status:LED状态,1/0亮灭
 *返回参数:如果成功返回0
*/
static int board_imx6ull_led_ctl(int which, char status)
{
	printk("set led %s: group %d, pin %d\n", status ? "on" : "off", GROUP(g_ledpins[which]), PIN(g_ledpins[which]));
	switch(GROUP(g_ledpins[which]))
	{
		case 0:
		{
			printk("set pin of group 0 ...\n");
			break;
		}
		case 1:
		{
			printk("set pin of group 1 ...\n");
			break;
		}
		case 2:
		{
			printk("set pin of group 2 ...\n");
			break;
		}
		case 3:
		{
			printk("set pin of group 3 ...\n");
			break;
		}
	}

	return 0;
}


static struct led_operations board_imx6ull_led_opr =
{
	.init = board_imx6ull_led_init,
	.ctl  = board_imx6ull_led_ctl,
};

struct led_operations *get_board_led_opr(void)
{
    return &board_imx6ull_led_opr;
}


/*
 *函数:chip_imx6ull_gpio_led_probe
 *功能:记录引脚
 		创建设备,device_create
*/
static int chip_imx6ull_gpio_led_probe(struct platform_device *dev)
{
	int i = 0;
	struct resource *res;
	struct device_node *p;
	int led_pin;

	p = dev->dev.of_node;
	if(!p)
		return -1;

	//读取pin属性的值保存在led_pin变量里
	int err = of_property_read_u32(p, "pin", &led_pin);
	g_ledpins[g_ledcnt] = led_pin;

	/*创建设备*/
	led_device_create(g_ledcnt);
	g_ledcnt++;

	return 0;
}

/*
 *函数:chip_imx6ull_gpio_led_remove
 *功能:注销设备,device_destory
*/
static int chip_imx6ull_gpio_led_remove(struct platform_device *dev)
{
	int i;
	for(i = 0; i < g_ledcnt; i++)
	{
		led_device_destory(i);
	}
	g_ledcnt = 0;
	return 0;
}

//of_match_table成员,用于设备树节点和platform_driver的匹配上
static const struct of_device_id ask100_leds[] = {
    { .compatible = "100as,leddrv" },
    { },
};

static struct platform_driver chip_imx6ull_gpio_driver = {
    .probe      = chip_imx6ull_gpio_led_probe,
    .remove     = chip_imx6ull_gpio_led_remove,
    .driver     = {
        .name   = "100ask_led",
		.of_match_table = ask100_leds,
    },
};


/*入口函数,platform_driver
 *功能:注册设备
 		底层到上层的注册
*/
static int chip_imx6ull_gpio_drv_init(void)
{
	int err;
	err = platform_driver_register(&chip_imx6ull_gpio_driver);
	register_led_operations(&board_imx6ull_led_opr);
	return 0;
}

/*出口函数,paltform_driver*/
static void chip_imx6ull_gpio_drv_exit(void)
{
	platform_driver_unregister(&chip_imx6ull_gpio_driver);
}


module_init(chip_imx6ull_gpio_drv_init);
module_exit(chip_imx6ull_gpio_drv_exit);
MODULE_LICENSE("Dual BSD/GPL");
5.2.3 Makefile code
Compared with the content in the previous section, board_A_led.c is no longer needed here.
# 1. 使用不同的开发板内核时, 一定要修改KERN_DIR
# 2. KERN_DIR中的内核要事先配置、编译, 为了能编译内核, 要先设置下列环境变量:
# 2.1 ARCH,          比如: export ARCH=arm
# 2.2 CROSS_COMPILE, 比如: export CROSS_COMPILE=arm-buildroot-linux-gnueabihf-
# 2.3 PATH,          比如: export PATH=$PATH:/home/book/100ask_imx6ull-sdk/ToolChain/arm-buildroot-linux-gnueabihf_sdk-buildroot/bin
# 注意: 不同的开发板不同的编译器上述3个环境变量不一定相同,
#       请参考各开发板的高级用户使用手册

KERN_DIR = /home/book/100ask_imx6ull-sdk/Linux-4.9.88

all:
	make -C $(KERN_DIR) M=`pwd` modules
	$(CROSS_COMPILE)gcc -o led_test led_test.c

clean:
	make -C $(KERN_DIR) M=`pwd` modules clean
	rm -rf modules.order
	rm -f led_test

# 参考内核源码drivers/char/ipmi/Makefile
# 要想把a.c, b.c编译成ab.ko, 可以这样指定:
# ab-y := a.o b.o
# obj-m += ab.o

obj-m	+= led_drive.o chip_imx6ull_gpio.o
5.3 Summary
Test program: (device tree loading situation)
//加载设备树文件
cp /mnt/100ask_imx6ull-14x14.dtb /boot/
reboot
cd /sys/firmware/devicetree/base/
ls -ld *100ask*
cd 100ask_led@0
ls
cat compatible
hexdump pin
The running results of the subsequent led_test test program are exactly the same as those in the previous chapter, and here is the change in the way of managing resources.
I believe that everyone will have a hearty feeling after going through the above-mentioned LED drive evolution road.