MinIO | High-performance, Kubernetes-friendly object storage
MinIO High Performance Object Storage — MinIO Object Storage for Linux
A Distributed File System Application Scenario
- fastDFS
- shortcoming:
- Deployment is troublesome.
- Because the filename is automatically generated, additional encoding is required if the file is to be processed.
- shortcoming:
- Introduction
- Application Scenario
- Storage requirements for massive unstructured data on the Internet, such as
E-commerce website: massive product imagesVideo Website: Massive Video FilesNetwork disk: massive filesSocial Networking Sites: Massive Images
-
For small and medium-sized enterprises, if they do not choose to store on the cloud, then Minio is a good choice. Although the sparrow is small, it has all the internal organs. Of course, in addition to being used directly as object storage, Minio can also be used as the gateway layer of object storage services on the cloud, seamlessly connecting to Amazon S3 and Microsoft Azure.
-
Unstructured Data vs. Structured Data
-
Unstructured data: files, audio, video, pictures
-
Structured data: For example, common relational databases (mysql, oracle, sqlserver) use tables to store membership information of a certain website.
-
- Storage requirements for massive unstructured data on the Internet, such as
-
What is minio?
- MinIO is an object storage service based on the Apache License v2.0 open source protocol.
-
Object Storage Service (OSS) is a massive, secure, low-cost, and highly reliable cloud storage service suitable for storing any type of file. Elastic expansion of capacity and processing power, multiple storage types to choose from, and comprehensive optimization of storage costs.
-
- Minio is written in go language and naturally supports cross-platform.
- MinIO is an object storage service based on the Apache License v2.0 open source protocol.
- Advantages of minio
-
Easy to deploy: a single binary is everything and supports various platforms.
-
minio supports massive storage, can be expanded by zone (the original zone will not be affected in any way), and supports a single object up to 5TB;
-
Compatible with the Amazon S3 interface, fully considering the needs and experience of developers;
-
Low redundancy and high tolerance for disk damage, the standard and highest data redundancy factor is 2 (that is, to store a 1M data object, the actual disk space occupied is 2M). However, data can still be read when any n/2 disks are damaged (n is the number of disks in an Erasure Coding Set). And this kind of damage recovery is based on a single object, not based on the entire storage volume.
-
Excellent read and write performance
-
- Application Scenario
-
Basic concepts of MinIO
-
Object: a file/video/audio/byte stream/Anything...
-
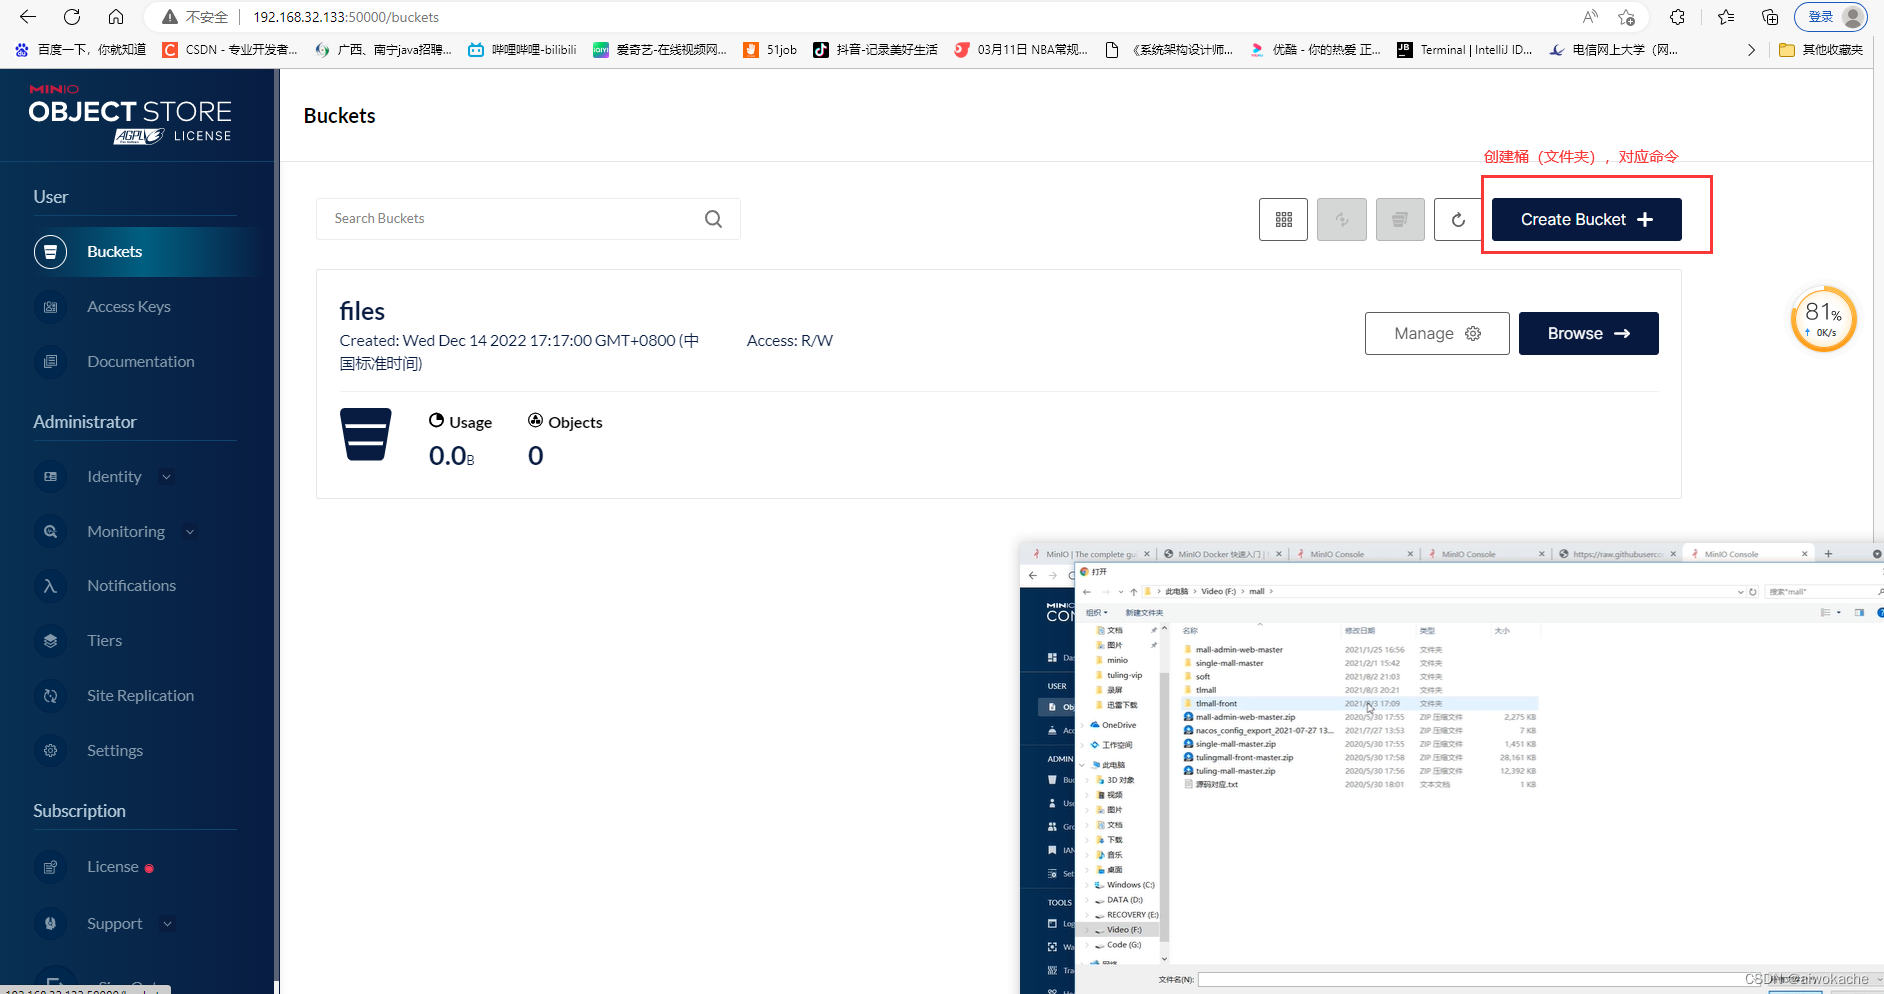
Bucket: The translation is a bucket, which can be understood as a top-level directory (folder). Bucket is used to hold Objects.
-
Drive: The disk that stores data.
-
Set : In a distributed cluster scenario or a multi-disk scenario. A collection of Drives.
-
Remark:
-
When the MinIO cluster service starts, it indicates that the Drive has been configured (of course, we need to specify the location and storage directory of the Drive).
-
Object and Bucket are two things that we really operate and control, such as which Bucket we want to store files in and which Objects we want to upload.
-
-
-
Erasure Code EC (Erasure Code): Backup and Recovery
- Definition, source of flow :
-
Erasure code is a mathematical algorithm to restore lost and damaged data. Minio uses Reed-Solomon code to split (ps: each object uploaded by the user) object into N/2 data and N/2 parity blocks. This means that if there are 12 disks, an object will be divided into 6 data blocks and 6 parity blocks, and you can lose any 6 disks (regardless of whether they are stored data blocks or parity blocks), you Restoration is still possible from the data on the remaining disks.

-
BLOCK: block. In minio, a block is about 10M.
-
DATA BLOCK: data block.
-
PARITY BLOCK: parity block.
-
-
- effect:
- The EC mechanism is used to ensure the high reliability of MinIO.
- The first step: The EC mechanism is used to verify whether the data is damaged (such as the disk (hardware) itself is damaged, such as the damage of data alone).
- Verification principle (Bit Rot Protection) : directly perform a hash on the file in MinIO. Because the hash code is unique, if the hash code remains unchanged, it means that the file is not damaged, otherwise it means that the file has been damaged.
- Step 2: The EC mechanism is used for data redundancy and recovery
- Description of the function of erasure code on the official website : Minio uses erasure code erasure code and checksum checksum to protect data from hardware failure and silent data corruption. Even if you lose half the number (N/2 ) of your hard drives, you can still recover your data.
- If the data is damaged, it can be verified whether the source file data is damaged, and the EC mechanism highwayhash can be used to deal with data damage (Bit Rot Protection).
- MinIO erasure code restoration depends on the number of EC disks for processing.
- Rule 1: All disks are readable.
- Rule 2: The number of necrotic disks cannot be greater than n/2+1 , otherwise the data cannot be recovered.
- Rule 3: If it is a dead disk, MinIO does not allow us to upload new files to the dead disk.
- Rule 4: If the dead disk is greater than or equal to N/2, then minio is not allowed to upload files. Minio allows uploading files only when no more than half of the disks are dead (n/2).
- Rule 5: There must be disks greater than or equal to N/2+1 that are readable and normal, so as to ensure the existence of EC disk data, and it is also possible to recover data through the EC mechanism.
- The first step: The EC mechanism is used to verify whether the data is damaged (such as the disk (hardware) itself is damaged, such as the damage of data alone).
- The EC mechanism is used to ensure the high reliability of MinIO.
- Case 1: Data redundancy and recovery under the EC mechanism
- There are 6 disks (because the EC mechanism requires at least 4 disks to take effect).
- Among them, 4 disks are used to store user data, such as 1.jpg.
- Two of the disks are used to store the 1.jpg generated after numbering its EC mechanism.
- If one piece of data is lost, it can be 1.jpg on one of the four disks, or 1.jpg after EC on one of the two disks. Then, according to a certain algorithm, it can be recovered and restored.
- If 2 copies of data are lost, and 1.jpg after the EC of 2 disks is lost, then there are 1.jpg of 4 disks.
- If 3 copies of data are lost, one of the 4 disks and 1.jpg after the EC of the 2 disks are all lost, then it is impossible to restore and restore.
- Case 2: In order to ensure data redundancy and restore MinIO recommended usage
- MinIO recommends to allocate evenly
- 8 discs.
- 4 inventories of source data and 4 inventories of EC data.
- It means that no matter what the circumstances, if the lost data <= 4 disks, the data can still be recovered.
- MinIO recommends to allocate evenly
- Definition, source of flow :
- storage form
- Enable the storage form in EC mode:
- Enable the storage form in EC mode:
- storage solution
- Storage solution for MinIO cluster:
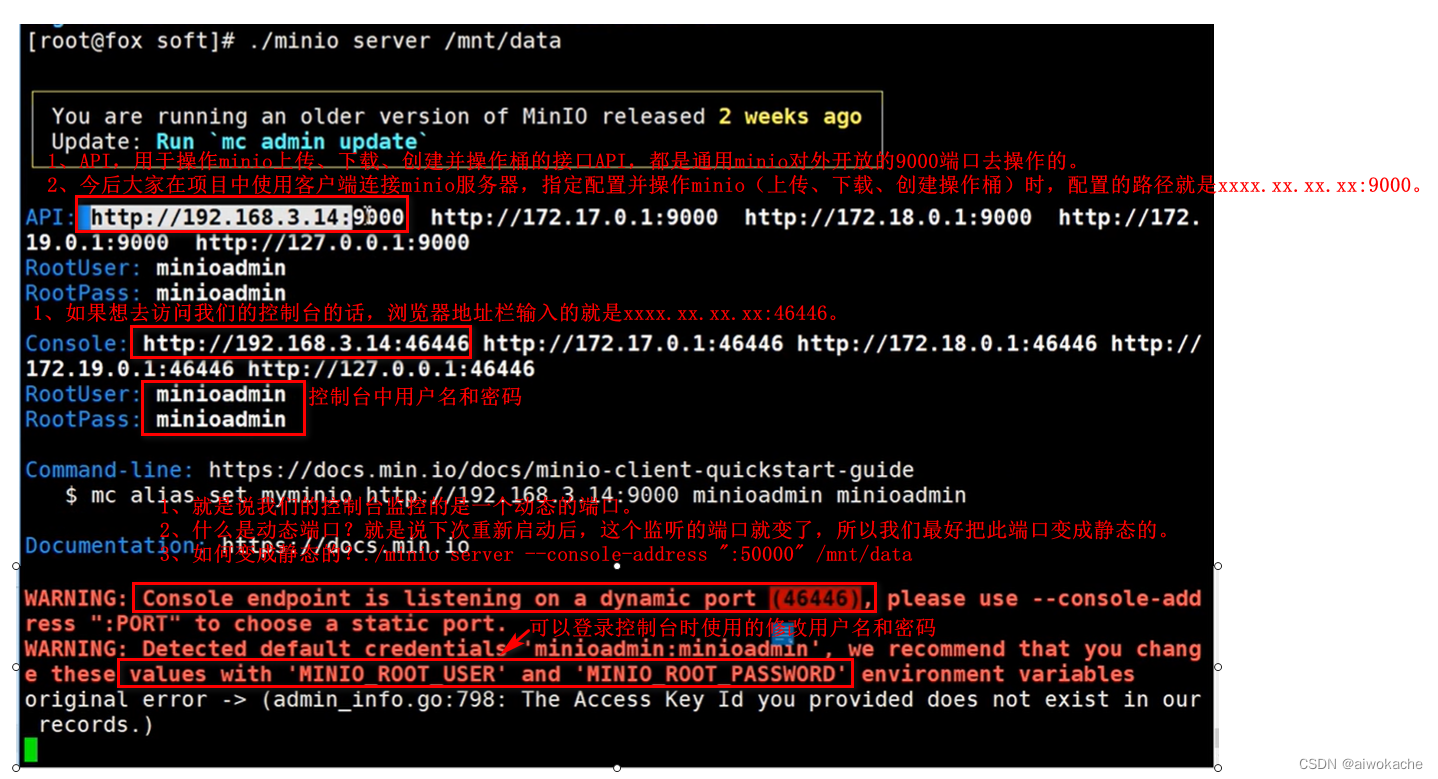
- Step 1: Build a MinIO cluster
- Step 2: The MinIO cluster provides API interface for operation, the default port is 9000, which can read and write files in the cluster.
- Step 3: The console provided by the MinIO cluster, the port is defined freely, such as 50000
- Storage solution for MinIO cluster:
Two Minio environment construction
- Overview: 3 modes
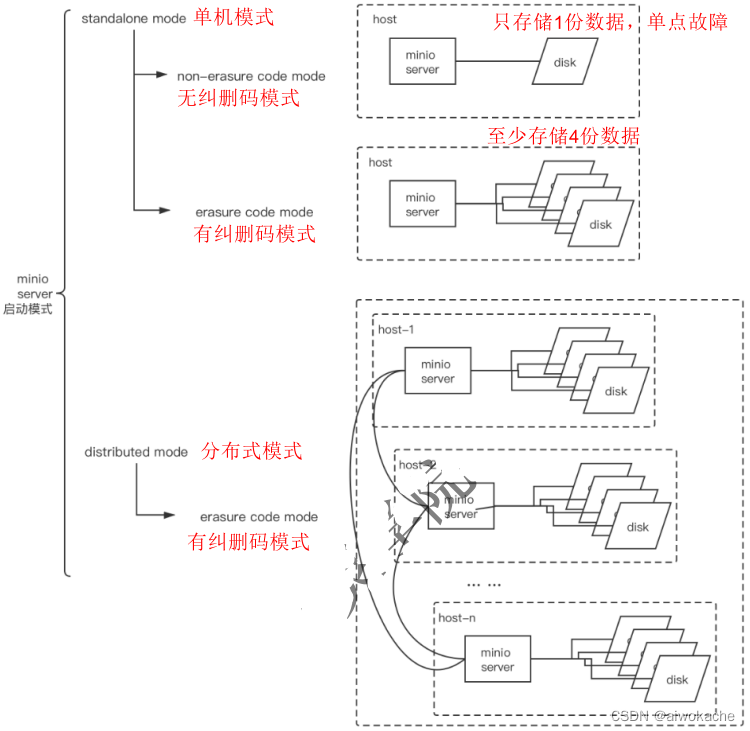
- Method 1: Stand-alone deployment - no erasure code
- do not use docker
- Linux: systemctl stop firewalld (turn off the firewall)
- Startup before optimization
- Step 1: Download: wget https://dl.min.io/server/minio/release/linux-amd64/minio
- The second step: chmod +x minio, turn it into an executable file.
- Step 3: ./minio server /data, specify the disk location (where the data is saved) and run. There is no background startup here, and I want to go to see the log with everyone.
-
Step 4: Check the log
- Step 5: Verification: log in to the console, and operate the upload and download of files
- Optimized startup
- Step 1: Download: wget https://dl.min.io/server/minio/release/linux-amd64/minio
- The second step: chmod +x minio, turn it into an executable file.
- Step 3: Specify the user name and password used to log in to the console:
export MINIO_ROOT_USER=adminexport MINIO_ROOT_PASSWORD=12345678
- Step 4: Use the path where the custom configuration file is located:
./minio server --config-dir /usr/local/minioInstall/config /usr/local/minioInstall/data- --config-dir /usr/local/minioInstall/config: the path where the custom configuration file is located
- /usr/local/minioInstall/data: the path where the uploaded and downloaded files are located
- Step 5: Specify the listening port of the login console as 5000:
./minio server --console-address ":50000" /usr/local/minioInstall/data- --console-address ":50000": Specify the port 5000 for logging in to the console
- Step 6: Verification: log in to the console, and operate the upload and download of files
- Summarize
- Feature 1: This is our stand-alone deployment mode without erasure codes. Why is there no erasure code? Because we only allocate 1 disk here, it is required to have more than 4 disks in the erasure code deployment mode.
- Feature 2: In the deployment mode without erasure code, the files saved in /usr/local/minioInstall/data are source files, not encrypted files:

- Startup before optimization
- window
- Step 1: Download: http://dl.minio.org.cn/server/minio/release/windows-amd64/minio.exe
- Step 2: minio.exe server D:\, specify the disk location and run
- Linux: systemctl stop firewalld (turn off the firewall)
- use docker
- linux: Chinese official website documents are updated slowly (the access port of the console is not exposed in the configuration), be sure to refer to the English documents on the English official website
-
docker run -d -p 9000:9000 -p 50000:50000 --name minio\;-e "MINIO_ROOT_USER=admin" \-e "MINIO_ROOT_PASSWORD=12345678" \-v /usr/loca/minioInstall/data:/data \-v /mnt/config:/root/.minio \minio/minio server --console-address ":50000" /data
-
docker run -d: indicates that it is started in the background
-
-e "MINIO_ROOT_USER=admin" \: specify the console user name
-
-e "MINIO_ROOT_PASSWORD=12345678" \: Specify console password
-
-v /usr/loca/minioInstall/data:/data \: Specify the directory to mount, the directory where files (upload and download) are located
-
:/data: variable, corresponding to /data below
-
-
-v /mnt/config:/root/.minio \: Specify the directory where the custom configuration file is located
-
--console-address ":50000": Exposed console port 5000.
-
/data: The disk of the specified file (upload and download), here /data is just a variable, and the real value uses the above /usr/loca/minioInstall/data.
-
-
- window
- linux: Chinese official website documents are updated slowly (the access port of the console is not exposed in the configuration), be sure to refer to the English documents on the English official website
- do not use docker
- Method 2: Stand-alone deployment - with erasure code, that is, at least 4 disks (disk1, disk2, disk3, disk4...) must be mounted
- do not use docker
- linux
- windows
- use docker
- linux
-
Step 1: start
docker run -d -p 9000:9000 -p 50000:50000 --name minio \-v /mnt/data1:/data1 \-v /mnt/data2:/data2 \-v /mnt/data3:/data3 \-v /mnt/data4:/data4 \-v /mnt/data5:/data5 \-v /mnt/data6:/data6 \-v /mnt/data7:/data7\-v /mnt/data8:/data8 \minio/minio server /data{1...8} --console-address ":50000"-
docker run -d: running in the background
-
9000:9000: expose API port 9000 to the host
-
50000:50000: Expose console port 50000 to the host
-
--console-address ":50000": expose console port 50000 to the host
-
-v /mnt/data1:/data1 \-v /mnt/data2:/data2 \-v /mnt/data3:/data3 \-v /mnt/data4:/data4 \-v /mnt/data5:/data5 \-v /mnt/data6:/data6 \-v /mnt/data7:/data7\-v /mnt/data8:/data8 \Mount your directory on the external disk, that is, on the disk of the host machine.
The above indicates that 8 disks are enabled.
-
-
Step Two: Verify
-
Step 1: Log in to the console
-
Step 2: Simply complete file upload and download
-
Step 3: Enter the directory where the file is located, and see that there are 8 disks:

-
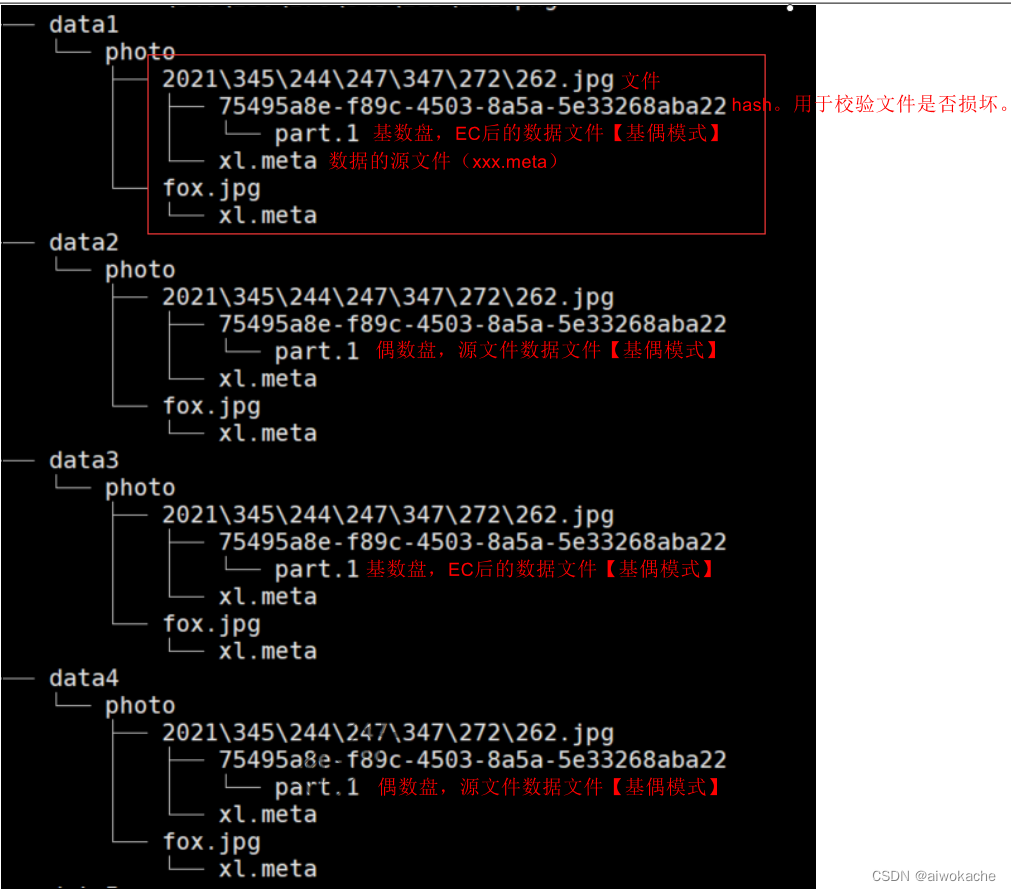
Step 4: View the tree command, each directory of the previously uploaded files will have:
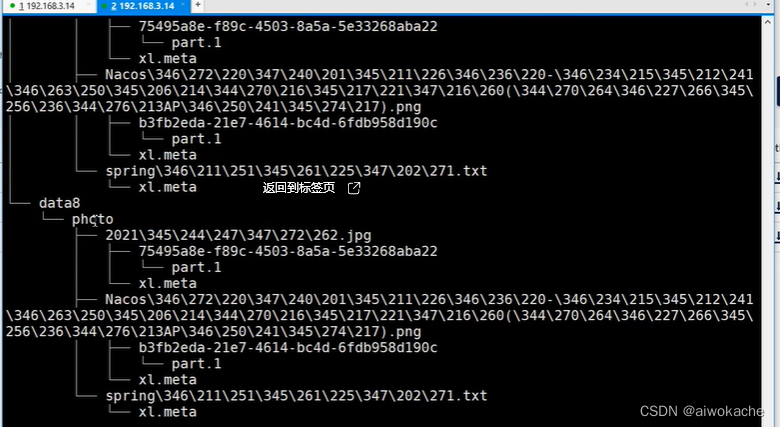
-
-
Step 3: Summary: This is the erasure code mode. In the erasure code mode, your disk will be divided evenly. If there are 8 disks, then there will be 4 disks to store our data, and 4 disks to store our verification code.
-
- windows
- linux
- do not use docker
- Method 3: Distributed Erasure Code Cluster Deployment: Highly Available Deployment Method
- basic knowledge
-
Common Methods for Distributed Storage Reliability
-
redundancy
-
How does minio achieve redundancy? That is, our erasure code (EC code) is used.
-
-
check
-
How does minio implement verification? Check our Rot Bit, and use the hash method to determine whether the file is damaged. If you are not the source file, then the hashcode must be different. If it is not the same, it indicates a problem.
-
-
-
- Business needs:
- Disadvantages in stand-alone erasure code mode: Although data can also be recovered, there will be a single point of failure.
- case:
- For example, a 16- node Minio cluster with 16 hard disks per node, even if 8 servers go down, the cluster is still readable, but you need 9 servers to write data.
- principle:
- A better way is to evenly distribute our disks to different machines. For example, our multiple disks, it is a set. For example, if there are many nodes, multiple disks will be mounted on each node. The cluster divides us into many groups of sets, and one of our objects exists in one set, so that a fault-tolerant process can be performed:
- A better way is to evenly distribute our disks to different machines. For example, our multiple disks, it is a set. For example, if there are many nodes, multiple disks will be mounted on each node. The cluster divides us into many groups of sets, and one of our objects exists in one set, so that a fault-tolerant process can be performed:
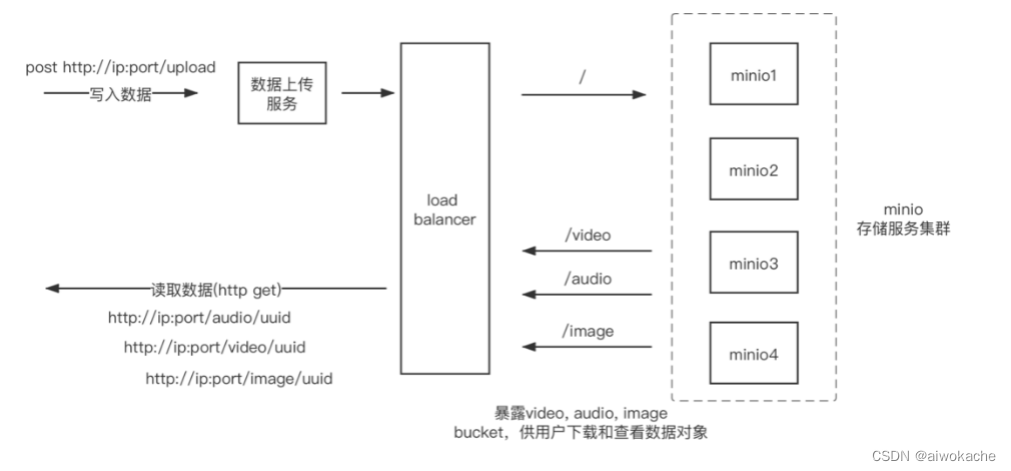
- Distributed cluster deployment scheme diagram:
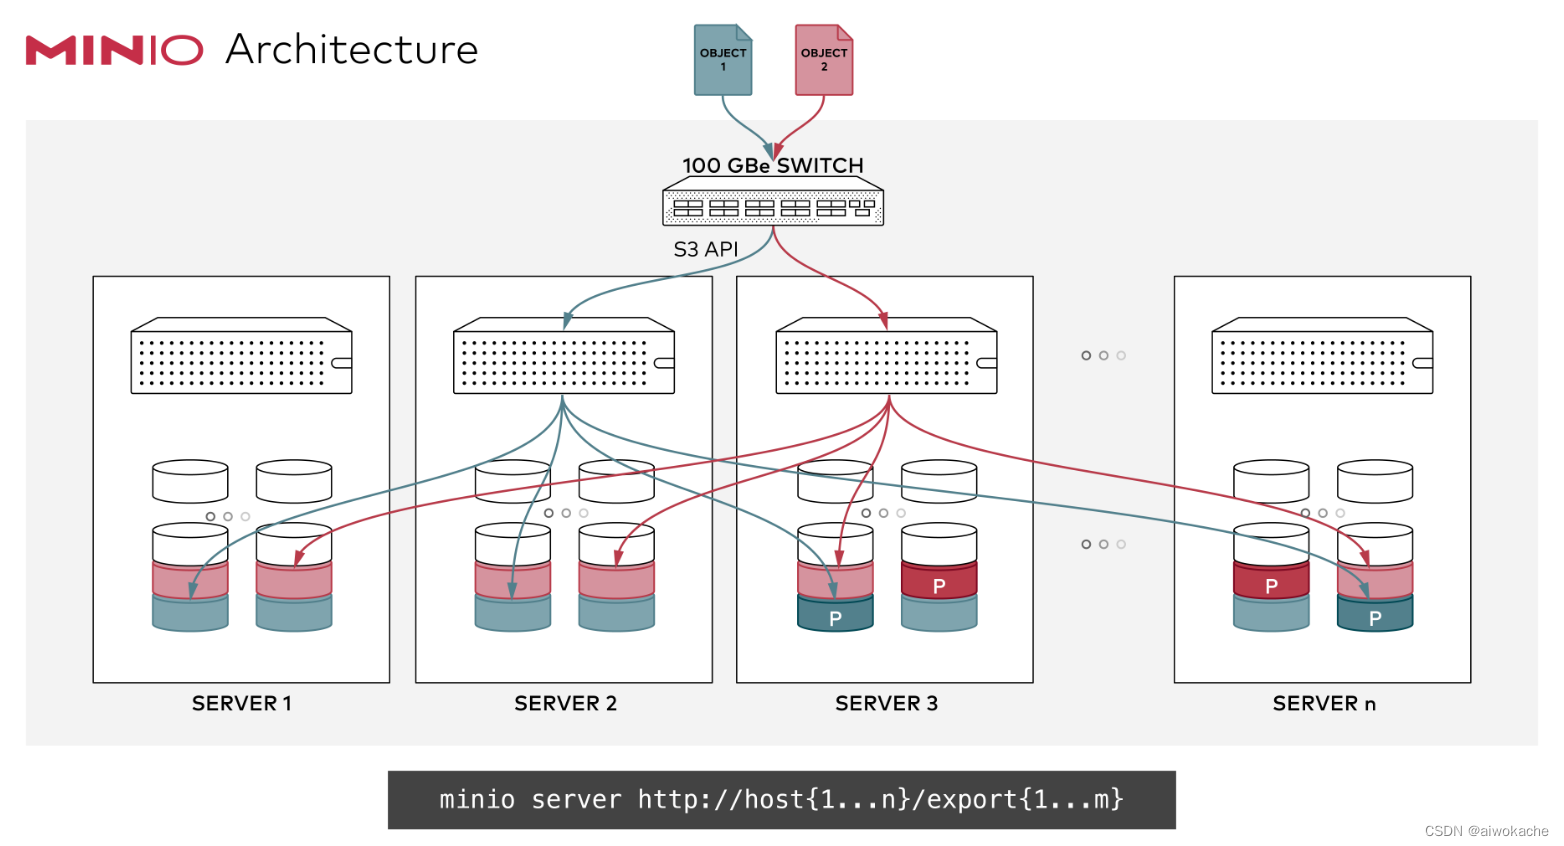
- It is also very convenient to publish: minio server http://host{1...n}/export{1...m}
- http://host{1...n}: node (ip+port), that is, the specified host list
- export{1...m}: directory where files are stored, such as data1, data2, data3, data4, data5, data6.
- What is export? export is our directory.
- If it is released, we can also add a loadbalance (load balancer) in front of it to let the files fall on which disk of which node in a balanced manner. In fact, this is how to find it.
- It is also very convenient to publish: minio server http://host{1...n}/export{1...m}
- Detailed distributed erasure code cluster deployment steps:
- Detailed Step 1: Basic Implementation
-
Step 1: Write a script to start a distributed Minio instance
-
Case 1: To start a distributed Minio instance, with 8 nodes (different ip ports indicate 1 node), and 1 disk per node (export1...8), you need to run the following command on all 8 nodes:

-
export MINIO_ROOT_USER = adminexport MINIO_ROOT_PASSWORD = 12345678mini server http://192.168.1.11/export1 http://192.168.1.12/export2 \http://192.168.1.13/export3 http://192.168.1.14/export4 \http://192.168.1.15/export5 http://192.168.1.16/export6 \http://192.168.1.17/export7 http://192.168.1.18/export8
- Note: The above commands are incomplete, because there are no commands to expose ports.
-
- Case 2: To start a distributed Minio instance with 4 nodes and 4 disks per node , you need to run the following command on all 4 nodes:
 export MINIO_ROOT_USER = adminexport MINIO_ROOT_PASSWORD = 12345678mini server http://192.168.1.11/export1 http://192.168.1.11/export2 \http://192.168.1.11/export3 http://192.168.1.11/export4 \http://192.168.1.12/export1 http://192.168.1.12/export2 \http://192.168.1.12/export3 http://192.168.1.12/export4 \http://192.168.1.13/export1 http://192.168.1.13/export2 \http://192.168.1.13/export3 http://192.168.1.13/export4 \http://192.168.1.14/export1 http://192.168.1.14/export2 \http://192.168.1.14/export3 http://192.168.1.14/export4
-
Note: For the same ip port, 3 exports are mounted later.
-
-
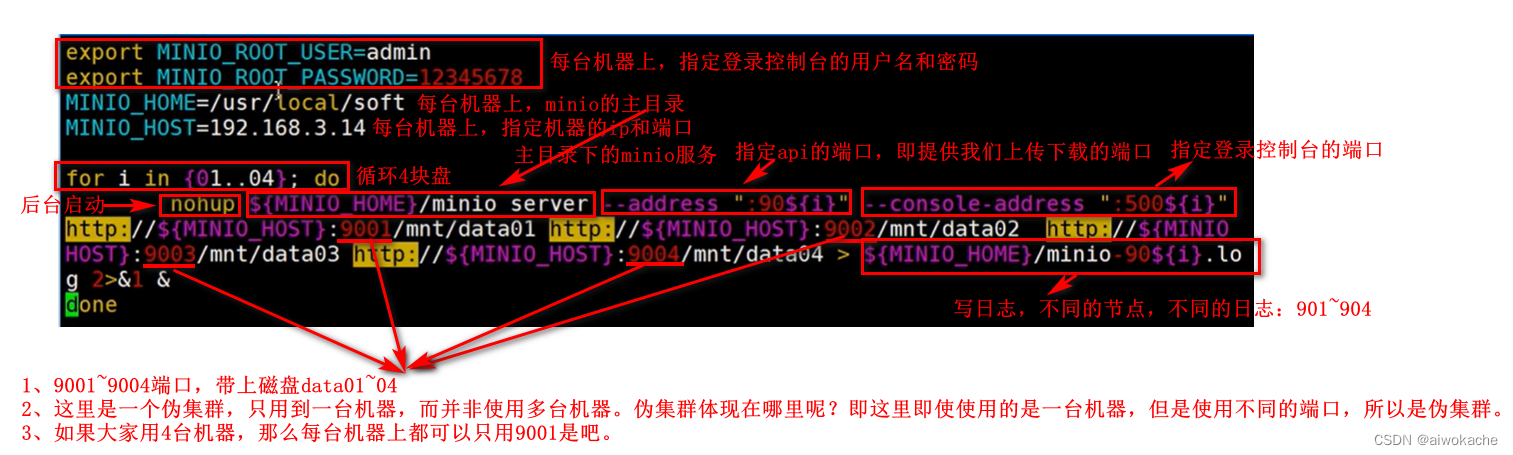
For convenience, I wrote a script here to start: vim minio-cluster.sh:
-
-
Step 2: Stop docker:
-
docker ps, get id
-
docker stop xxxxxx
-
-
Step 3: Execute the script: ./minio -cluster.sh
- Step Four: Verify
- Step 1: ps -ef|grep minio to view the effect:

- As can be seen from the figure above, we have started 4 nodes (9001~9004) and console ports (50001~50004).
- Step 2: The browser accesses 4 consoles (5001~5004)
- Step 3: Simple operation file upload and download
- Step 4: tree command query effect
- Step 1: ps -ef|grep minio to view the effect:
- Step 5: Implement loadbalancer based on nginx . Requirement: In this way, if we really use it, there must be an entrance. That is to say, if it is in this distributed erasure code deployment mode, we must have an entrance, and we must have a unified entrance. What about the unified entrance? Is there a load balancer (loadbalance).
- Step 1: Configure nginx
Step a: configure an upstream, 9001~9004.upstream minio { server 192.168.3.14:9001; server 192.168.3.14:9002; server 192.168.3.14:9003; server 192.168.3.14:9004; } upstream console { ip_hash; server 192.168.3.14:50001; server 192.168.3.14:50002; server 192.168.3.14:50003; server 192.168.3.14:50004; } server { listen 9000; listen [::]:9000; server_name localhost; # To allow special characters in headers ignore_invalid_headers off; # Allow any size file to be uploaded. # Set to a value such as 1000m; to restrict file size to a specific value client_max_body_size 0; # To disable buffering proxy_buffering off; location / { proxy_set_header Host $http_host; proxy_set_header X-Real-IP $remote_addr; proxy_set_header X-Forwarded-For $proxy_add_x_forwarded_for; proxy_set_header X-Forwarded-Proto $scheme; proxy_connect_timeout 300; # Default is HTTP/1, keepalive is only enabled in HTTP/1.1 proxy_http_version 1.1; proxy_set_header Connection ""; chunked_transfer_encoding off; proxy_pass http://minio; } } server { listen 50000; listen [::]:50000; server_name localhost; # To allow special characters in headers ignore_invalid_headers off; # Allow any size file to be uploaded. # Set to a value such as 1000m; to restrict file size to a specific value client_max_body_size 0; # To disable buffering proxy_buffering off; location / { proxy_set_header Host $http_host; proxy_set_header X-Real-IP $remote_addr; proxy_set_header X-Forwarded-For $proxy_add_x_forwarded_for; proxy_set_header X-Forwarded-Proto $scheme; proxy_set_header X-NginX-Proxy true; proxy_connect_timeout 300; # Default is HTTP/1, keepalive is only enabled in HTTP/1.1 proxy_http_version 1.1; proxy_set_header Connection ""; chunked_transfer_encoding off; proxy_pass http://console; } }
Step b: proxy_pass http://minio;, we use proxy_pass to access this minio.
Step c: listen 9000;, I change my port to 9000, is it all right? Step d: listen 50000, similarly, we change the port of the console to 50000
Step e: we pass ip_hash way to perform a route. -
Step 2: Start nginx with the specified configuration file: sbin nginx
-
Step 3: Verify that nginx is started: ps ef|grep nginx
- Step 1: Configure nginx
-
Step Six: Test
-
http://192.168.3.14:50001/dashboard, and complete simple upload and download files
-
-
-
Detailed step 2: use docker compost to deploy distributed cluster minio
-
Step 1: Please download docker-compose.yaml and nginx.conf to your current working directory. docker-compose.yaml is pulled down directly through docker-compose pull. nginx.conf is a configuration file it provides, which contains nginx configuration:
-
Step 1: docker-compose pull: pull it down directly at once:

- Step 2: Open the configuration file it provides to see the nginx configuration.
-
-
Step 2: docker-compose up
-
-
Detailed step 3: Expansion: If the disk is not enough, it is very convenient to add disks and nodes.
-
For example, I only deployed 32 nodes and 32 disks before. Now, I'm going to expand it to 64. How to do it? That is, add 32 new nodes to the original 32 nodes.
-
- Detailed Step 1: Basic Implementation
- Distributed erasure code cluster deployment precautions (official website translation):
-
All nodes in distributed Minio need to have the same access key and secret key so that these nodes can establish connections. In order to achieve this, you need to export the access key and secret key as environment variables before executing the minio server command. The new version uses MINIO_ROOT_USER&MINIO_ROOT_PASSWORD.
-
ps: In the cluster deployment mode, you need to configure authority authentication, user name, and password, that is, run it on each machine.
-
-
The disks used by Distributed Minio must be clean with no data in them.
-
The IP in the example below is for example reference only, you need to change it to your actual IP and folder path.
-
ps: Replace it with a physical real IP address, which fully ensures that each node can communicate with each other. For example, the following ones may all be IP PORTs of your LAN, which ensures that each node can communicate with each other.
-
-
The time difference between nodes in distributed Minio cannot exceed 3 seconds, and you can use NTP to ensure consistent time.
-
ps: Important, highlighted.
-
-
Running distributed Minio under Windows is in the experimental stage, please take it easy.
-
- basic knowledge
- Summarize:
- ps: Everyone pay attention, if you play by yourself, the machine is not very good (4G 8G memory only), you can set up a stand-alone mode. Erasure codes are fine, erasure codes are nothing more than adding a few disks. In cluster mode, you can play in the docker container in the virtual machine. In fact, deployment is still very convenient, which is one of the reasons why minio can be popularized.
Three mc admin use (user CRUD, file access control (read-only, writable))
- overview
- MinIO Client (mc) provides an "admin" subcommand to perform administrative tasks on your MinIO deployment:
- service service restarts and stops all MinIO servers
- update Update updates all MinIO servers
- info information display MinIO server information
- user user management user
- group group management group
- policy Policy management policy defined in the MinIO server
- config configures and manages MinIO server configuration
- heal Heal disks, buckets and objects on a MinIO server
- profile profile generate profile data for debugging
- top Top provides MinIO's top stats
- trace shows the MinIO server's http trace
- The console console displays the console log of the MinIO server
- prometheus Prometheus management Prometheus configuration
- kms kms perform KMS management operations
- MinIO Client (mc) provides an "admin" subcommand to perform administrative tasks on your MinIO deployment:
- More commonly used commands
- server information display
- info: information display MinIO server information
- trace: trace shows the http trace of the MinIO server
- console: The console displays the console log of the MinIO server
- server management
- service: The service restarts and stops all MinIO servers
- policy MinIO: policy management policy defined in the server
- File and folder (bucket) permission control (read-only (bucket download), writable (bucket upload))
- config: configuration management MinIO server configuration, such as server address
- User and group crud
- user: user management user
- group: group management group
- server information display
- Case 1: User management
#command list
mc admin
#command listmc admin user --help#Create a new user. At this time, the user does not have any permissions (not even the permission to log in to the console). At this time, permission management (policy management) is required.mc admin user add minio-server foxmc admin user add minio-server fox02 12345678# view usersmc admin user list minio-server# disable usermc admin user disable minio-server fox02# enable usermc admin user enable minio-server fox02# View user informationmc admin user info minio-server fox#delete usermc admin user remove minio-server fox02#View user's file and folder (bucket) permission controlmc admin user policy minio-server fox02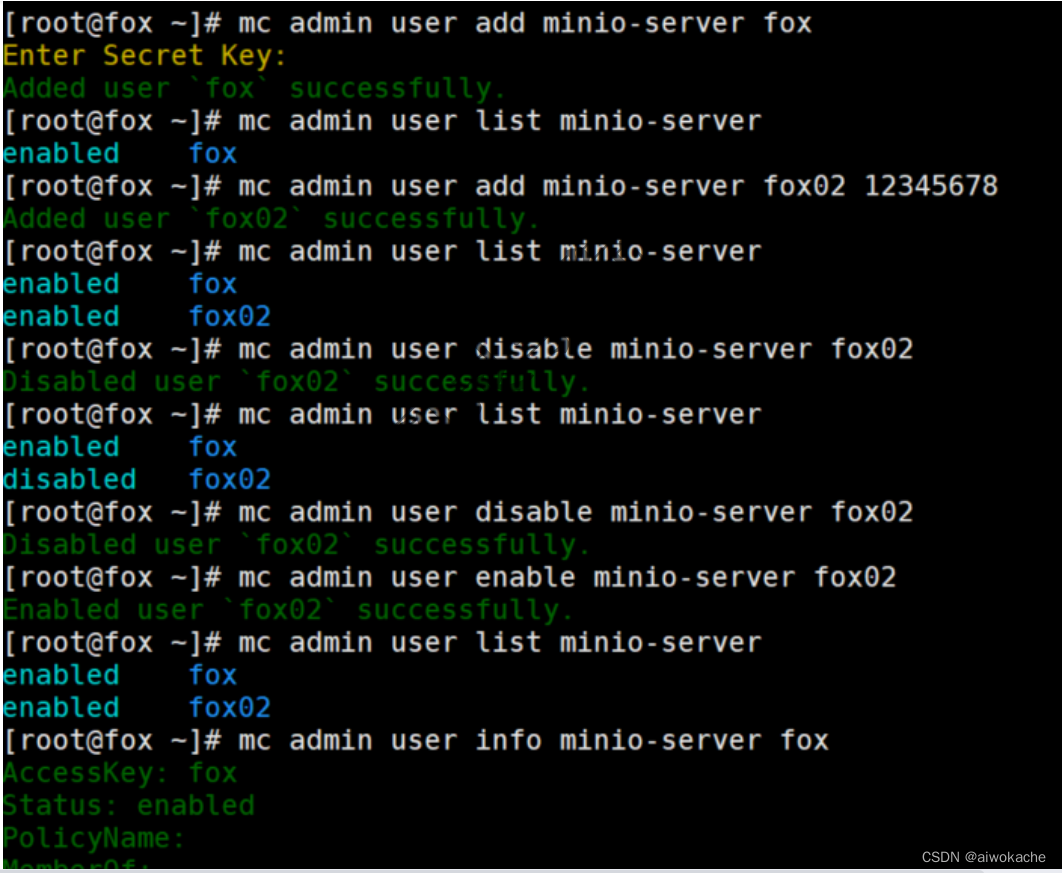
- Case 2: Policy Management
- policy command to add, delete, list policies, get information about policies and set policies for users on the MinIO server.
#command listmc admin policy --help#List all fixed policies on MinIO (
that is, all operation permissions:
diagnostics: used for our control,
readonly for monitoring: read-only
readwrite: read-write
writeonly: write-only
consoleAdmin: console login permission
)mc admin policy list minio-server#View plicy information . View information about read and write permissions.mc admin policy info minio-server readwrite
-
Add new policy:
-
Step 1: Write a policy file (permission script): /root/tulingmall.json 》vim tulingmall.json 》paste the following code》wq
{"Version" : "2012-10-17" ,"Statement" : [{"Effect" : "Allow" , #Allow"Action" : ["s3:GetBucketLocation" , #Get the permission of the path of the bucket"s3:GetObject" #Get the permission of specific object (download)],"Resource" : ["arn:aws:s3:::tulingmall" #Only for tulingmall bucket]},{"Effect" : "Allow" , #Allow"Action" : ["s3:*" #All actions are allowed],"Resource" : ["arn:aws:s3:::tulingmall/*" #Only for the tulingmall bucket and all sub-buckets of this bucket]}]} - Step 2: Add tulingmall.json to the policy database
#Add new policy
# Define a "tulingmall-admin" role here, and specify the adopted policy
mc admin policy add minio-server tulingmall-admin /root/tulingmall.json
# When viewing policy information, there will be an additional policy
mc admin policy list minio-server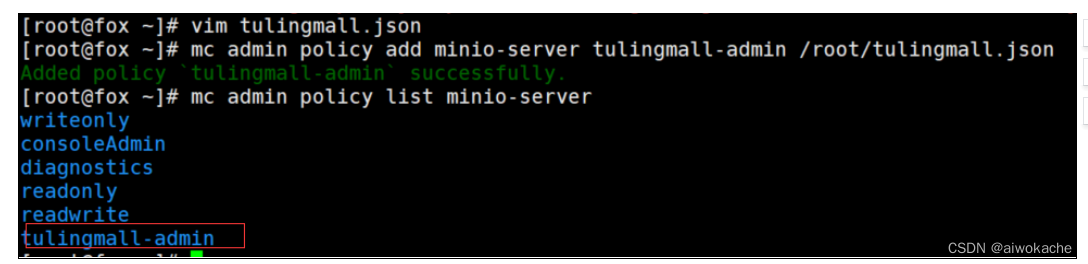
- Step 3: Add and bind new policies to newly created users (add certain permissions)
mc admin user add minio-server fox03 12345678#Set the user's access policymc admin policy set minio-server tulingmall-admin user = fox03

- Step Four: Verify
-
Test: fox03/12345678 logs in to the minio console http://192.168.3.14:50000/ , and can only operate (upload files, download files, etc.) the bucket (bucket, that is, folder) of tulingmall
-
- Attachment: Behavior List
"Action": ["s3:GetBucketLocation","s3:ListBucket","s3:GetObject","s3:PutObject","s3:DeleteObject"]
-
- policy command to add, delete, list policies, get information about policies and set policies for users on the MinIO server.
Four Minio client (minio client) use
- overview
- The minio client provides a set of linux-like commands, which are very convenient, such as mc ls, mc mb, etc.:
ls lists files and folders (buckets).mb creates a bucket or a folder.cat displays file and object contents.pipe redirects a STDIN to an object or file or STDOUT .share Generates a URL for sharing .cp copies files and objects.mirror mirrors buckets and folders.find finds files based on arguments.diff compares differences between two folders or buckets.rm deletes a specific file and object.events manages object notifications.watch monitors events on files and objects.policy manages access policies.config manages mc configuration files. To communicate between the client and the server, the client must specify the IP+port where the server (minio server) is located.update Checks for software updates.version outputs version information.
- The minio client provides a set of linux-like commands, which are very convenient, such as mc ls, mc mb, etc.:
- business
- How does the Minio client (MC) operate Minio?
- Detailed steps: English official website documents: under the MINIO CLIENT directory
- Step 1: View the commands of the Minio client: linux 》cmd 》mc:

- Through commands such as cp, ls, mb, etc., complete: use the Minio client to create a bucket, delete a bucket, etc. minio operations.
- Step 2: Deploy the client
wget http://dl.minio.org.cn/client/mc/release/linux-amd64/mcchmod + x mc./mc --helpmv mc /usr/local/sbin/
Note: In order to use the mc+... command conveniently, we don’t need to go to the directory where mc is located every time, we can copy the downloaded executable file to the sbin directory. Similarly, for windows, copy the downloaded executable file (mc.exe) to system32. - Step 3: Configure mc
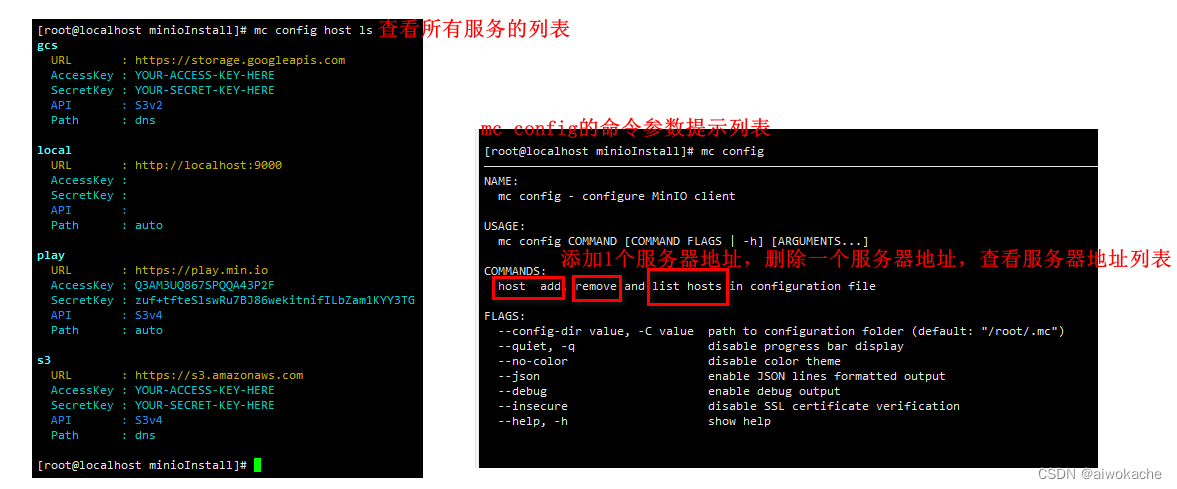
mc stores all configuration information in the ~/.mc/config.json file:# Query mc host configuration (mc config available command parameter list)mc config host ls#Add minio service, that is , which minio server to connect to MCmc config host add minio-server http://192.168.32.133:9000 admin 12345678#Delete host, "minio-server" is the name of the servermc config host remove minio-server
-
Step 4: Use the mc command

-
mc coinfig
-
mc config host ls
-
Connect to a minio server and check the file information of some directories inside:
-
ls tuling-minio: bring the host (the name of the minio server)
-
ls tuling-minio/springcloud: View the file information of springcloud in the tuling-minio server
-
-
View the bucket (directory) information of a minio server:
-
Add minio server to mc and give it a name
-
mc ls servername
-
-
-
Step 5: Demo upload, download , and verify on the console
-
Step 1: Add minio server to mc (mc connects to minio server), and take a name
- Step 2:
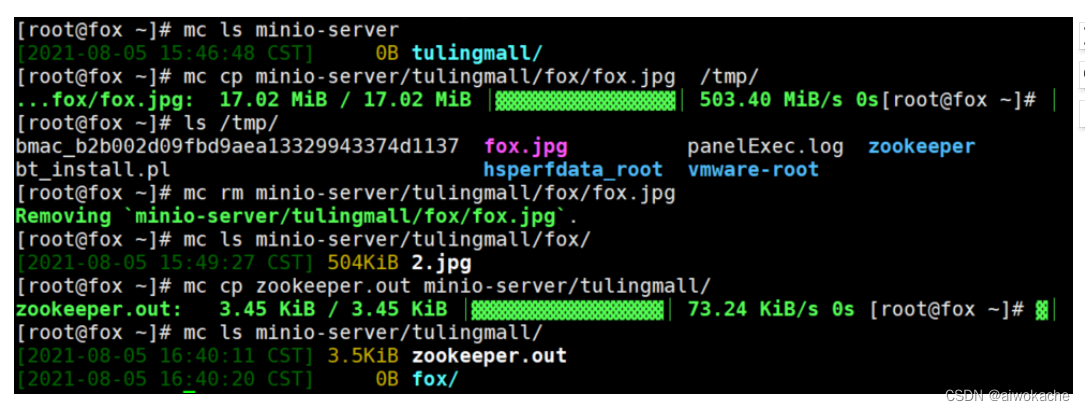
# linux/windows minion server: query all buckets ( files and folders ) on the minio servicemc ls minio-server
# linux minion server: download files to local (linux local folder)mc cp minio-server/tulingmall/fox/fox.jpg /tmp/
# windows minion server: download files to local (windows local folder)
mc cp minio-server/tulingmall/fox/fox.jpg D:/tmp/
#Delete files in minio servermc rm minio-server/tulingmall/fox/fox.jpg
#linux minion server: Local files of linux, uploaded to minio server , where tulingmall is a bucket (folder)mc cp zookeeper.out minio-server/tulingmall/
#windows minion server: Windows local files, uploaded to minio server, where tulingmall is a bucket (folder)
mc cp zookeeper.out minio-server/tulingmall/
-
- Step 6: Demonstrate Bucket management and verify it on the console
#create bucket _mc mb minio-server/bucket01#delete bucket _mc rb minio-server/bucket02# bucket is not empty, you can force delete it with cautionmc rb --force minio-server/bucket01
 #Query the disk usage of bucket03
mc du minio-server Check the total usagemc du minio-server/bucket03 Check how much bucket03 is used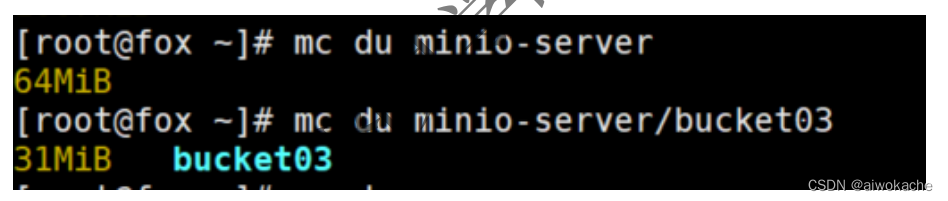
- Step 1: View the commands of the Minio client: linux 》cmd 》mc:
Five Minio Java Client use: check the official website case and api manual
- overview
-
MinIO Java Client (client) SDK provides a simple API to access the minio server
-
Official demo: https://github.com/minio/minio-java


-
Official documentation: https://docs.min.io/docs/java-client-api-reference.htmlEnglish official website 》MINIO SDKS》Java Client Quickstart Guide (support for java) / Java Client API Reference (specific usage (operation) of API)
-
- File Upload
- Step 1: Introduce dependencies
<dependency><groupId> io.minio </groupId><artifactId> minio </artifactId><version> 8.3.0 </version></dependency><dependency><groupId> me.tongfei </groupId><artifactId> progressbar </artifactId> for communication dependencies<version> 0.5.3 </version></dependency><dependency><groupId> com.squareup.okhttp3 </groupId><artifactId> okhttp </artifactId> for communication dependencies<version> 4.8.1 </version></dependency>
- Step 2: Connect to the Minio Server (server), upload the file to the specific bucket (folder)

package com.atguigu.pojo; import io.minio.BucketExistsArgs; import io.minio.MakeBucketArgs; import io.minio.MinioClient; import io.minio.UploadObjectArgs; import io.minio.errors.MinioException; import java.io.IOException; import java.security.InvalidKeyException; import java.security.NoSuchAlgorithmException; public class FileUploader { public static void main(String[] args) throws IOException, NoSuchAlgorithmException, InvalidKeyException { try { // Create a minioClient with the MinIO server playground, its access key and secret key. // 获取Minio Java client(客户端)对象 MinioClient minioClient = MinioClient.builder() //建造者模式 .endpoint("http://192.168.32.133:9000") //绑定地址 .credentials("admin", "12345678") //绑定用户名和密码 .build(); //建造 // 创建bucket String bucketName = "tulingmall"; boolean exists = minioClient.bucketExists(BucketExistsArgs.builder().bucket(bucketName).build()); if (!exists) { // 判断bucket是否存在。如果不存在,创建一个bucket。 minioClient.makeBucket(MakeBucketArgs.builder().bucket(bucketName).build()); } // 上传一个对象(一个文件) minioClient.uploadObject( UploadObjectArgs.builder() .bucket(bucketName) .object("tuling-mall-master.zip")//自定义对象的名称 .filename("F:\\mall\\tuling-mall-master.zip") //本地磁盘上,上传的对象(文件)路径+名称 .build()); System.out.println("上传文件成功"); } catch (MinioException e) { System.out.println("Error occurred: " + e); System.out.println("HTTP trace: " + e.httpTrace()); } } } - Step 3: Log in to the console, find the bucket, and view the file
- Step 1: Introduce dependencies
- Download Document
- Step 1: Introduce dependencies
- Step 2: Connect to Minio Server (server) and download objects (files) from specific buckets (folders)
package com.atguigu.pojo; import io.minio.DownloadObjectArgs; import io.minio.MinioClient; public class DownLoadDemo { public static void main(String[] args) { // Create a minioClient with the MinIO server playground, its access key and secret key. // 获取Minio Java client(客户端)对象 MinioClient minioClient = MinioClient.builder() .endpoint("http://192.168.3.14:9000") .credentials("admin", "12345678") .build(); // Download object given the bucket, object name and output file name try { minioClient.downloadObject( DownloadObjectArgs.builder() .bucket("tulingmall") //桶的名称 .object("fox/fox.jpg") //桶(tulingmall) 》 子桶(fox) 》 对象(fox.jpg) .filename("fox.jpg") //下载到本地磁盘的路径与名称(可自定义对象名称) .build()); } catch (Exception e) { e.printStackTrace(); } } } - Step 3: See the downloaded file
- Spring boot integrates minio
- Business needs:
- The problem with the above example: we all operate through api, and what we create in the real development process must be a springboot application . And if you want to operate minio Server in springboot, the key point is to turn the code of "obtaining the Minio Java client (client) object" into a reusable one . The best way is to hand over the "Minio Java client (client) object" to the spring container for management , and then we can directly use it to call the api to complete the operation on the server.
- You can further encapsulate the official website code and write your own Uitl.java tool class
- The official does not provide the integration package of minio server and spingboot, we need to realize the integration by ourselves
- principle
- Give the MinioClient object to the spring container for management:
- Option 1: Write a XxxConfigure.java configuration class yourself.
- Solution 2: You can write a springboot-minio-starter startup class (startup dependency) by yourself, and implement an automatic configuration class by yourself. The XxxFactory.java of minio is configured in the automatic configuration class, and XxxFactory.java produces an instance of the automatic configuration class.
- Remarks: springboot is nothing more than a further encapsulation of spring, using the automatic configuration class to simplify many configurations.
- Give the MinioClient object to the spring container for management:
- Option 1: Write a XxxConfigure.java configuration class by yourself to build the MinioClient object and hand it over to spring for management.
- Step 1: Dependency
<?xml version="1.0" encoding="UTF-8"?> <project xmlns="http://maven.apache.org/POM/4.0.0" xmlns:xsi="http://www.w3.org/2001/XMLSchema-instance" xsi:schemaLocation="http://maven.apache.org/POM/4.0.0 https://maven.apache.org/xsd/maven-4.0.0.xsd"> <modelVersion>4.0.0</modelVersion> <parent> <groupId>org.springframework.boot</groupId> <artifactId>spring-boot-starter-parent</artifactId> <version>2.6.3</version> <relativePath/> <!-- lookup parent from repository --> </parent> <groupId>com.atguigu</groupId> <artifactId>mybatisplus_demo01</artifactId> <version>0.0.1-SNAPSHOT</version> <name>mybatisplus_demo01</name> <description>Demo project for Spring Boot</description> <properties> <java.version>8</java.version> </properties> <dependencies> <dependency> <groupId>org.springframework.boot</groupId> <artifactId>spring-boot-starter</artifactId> </dependency> <dependency> <groupId>io.minio</groupId> <artifactId>minio</artifactId> <version>8.3.0</version> </dependency> <dependency> <groupId>me.tongfei</groupId> <artifactId>progressbar</artifactId> <version>0.5.3</version> </dependency> <dependency> <groupId>com.squareup.okhttp3</groupId> <artifactId>okhttp</artifactId> <version>4.8.1</version> </dependency> <dependency> <groupId>org.springframework.boot</groupId> <artifactId>spring-boot-starter-test</artifactId> <scope>test</scope> </dependency> <dependency> <groupId>com.baomidou</groupId> <artifactId>mybatis-plus-boot-starter</artifactId> <version>3.5.1</version> </dependency> <dependency> <groupId>org.projectlombok</groupId> <artifactId>lombok</artifactId> <optional>true</optional> </dependency> <dependency> <groupId>mysql</groupId> <artifactId>mysql-connector-java</artifactId> <scope>runtime</scope> </dependency> <dependency> <groupId>org.springframework.boot</groupId> <artifactId>spring-boot-starter-web</artifactId> </dependency> <dependency> <groupId>commons-io</groupId> <artifactId>commons-io</artifactId> <version>2.6</version> </dependency> <dependency> <groupId>com.alibaba</groupId> <artifactId>fastjson</artifactId> <version>LATEST</version> </dependency> <dependency> <groupId>com.squareup.okhttp3</groupId> <artifactId>okhttp</artifactId> <version>4.8.1</version> </dependency> </dependencies> <build> <plugins> <plugin> <groupId>org.springframework.boot</groupId> <artifactId>spring-boot-maven-plugin</artifactId> </plugin> <!--Add this to prevent maven packaging errors--> <plugin> <groupId>org.apache.maven.plugins</groupId> <artifactId>maven-resources-plugin</artifactId> <version>3.1.0</version><!--Pro-test: both 3.1.0 and 2.4.3 are available. --> </plugin> </plugins> </build> </project> - Step 2: .yml: Configure the 3 parameters required to create a minio object:
minion:
  endpoint: http://192.168.32.133:9000
  accesskey: admin
  secretKey: 12345678
  bucketName: bucker03
- Step 3: MinioProperties.java: property configuration class
import lombok.Data; import org.springframework.boot.context.properties.ConfigurationProperties; import org.springframework.stereotype.Component; @Data @Component @ConfigurationProperties(prefix = "minio") //Define the prefix public class MinioProperties { private String endpoint; //endpoint private String accessKey; //username private String secretKey; //password } - Step 4: MinioConfig.java: minio configuration class
package com.atguigu.springboot; import io.minio.MinioClient; import org.springframework.beans.factory.annotation.Autowired; import org.springframework.context.annotation.Bean; import org.springframework.context.annotation.Configuration; @Configuration public class MinioConfig { @Autowired private MinioProperties minioProperties; @Bean public MinioClient minioClient(){ // Building a MinioClient object requires 3 parameters: // Step 1: These 3 parameters can be configured in the configuration file through yml. // Step 2: And use a property configuration class to encapsulate for easy access. MinioClient minioClient = MinioClient.builder() .endpoint(minioProperties.getEndpoint()) .credentials(minioProperties.getAccessKey(), minioProperties.getSecretKey()) .build(); return minioClient; } } - Step 5: MinioController.java: open restful interface
package com.atguigu.springboot; import com.alibaba.fastjson.JSON; import me.minium.*; import io.minio.messages.Item; import lombok.extern.slf4j.Slf4j; import org.apache.tomcat.util.http.fileupload.IOUtils; import org.springframework.beans.factory.annotation.Autowired; import org.springframework.beans.factory.annotation.Value; import org.springframework.web.bind.annotation.*; import org.springframework.web.multipart.MultipartFile; import javax.servlet.http.HttpServletResponse; import java.io.IOException; import java.io.InputStream; import java.net.URLEncoder; import java.text.DecimalFormat; import java.util.*; @RestController @Slf4j public class MinioController { @Autowired private MinioClient minioClient; // .yml (directory, folder). Because when users configure buckets to upload and download operations, they need to pass the specific buckets to be operated. @Value("${minio.bucketName}") private String bucketName; @GetMapping("/list") public void list() throws Exception { //Get bucket list Iterable<Result<Item>> myObjects = minioClient.listObjects(ListObjectsArgs.builder().bucket(bucketName).build()); Iterator<Result<Item>> iterator = myObjects.iterator(); List<Object> items = new ArrayList<>(); String format = "{'fileName':'%s','fileSize':'%s'}";//custom output format //Loop through all buckets while (iterator.hasNext()) { Item item = iterator.next().get(); items.add(JSON.parse(String.format(format, item.objectName(), formatFileSize(item.size())))); } //return items; System.out.println(items.size()); } @PostMapping("/upload") public void upload(@RequestParam(name = "file", required = false) MultipartFile[] file) { if (file == null || file.length == 0) { /*return Res.error("The uploaded file cannot be empty");*/ System.out.println("Upload file cannot be empty"); }else { //Upload multiple files List<String> orgfileNameList = new ArrayList<>(file.length); for (MultipartFile multipartFile : file) { String orgfileName = multipartFile.getOriginalFilename(); orgfileNameList.add(orgfileName); try { //File Upload InputStream in = multipartFile.getInputStream(); minioClient.putObject( PutObjectArgs.builder().bucket(bucketName).object(orgfileName).stream( in, multipartFile.getSize(), -1) .contentType(multipartFile.getContentType()) .build()); in.close(); } catch (Exception e) { log.error(e.getMessage()); System.out.println("Upload failed"); //return Res.error("Upload failed"); } } Map<String, Object> data = new HashMap<String, Object>(); data.put("bucketName", bucketName); data.put("fileName", orgfileNameList); //return Res.ok("uploaded successfully", data); System.out.println("uploaded successfully"); } } @RequestMapping("/download/{fileName}") public void download(HttpServletResponse response, @PathVariable("fileName") String fileName) { InputStream in = null; try { // Get object information StatObjectResponse stat = minioClient.statObject(StatObjectArgs.builder().bucket(bucketName).object(fileName).build()); response.setContentType(stat.contentType()); response.setHeader("Content-Disposition", "attachment;filename=" + URLEncoder.encode(fileName, "UTF-8")); //Download Document //Because the browser responds here, a stream is returned in = minioClient.getObject( GetObjectArgs.builder() .bucket(bucketName) .object(fileName) .build()); IOUtils.copy(in, response.getOutputStream()); } catch (Exception e) { log.error(e.getMessage()); } finally { if (in != null) { try { in.close(); } catch (IOException e) { log.error(e.getMessage()); } } } } @DeleteMapping("/delete/{fileName}") public void delete(@PathVariable("fileName") String fileName) { try { minioClient.removeObject(RemoveObjectArgs.builder().bucket(bucketName).object(fileName).build()); } catch (Exception e) { log.error(e.getMessage()); //return Res.error("Delete failed"); System.out.println("Delete failed"); } //return Res.ok("deleted successfully", null); System.out.println("delete successfully"); } private static String formatFileSize(long fileS) { DecimalFormat df = new DecimalFormat("#.00"); String fileSizeString = ""; String wrongSize = "0B"; if (fileS == 0) { return wrongSize; } if (fileS < 1024) { fileSizeString = df.format((double) fileS) + " B"; } else if (fileS < 1048576) { fileSizeString = df.format((double) fileS / 1024) + " KB"; } else if (fileS < 1073741824) { fileSizeString = df.format((double) fileS / 1048576) + " MB"; } else { fileSizeString = df.format((double) fileS / 1073741824) + " GB"; } return fileSizeString; } } - Step Six: Test
- the list
- upload
- download
- delete
- Step 1: Dependency
- Business needs:
Six Minio console usage details (corresponding to mc command)