Faster-RCNN Code Interpretation 5: Interpretation of Main Documents-Part 1
foreword
Because I plan to try the reproduction of Faster-RCNN recently, don't think too much, I am not good enough to reproduce all the codes by myself. Therefore, it is to refer to other people's code and perform your own interpretation.
The code comes from the UP master of station B (big brother 666) , who put the code on GitHub, and I put the link below (it should not be considered an infringement, after all, the code is open source_ ) :
b站链接:https://www.bilibili.com/video/BV1of4y1m7nj/?vd_source=afeab8b555e5eb1bfa1e7f267262cbf2

GitHub链接:https://github.com/WZMIAOMIAO/deep-learning-for-image-processing
Purpose
In fact, the UP master has made a good video explaining his code, but sometimes I still like to read blogs to learn, and the video is very long, 6 hours, I tend to fall asleep when watching it_, so I plan to write Blog to record study notes.
What's done so far
Part 1 : Detailed introduction of VOC dataset
Part 2 : Faster-RCNN Code Interpretation 2: Getting Started Quickly
Part Three : Faster-RCNN Code Interpretation 3: Making Your Own Data Loader
Part Four : Interpretation of Faster-RCNN Code 4: Interpretation of Auxiliary Documents
Part Five : Interpretation of Faster-RCNN Code 5: Interpretation of Main Documents - Part 1 (this article)
Directory Structure
Article directory
1 Introduction:
This article mainly introduces the contents of the network_files folder under the Faster-RCNN project . This folder is the core folder of the project, mainly about Faster-RCNN construction.
Since there is a lot of content, I plan to divide it into three parts to explain. The main documents explained in this article are:
boxes.py
image_list.py
transform.py
Before explaining the file, let me explain a phenomenon that often appears in the code:

is a function with the same function, sometimes it will appear twice, and one of them will have @torch.jit.unused. onnxIndicates that the model is converted into a general and open neural network model. This model has nothing to do with frameworks such as pytorch and tensorflow, and the two can also be converted to each other.
2. Interpretation of the boxes.py file:
The main function of this file is: it defines many functional functions related to the bounding box, such as nms, calculating area, calculating iou, etc. Let's explain them one by one.
2.1 nms function:
This function performs NMS processing on the bounding box of an image .
Input parameters:
| parameter | significance |
|---|---|
| boxes | The bounding box value of the image, the format is Tensor[N, 4] where N represents N bounding boxes, and 4 represents the 4 coordinate values of the upper left corner and lower right corner |
| scores | The confidence value corresponding to the bounding box above, in the format of Tensor[N] |
| iou_threshold | Threshold, used as the basis for judgment during NMS processing, that is, to discard all frames with IOU greater than the threshold |
The content of this function is only one sentence, namely:
return torch.ops.torchvision.nms(boxes, scores, iou_threshold)
It can be seen that this function is actually called by the nms method officially implemented by pytorch.
2.2 batched_nms function:
This function performs NMS operations in the form of batch processing .
There are three input parameters that are the same as the above, so I won’t say more, there is only one new parameter, namely:
idxs,其是每个边界框的类别索引值,格式为Tensor[N]
The content of the function is as follows (see comments):
# boxes.numel()返回元素个数
if boxes.numel() == 0:
    # 如果boxes中没有值了,就可以结束函数了
    return torch.empty((0,), dtype=torch.int64, device=boxes.device)

# 获取所有boxes中最大的坐标值(xmin, ymin, xmax, ymax)
max_coordinate = boxes.max()

# 为每一个类别/每一层生成一个很大的偏移量
# 这里的to只是让生成tensor的dytpe和device与boxes保持一致
offsets = idxs.to(boxes) * (max_coordinate + 1)
# boxes加上对应层的偏移量后,保证不同类别/层之间boxes不会有重合的现象
boxes_for_nms = boxes + offsets[:, None]
# 进行nms操作
keep = nms(boxes_for_nms, scores, iou_threshold)
return keep
2.3 remove_small_boxes function:
The main function of this function is to delete those bounding boxes whose width and height are smaller than the threshold.
Input parameters:
| parameter | significance |
|---|---|
| boxes: | bounding box object |
| min_size : | The minimum width and height, that is, the threshold |
The content of the function is as follows:
ws, hs = boxes[:, 2] - boxes[:, 0], boxes[:, 3] - boxes[:, 1]  # 预测boxes的宽和高
# keep = (ws >= min_size) & (hs >= min_size)  # 当满足宽,高都大于给定阈值时为True
# torch.logical_and即逻辑与,当都为真时才为真
# torch.ge(value,threshold)逐元素比较,当value大于threshold时为True
keep = torch.logical_and(torch.ge(ws, min_size), torch.ge(hs, min_size))
keep = torch.where(keep)[0]
return keep
2.4 clip_boxes_to_image function:
The function of this function is to crop the prediction frame whose coordinates exceed the image range, and define the out-of-bounds coordinates as the image boundary.
Input parameters:
| parameter | significance |
|---|---|
| boxes | Predict the bounding box, same as above |
| size | The width and height of the image, in the format of Tuple[height, width] |
The content of the function is as follows, see the comments:
# 获取boxes的维度
dim = boxes.dim()
# 获取box的坐标信息
# boxes_x = [N,2],boxes_y=[N,2]
boxes_x = boxes[..., 0::2]  # x1, x2
boxes_y = boxes[..., 1::2]  # y1, y2
# 获取图像宽高
height, width = size

# torchvision._is_tracing 与 torch._C._get_tracing_state()
# 是否为JIT跟踪模型,具体我也不是很懂,涉及到了torch的源码内容
if torchvision._is_tracing():
    # 首先和图像左上角(0,0)坐标比较,如果边界框x轴比左上角小,则取0
    boxes_x = torch.max(boxes_x, torch.tensor(0, dtype=boxes.dtype, device=boxes.device))
    # 然后和图像宽度比,即如果坐标比宽度大,则直接取宽度的值
    boxes_x = torch.min(boxes_x, torch.tensor(width, dtype=boxes.dtype, device=boxes.device))
    # y同x原理一样
    boxes_y = torch.max(boxes_y, torch.tensor(0, dtype=boxes.dtype, device=boxes.device))
    boxes_y = torch.min(boxes_y, torch.tensor(height, dtype=boxes.dtype, device=boxes.device))
else:
	# boxes_x.clamp : 返回限制范围内的数据
    boxes_x = boxes_x.clamp(min=0, max=width)   # 限制x坐标范围在[0,width]之间
    boxes_y = boxes_y.clamp(min=0, max=height)  # 限制y坐标范围在[0,height]之间

# 将过滤后的x、y拼接在一起,dim指定维度
clipped_boxes = torch.stack((boxes_x, boxes_y), dim=dim)
return clipped_boxes.reshape(boxes.shape)
2.5 box_area function:
The function of this function is to calculate the area of the bounding box through the coordinates, as long as it is used to calculate the IOU.
There is only one input parameter, the boxes object.
Then the code is also very simple, only one sentence:
return (boxes[:, 2] - boxes[:, 0]) * (boxes[:, 3] - boxes[:, 1])
The shape of the boxes is [N,4], where 4 represents the four coordinate values of the upper left corner and the lower right corner. The area must be the length multiplied by the width, that is, the product of the x-coordinate difference and the y-coordinate difference.
2.6 box_iou function:
The function of this function is to calculate the IOU value of the two bounding boxes.
Input parameters: two bounding box objects, both in the format Tensor[N, 4].
The content of the function is as follows:
# 计算面积
area1 = box_area(boxes1)
area2 = box_area(boxes2)

# 寻找两个边界框中:
# 左上角最大的坐标 ---- 相交部分左上角
# 右下角最小的坐标 ---- 相交部分右下角
lt = torch.max(boxes1[:, None, :2], boxes2[:, :2])  # left-top [N,M,2]
rb = torch.min(boxes1[:, None, 2:], boxes2[:, 2:])  # right-bottom [N,M,2]

# 计算相交的值
wh = (rb - lt).clamp(min=0)  # [N,M,2]
inter = wh[:, :, 0] * wh[:, :, 1]  # [N,M]

# IOU = 交集 / 并集
# 交集 = 两个面积相交的部分
# 并集 = 两个面积相加 减去 交集
iou = inter / (area1[:, None] + area2 - inter)
return iou
Let me talk about why the coordinates of the intersecting parts above find the maximum and minimum (the picture I drew):

3. Interpretation of image_list.py file:
This file only defines one ImageListclass, the purpose is to associate the data before and after the image size transformation together for easy use.
__init__ method
Input parameters:
| parameter | significance |
|---|---|
| tensors | Image data after padding |
| image_sizes | Image size before padding, the format is: list[tuple[int, int]] |
The initialization method is very simple, which is to define the incoming parameters as class variables:
self.tensors = tensors
self.image_sizes = image_sizes
to method
It is to put the data into the specified device, which tois similar to the way we usually put the model into the specified device.
4. Interpretation of the transform.py file:
The main function of this file is to: **Define the pre-processing and post-processing methods of the data. **Pre-processing methods such as standardization, packaging images of different sizes into a batch, and so on. Post-processing methods such as mapping the bounding box back to the original size (because images of different sizes can be packed together and the image size is changed, it needs to be mapped back). In addition, it is precisely because the image size is changed that the above ImageList class needs to be defined.
4.1 GeneralizedRCNNTransform类:
First of all, look at GeneralizedRCNNTransformthe class, which is the core component of the file.
__init__ method
Input parameters:
| parameter | significance |
|---|---|
| min_size | Specify the minimum side length range of the image |
| max_size | Specifies the maximum side length range of the image |
| image_mean | Specifies the mean of the image during normalization |
| image_std | specify the variance of the image in the normalization process |
The content of the code is very simple. First, judge whether the input value is a list or a tuple. If not, convert it to a tuple:
if not isinstance(min_size, (list, tuple)):
	min_size = (min_size,)
Then, convert the input parameters into class variables:
self.min_size = min_size      # 指定图像的最小边长范围
self.max_size = max_size      # 指定图像的最大边长范围
self.image_mean = image_mean  # 指定图像在标准化处理中的均值
self.image_std = image_std    # 指定图像在标准化处理中的方差
normalize method:
The purpose of this method is to standardize the image .
See notes for details:
# 获取数据类型和设备信息 cpu or gpu
dtype, device = image.dtype, image.device
# 均值 + 方差,转为tensor格式
mean = torch.as_tensor(self.image_mean, dtype=dtype, device=device)
std = torch.as_tensor(self.image_std, dtype=dtype, device=device)
# 进行标准化
# [:, None, None]: shape [3] -> [3, 1, 1],让维度和图像保持相同【channel、w、h】
return (image - mean[:, None, None]) / std[:, None, None]
resize method:
The function of this method is to scale the image to a specified size range and scale its boxes information at the same time.
Incoming parameters:
| parameter | significance |
|---|---|
| image | input image |
| target | Enter the relevant information of the picture (including bboxes information) This is one of the values returned when we define the dataset |
First, get the image width and height:
# image = [channel, height, width]
# 获取宽高
h, w = image.shape[-2:]
Determine whether it is in the training state or the verification state, because the format of the min_size parameter passed in in different states is different:
# 判断是训练还是验证
if self.training:
    # 指定输入图片的最小边长,注意是self.min_size不是min_size
    # min_size: int ; self.min_size: tuple
    size = float(self.torch_choice(self.min_size))
else:
    # FIXME assume for now that testing uses the largest scale
    # 指定输入图片的最小边长,注意是self.min_size不是min_size
    size = float(self.min_size[-1])
Then send the picture into _resize_imagethe function (see 4.2 below for the specific method, not mentioned here), and change the size of the image:
# if 条件不用管,两者的目的都是相同的
if torchvision._is_tracing():
    image = _resize_image_onnx(image, size, float(self.max_size))
else:
	image = _resize_image(image, size, float(self.max_size))
After scaling the picture, it is definitely necessary to scale the box corresponding to the picture. But before that, first judge whether the target is empty, if it is empty, it means that the image has no object at all, just skip it. Otherwise, the box information can be scaled:
# 如果target为空,则结束函数
if target is None:
    return image, target

# 从target获取boxes值
bbox = target["boxes"]
# 根据图像的缩放比例来缩放bbox
# 原来: [h, w] ; 缩放的要求: image.shape[-2:]
bbox = resize_boxes(bbox, [h, w], image.shape[-2:])
# 添加缩放后的值
target["boxes"] = bbox
Among them, the function of scaling the box is called resize_boxes, which receives three parameters:
待缩放的box
缩放前尺寸
缩放后尺寸
See the content of 4.3 below for the content of this function.
batch_images method:
The function of this method is to pack images of different sizes into a batch. **It is worth mentioning here that in image classification, our input image size is fixed, so it can be directly packaged into a batch without us having to implement it separately. In detection, the input image size is different, so we need to The images are changed to the same size and then packed.
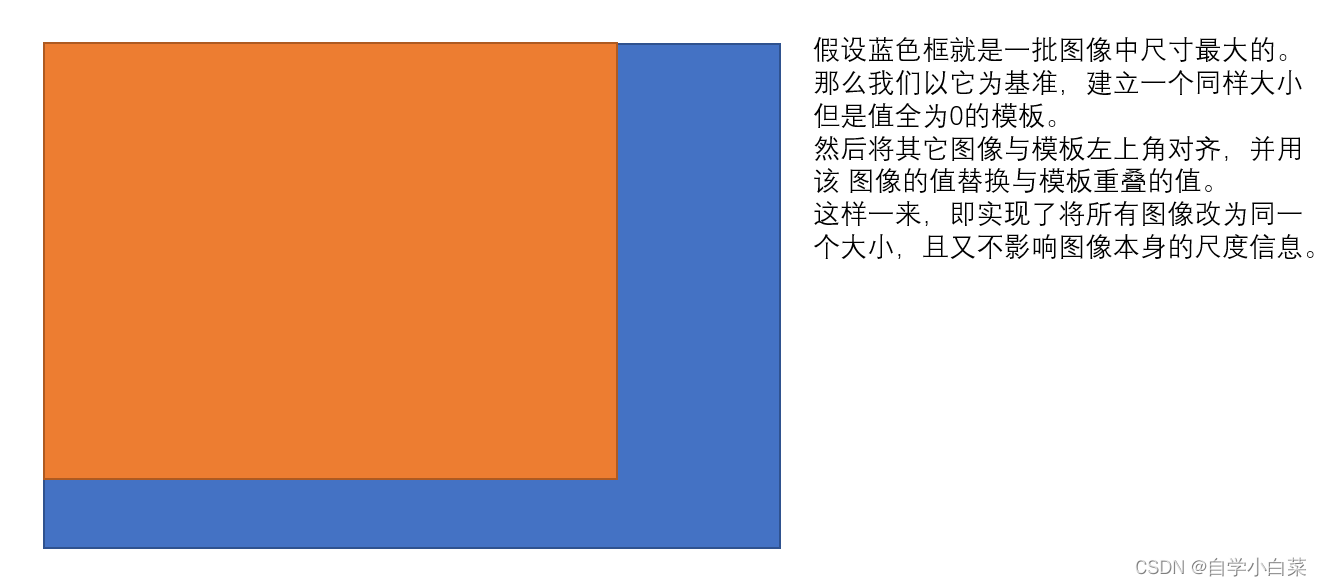
Here, the packaging idea chosen by the author is: get the maximum size of a batch of images, use it as a template, align the rest of the images with its upper left corner, and then fill the parts of the rest of the images with 0 compared with the largest image. See the diagram below:
The author implemented it according to this idea:
# 分别计算一个batch中所有图片中的最大channel(3), height, width
max_size = self.max_by_axis([list(img.shape) for img in images])

# 将刚刚获得的size取离32最近的整数倍值,一种玄学,就是32的倍数更利于训练,比如2的n次方
stride = float(size_divisible)
# 将height向上调整到stride的整数倍
max_size[1] = int(math.ceil(float(max_size[1]) / stride) * stride)
# 将width向上调整到stride的整数倍
max_size[2] = int(math.ceil(float(max_size[2]) / stride) * stride)

# 构建训练batch:[batch, channel, height, width]
batch_shape = [len(images)] + max_size

# 创建shape为batch_shape且值全部为0的tensor
# images[0]中的索引无所谓,只是利用new_full方法,即以batch_shape为shape创建一个tensor,其值全为0
batched_imgs = images[0].new_full(batch_shape, 0)
for img, pad_img in zip(images, batched_imgs):
    # 将输入images中的每张图片复制到新的batched_imgs的每张图片中,对齐左上角,保证bboxes的坐标不变
    # 这样保证输入到网络中一个batch的每张图片的shape相同
    # 0 : img.shape[0],channel维度 ; : img.shape[1] : 图像高 ; : img.shape[2],图像高
    pad_img[: img.shape[0], : img.shape[1], : img.shape[2]].copy_(img)
Among them, there is another method max_by_axis, see below.
max_by_axis method:
The function of this method is to find the maximum value of the number of channels, width and height in the image . Of course, the number of channels is the same, 3.
This method is implemented with two layers of loops. The idea of implementation is somewhat similar to the bubble sort in the sorting algorithm, that is, first find a temporary variable as the maximum value, and then keep comparing, whoever is bigger will replace it:
# 将索引为0的值给maxes
maxes = the_list[0]
# 从索引为1的开始遍历
for sublist in the_list[1:]:
    # 将当前索引的值与前一个最大的值比较,如果比它大,则重新设置最大值
    for index, item in enumerate(sublist):
        maxes[index] = max(maxes[index], item)
# 返回最大值
return maxes
forward method:
This method is the forward propagation process of this class .
Input parameters:
| parameter | significance |
|---|---|
| images | Input image list (number of a batch) |
| targets | Information corresponding to the image |
First, convert the input image parameter into a list:
# 获取图像列表
images = [img for img in images]
Then, iterate through the images, normalizing and scaling each image:
# 遍历图像
for i in range(len(images)):
    # 复制一份图像
    image = images[i]
    # 判断target是否为空,
    target_index = targets[i] if targets is not None else None

    # 判断图片维度是否为3
    if image.dim() != 3:
        raise ValueError("images is expected to be a list of 3d tensors "
                         "of shape [C, H, W], got {}".format(image.shape))
	# 对图像进行标准化处理
    image = self.normalize(image)
    # 对图像和对应的bboxes缩放到指定范围
    image, target_index = self.resize(image, target_index)
    # 替换图像
    images[i] = image
    # 判断图像是否为空
    if targets is not None and target_index is not None:
        # 替换target,即替换resize后的box
        targets[i] = target_index
Next, pack the picture into a batch, and because the box needs to be mapped back to the original image at the end, it is necessary to record the resized size (the size may be different) and the packed size (the size is the same):
# 记录resize后的图像尺寸。此时图片的尺寸可能不同
image_sizes = [img.shape[-2:] for img in images]
# 将images打包成一个batch,此时图像大小尺寸相同了
images = self.batch_images(images)
# 指定image_list格式
image_sizes_list = torch.jit.annotate(List[Tuple[int, int]], [])

# 遍历image_sizes
for image_size in image_sizes:
    # 如果image_size长度为2,报错
    assert len(image_size) == 2
    # 将值打包为一个tuple,传入一个list中,符合image_sizes_list格式
    image_sizes_list.append((image_size[0], image_size[1]))

# ImageList类:将两者关联一起
#  images :打包后一个独立的tensor变量
# image_sizes_list: 打包前的图像尺寸信息
# 主要方便后期绘图,因为图像原尺寸就在xml文件中,所以需要记录一下resiz后的尺寸和打包后的尺寸
image_list = ImageList(images, image_sizes_list)
# 得到即将输入backbone的信息
return image_list, targets
postprocess method:
This method is to post-process the prediction results of the network (mainly restore the bboxes to the original image scale) .
Input parameters:
| parameter | significance |
|---|---|
| result | Network prediction results (bbox information and category information) |
| image_shapes | Size after image preprocessing and scaling (that is, after packaging) |
| original_image_sizes | The original size of the image (that is, the size after scaling to the specified range) |
First, judge whether it is training mode, if yes, no post-processing is required:
# 如果为训练模式,不需要后处理
if self.training:
	return result
Then, to zoom and map, or use resize_boxesthe method, this is very simple:
# 遍历每张图片的预测信息,将boxes信息还原回原尺度
for i, (pred, im_s, o_im_s) in enumerate(zip(result, image_shapes, original_image_sizes)):
    # 获取预测结果的boxes信息
    boxes = pred["boxes"]
    # 通过resize_boxes(box信息,原始尺寸,要转为的尺寸)
    boxes = resize_boxes(boxes, im_s, o_im_s)  # 将bboxes缩放回原图像尺度上
    # 替换
    result[i]["boxes"] = boxes
4.2 _resize_image function:
Role: Change the size of the image.
Input parameters:
| parameter | significance |
|---|---|
| image | input image |
| self_min_size | Minimum size allowed |
| self_max_size | maximum size allowed |
The implementation idea of this function is: first obtain the width and height of the image, and set the maximum and minimum values of the width and height; then, divide the allowed minimum size by the minimum value of the image width and height to obtain the scaling factor; if the maximum size of the image If the multiplied scaling factor is smaller than the maximum size allowed, then the image can be scaled, otherwise the scaling factor needs to be modified.
See the comments for the specific content of the code:
# 获取图像原尺寸信息
im_shape = torch.tensor(image.shape[-2:])
min_size = float(torch.min(im_shape))    # 获取高宽中的最小值
max_size = float(torch.max(im_shape))    # 获取高宽中的最大值
scale_factor = self_min_size / min_size  # 根据指定最小边长和图片最小边长计算缩放比例

# 如果使用该缩放比例计算的图片最大边长大于指定的最大边长
if max_size * scale_factor > self_max_size:
    # 重新指定缩放因子
    scale_factor = self_max_size / max_size  # 将缩放比例设为指定最大边长和图片最大边长之比

# interpolate利用插值的方法缩放图片
# image[None]操作是在最前面添加batch维度[C, H, W] -> [1, C, H, W]
# 原因:bilinear(双线性插值)只支持4D Tensor
image=torch.nn.functional.interpolate(image[None],scale_factor=scale_factor,mode="bilinear",recompute_scale_factor=True,align_corners=False)[0]
4.3 resize_boxes function:
Function: Scale the boxes parameter according to the scaling of the image .
Input parameters:
| parameter | significance |
|---|---|
| boxes | The box to be scaled |
| original_size | The size of the image before scaling |
| new_size | Image scaled size |
First, get the scaling factor of width and height:
# 获取宽度和高度方向的缩放因子
# 下面的/为除号
ratios = [
    torch.tensor(s, dtype=torch.float32, device=boxes.device) /
    torch.tensor(s_orig, dtype=torch.float32, device=boxes.device)
    for s, s_orig in zip(new_size, original_size)
]
ratios_height, ratios_width = ratios
Next, get the four coordinate information of the box, multiply it by the scaling factor to get the new coordinate value, and finally splice it back:
# boxes [minibatch, 4],
# boxes.unbind(1)表示在4这个维度展开,得到坐标值
xmin, ymin, xmax, ymax = boxes.unbind(1)
# 缩放
xmin = xmin * ratios_width
xmax = xmax * ratios_width
ymin = ymin * ratios_height
ymax = ymax * ratios_height
# 将坐标拼接,然后返回去
return torch.stack((xmin, ymin, xmax, ymax), dim=1)
5. Summary:
From the beginning of this article, it is to explain the implementation of the specific architecture of Faster-RCNN. This article mainly explains the functions and functions of the auxiliary files. One of the more important files is transform.py.