Simple use of Ajax in php
How to use Ajax in jQuery?
Two methods get() and post() are encapsulated in jQuery, which are used to request data from the server through HTTP GET or POST requests.
Two common methods for request-response on client and server side are: GET and POST.
- GET - request data from the specified resource
- POST - Submits data to be processed to the specified resource
GET is basically used to get (retrieve) data from the server. Note: The GET method may return cached data.
POST can also be used to fetch data from the server. However, the POST method does not cache data and is often used to send data along with the request.
1. get
The $.get() method requests data from the server via an HTTP GET request.
Grammar format :
$.get(URL,callback);
或
$.get( URL [, data ] [, callback ] [, dataType ] )
- URL : The URL string to send the request to.
- data : Optional, a string or key/value pair sent to the server.
- callback : Optional, the callback function to be executed after the request is successful.
- dataType : optional, the data type returned from the server. (can be xml, json, script, or html).
$.get() usage example:
<button id="btn1">get</button>
$("#btn1").click(function (){


    // get 格式 $.get(url,callback) $.get(url连接,回调函数)
    $.get("请求url",function (data,status){


        alert(data+"状态:"+status);
    })
});
2. post
The $.post() method submits data to the server through an HTTP POST request
Grammar format:
$.post(URL,callback);
或
$.post( URL [, data ] [, callback ] [, dataType ] )
- URL : The URL string to send the request to.
- data : Optional, a string or key/value pair sent to the server.
- callback : Optional, the callback function to be executed after the request is successful.
- dataType : optional, the data type returned from the server. (can be xml, json, script, or html).
The way $.post() is often used:
 <!--  利用ajax 完成 表单数据的上传  -->
<form>
    <input type="text" id="uname" name="uname"><br>
    <input type="password" id="upwd" name="upwd"><br>
    <input type="button" value="提交" id="btn2">
</form>
$("#btn2").click(function (){


    $.post("请求url",{


        // 封装表单需要的字段及数据
        "uname":$("#uname").val(),// uname="xxx"
        "upwd":$("#upwd").val()// upwd="xxx"
    },function (data,status) {


        if(status=="success"){


            alert('请求成功);
        }else{


            alert('请求失败);
        }
    })
})
Example: login combined with the use of ajax
For convenience, we directly use the layui framework to quickly complete the construction of the front-end page
Front-end part (login.html)
<!DOCTYPE html>
<html lang="en">
<head>
<meta charset="UTF-8">
<title>Title</title>
<!-- 引入 layui.css -->
<link href="//unpkg.com/[email protected]/dist/css/layui.css" rel="stylesheet">
<!-- 引入 layui.js -->
<script src="//unpkg.com/[email protected]/dist/layui.js"></script>
<!--jquery cdn-->
<script src="https://apps.bdimg.com/libs/jquery/2.1.4/jquery.min.js"> </script>
</head>
<body>
<style>
.demo-login-container{
width: 320px; margin: 21px auto 0;margin-top: 200px;}
.demo-login-other .layui-icon{
position: relative; display: inline-block; margin: 0 2px; top: 2px; font-size: 26px;}
</style>
<form class="layui-form">
<div class="demo-login-container">
<div class="layui-form-item">
<div class="layui-input-wrap">
<div class="layui-input-prefix">
<i class="layui-icon layui-icon-username"></i>
</div>
<input type="text" name="username" value="" lay-verify="required" placeholder="用户名" lay-reqtext="请填写用户名"
autocomplete="off" class="layui-input" lay-affix="clear" id="uname">
</div>
</div>
<div class="layui-form-item">
<div class="layui-input-wrap">
<div class="layui-input-prefix">
<i class="layui-icon layui-icon-password"></i>
</div>
<input type="password" name="password" value="" lay-verify="required" placeholder="密 码" lay-reqtext="请填写密码"
autocomplete="off" class="layui-input" lay-affix="eye" id="upwd">
</div>
</div>
<div class="layui-form-item">
<button class="layui-btn layui-btn-fluid" lay-verify="required" id="login" type="button">登录</button>
</div>
<div class="layui-form-item demo-login-other">
<label>社交账号登录</label>
<span style="padding: 0 21px 0 6px;">
<a href="javascript:;"><i class="layui-icon layui-icon-login-qq" style="color: #3492ed;"></i></a>
<a href="javascript:;"><i class="layui-icon layui-icon-login-wechat" style="color: #4daf29;"></i></a>
<a href="javascript:;"><i class="layui-icon layui-icon-login-weibo" style="color: #cf1900;"></i></a>
</span>
或 <a href="form.html#reg">注册帐号</a></span>
</div>
</div>
</form>
<script>
// 这里为了方便直接调用ajax来做弹出层
$("#login").click(function () {
$.post("main_post.php",{
// 设定post表单的数据 username="xxx" password="xxx"
"username":$("#uname").val(),
"password":$("#upwd").val()
},function (data,status) {
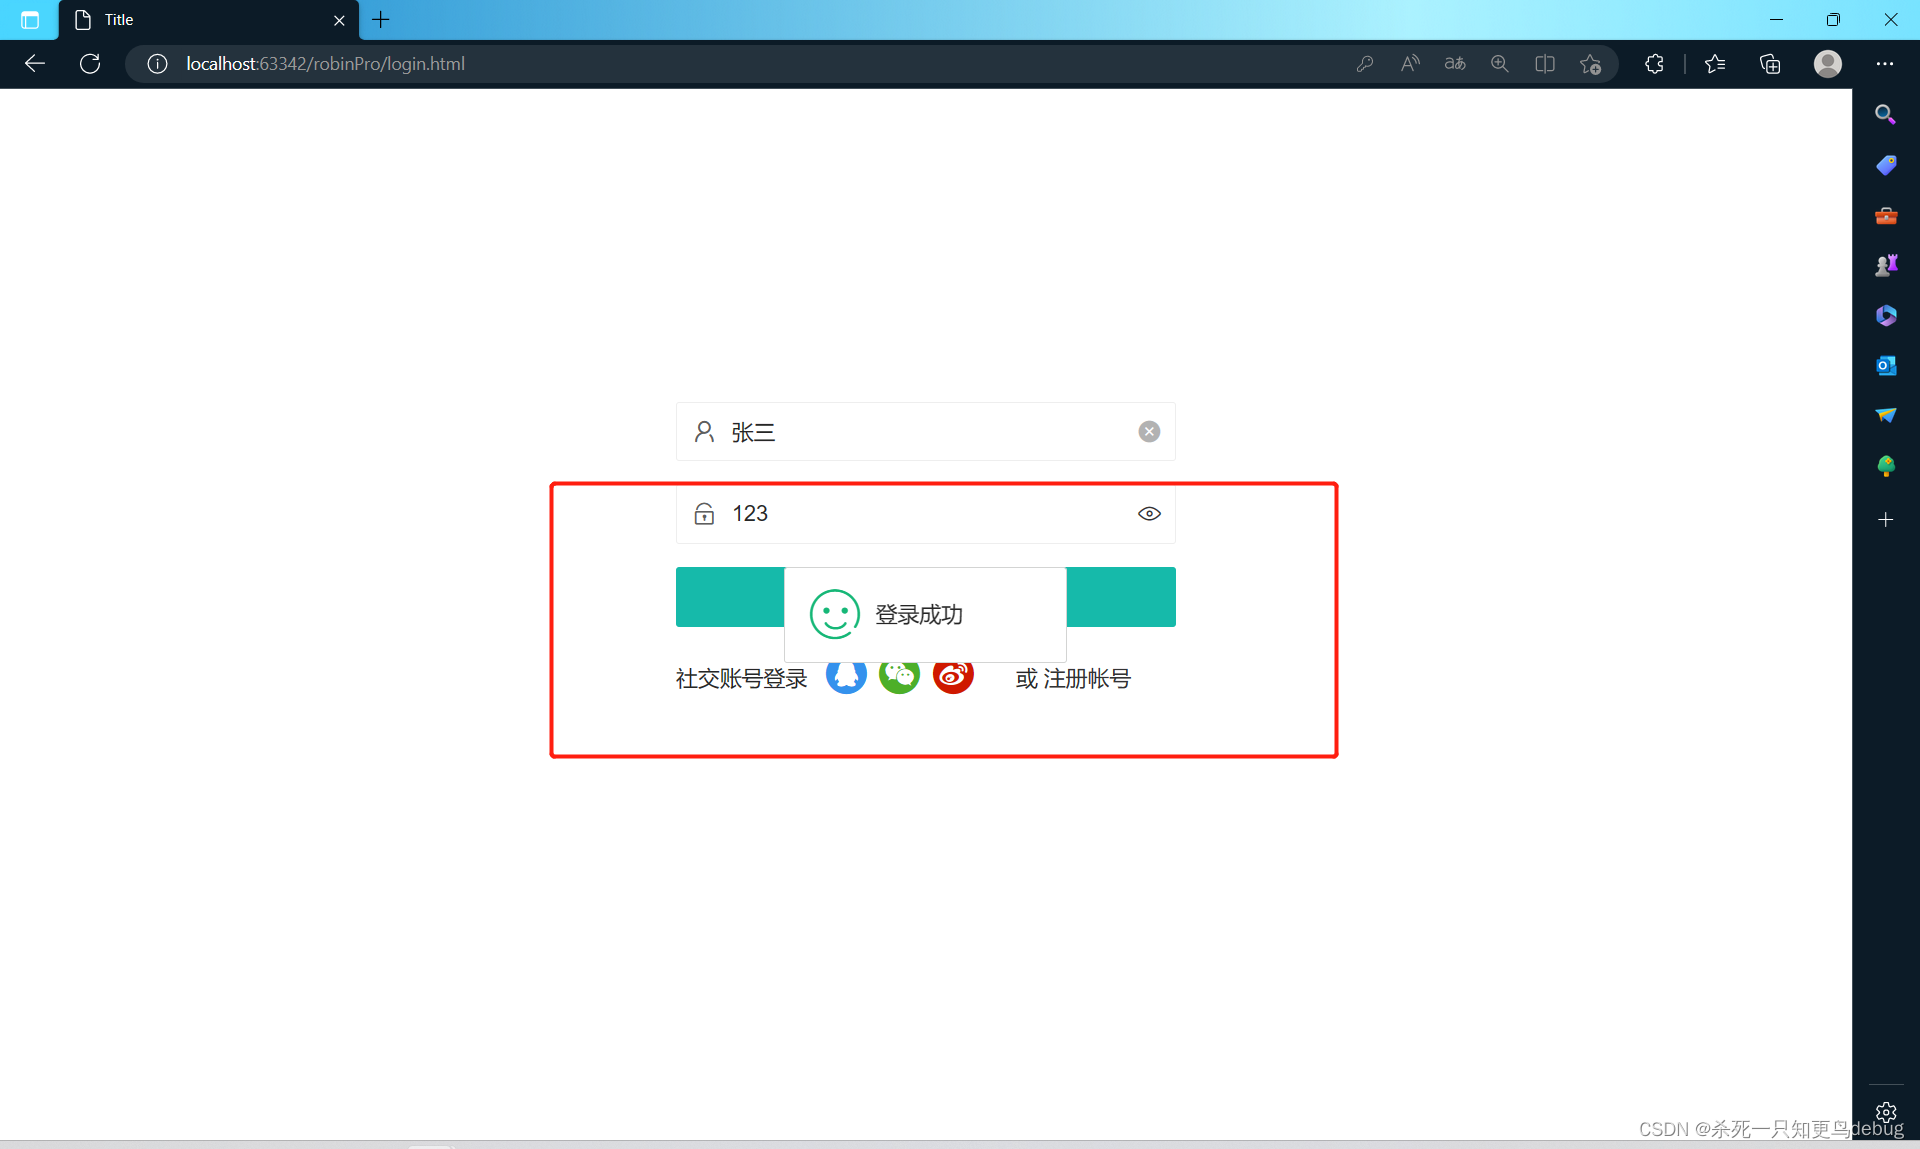
if(data=="ok"&&status=="success"){
layer.msg('登录成功', {
icon: 6});
}else{
layer.msg('登录失败', {
icon: 5});
}
})
})
</script>
</body>
</html>
Backend section (main_post.php)
<?php
if($_POST){
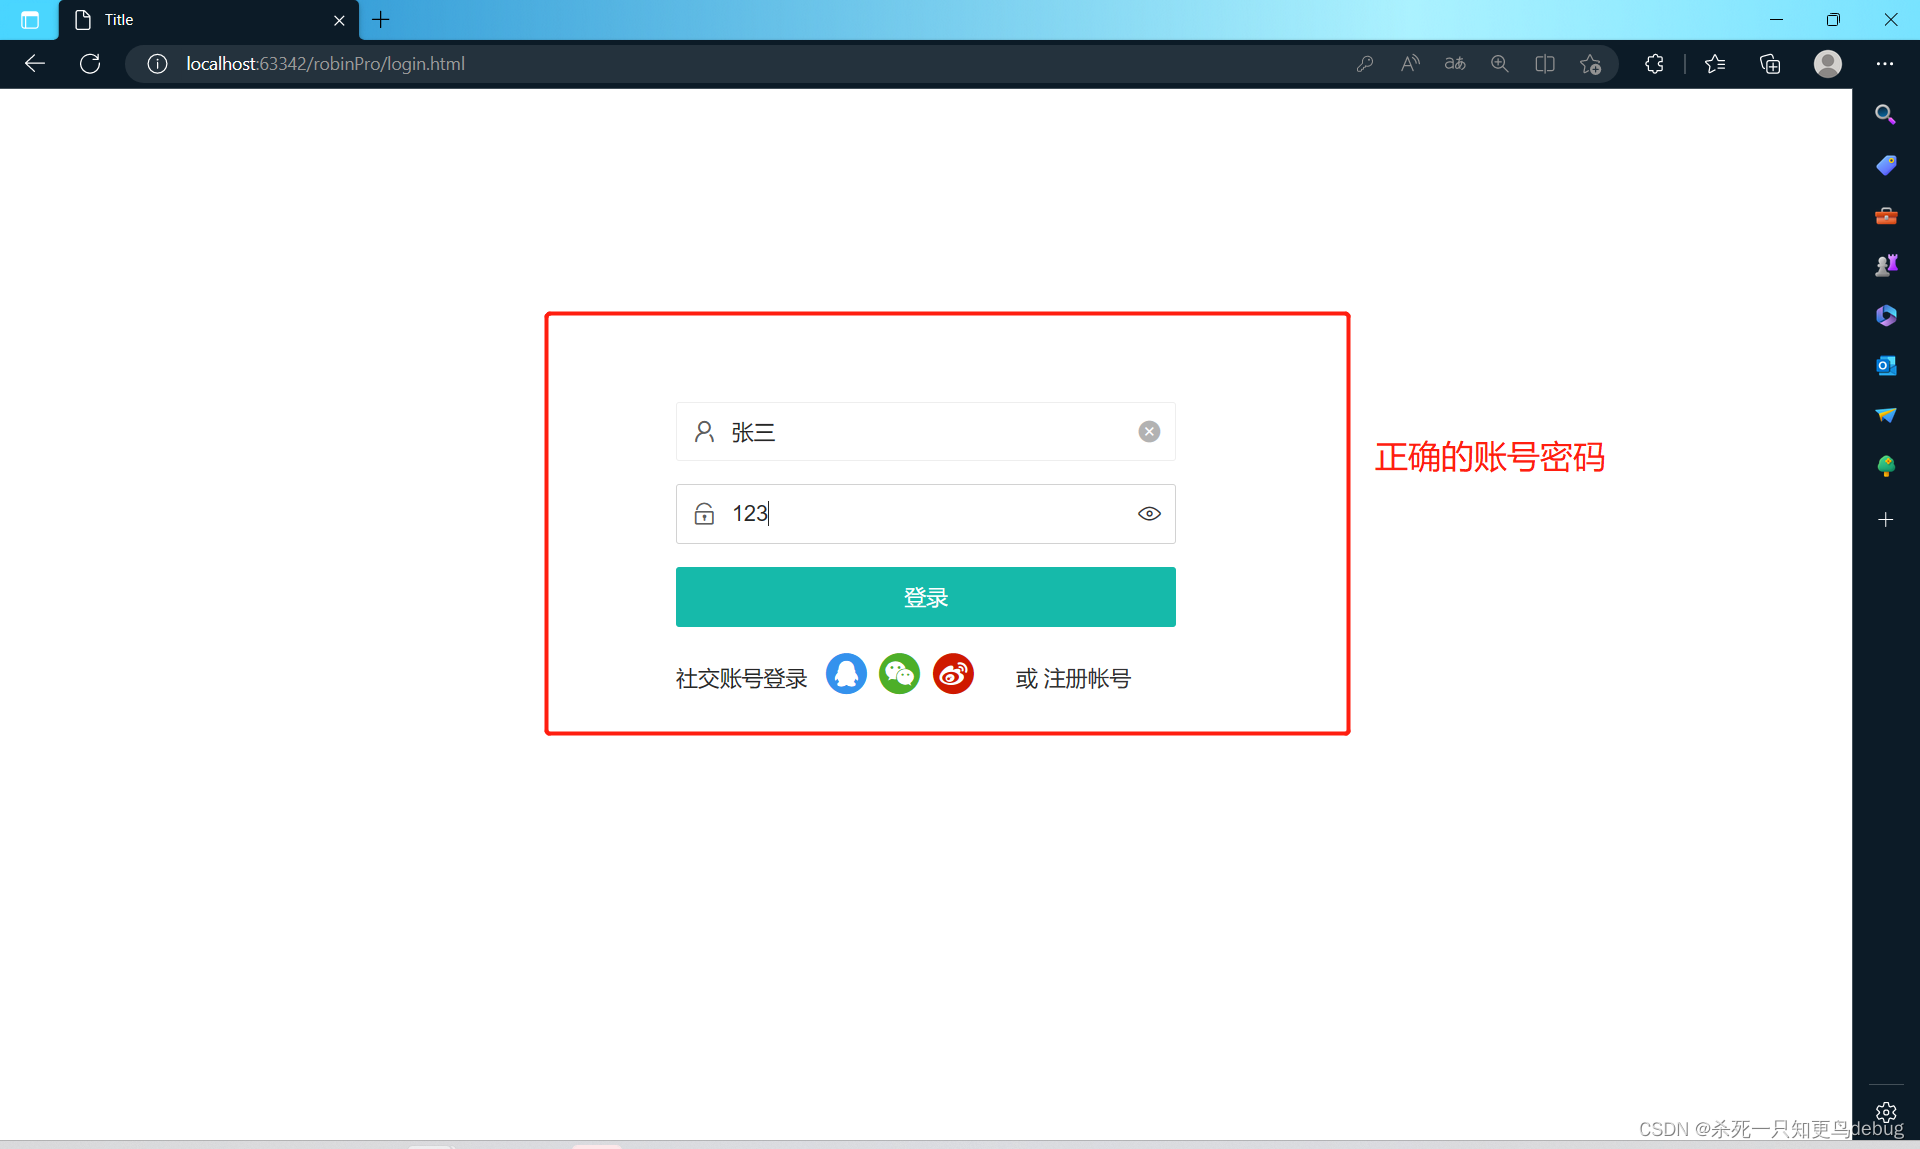
// 只要输入名为 张三 密码为123,即认为正确登录(实际上肯定是去查询数据库,这里我就简单演示下)
$uname = $_POST['username'];
$upwd = $_POST['password'];
if($uname=="张三"&&$upwd=="123"){
echo "ok";
}else{
echo "no";
}
}
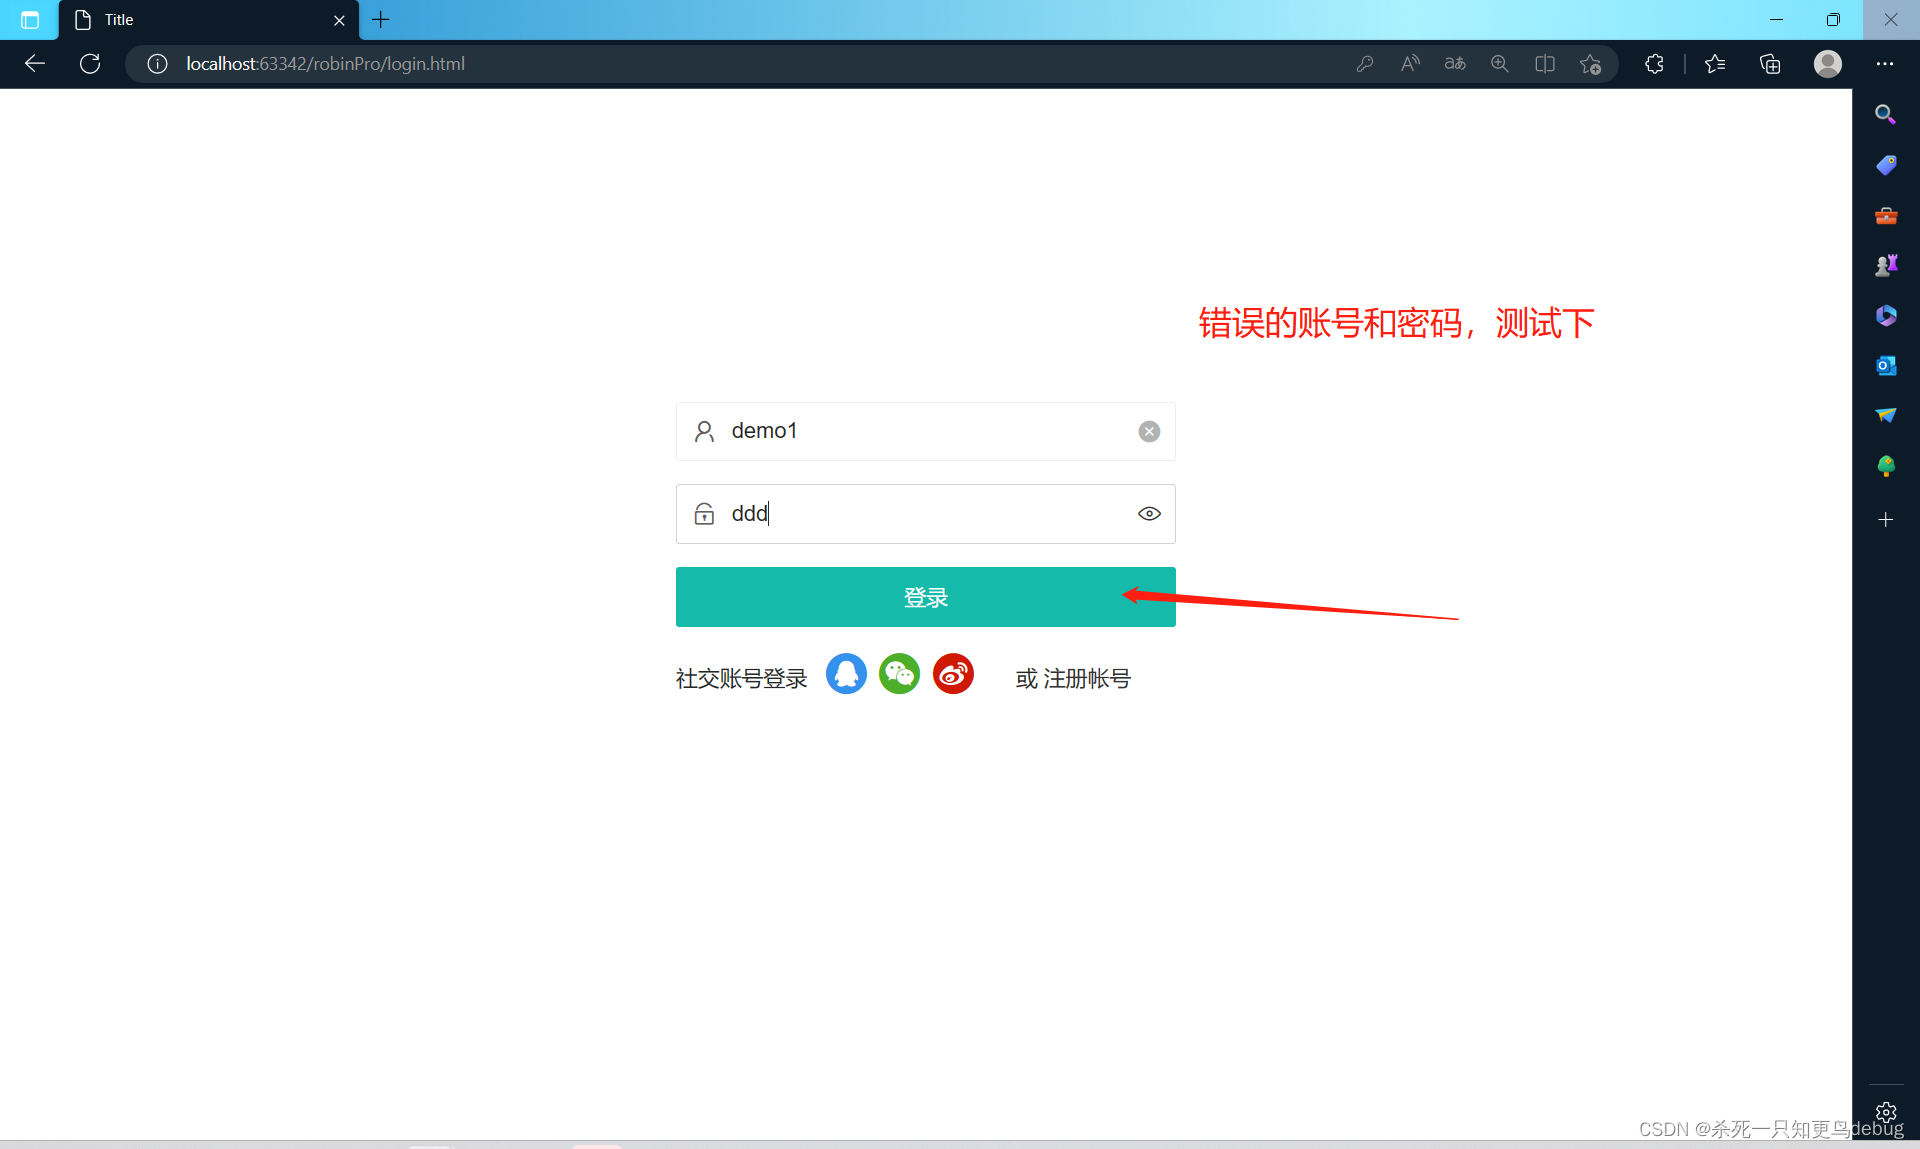
run test
1. Test the wrong data

2. Test the correct data
Calling Ajax in jQuery is really convenient, and adjusting the API is delicious!