Table of contents
Getting Started Case Workflow Analysis
Five types of parameter passing
Presentation layer encapsulates data
Project exception handling plan
Case: SSM integration standard development
Interceptor chain configuration
Introduction to Spring MVC
Overview of Spring MVC
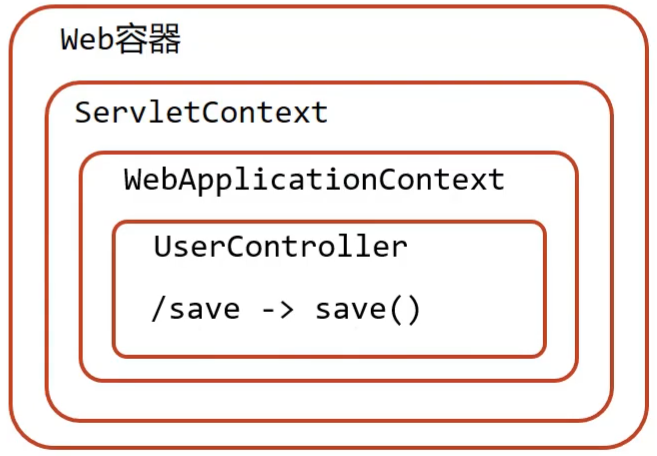
浏览器发送一个请求给后端服务器,后端服务器现在是使用Servlet来接收请求和数据
如果所有的处理都交给Servlet来处理的话,所有的东西都耦合在一起,对后期的维护和扩展极为不利
将后端服务器Servlet拆分成三层,分别是web 、 service 和dao

web层主要由servlet来处理,负责页面请求和数据的收集以及响应结果给前端service层主要负责业务逻辑的处理
dao层主要负责数据的增删改查操作
servlet处理请求和数据的时候,存在的问题是一个servlet只能处理一个请求

针对web层进行了优化,采用了MVC设计模式,将其设计为controller 、 view 和Model

controller负责请求和数据的接收,接收后将其转发给service进行业务处理service根据需要会调用dao对数据进行增删改查
dao把数据处理完后将结果交给service,service再交给controller
controller根据需求组装成Model和View,Model和View组合起来生成页面转发给前端浏览器
这样做的好处就是controller可以处理多个请求,并对请求进行分发,执行不同的业务操作。


因为是异步调用,所以后端不需要返回view视图,将其去除
前端如果通过异步调用的方式进行交互,后台就需要将返回的数据转换成json格式进行返回
SpringMVC主要负责的就是
controller如何接收请求和数据
如何将请求和数据转发给业务层
如何将响应数据转换成json发回到前端
SpringMVC是一种基于Java实现MVC模型的轻量级Web框架
优点
使用简单、开发便捷(相比于Servlet)
灵活性强
小结
1.SpringMVC是一种表现层框架技术
2.SpringMVC用于表现层功能开发
Getting Started Case
Implementation process
1. Create a web project (Maven structure )
2. Set tomcat server, load web project (tomcat plug-in )
3. Import coordinates ( SpringMVC +Servlet )4. Define the functional class that handles the request ( UserController )
5. Set the request mapping ( configuration mapping relationship )6. Load SpringMVC settings into the Tomcat container
Step 1: Create a Maven project
Step 2 : Import the jar package
<?xml version="1.0" encoding="UTF-8"?>
<project xmlns="http://maven.apache.org/POM/4.0.0"
         xmlns:xsi="http://www.w3.org/2001/XMLSchema-instance"
         xsi:schemaLocation="http://maven.apache.org/POM/4.0.0 http://maven.apache.org/xsd/maven-4.0.0.xsd">
    <modelVersion>4.0.0</modelVersion>

    <groupId>org.example</groupId>
    <artifactId>springmvc_01_quickstart</artifactId>
    <version>1.0-SNAPSHOT</version>
    <packaging>war</packaging>

    <properties>
        <maven.compiler.source>13</maven.compiler.source>
        <maven.compiler.target>13</maven.compiler.target>
    </properties>

    <dependencies>
        <!--导入SpringMVC和Servlet坐标-->
        <dependency>
            <groupId>javax.servlet</groupId>
            <artifactId>javax.servlet-api</artifactId>
            <version>3.1.0</version>
            <scope>provided</scope>
        </dependency>
        <dependency>
            <groupId>org.springframework</groupId>
            <artifactId>spring-webmvc</artifactId>
            <version>5.2.10.RELEASE</version>
        </dependency>
    </dependencies>


    <build>
        <plugins>
            <plugin>
                <groupId>org.apache.tomcat.maven</groupId>
                <artifactId>tomcat7-maven-plugin</artifactId>
                <version>2.2</version>
<!--                <configuration>-->
<!--                    <port>80</port>-->
<!--                    <path>/</path>-->
<!--                </configuration>-->
            </plugin>
        </plugins>
    </build>
</project>
说明:servlet的坐标为什么需要添加<scope>provided</scope>
scope是maven中jar包依赖作用范围的描述,
如果不设置默认是compile 在在编译、运行、测试时均有效
如果运行有效的话就会和tomcat中的servlet-api包发生冲突,导致启动报错
provided代表的是该包只在编译和测试的时候用,运行的时候无效直接使用tomcat中的,就避免冲突
Step 3 : Create configuration class
//3、创建springmvc的配置文件,加载controller对应的bean
@Configuration
@ComponentScan("com.green.controller")
public class SpringMvcConfig {
}
Step 4 : Create Controller class
//2.定义controller
//2.1使用@Controller定义Bean
@Controller
public class UserController {

    //2.2设置当前操作的访问路径
    @RequestMapping("/save")
    //2.3设置当前返回值类型
    @ResponseBody
    public String save() {
        System.out.println("user save...");
        return "{'module' : 'springmvc'}";
    }

    @RequestMapping("/delete")
    @ResponseBody
    public String delete() {
        System.out.println("user delete...");
        return "{'module' : 'springmvc delete'}";
    }
}
Step 5 : Replace web.xml with configuration class
将web.xml删除,换成ServletContainersInitConfig
//4、定义一个Servlet容器启动的配置类,在里面加载spring的配置
public class ServletContainersInitConfig extends AbstractDispatcherServletInitializer {

    //加载SpringMVC容器配置
    @Override
    protected WebApplicationContext createServletApplicationContext() {
        AnnotationConfigWebApplicationContext ctx = new AnnotationConfigWebApplicationContext();
        ctx.register(SpringMvcConfig.class);
        return ctx;
    }

    //设置哪些请求归属SpringMVC处理
    @Override
    protected String[] getServletMappings() {
        return new String[]{"/"};
    }

    //加载spring容器配置
    @Override
    protected WebApplicationContext createRootApplicationContext() {
        return null;
    }
}
Step 8: Start and run the project
Step 9: Browser access
| name |
@Controller |
| type |
class annotation |
| Location |
Above the SpringMVC controller class definition |
| effect |
Set the core controller of SpringMVC to be an |
| name |
@RequestMapping |
| type |
class annotation or method annotation |
| Location |
Above the SpringMVC controller class or method definition |
| effect |
Set the current controller method request access path |
| related attributes |
value ( default ) , request access path |
| name |
@ResponseBody |
| type |
class annotation or method annotation |
| Location |
Above the SpringMVC controller class or method definition |
| effect |
Set the response content as the current return value without parsing |
Getting Started Case Workflow Analysis
一次性工作
创建工程,设置服务器,加载工程导入坐标
创建web容器启动类,加载SpringMVC配置,并设置SpringMVC请求拦截路径
SpringMVC核心配置类(设置配置类,扫描controller包,加载Controller控制器bean)

多次工作
定义处理请求的控制器类
定义处理请求的控制器方法,并配置映射路径(@RequestMapping)与返回json数据(@ResponseBody)
Workflow Analysis
Start the server initialization process
1. 服务器启动,执行ServletContainersInitConfig类,初始化web容器
    功能类似于以前的web.xml
2. 执行createServletApplicationContext方法,创建了WebApplicationContext对象
    该方法加载SpringMVC的配置类SpringMvcConfig来初始化SpringMVC的容器
3. 加载SpringMvcConfig配置类
4.  执行@ComponentScan加载对应的bean
    扫描指定包及其子包下所有类上的注解,如Controller类上的@Controller注解
5. 加载UserController,每个@RequestMapping的名称对应一个具体的方法
    此时就建立了 /save  和 save方法的对应关系
6. 执行getServletMappings方法,设定SpringMVC拦截请求的路径规则
    / 代表所拦截请求的路径规则,只有被拦截后才能交给SpringMVC来处理请求
single request process
1. 发送请求http://localhost/save
2. web容器发现该请求满足SpringMVC拦截规则,将请求交给SpringMVC处理
3. 解析请求路径/save
4. 由/save匹配执行对应的方法save()
    上面的第五步已经将请求路径和方法建立了对应关系,通过/save就能找到对应的save方法
5. 执行save()
6. 检测到有@ResponseBody直接将save()方法的返回值作为响应
Controller loading control
bean loading control
config目录存入的是配置类,写过的配置类有:
    ServletContainersInitConfig
    SpringConfig
    SpringMvcConfig
    JdbcConfig
    MybatisConfig
controller目录存放的是SpringMVC的controller类
service目录存放的是service接口和实现类
dao目录存放的是dao/Mapper接口

controller、service和dao这些类都需要被容器管理成bean对象,那么到底是该让SpringMVC加载还是让Spring加载呢?

SpringMVC加载其相关bean(表现层bean),也就是controller包下的类
Spring控制的bean
    业务bean(Service)
    功能bean(DataSource,SqlSessionFactoryBean,MapperScannerConfigurer等)
在SpringMVC的配置类SpringMvcConfig 中使用注解@ComponentScan ,
所以只需要将其扫描范围设置到controller即可
Because of different functions, how to avoid Spring error loading into SpringMVC bean ?
Idea analysis
加载Spring控制的bean的时候排除掉SpringMVC控制的bean具体该如何排除:
方式一:Spring加载的bean设定扫描范围为精准范围,例如service包、dao包等
方式二:Spring加载的bean设定扫描范围为com.green,排除掉controller包中的bean
方式三:不区分Spring与SpringMVC的环境,加载到同一个环境中[了解即可]
Environmental preparation
pom.xml adds Spring dependency
<?xml version="1.0" encoding="UTF-8"?>
<project xmlns="http://maven.apache.org/POM/4.0.0"
         xmlns:xsi="http://www.w3.org/2001/XMLSchema-instance"
         xsi:schemaLocation="http://maven.apache.org/POM/4.0.0 http://maven.apache.org/xsd/maven-4.0.0.xsd">
    <modelVersion>4.0.0</modelVersion>

    <groupId>org.example</groupId>
    <artifactId>spring_02_bean_load</artifactId>
    <version>1.0-SNAPSHOT</version>
    <packaging>war</packaging>

    <properties>
        <maven.compiler.source>13</maven.compiler.source>
        <maven.compiler.target>13</maven.compiler.target>
    </properties>

    <dependencies>
        <!--导入SpringMVC和Servlet坐标-->
        <dependency>
            <groupId>javax.servlet</groupId>
            <artifactId>javax.servlet-api</artifactId>
            <version>3.1.0</version>
            <scope>provided</scope>
        </dependency>
        <dependency>
            <groupId>org.springframework</groupId>
            <artifactId>spring-webmvc</artifactId>
            <version>5.2.10.RELEASE</version>
        </dependency>

        <dependency>
            <groupId>javax.servlet</groupId>
            <artifactId>javax.servlet-api</artifactId>
            <version>3.1.0</version>
            <scope>provided</scope>
        </dependency>

        <dependency>
            <groupId>com.alibaba</groupId>
            <artifactId>druid</artifactId>
            <version>1.1.16</version>
        </dependency>

        <dependency>
            <groupId>org.mybatis</groupId>
            <artifactId>mybatis</artifactId>
            <version>3.5.6</version>
        </dependency>

        <dependency>
            <groupId>mysql</groupId>
            <artifactId>mysql-connector-java</artifactId>
            <version>5.1.47</version>
        </dependency>

        <dependency>
            <groupId>org.springframework</groupId>
            <artifactId>spring-jdbc</artifactId>
            <version>5.2.10.RELEASE</version>
        </dependency>

        <dependency>
            <groupId>org.mybatis</groupId>
            <artifactId>mybatis-spring</artifactId>
            <version>1.3.0</version>
        </dependency>

    </dependencies>


    <build>
        <plugins>
            <plugin>
                <groupId>org.apache.tomcat.maven</groupId>
                <artifactId>tomcat7-maven-plugin</artifactId>
                <version>2.2</version>
                <!--                <configuration>-->
                <!--                    <port>80</port>-->
                <!--                    <path>/</path>-->
                <!--                </configuration>-->
            </plugin>
        </plugins>
    </build>

</project>
Create the corresponding configuration class
//简化开发
public class ServletContainersInitConfig extends AbstractAnnotationConfigDispatcherServletInitializer {

    @Override
    protected Class<?>[] getRootConfigClasses() {
        return new Class[]{SpringConfig.class};
    }

    @Override
    protected Class<?>[] getServletConfigClasses() {
        return new Class[]{SpringMvcConfig.class};
    }

    @Override
    protected String[] getServletMappings() {
        return new String[]{"/"};
    }
}

/*
//4、定义一个Servlet容器启动的配置类,在里面加载spring的配置
public class ServletContainersInitConfig extends AbstractDispatcherServletInitializer {

    //加载SpringMVC容器配置
    @Override
    protected WebApplicationContext createServletApplicationContext() {
        AnnotationConfigWebApplicationContext ctx = new AnnotationConfigWebApplicationContext();
        ctx.register(SpringMvcConfig.class);
        return ctx;
    }

    //加载spring容器配置
    @Override
    protected WebApplicationContext createRootApplicationContext() {
        AnnotationConfigWebApplicationContext ctx = new AnnotationConfigWebApplicationContext();
        ctx.register(SpringConfig.class);
        return ctx;
    }

    //设置哪些请求归属SpringMVC处理
    @Override
    protected String[] getServletMappings() {
        return new String[]{"/"};
    }
}
*/

@Configuration
//@ComponentScan({"com.green.service","com.green.dao"})
@ComponentScan(value = "com.green",
            excludeFilters = @ComponentScan.Filter(
                    type = FilterType.ANNOTATION,   //按注解排除
                    classes = Controller.class
            )
)
public class SpringConfig {
}

//3、创建springmvc的配置文件,加载controller对应的bean
//@Configuration
@ComponentScan("com.green.controller")
public class SpringMvcConfig {
}
编写Controller,Service,Dao,Domain类
//2.定义controller
//2.1使用@Controller定义Bean
@Controller
public class UserController {
//2.2设置当前操作的访问路径
@RequestMapping("/save")
//2.3设置当前返回值类型
@ResponseBody
public String save() {
System.out.println("user save...");
return "{'module' : 'springmvc'}";
}
@RequestMapping("/delete")
@ResponseBody
public String delete() {
System.out.println("user delete...");
return "{'module' : 'springmvc delete'}";
}
}
public interface UserService {
void save(User user);
}
@Service
public class UserServiceImpl implements UserService {
@Override
public void save(User user) {
System.out.println("user service ...");
}
}
public interface UserDao {
@Insert("insert into tbl_user(name ,age)values (#{name},#{age})")
void save(User user);
}
public class User {
private Integer id;
private String name;
private Integer age;
//setter..getter..toString略
}excludeFilters属性:设置扫描加载bean时,排除的过滤规则
type属性:设置排除规则,当前使用按照bean定义时的注解类型进行排除
ANNOTATION:按照注解排除
ASSIGNABLE_TYPE:按照指定的类型过滤
ASPECTJ:按照Aspectj表达式排除,基本上不会用
REGEX:按照正则表达式排除
CUSTOM:按照自定义规则排除
classes属性:设置排除的具体注解类,当前设置排除@Controller定义的bean运行测试类
public class test {
public static void main(String[] args) {
AnnotationConfigApplicationContext ctx = new AnnotationConfigApplicationContext(SpringConfig.class);
UserController userController = ctx.getBean(UserController.class);
System.out.println(userController);
}
}Note : When testing, you need to annotate the @ComponentScan annotation on the SpringMvcConfig configuration class , otherwise no error will be reported
| name |
@ComponentScan |
| type |
class annotation |
| Location |
above the class definition |
| effect |
Set the spring configuration class scanning path for loading be an defined in the annotation format |
| related attributes |
excludeFilters: Exclude beans loaded in the scan path , you need to specify the category (type) and specific items (classes) includeFilters: To load the specified bean , you need to specify the category (type) and specific items (c lasses) |
PostMan
PostMan是一款功能强大的网页调试与发送网页HTTP请求的Chrome插件。
作用:常用于进行接口测试
特征:
    简单
    实用
    美观
    大方
PostMan installation
Create a WorkSpace workspace

send request

save current request

request and response
Set request mapping path
Environmental preparation
pom.xml adds Spring dependency
 <dependencies>
        <!--导入SpringMVC和Servlet坐标-->
        <dependency>
            <groupId>javax.servlet</groupId>
            <artifactId>javax.servlet-api</artifactId>
            <version>3.1.0</version>
            <scope>provided</scope>
        </dependency>
        <dependency>
            <groupId>org.springframework</groupId>
            <artifactId>spring-webmvc</artifactId>
            <version>5.2.10.RELEASE</version>
        </dependency>

        <dependency>
            <groupId>com.alibaba</groupId>
            <artifactId>druid</artifactId>
            <version>1.1.16</version>
        </dependency>

        <dependency>
            <groupId>org.mybatis</groupId>
            <artifactId>mybatis</artifactId>
            <version>3.5.6</version>
        </dependency>

        <dependency>
            <groupId>mysql</groupId>
            <artifactId>mysql-connector-java</artifactId>
            <version>5.1.47</version>
        </dependency>

        <dependency>
            <groupId>org.springframework</groupId>
            <artifactId>spring-jdbc</artifactId>
            <version>5.2.10.RELEASE</version>
        </dependency>

        <dependency>
            <groupId>org.mybatis</groupId>
            <artifactId>mybatis-spring</artifactId>
            <version>1.3.0</version>
        </dependency>

    </dependencies>

    <build>
        <plugins>
            <plugin>
                <groupId>org.apache.tomcat.maven</groupId>
                <artifactId>tomcat7-maven-plugin</artifactId>
                <version>2.2</version>
                                <configuration>
                <!--                    <port>80</port>-->
                                    <path>/</path>
                                </configuration>
            </plugin>
        </plugins>
    </build>
Create the corresponding configuration class
public class ServletContainersInitConfig extends AbstractAnnotationConfigDispatcherServletInitializer {

    @Override
    protected Class<?>[] getRootConfigClasses() {
        return new Class[]{SpringConfig.class};
    }

    @Override
    protected Class<?>[] getServletConfigClasses() {
        return new Class[]{SpringMvcConfig.class};
    }

    @Override
    protected String[] getServletMappings() {
        return new String[]{"/"};
    }
}

@ComponentScan("com.green.controller")
public class SpringMvcConfig {
}
编写BookController和UserController
@Controller
@RequestMapping("/book")
public class BookController {
//2.2设置当前操作的访问路径
@RequestMapping("/save")
//2.3设置当前返回值类型
@ResponseBody
public String save() {
System.out.println("book save...");
return "{'module' : 'book save'}";
}
@RequestMapping("/delete")
@ResponseBody
public String delete() {
System.out.println("book delete...");
return "{'module' : 'book delete'}";
}
}
@Controller
@RequestMapping("/user")
public class UserController {
//2.2设置当前操作的访问路径
@RequestMapping("/save")
//2.3设置当前返回值类型
@ResponseBody
public String save() {
System.out.println("user save...");
return "{'module' : 'user save'}";
}
@RequestMapping("/delete")
@ResponseBody
public String delete() {
System.out.println("user delete...");
return "{'module' : 'user delete'}";
}
}request parameters
GET
POST
Environmental preparation
pom.xml adds Spring dependency
<dependencies>
<dependency>
<groupId>javax.servlet</groupId>
<artifactId>javax.servlet-api</artifactId>
<version>3.1.0</version>
<scope>provided</scope>
</dependency>
<dependency>
<groupId>org.springframework</groupId>
<artifactId>spring-webmvc</artifactId>
<version>5.2.10.RELEASE</version>
</dependency>
</dependencies>


<build>
<plugins>
<plugin>
<groupId>org.apache.tomcat.maven</groupId>
<artifactId>tomcat7-maven-plugin</artifactId>
<version>2.1</version>
<configuration>
<port>80</port>
<path>/</path>
</configuration>
</plugin>
</plugins>
</build>
</project>
创建对应的配置类
public class ServletContainersInitConfig extends AbstractAnnotationConfigDispatcherServletInitializer {
@Override
protected Class<?>[] getRootConfigClasses() {
return new Class[0];
}
@Override
protected Class<?>[] getServletConfigClasses() {
return new Class[]{SpringMvcConfig.class};
}
@Override
protected String[] getServletMappings() {
return new String[]{"/"};
}
//post乱码处理
@Override
protected Filter[] getServletFilters() {
CharacterEncodingFilter filter = new CharacterEncodingFilter();
filter.setEncoding("UTF-8");
return new Filter[]{filter};
}
}
@Configuration
@ComponentScan("com.green.controller")
public class SpringMvcConfig {
}编写UserController
@Controller
public class UserController {
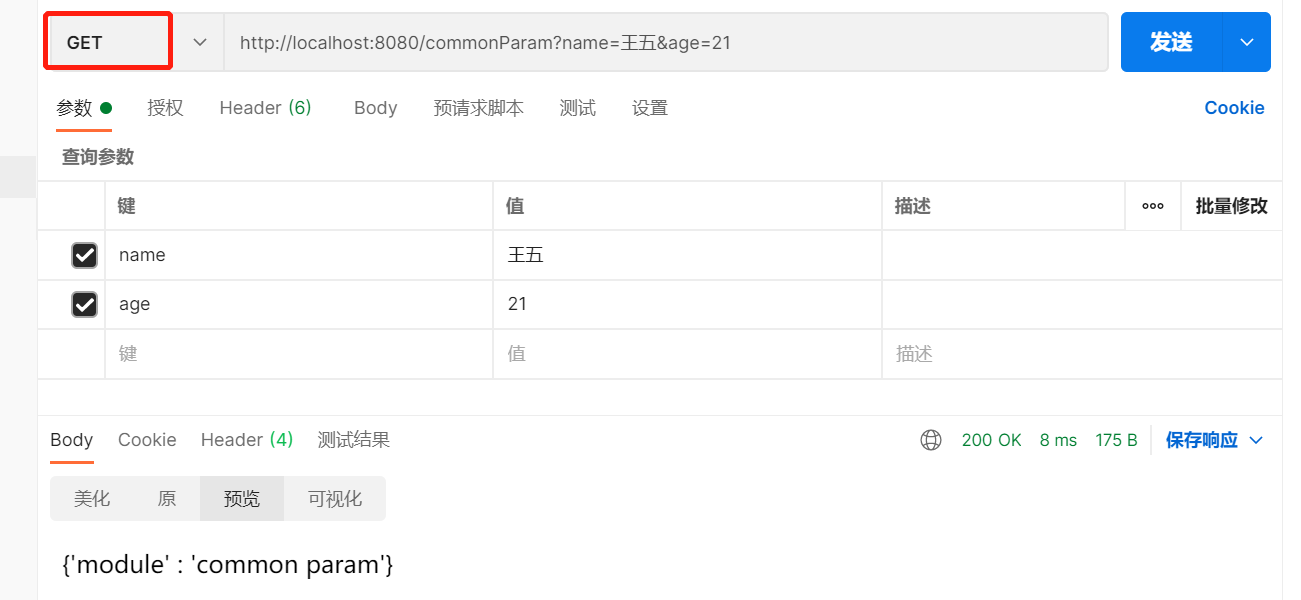
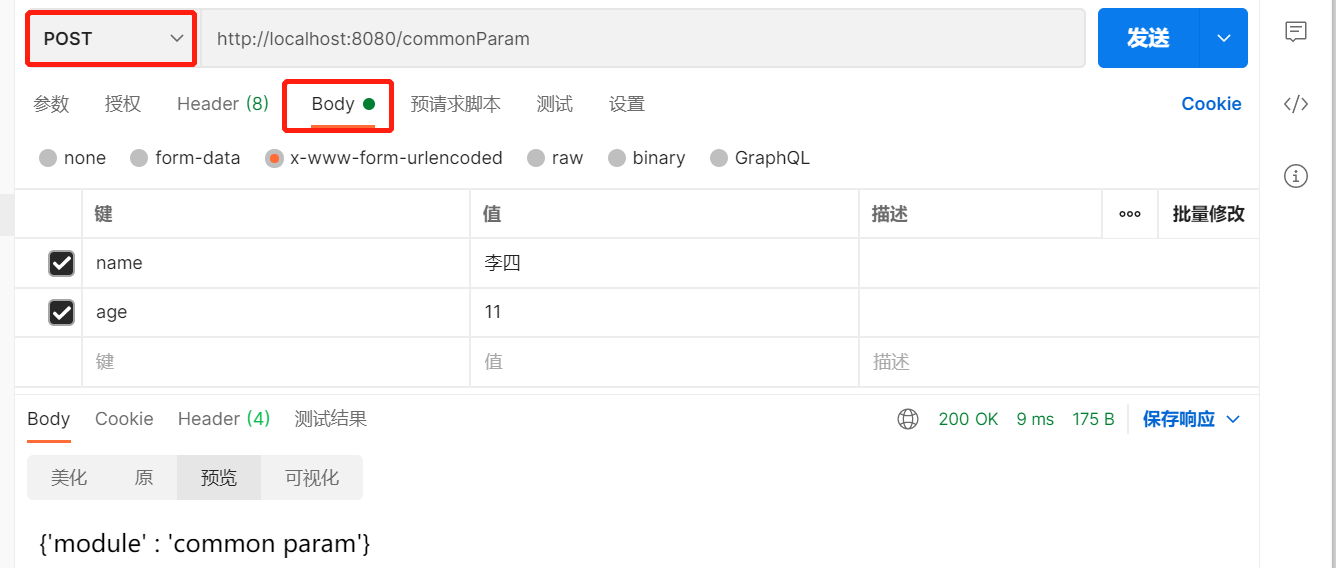
@RequestMapping("/commonParam")
@ResponseBody
public String commonParam(String name,int age) {
System.out.println("普通参数传递 name ==>" + name);
System.out.println("普通参数传递 age ==>" + age);
return "{'module' : 'common param'}";
}
}编写模型类,User和Address
Parameter passing
get send parameter
POST send parameters
Five types of parameter passing
普通参数
POJO类型参数
嵌套POJO类型参数
数组类型参数
集合类型参数
common parameters
普通参数:url地址传参,地址参数名与形参变量名相同,定义形参即可接收参数。
如果形参与地址参数名不一致该如何解决?Send request and parameters :
![]()
Background receiving parameters :
因为前端给的是name ,后台接收使用的是userName ,两个名称对不上,导致接收数据失败:
解决方案:使用@RequestParam注解
注意:写上@RequestParam注解框架就不需要自己去解析注入,能提升框架处理性能

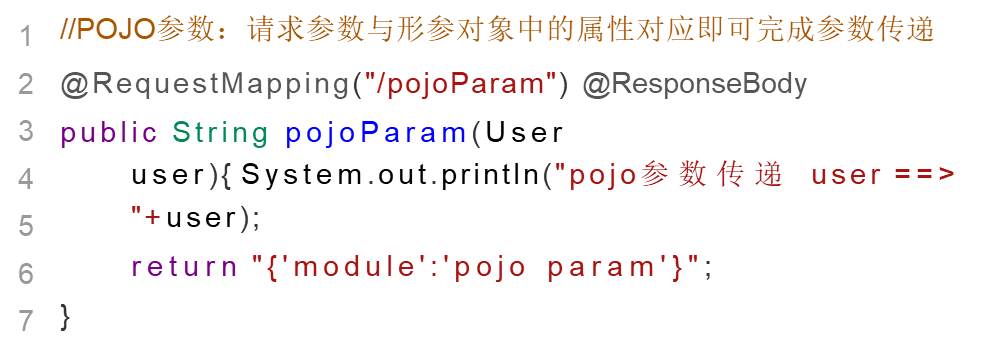
POJO data type
POJO参数:请求参数名与形参对象属性名相同,定义POJO类型形参即可接收参数
此时需要使用前面准备好的POJO类,先来看下User
public class User {
    private String name;
    private int age;
    //setter...getter...略
}
Send request and parameters :

Background receiving parameters :
注意:
POJO参数接收,前端GET和POST发送请求数据的方式不变。
请求参数key的名称要和POJO中属性的名称一致,否则无法封装。
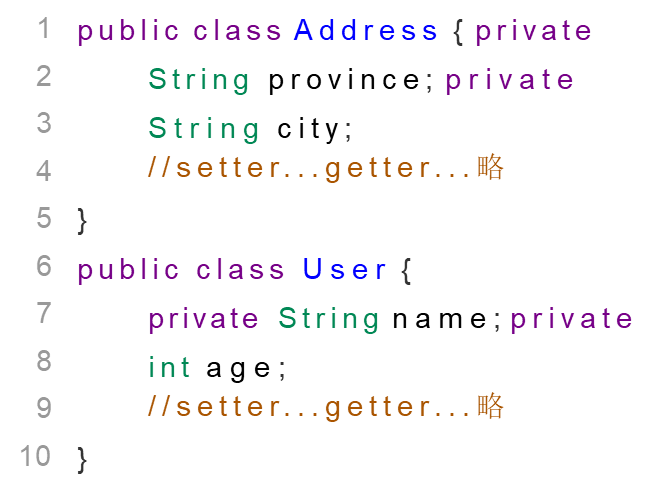
Nested POJO type parameters
如果POJO对象中嵌套了其他的POJO类,如
public class Address {
    private String province;
    private String city;
    //setter...getter...略
}
public class User {
    private String name;
    private int age;
    private Address address;//嵌套Address
    //setter...getter...略
}
Send request and parameters :
Background receiving parameters :
The name of the request parameter key must be consistent with the name of the attribute in the POJO , otherwise it cannot be encapsulated
Array type parameter
数组参数:请求参数名与形参对象属性名相同且请求参数为多个,定义数组类型即可接收参数发送请求和参数:
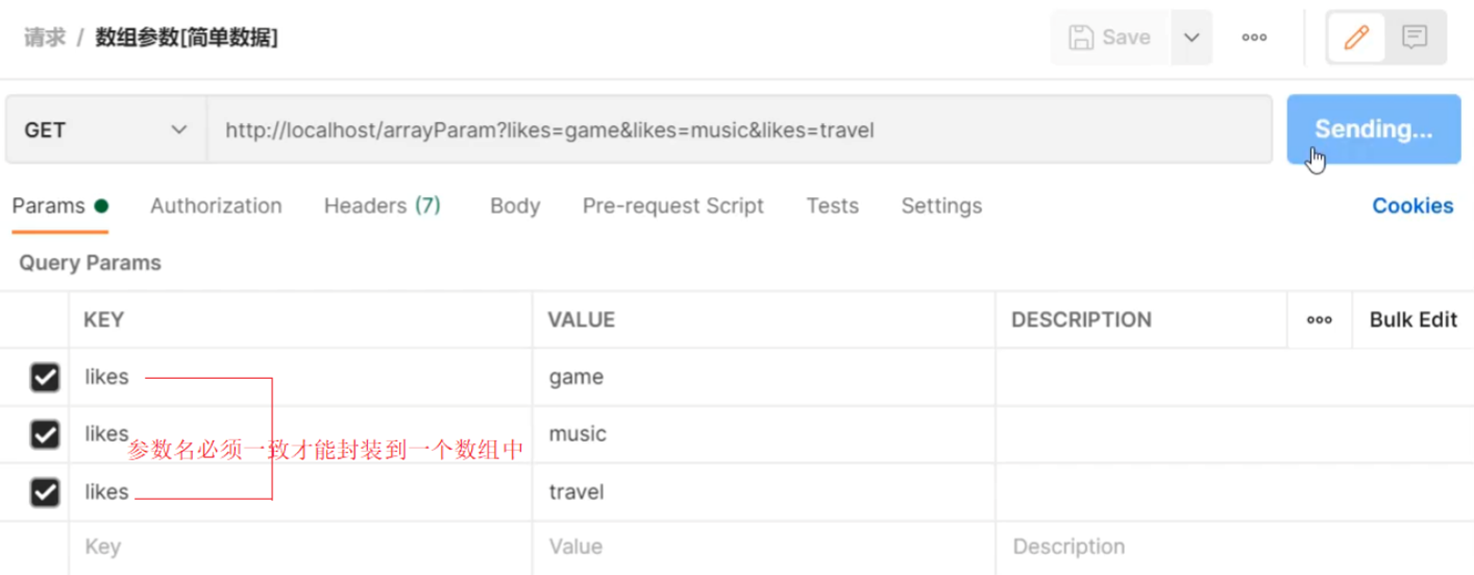
Background receiving parameters :

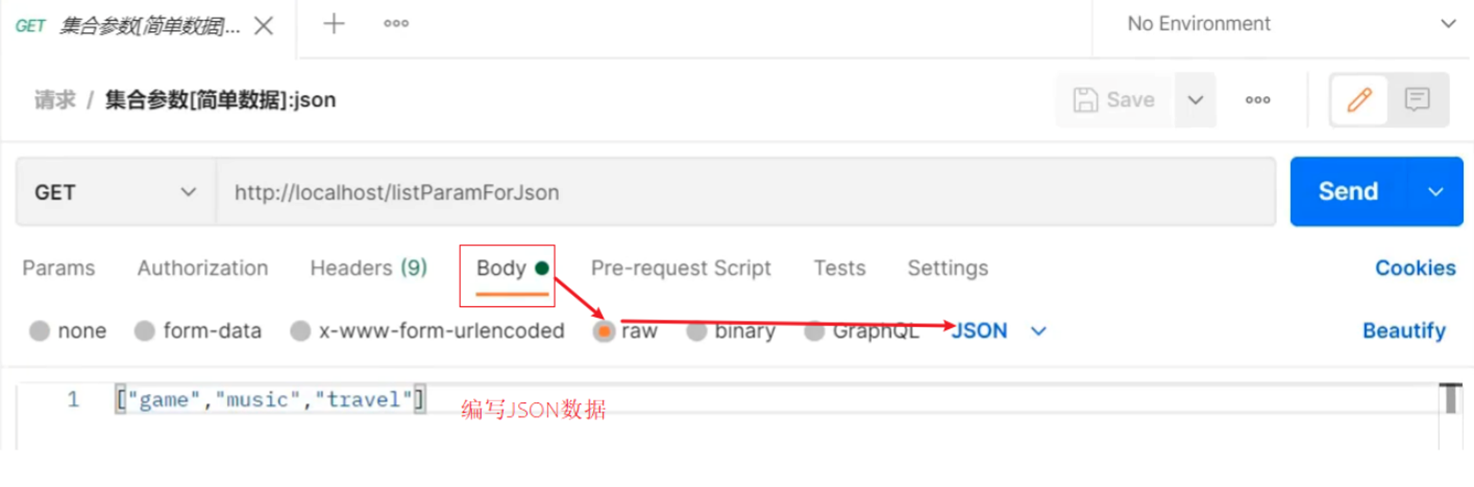
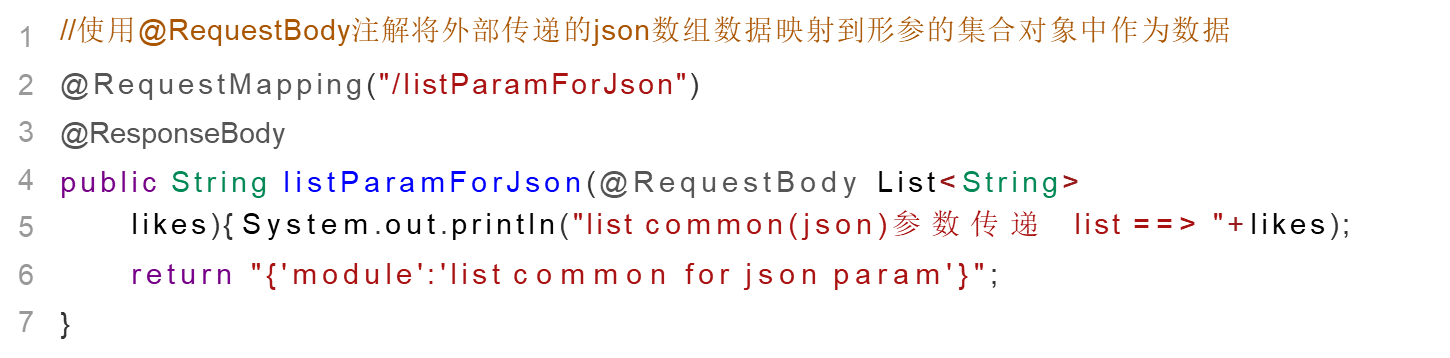
collection type parameters

Background receiving parameters :

Running will report an error,
错误的原因是:SpringMVC将List看做是一个POJO对象来处理,
将其创建一个对象并准备把前端的数据封装到对象中,但是List是一个接口无法创建对象,所以报错。
解决方案是:使用@RequestParam 注解
| name |
@RequestParam |
| type |
Formal parameter annotation |
| Location |
SpringMVC controller method parameter definition front |
| effect |
Relationship Between Binding Request Parameters and Processor Method Parameters |
| Related parameters |
required : whether it is a required parameter |
JSON data transfer parameters
json普通数组(["value1","value2","value3",...])
json对象({key1:value1,key2:value2,...})
json对象数组([{key1:value1,...},{key2:value2,...}])
JSON plain array
Step 1: Add dependencies to pom.xml
SpringMVC默认使用的是jackson来处理json的转换,所以需要在pom.xml添加jackson依赖
<dependency>
    <groupId>com.fasterxml.jackson.core</groupId>
    <artifactId>jackson-databind</artifactId>
    <version>2.9.0</version>
</dependency>
Step 2: PostMan sends JSON data
Step 3: Enable SpringMVC annotation support
SpringMVC的配置类中开启SpringMVC的注解支持,这里面就包含了将JSON转换成对象的功能。
@Configuration
@ComponentScan("com.green.controller")
//开启json数据类型自动转换
@EnableWebMvc
public class SpringMvcConfig {
}
Step 4: Add @Requ estBody before the parameter
Step 5: Start and run the program
JSON object data
Sending of requests and data :

The backend receives data:

Start program access test

说明:
address为null的原因是前端没有传递数据给后端。
如果想要address也有数据,我们需求修改前端传递的数据内容: 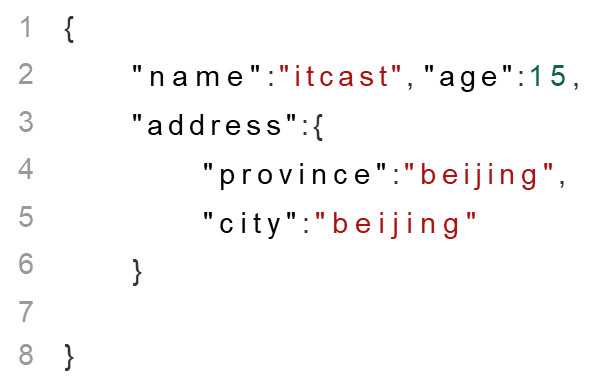
Send the request again, and you can see the data in address
array of JSON objects
集合中保存多个POJO该如何实现? 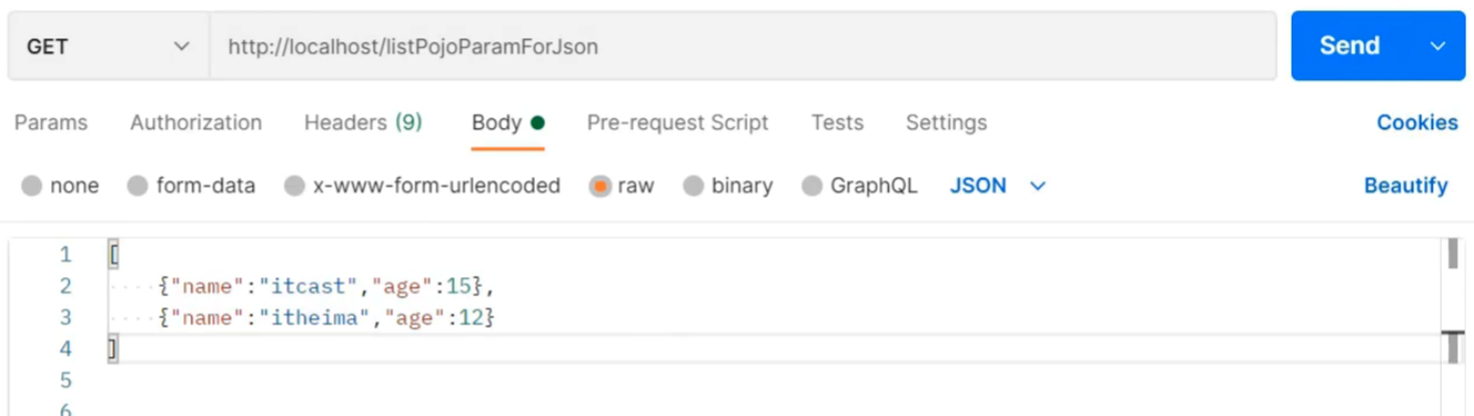

小结
SpringMVC接收JSON数据的实现步骤为:
(1)导入jackson包
(2)使用PostMan发送JSON数据
(3)开启SpringMVC注解驱动,在配置类上添加@EnableWebMvc注解
(4)Controller方法的参数前添加@RequestBody注解
| name |
@EnableWebMvc |
@RequestBody |
| type |
Configuration class annotation |
Formal parameter annotation |
| Location |
Above the SpringMVC configuration class definition |
SpringMVC controller method parameter definition front |
| effect |
Enable multiple auxiliary functions of SpringMVC |
Pass the data contained in the request body to the request parameters. This annotation can only be used once for a handler method |
The difference between @RequestBody and @RequestParam
区别
    @RequestParam用于接收url地址传参,表单传参【application/x-www-form- urlencoded】
    @RequestBody用于接收json数据【application/json】
应用
    后期开发中,发送json格式数据为主,@RequestBody应用较广
    如果发送非json格式数据,选用@RequestParam接收请求参数
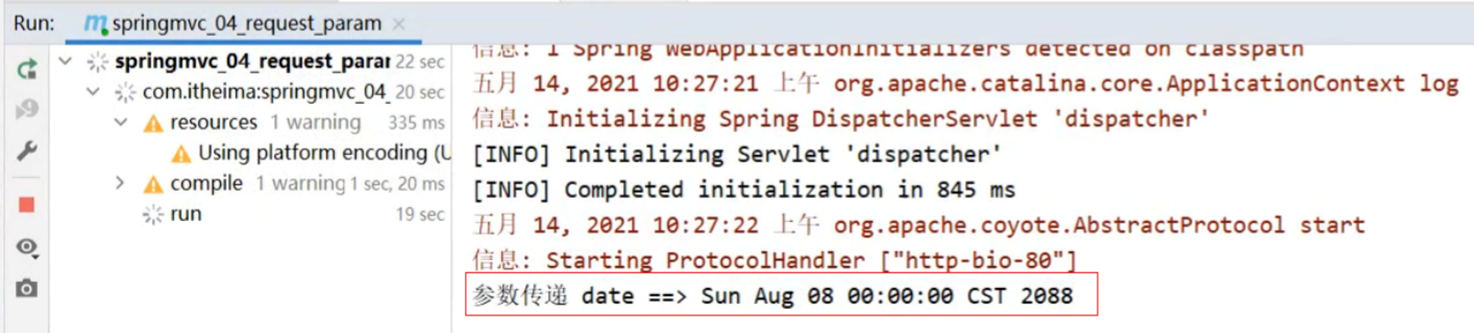
Date type parameter passing
Step 1: Write a method to receive date data
在UserController类中添加方法,把参数设置为日期类型
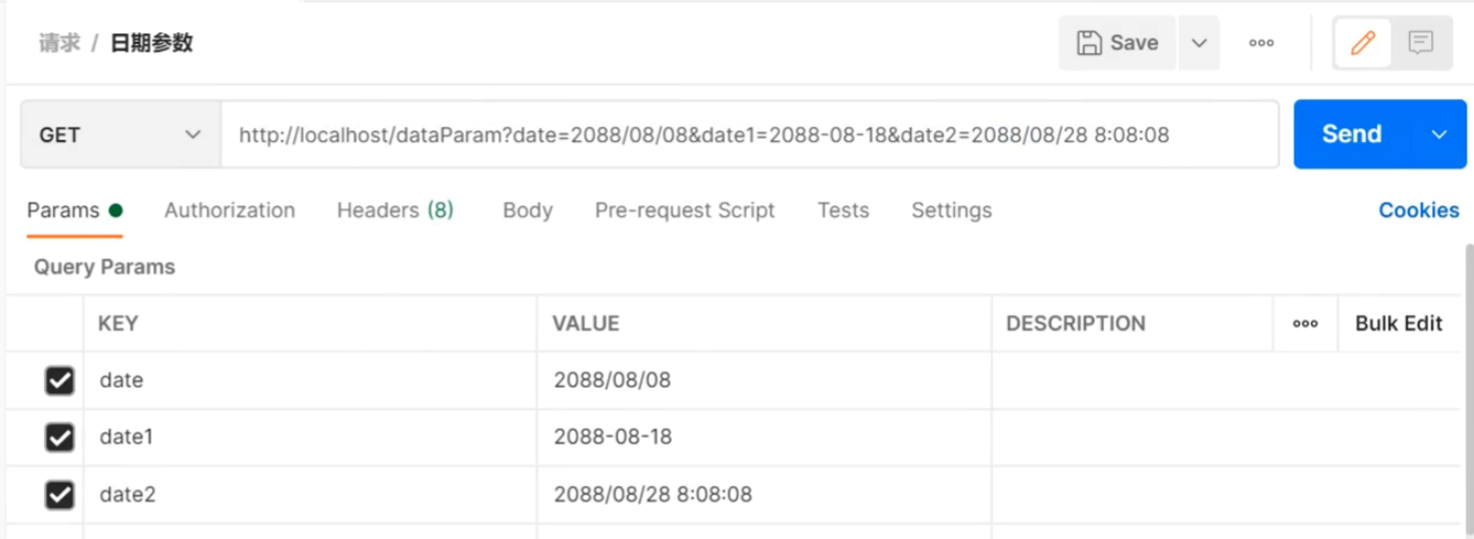
@RequestMapping("/dataParam")
@ResponseBody
public String dataParam(Date date){
System.out.println("参数传递 date ==> "+date);
return "{'module':'data param'}";
}
Step 2: Start the Tomcat server
查看控制台是否报错,如果有错误,先解决错误。
Step 3: Send the request using PostMan
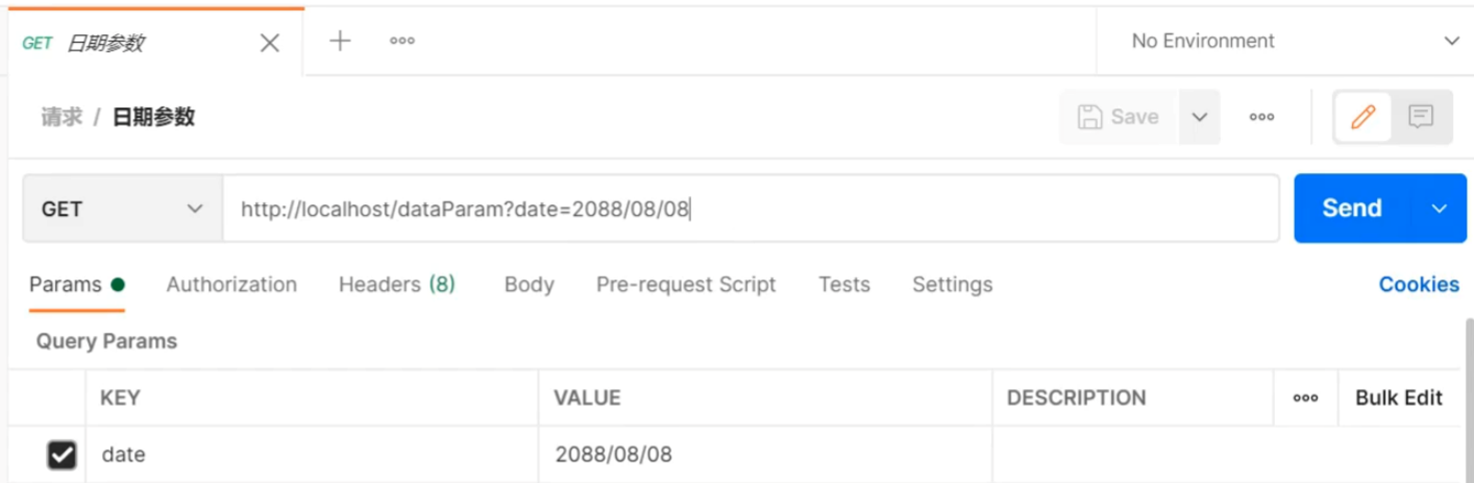
Step 4: View the console
Step 5: Change the date format
    //日期参数
    @RequestMapping("/dateParam")
    @ResponseBody
    public String dateParam(Date date, @DateTimeFormat(pattern = "yyyy-MM-dd") Date date1,
                            @DateTimeFormat(pattern = "yyyy/MM/dd HH:mm:ss") Date date2) {
        System.out.println("参数传递date==>" + date);
        System.out.println("参数传递date1(yyyy-MM-DD)==>" + date1);
        System.out.println("参数传递date2(yyyy/MM/DD HH:mm:ss)==>" + date2);
        return "{'module' : 'date param'}";
    }

| name |
@DateTimeFormat |
| type |
Formal parameter annotation |
| Location |
Before the SpringMVC controller method formal parameters |
| effect |
Set date and time data format |
| related attributes |
pattern : specifies the datetime format string |
Internal realization principle
前端传递字符串,后端使用日期Date接收
前端传递JSON数据,后端使用对象接收
前端传递字符串,后端使用Integer接收
后台需要的数据类型有很多中
在数据的传递过程中存在很多类型的转换
问:谁来做这个类型转换?
答:SpringMVC
问:SpringMVC是如何实现类型转换的?
答:SpringMVC中提供了很多类型转换接口和实现类
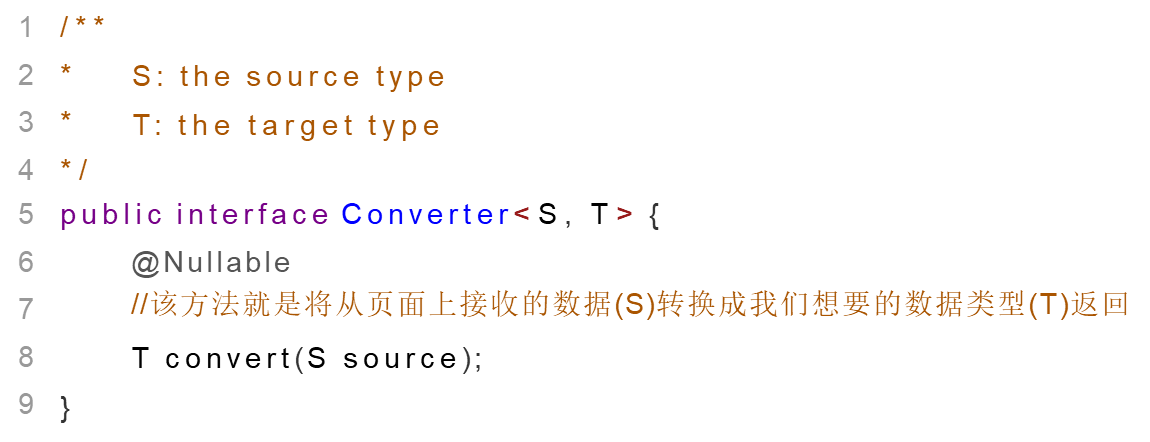
在框架中,有一些类型转换接口,其中有:
(1) Converter接口
注意:Converter所属的包为org.springframework.core.convert.converter Converter接口的实现类
框架中有提供很多对应Converter接口的实现类,用来实现不同数据类型之间的转换,如:
请求参数年龄数据(String→Integer)
日期格式转换(String → Date)
(2) HttpMessageConverter接口
该接口是实现对象与JSON之间的转换工作
注意:SpringMVC的配置类把@EnableWebMvc当做标配配置上去,不要省略
response
对于响应,主要就包含两部分内容:
响应页面
响应数据
    文本数据
    json数据
因为异步调用是目前常用的主流方式,所以需要更关注的就是如何返回JSON数据,
对于其他只需要认识了解即可。
Environmental preparation
创建一个Web的Maven项目
pom.xml添加Spring依赖
 <dependencies>
        <dependency>
            <groupId>javax.servlet</groupId>
            <artifactId>javax.servlet-api</artifactId>
            <version>3.1.0</version>
            <scope>provided</scope>
        </dependency>
        <dependency>
            <groupId>org.springframework</groupId>
            <artifactId>spring-webmvc</artifactId>
            <version>5.2.10.RELEASE</version>
        </dependency>
        <dependency>
            <groupId>com.fasterxml.jackson.core</groupId>
            <artifactId>jackson-databind</artifactId>
            <version>2.9.0</version>
        </dependency>
    </dependencies>

    <build>
        <plugins>
            <plugin>
                <groupId>org.apache.tomcat.maven</groupId>
                <artifactId>tomcat7-maven-plugin</artifactId>
                <version>2.2</version>
                <configuration>
                    <!--                    <port>80</port>-->  <!--tomcat端口号-->
                    <path>/</path>  <!--虚拟目录-->
                    <uriEncoding>UTF-8</uriEncoding><!--get乱码处理 访问路径编解码字符集-->
                </configuration>
            </plugin>
        </plugins>
    </build>
创建对应的配置类
public class ServletContainersInitConfig extends AbstractAnnotationConfigDispatcherServletInitializer {
@Override
protected Class<?>[] getRootConfigClasses() {
return new Class[0];
}
@Override
protected Class<?>[] getServletConfigClasses() {
return new Class[]{SpringMvcConfig.class};
}
@Override
protected String[] getServletMappings() {
return new String[]{"/"};
}
//post乱码处理
@Override
protected Filter[] getServletFilters() {
CharacterEncodingFilter filter = new CharacterEncodingFilter();
filter.setEncoding("UTF-8");
return new Filter[]{filter};
}
}
@Configuration
@ComponentScan("com.green.controller")
@EnableWebMvc//json数据转换成Java对象功能
public class SpringMvcConfig {
}编写模型类User
public class User {
private String name;
private int age;
//getter...setter...toString省略
}
webapp下创建page.jsp
<html>
<body>
<h2>Hello Spring MVC!</h2>
</body>
</html>
编写UserController
@Controller
public class UserController {

    //响应页面/跳转页面
    @RequestMapping("/toJumpPage")
    //注意
    //1.此处不能添加@ResponseBody,如果加了该注入,会直接将page.jsp当字符串返回前端
    //2.方法需要返回String
    public String toJumpPage() {
        System.out.println("跳转页面");
        return "page.jsp";
    }

    //响应文本数据
    @RequestMapping("/toText")
    //注意此处该注解就不能省略,如果省略了,会把response text当前页面名称去查找,如果没有回报404错误
    @ResponseBody
    public String toText() {
        System.out.println("返回纯文本数据");
        return "response text";
    }

    //响应JSON数据
    @RequestMapping("/toJsonPOJO")
    @ResponseBody
    public User toJsonPOJO() {
        System.out.println("返回json对象数据");
        User user = new User();
        user.setName("张三");
        user.setAge(15);
        return user;
    }

    //响应POJO集合对象
    @RequestMapping("/toJsonList")
    @ResponseBody
    public List<User> toJsonList() {
        System.out.println("返回json集合数据");
        User user1 = new User();
        user1.setName("李四");
        user1.setAge(15);

        User user2 = new User();
        user2.setName("王五");
        user2.setAge(12);

        List<User> userList = new ArrayList<User>();
        userList.add(user1);
        userList.add(user2);

        return userList;
    }
}| name |
@ResponseBody |
| type |
Method \ Class Annotation |
| Location |
Above the SpringMVC controller method definition and on the control class |
| effect |
Set the current controller return value as the response body , Written on the class, all methods of the class have the annotation function |
| related attributes |
pattern : specifies the datetime format string |
说明:
该注解可以写在类上或者方法上
写在类上就是该类下的所有方法都有@ReponseBody功能
当方法上有@ReponseBody注解后
    方法的返回值为字符串,会将其作为文本内容直接响应给前端
    方法的返回值为对象,会将对象转换成JSON响应给前端
对象转Json数据(POJO -> json)
集合转Json数据(Collection -> json)
REST style
Introduction to REST Style
REST(Representational  State  Transfer),表现形式状态转换,它是一种软件架构风格
传统风格资源描述形式
    http://localhost/user/getById?id=1  查询id为1的用户信息
    http://localhost/user/saveUser  保存用户信息
REST风格描述形式
    http://localhost/user/1
    http://localhost/user
REST的优点有:
    隐藏资源的访问行为,无法通过地址得知对资源是何种操作
    书写简化
按照REST风格访问资源时使用行为动作区分对资源进行了何种操作
    http://localhost/users  查询全部用户信息 GET(查询)
    http://localhost/users/1  查询指定用户信息 GET(查询)
    http://localhost/users  添加用户信息 POST(新增/保存)
    http://localhost/users  修改用户信息 PUT(修改/更新)
    http://localhost/users/1  删除用户信息 DELETE(删除)
按照不同的请求方式代表不同的操作类型。
    发送GET请求是用来做查询
    发送POST请求是用来做新增
    发送PUT请求是用来做修改
    发送DELETE请求是用来做删除
注意:
上述行为是约定方式,约定不是规范,可以打破,所以称REST风格,而不是REST规范
REST提供了对应的架构方式,按照这种架构设计项目可以降低开发的复杂性,提高系统的可伸缩性
REST中规定GET/POST/PUT/DELETE针对的是查询/新增/修改/删
描述模块的名称通常使用复数,也就是加s的格式描述,表示此类资源,而非单个资源,
例如:users、books、accounts......
根据REST风格对资源进行访问称为RESTful。
RESTful entry case
Environmental preparation
创建一个Web的Maven项目
pom.xml添加Spring依赖
<?xml version="1.0" encoding="UTF-8"?>
<project xmlns="http://maven.apache.org/POM/4.0.0"
         xmlns:xsi="http://www.w3.org/2001/XMLSchema-instance"
         xsi:schemaLocation="http://maven.apache.org/POM/4.0.0 http://maven.apache.org/xsd/maven-4.0.0.xsd">
    <modelVersion>4.0.0</modelVersion>

    <groupId>org.example</groupId>
    <artifactId>spring_06_rest</artifactId>
    <version>1.0-SNAPSHOT</version>
    <packaging>war</packaging>

    <properties>
        <maven.compiler.source>13</maven.compiler.source>
        <maven.compiler.target>13</maven.compiler.target>
    </properties>

    <dependencies>
        <dependency>
            <groupId>javax.servlet</groupId>
            <artifactId>javax.servlet-api</artifactId>
            <version>3.1.0</version>
            <scope>provided</scope>
        </dependency>
        <dependency>
            <groupId>org.springframework</groupId>
            <artifactId>spring-webmvc</artifactId>
            <version>5.2.10.RELEASE</version>
        </dependency>
        <dependency>
            <groupId>com.fasterxml.jackson.core</groupId>
            <artifactId>jackson-databind</artifactId>
            <version>2.9.0</version>
        </dependency>
    </dependencies>

    <build>
        <plugins>
            <plugin>
                <groupId>org.apache.tomcat.maven</groupId>
                <artifactId>tomcat7-maven-plugin</artifactId>
                <version>2.2</version>
                <configuration>
                    <!--                    <port>80</port>-->  <!--tomcat端口号-->
                    <path>/</path>  <!--虚拟目录-->
                    <uriEncoding>UTF-8</uriEncoding><!--get乱码处理 访问路径编解码字符集-->
                </configuration>
            </plugin>
        </plugins>
    </build>

</project>
创建对应的配置类
public class ServletContainersInitConfig extends AbstractAnnotationConfigDispatcherServletInitializer {
@Override
protected Class<?>[] getRootConfigClasses() {
return new Class[0];
}
@Override
protected Class<?>[] getServletConfigClasses() {
return new Class[]{SpringMvcConfig.class};
}
@Override
protected String[] getServletMappings() {
return new String[]{"/"};
}
//post乱码处理
@Override
protected Filter[] getServletFilters() {
CharacterEncodingFilter filter = new CharacterEncodingFilter();
filter.setEncoding("UTF-8");
return new Filter[]{filter};
}
}
@Configuration
@ComponentScan("com.green.controller")
@EnableWebMvc//json数据转换成Java对象功能
public class SpringMvcConfig {
}编写模型类User和Book

编写UserController和BookController
@Controller
public class UserController {
//设置当前请求方法为POST,表示REST风格中的添加操作
@RequestMapping(value = "/users", method = RequestMethod.POST)
@ResponseBody
public String save(@RequestBody User user) {
System.out.println("user save..." + user);
return "{'module':'user save'}";
}
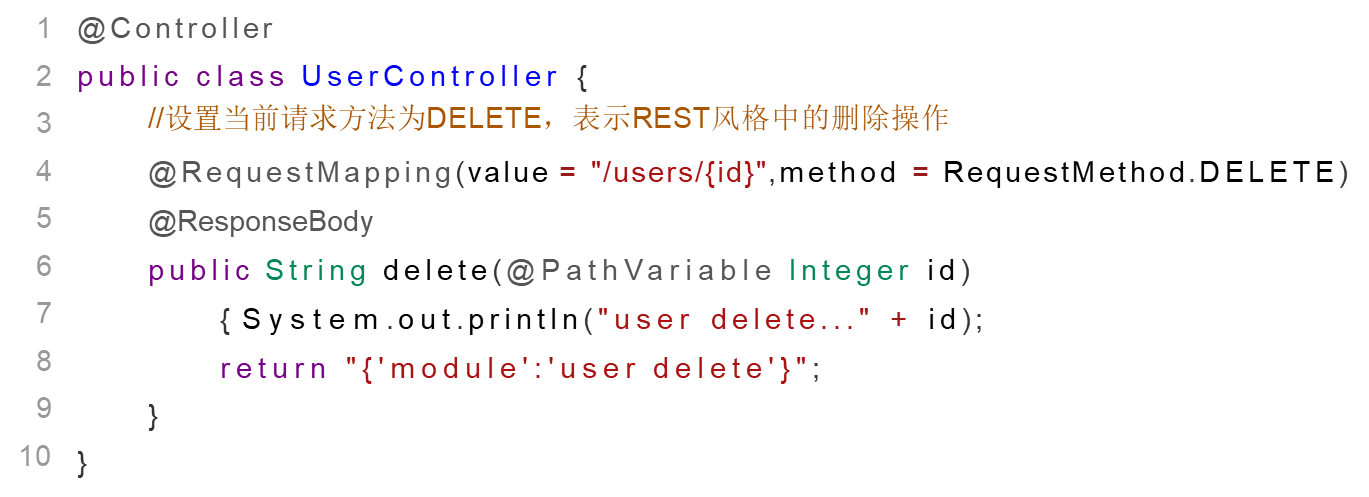
//设置当前请求方法为DELETE,表示REST风格中的删除操作
//@PathVariable注解用于设置路径变量(路径参数),要求路径上设置对应的占位符,并且占位符名称与方法形参名称相同
@RequestMapping(value = "/users/{id}", method = RequestMethod.DELETE)
@ResponseBody
public String delete(@PathVariable Integer id) {
System.out.println("user delete..." + id);
return "{'module':'user delete'}";
}
//设置当前请求方法为PUT,表示REST风格中的修改操作
@RequestMapping(value = "/users", method = RequestMethod.PUT)
@ResponseBody
public String update(@RequestBody User user) {
System.out.println("user update..." + user);
return "{'module':'user update'}";
}
//设置当前请求方法为GET,表示REST风格中的查询操作
//@PathVariable注解用于设置路径变量(路径参数),要求路径上设置对应的占位符,并且占位符名称与方法形参名称相同
@RequestMapping(value = "/users/{id}", method = RequestMethod.GET)
@ResponseBody
public String getById(@PathVariable Integer id) {
System.out.println("user getById..." + id);
return "{'module':'user getById'}";
}
//设置当前请求方法为GET,表示REST风格中的查询操作
@RequestMapping(value = "/users", method = RequestMethod.GET)
@ResponseBody
public String getAll() {
System.out.println("user getAll...");
return "{'module':'user getAll'}";
}
}
//@Controller
//@ResponseBody配置在类上可以简化配置,表示设置当前每个方法的返回值都作为响应体
//@ResponseBody
@RestController //使用@RestController注解替换@Controller与@ResponseBody注解,简化书写
@RequestMapping("/books")
public class BookController {
// @RequestMapping( method = RequestMethod.POST)
@PostMapping //使用@PostMapping简化Post请求方法对应的映射配置
public String save(@RequestBody Book book) {
System.out.println("book save..." + book);
return "{'module':'book save'}";
}
// @RequestMapping(value = "/{id}" ,method = RequestMethod.DELETE)
@DeleteMapping("/{id}") //使用@DeleteMapping简化DELETE请求方法对应的映射配置
public String delete(@PathVariable Integer id) {
System.out.println("book delete..." + id);
return "{'module':'book delete'}";
}
// @RequestMapping(method = RequestMethod.PUT)
@PutMapping //使用@PutMapping简化Put请求方法对应的映射配置
public String update(@RequestBody Book book) {
System.out.println("book update..." + book);
return "{'module':'book update'}";
}
// @RequestMapping(value = "/{id}" ,method = RequestMethod.GET)
@GetMapping("/{id}") //使用@GetMapping简化GET请求方法对应的映射配置
public String getById(@PathVariable Integer id) {
System.out.println("book getById..." + id);
return "{'module':'book getById'}";
}
// @RequestMapping(method = RequestMethod.GET)
@GetMapping //使用@GetMapping简化GET请求方法对应的映射配置
public String getAll() {
System.out.println("book getAll...");
return "{'module':'book getAll'}";
}
} 
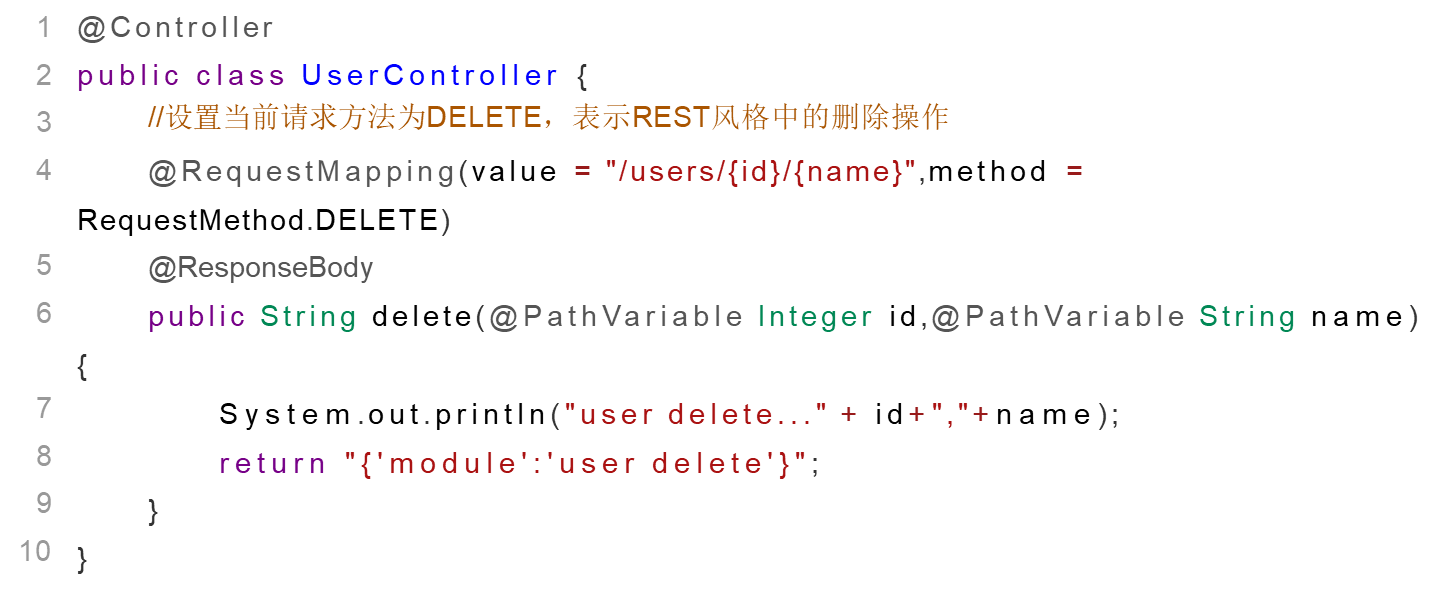
Consider the following two questions :
(1)如果方法形参的名称和路径{} 中的值不一致,该怎么办?

(2)如果有多个参数需要传递该如何编写?
前端发送请求的时候使用: http://localhost/users/1/tom ,
路径中的1 和tom 就是我们想要传递的两个参数。
| name |
@Pa thVariable |
| type |
Formal parameter annotation |
| Location |
SpringMVC controller method parameter definition front |
| effect |
The relationship between binding path parameters and processor method parameters requires a one-to-one correspondence between path parameter names and formal parameter names |
区别
@RequestParam用于接收url地址传参或表单传参
@RequestBody用于接收json数据
@PathVariable用于接收路径参数,使用{参数名称}描述路径参数
应用
后期开发中,发送请求参数超过1个时,以json格式为主,@RequestBody应用较广
如果发送非json格式数据,选用@RequestParam接收请求参数
采用RESTful进行开发,当参数数量较少时,例如1个,可以采用@PathVariable接收请求路径变量,通常用于传递id值
RESTful rapid development
做完了RESTful的开发,你会发现好麻烦,麻烦在哪?

问题1:每个方法的@RequestMapping注解中都定义了访问路径/books,重复性太高。
问题2:每个方法的@RequestMapping注解中都要使用method属性定义请求方式,重复性太高。
问题3:每个方法响应json都需要加上@ResponseBody注解,重复性太高。
解决方案:
1:将@RequestMapping提到类上面,用来定义所有方法共同的访问路径。
2:使用@GetMapping	@PostMapping	@PutMapping	@DeleteMapping代替
3:
    将ResponseBody提到类上面,让所有的方法都有@ResponseBody的功能
    使用@RestController注解替换@Controller与@ResponseBody注解,简化书写
//@Controller + ReponseBody @RequestMapping("/books")
//@Controller
//@ResponseBody配置在类上可以简化配置,表示设置当前每个方法的返回值都作为响应体
//@ResponseBody
@RestController     //使用@RestController注解替换@Controller与@ResponseBody注解,简化书写
@RequestMapping("/books")
public class BookController {

    //    @RequestMapping( method = RequestMethod.POST)
    @PostMapping        //使用@PostMapping简化Post请求方法对应的映射配置
    public String save(@RequestBody Book book) {
        System.out.println("book save..." + book);
        return "{'module':'book save'}";
    }

    //    @RequestMapping(value = "/{id}" ,method = RequestMethod.DELETE)
    @DeleteMapping("/{id}")     //使用@DeleteMapping简化DELETE请求方法对应的映射配置
    public String delete(@PathVariable Integer id) {
        System.out.println("book delete..." + id);
        return "{'module':'book delete'}";
    }

    //    @RequestMapping(method = RequestMethod.PUT)
    @PutMapping         //使用@PutMapping简化Put请求方法对应的映射配置
    public String update(@RequestBody Book book) {
        System.out.println("book update..." + book);
        return "{'module':'book update'}";
    }

    //    @RequestMapping(value = "/{id}" ,method = RequestMethod.GET)
    @GetMapping("/{id}")    //使用@GetMapping简化GET请求方法对应的映射配置
    public String getById(@PathVariable Integer id) {
        System.out.println("book getById..." + id);
        return "{'module':'book getById'}";
    }

    //    @RequestMapping(method = RequestMethod.GET)
    @GetMapping             //使用@GetMapping简化GET请求方法对应的映射配置
    public String getAll() {
        System.out.println("book getAll...");
        return "{'module':'book getAll'}";
    }
}| 名称 |
@RestController |
| 类型 |
类注解 |
| 位置 |
基于SpringMVC的RESTful开发控制器类定义上方 |
| 作用 |
设置当前控制器类为RESTful风格, 等同于@Controller与@ResponseBody两个注解组合功能 |
| 名称 |
@GetMapping @PostMapping @PutMapping @DeleteMapping |
| 类型 |
方法注解 |
| 位置 |
基于SpringMVC的RESTful开发控制器方法定义上方 |
| 作用 |
设置当前控制器方法请求访问路径与请求动作,每种对应一个请求动作, |
| 相关属性 |
value(默认):请求访问路径 |
RESTful案例
需求分析
需求一:图片列表查询,从后台返回数据,将数据展示在页面上
需求二:新增图片,将新增图书的数据传递到后台,并在控制台打印

步骤分析:
1.搭建项目导入jar包
2.编写Controller类,提供两个方法,一个用来做列表查询,一个用来做新增
3.在方法上使用RESTful进行路径设置
4.完成请求、参数的接收和结果的响应
5.使用PostMan进行测试
6.将前端页面拷贝到项目中
7.页面发送ajax请求
8.完成页面数据的展示
环境准备
创建一个Web的Maven项目
pom.xml添加Spring依赖
<?xml version="1.0" encoding="UTF-8"?>
<project xmlns="http://maven.apache.org/POM/4.0.0"
         xmlns:xsi="http://www.w3.org/2001/XMLSchema-instance"
         xsi:schemaLocation="http://maven.apache.org/POM/4.0.0 http://maven.apache.org/xsd/maven-4.0.0.xsd">
    <modelVersion>4.0.0</modelVersion>

    <groupId>org.example</groupId>
    <artifactId>spring_07_rest_case</artifactId>
    <version>1.0-SNAPSHOT</version>
    <packaging>war</packaging>

    <properties>
        <maven.compiler.source>13</maven.compiler.source>
        <maven.compiler.target>13</maven.compiler.target>
    </properties>

    <dependencies>
        <dependency>
            <groupId>javax.servlet</groupId>
            <artifactId>javax.servlet-api</artifactId>
            <version>3.1.0</version>
            <scope>provided</scope>
        </dependency>
        <dependency>
            <groupId>org.springframework</groupId>
            <artifactId>spring-webmvc</artifactId>
            <version>5.2.10.RELEASE</version>
        </dependency>
        <dependency>
            <groupId>com.fasterxml.jackson.core</groupId>
            <artifactId>jackson-databind</artifactId>
            <version>2.9.0</version>
        </dependency>
    </dependencies>

    <build>
        <plugins>
            <plugin>
                <groupId>org.apache.tomcat.maven</groupId>
                <artifactId>tomcat7-maven-plugin</artifactId>
                <version>2.2</version>
                <configuration>
                    <!--                    <port>80</port>-->  <!--tomcat端口号-->
                    <path>/</path>  <!--虚拟目录-->
                    <uriEncoding>UTF-8</uriEncoding><!--get乱码处理 访问路径编解码字符集-->
                </configuration>
            </plugin>
        </plugins>
    </build>

</project>
创建对应的配置类
public class ServletContainersInitConfig extends AbstractAnnotationConfigDispatcherServletInitializer {
@Override
protected Class<?>[] getRootConfigClasses() {
return new Class[0];
}
@Override
protected Class<?>[] getServletConfigClasses() {
return new Class[]{SpringMvcConfig.class};
}
@Override
protected String[] getServletMappings() {
return new String[]{"/"};
}
//post乱码处理
@Override
protected Filter[] getServletFilters() {
CharacterEncodingFilter filter = new CharacterEncodingFilter();
filter.setEncoding("UTF-8");
return new Filter[]{filter};
}
}
@Configuration
@ComponentScan("com.green.controller")
@EnableWebMvc//json数据转换成Java对象功能
public class SpringMvcConfig {
}编写模型类Book
public class Book {
private Integer id;
private String type;
private String name;
private String description;
//get...set..toString方法省略
}编写BookController
@RestController
@RequestMapping("/books")
public class BookController {
@PostMapping
public String save(@RequestBody Book book){
System.out.println("book save ==>" + book);
return "{'module':'book save success'}";
}
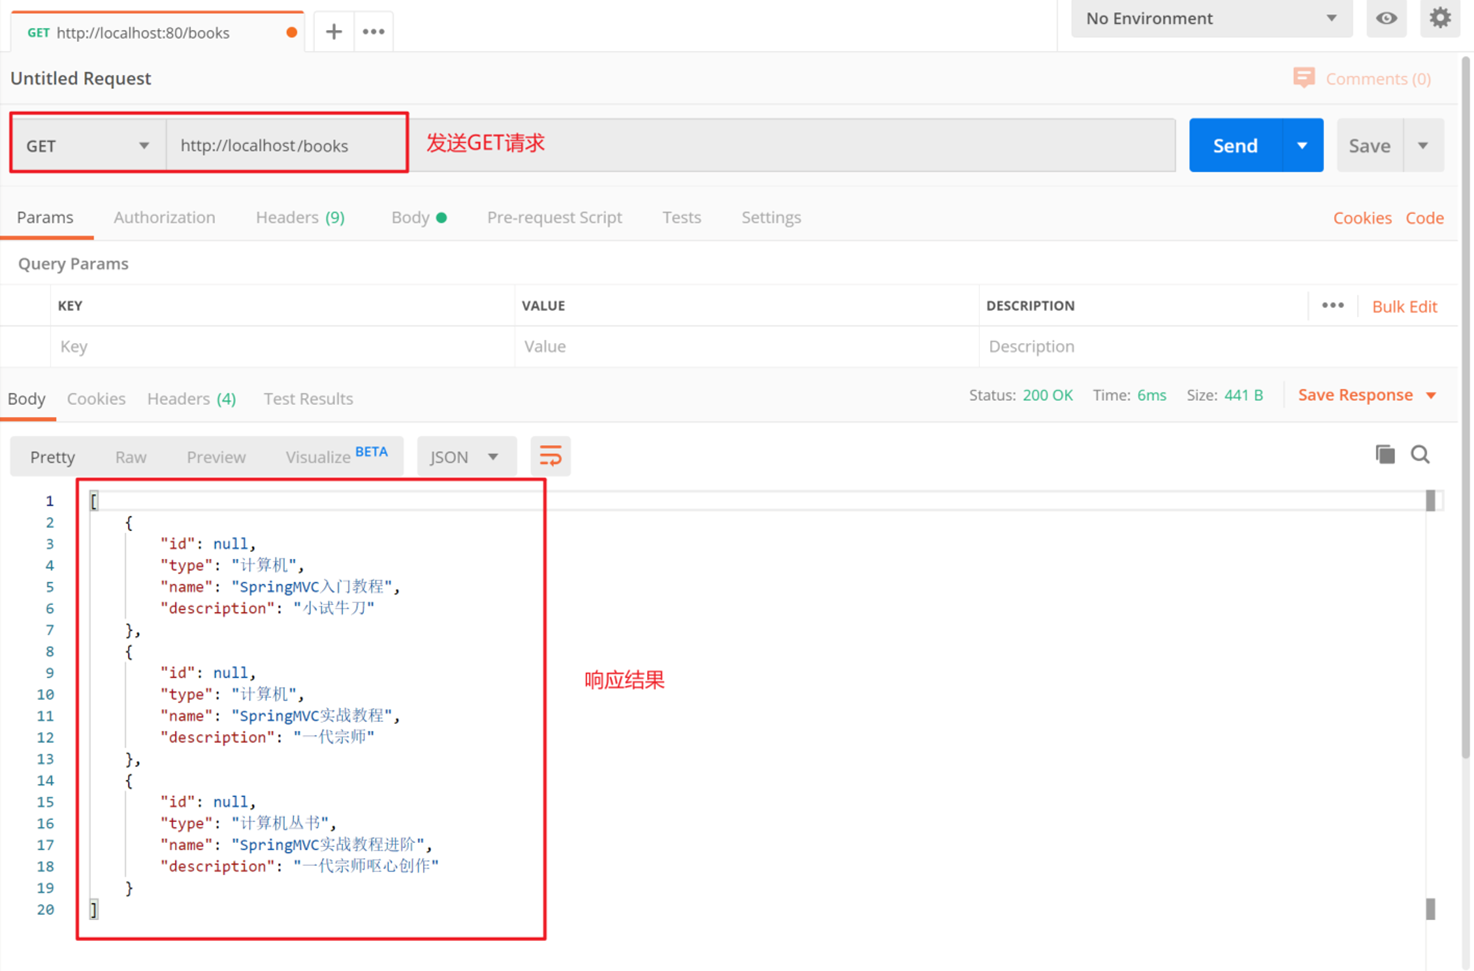
@GetMapping
public List<Book> getAll(){
List<Book> list = new ArrayList<>();
Book book1 = new Book();
book1.setType("计算机");
book1.setName("SpringMVC入门");
book1.setDescription("小试牛刀");
Book book2 = new Book();
book2.setType("计算机");
book2.setName("SpringMVC实战教程");
book2.setDescription("一代宗师");
list.add(book1);
list.add(book2);
return list;
}
}步骤2:使用PostMan进行测试

测试查询
页面访问处理
步骤1:拷贝静态页面
将资料\功能页面 下的所有内容拷贝到项目的webapp 目录下
步骤2:访问pages目录下的books.html

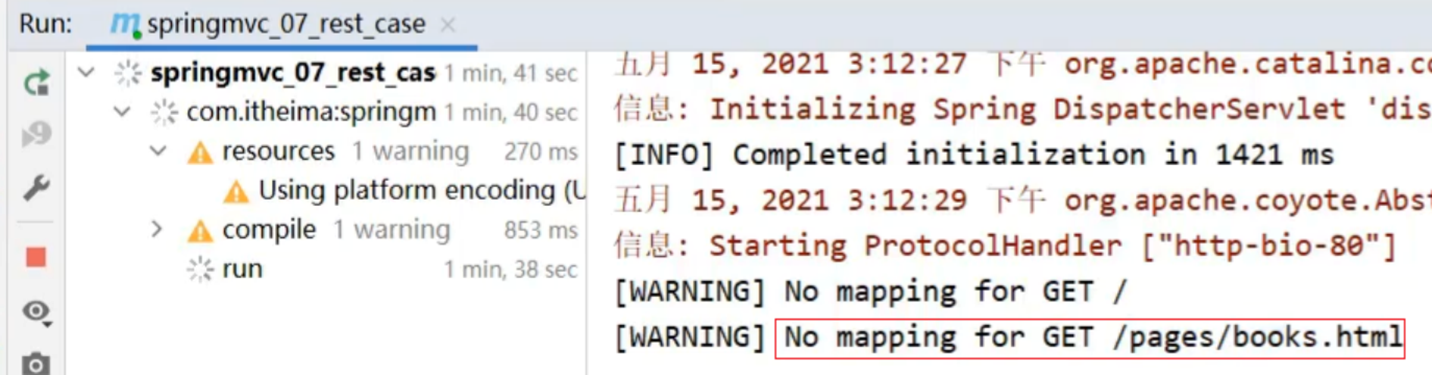
(1)出现错误的原因?
SpringMVC拦截了静态资源,根据/pages/books.html去controller找对应的方法,
找不到所以会报404的错误。
(2)SpringMVC为什么会拦截静态资源呢?

(3)解决方案?
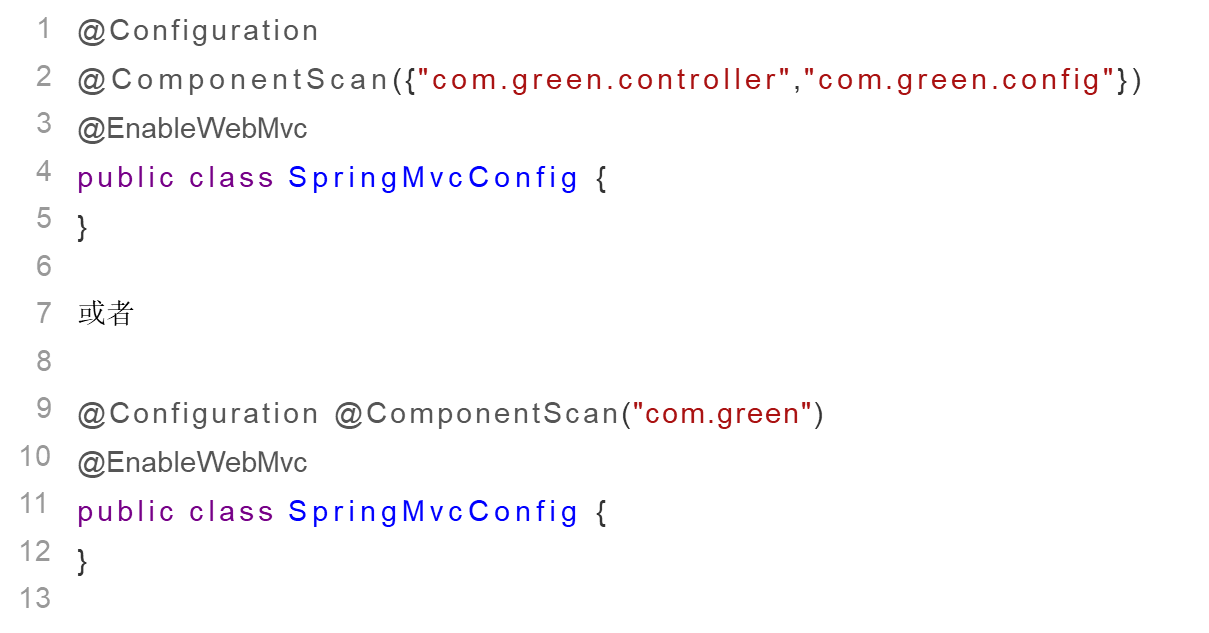
SpringMVC需要将静态资源进行放行。
该配置类是在config目录下,SpringMVC扫描的是controller包,
所以该配置类还未生效,要想生效需要将SpringMvcConfig配置类进行修改
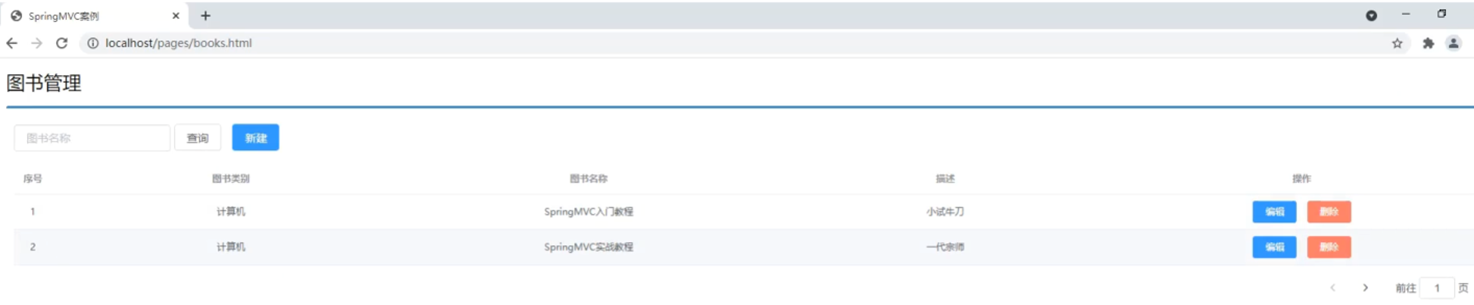
步骤3:修改books.html页面
<!DOCTYPE html>

<html>
<head>
    <!-- 页面meta -->
    <meta charset="utf-8">
    <title>SpringMVC案例</title>
    <!-- 引入样式 -->
    <link rel="stylesheet" href="../plugins/elementui/index.css">
    <link rel="stylesheet" href="../plugins/font-awesome/css/font-awesome.min.css">
    <link rel="stylesheet" href="../css/style.css">
</head>

<body class="hold-transition">

<div id="app">

    <div class="content-header">
        <h1>图书管理</h1>
    </div>

    <div class="app-container">
        <div class="box">
            <div class="filter-container">
                <el-input placeholder="图书名称" style="width: 200px;" class="filter-item"></el-input>
                <el-button class="dalfBut">查询</el-button>
                <el-button type="primary" class="butT" @click="openSave()">新建</el-button>
            </div>

            <el-table size="small" current-row-key="id" :data="dataList" stripe highlight-current-row>
                <el-table-column type="index" align="center" label="序号"></el-table-column>
                <el-table-column prop="type" label="图书类别" align="center"></el-table-column>
                <el-table-column prop="name" label="图书名称" align="center"></el-table-column>
                <el-table-column prop="description" label="描述" align="center"></el-table-column>
                <el-table-column label="操作" align="center">
                    <template slot-scope="scope">
                        <el-button type="primary" size="mini">编辑</el-button>
                        <el-button size="mini" type="danger">删除</el-button>
                    </template>
                </el-table-column>
            </el-table>

            <div class="pagination-container">
                <el-pagination
                        class="pagiantion"
                        @current-change="handleCurrentChange"
                        :current-page="pagination.currentPage"
                        :page-size="pagination.pageSize"
                        layout="total, prev, pager, next, jumper"
                        :total="pagination.total">
                </el-pagination>
            </div>

            <!-- 新增标签弹层 -->
            <div class="add-form">
                <el-dialog title="新增图书" :visible.sync="dialogFormVisible">
                    <el-form ref="dataAddForm" :model="formData" :rules="rules" label-position="right"
                             label-width="100px">
                        <el-row>
                            <el-col :span="12">
                                <el-form-item label="图书类别" prop="type">
                                    <el-input v-model="formData.type"/>
                                </el-form-item>
                            </el-col>
                            <el-col :span="12">
                                <el-form-item label="图书名称" prop="name">
                                    <el-input v-model="formData.name"/>
                                </el-form-item>
                            </el-col>
                        </el-row>
                        <el-row>
                            <el-col :span="24">
                                <el-form-item label="描述">
                                    <el-input v-model="formData.description" type="textarea"></el-input>
                                </el-form-item>
                            </el-col>
                        </el-row>
                    </el-form>
                    <div slot="footer" class="dialog-footer">
                        <el-button @click="dialogFormVisible = false">取消</el-button>
                        <el-button type="primary" @click="saveBook()">确定</el-button>
                    </div>
                </el-dialog>
            </div>

        </div>
    </div>
</div>
</body>

<!-- 引入组件库 -->
<script src="../js/vue.js"></script>
<script src="../plugins/elementui/index.js"></script>
<script type="text/javascript" src="../js/jquery.min.js"></script>
<script src="../js/axios-0.18.0.js"></script>

<script>
    var vue = new Vue({

        el: '#app',

        data: {
            dataList: [],//当前页要展示的分页列表数据
            formData: {},//表单数据
            dialogFormVisible: false,//增加表单是否可见
            dialogFormVisible4Edit: false,//编辑表单是否可见
            pagination: {},//分页模型数据,暂时弃用
        },

        //钩子函数,VUE对象初始化完成后自动执行
        created() {
            this.getAll();
        },

        methods: {
            // 重置表单
            resetForm() {
                //清空输入框
                this.formData = {};
            },

            // 弹出添加窗口
            openSave() {
                this.dialogFormVisible = true;
                this.resetForm();
            },

            //添加
            saveBook() {
                axios.post("/books", this.formData).then((res) => {
                    this.dialogFormVisible = false;//关闭新增表单
                });
            },

            //主页列表查询
            getAll() {
                axios.get("/books").then((res) => {
                    this.dataList = res.data;
                });
            }
        }
    })
</script>
</html>
SSM整合
SSM整合
1创建工程
2.SSM整合
    Spring
        SpringConfig
            标识该类为配置类 @Configuration
            扫描Service所在的包 @ComponentScan
            在Service层要管理事务 @EnableTransactionManagement
            读取外部的properties配置文件 @PropertySource
            整合Mybatis需要引入Mybatis相关配置类 @Import
    MyBatis
        MybatisConfig
            构建SqlSessionFactoryBean并设置别名扫描与数据源,@Bean
            构建MapperScannerConfigurer并设置DAO层的包扫描
        JdbcConfig
            构建DataSource数据源,DruidDataSouroce,需要注入数据库连接四要素,@Bean @Value
            构建平台事务管理器,DataSourceTransactionManager,@Bean
        jdbc.properties
    SpringMVC
        ServletConfig
        SpringMvcConfig
            标识该类为配置类 @Configuration
            扫描Controller所在的包 @ComponentScan
            开启SpringMVC注解支持 @EnableWebMvc
3. 功能模块
    表与实体类
    dao(接口+自动代理)
    service(接口+实现类)
        业务层接口测试(整合JUnit)
    controller
表现层接口测试(PostMan)步骤1:创建Maven的web项目
步骤2:添加依赖
<?xml version="1.0" encoding="UTF-8"?>
<project xmlns="http://maven.apache.org/POM/4.0.0"
         xmlns:xsi="http://www.w3.org/2001/XMLSchema-instance"
         xsi:schemaLocation="http://maven.apache.org/POM/4.0.0 http://maven.apache.org/xsd/maven-4.0.0.xsd">
    <modelVersion>4.0.0</modelVersion>

    <groupId>com.green</groupId>
    <artifactId>spring_08_ssm</artifactId>
    <version>1.0-SNAPSHOT</version>
    <packaging>war</packaging>

    <properties>
        <maven.compiler.source>13</maven.compiler.source>
        <maven.compiler.target>13</maven.compiler.target>
    </properties>

    <dependencies>
        <dependency>
            <groupId>org.springframework</groupId>
            <artifactId>spring-webmvc</artifactId>
            <version>5.2.10.RELEASE</version>
        </dependency>

        <dependency>
            <groupId>org.springframework</groupId>
            <artifactId>spring-jdbc</artifactId>
            <version>5.2.10.RELEASE</version>
        </dependency>

        <dependency>
            <groupId>org.springframework</groupId>
            <artifactId>spring-test</artifactId>
            <version>5.2.10.RELEASE</version>
        </dependency>

        <dependency>
            <groupId>org.mybatis</groupId>
            <artifactId>mybatis</artifactId>
            <version>3.5.6</version>
        </dependency>

        <dependency>
            <groupId>org.mybatis</groupId>
            <artifactId>mybatis-spring</artifactId>
            <version>1.3.0</version>
        </dependency>

        <dependency>
            <groupId>mysql</groupId>
            <artifactId>mysql-connector-java</artifactId>
            <version>5.1.47</version>
        </dependency>

        <dependency>
            <groupId>com.alibaba</groupId>
            <artifactId>druid</artifactId>
            <version>1.1.16</version>
        </dependency>

        <dependency>
            <groupId>junit</groupId>
            <artifactId>junit</artifactId>
            <version>4.12</version>
            <scope>test</scope>
        </dependency>

        <dependency>
            <groupId>javax.servlet</groupId>
            <artifactId>javax.servlet-api</artifactId>
            <version>3.1.0</version>
            <scope>provided</scope>
        </dependency>

        <dependency>
            <groupId>com.fasterxml.jackson.core</groupId>
            <artifactId>jackson-databind</artifactId>
            <version>2.9.0</version>
        </dependency>
    </dependencies>

    <build>
        <plugins>
            <plugin>
                <groupId>org.apache.tomcat.maven</groupId>
                <artifactId>tomcat7-maven-plugin</artifactId>
                <version>2.2</version>
                <configuration>
                    <!--                    <port>80</port>-->  <!--tomcat端口号-->
                    <path>/</path>  <!--虚拟目录-->
                    <uriEncoding>UTF-8</uriEncoding><!--get乱码处理 访问路径编解码字符集-->
                </configuration>
            </plugin>
        </plugins>
    </build>
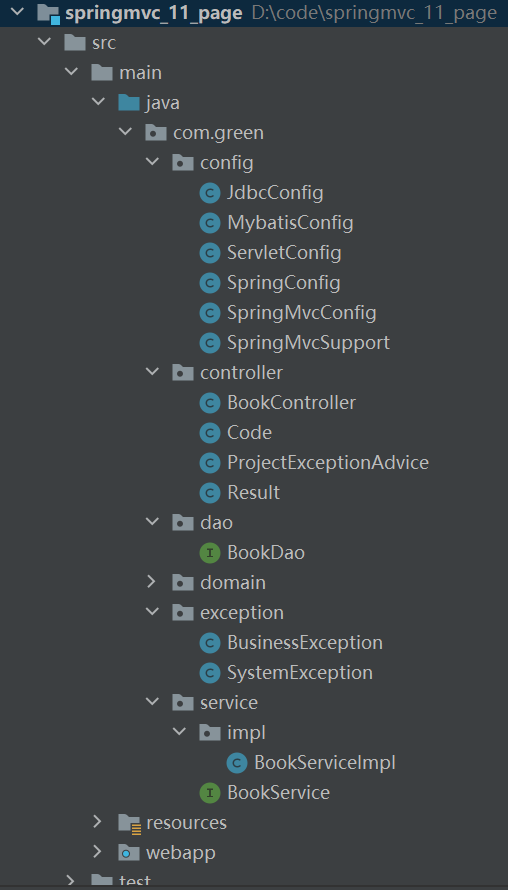
</project>步骤3:创建项目包结构
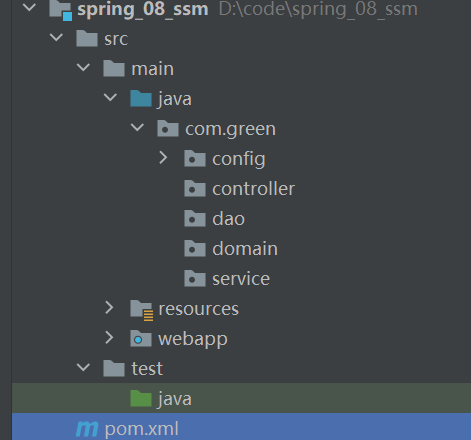
config目录存放的是相关的配置类
controller编写的是Controller类
dao存放的是Dao接口,因为使用的是Mapper接口代理方式,所以没有实现类包
service存的是Service接口,impl存放的是Service实现类
resources:存入的是配置文件,如Jdbc.properties
webapp:目录可以存放静态资源
test/java:存放的是测试类
步骤4:创建jdbc.properties
jdbc.driver=com.mysql.jdbc.Driver
jdbc.url=jdbc:mysql://localhost:3306/ssm_db
jdbc.username=root
jdbc.password=root
步骤5:创建配置类
@Configuration
@ComponentScan({"com.green.service"})
@PropertySource("classpath:jdbc.properties")//加载文件
@Import({JdbcConfig.class,MybatisConfig.class}) //加载其他配置类
@EnableTransactionManagement//事务管理
public class SpringConfig {
}

public class JdbcConfig {

    @Value("${jdbc.driver}")
    private String driver;

    @Value("${jdbc.url}")
    private String url;

    @Value("${jdbc.username}")
    private String username;

    @Value("${jdbc.password}")
    private String password;

    @Bean
    public DataSource dataSource() {
        DruidDataSource dataSource = new DruidDataSource();

        dataSource.setDriverClassName(driver);
        dataSource.setUrl(url);
        dataSource.setUsername(username);
        dataSource.setPassword(password);

        return dataSource;
    }

    //事务管理器
    @Bean
    public PlatformTransactionManager transactionManager(DataSource dataSource){
        DataSourceTransactionManager ds = new DataSourceTransactionManager();
        ds.setDataSource(dataSource);
        return ds;
    }
}

public class MybatisConfig {

    @Bean
    public SqlSessionFactoryBean sqlSessionFactory(DataSource dataSource){
        SqlSessionFactoryBean factoryBean = new SqlSessionFactoryBean();
        factoryBean.setDataSource(dataSource);
        factoryBean.setTypeAliasesPackage("com.green.domain");    //类型别名扫描包,实体类的扫描路径
        return factoryBean;
    }

    @Bean
    public MapperScannerConfigurer mapperScannerConfigurer(){
        MapperScannerConfigurer msc = new MapperScannerConfigurer();
        msc.setBasePackage("com.green.dao");    //配置 MyBatis 的 Mapper 接口扫描
        return msc;
    }
}

@Configuration
@ComponentScan({"com.green.controller"})
@EnableWebMvc
public class SpringMvcConfig {
}

public class ServletConfig extends AbstractAnnotationConfigDispatcherServletInitializer {

    @Override
    protected Class<?>[] getRootConfigClasses() {
        return new Class[]{SpringConfig.class};
    }

    @Override
    protected Class<?>[] getServletConfigClasses() {
        return new Class[]{SpringMvcConfig.class};
    }

    @Override
    protected String[] getServletMappings() {
        return new String[]{"/"};
    }

    //设置post请求中文乱码过滤器
    @Override
    protected Filter[] getServletFilters() {
        CharacterEncodingFilter filter = new CharacterEncodingFilter(); filter.setEncoding("utf-8");
        return new Filter[]{filter}; }
}
功能模块开发
需求:对表tbl_book进行新增、修改、删除、根据ID查询和查询所有
步骤1:创建数据库及表
-- ----------------------------
-- Table structure for tbl_book
-- ----------------------------
DROP TABLE IF EXISTS tbl_book;
CREATE TABLE tbl_book (
  id int(11) NOT NULL AUTO_INCREMENT,
  type varchar(20) CHARACTER SET utf8 COLLATE utf8_general_ci NULL DEFAULT NULL,
  name varchar(50) CHARACTER SET utf8 COLLATE utf8_general_ci NULL DEFAULT NULL,
  description varchar(255) CHARACTER SET utf8 COLLATE utf8_general_ci NULL DEFAULT NULL,
  PRIMARY KEY (id) USING BTREE
) ENGINE = InnoDB AUTO_INCREMENT = 13 CHARACTER SET = utf8 COLLATE = utf8_general_ci ROW_FORMAT = Dynamic;

-- ----------------------------
-- Records of tbl_book
-- ----------------------------
INSERT INTO tbl_book VALUES (1, '计算机理论', 'Spring实战 第5版', 'Spring入门经典教程,深入理解Spring原理技术内幕');
INSERT INTO tbl_book VALUES (2, '计算机理论', 'Spring 5核心原理与30个类手写实战', '十年沉淀之作,手写Spring精华思想');
INSERT INTO tbl_book VALUES (3, '计算机理论', 'Spring 5 设计模式', '深入Spring源码剖析Spring源码中蕴含的10大设计模式');
INSERT INTO tbl_book VALUES (4, '计算机理论', 'Spring MVC+MyBatis开发从入门到项目实战', '全方位解析面向Web应用的轻量级框架,带你成为Spring MVC开发高手');
INSERT INTO tbl_book VALUES (5, '计算机理论', '轻量级Java Web企业应用实战', '源码级剖析Spring框架,适合已掌握Java基础的读者');
INSERT INTO tbl_book VALUES (6, '计算机理论', 'Java核心技术 卷I 基础知识(原书第11版)', 'Core Java 第11版,Jolt大奖获奖作品,针对Java SE9、10、11全面更新');
INSERT INTO tbl_book VALUES (7, '计算机理论', '深入理解Java虚拟机', '5个维度全面剖析JVM,大厂面试知识点全覆盖');
INSERT INTO tbl_book VALUES (8, '计算机理论', 'Java编程思想(第4版)', 'Java学习必读经典,殿堂级著作!赢得了全球程序员的广泛赞誉');
INSERT INTO tbl_book VALUES (9, '计算机理论', '零基础学Java(全彩版)', '零基础自学编程的入门图书,由浅入深,详解Java语言的编程思想和核心技术');
INSERT INTO tbl_book VALUES (10, '市场营销', '直播就该这么做:主播高效沟通实战指南', '李子柒、李佳琦、薇娅成长为网红的秘密都在书中');
INSERT INTO tbl_book VALUES (11, '市场营销', '直播销讲实战一本通', '和秋叶一起学系列网络营销书籍');
INSERT INTO tbl_book VALUES (12, '市场营销', '直播带货:淘宝、天猫直播从新手到高手', '一本教你如何玩转直播的书,10堂课轻松实现带货月入3W+');
步骤2:编写模型类

步骤3:编写Dao接口
public interface BookDao {

    //新增数据
    @Insert("insert into tbl_book values (null, #{type}, #{name}, #{description})")
//    @Insert("insert into tbl_book (type, name, description) values (#{type},#{name},#{description})")
    void save(Book book);

    //修改数据
    @Update("update tbl_book set type = #{type}, name = #{name}, description = #{description} where id = #{id}")
    void update(Book book);

    //删除数据
    @Delete("delete from tbl_book where id = #{id}")
    void delete(Integer id);

    //根据id查询数据
    @Select("select * from tbl_book where id = #{id}")
    Book getById(Integer id);

    //查询所有数据
    @Select("select * from tbl_book")
    List<Book> getAll();
}步骤4:编写Service接口和实现类
@Transactional//事务管理
public interface BookService {

    /**
     * 添加数据
     * @param book
     * @return
     */
    boolean save(Book book);

    /**
     * 修改数据
     * @param book
     * @return
     */
    boolean update(Book book);

    /**
     * 根据id删除数据
     * @param id
     * @return
     */
    boolean delete(Integer id);

    /**
     * 根据id查询数据
     * @param id
     * @return
     */
    Book getById(Integer id);

    /**
     * 查询所有
     * @return
     */
    List<Book> getAll();
}

@Service
public class BookServiceImpl implements BookService {

    @Autowired
    private BookDao bookDao;

    @Override
    public boolean save(Book book) {
        bookDao.save(book);
        return true;
    }

    @Override
    public boolean update(Book book) {
        bookDao.update(book);
        return true;
    }

    @Override
    public boolean delete(Integer id) {
        bookDao.delete(id);
        return true;
    }

    @Override
    public Book getById(Integer id) {
        return bookDao.getById(id);
    }

    @Override
    public List<Book> getAll() {
        return bookDao.getAll();
    }
}
说明:
bookDao在Service中注入的会提示一个红线提示,为什么呢?
BookDao是一个接口,没有实现类,接口是不能创建对象的,
所以最终注入的应该是代理对象代理对象是由Spring的IOC容器来创建管理的
IOC容器又是在Web服务器启动的时候才会创建
IDEA在检测依赖关系的时候,没有找到适合的类注入,所以会提示错误提示
但是程序运行的时候,代理对象就会被创建,框架会使用DI进行注入,所以程序运行无影响。如何解决上述问题?
可以不用理会,因为运行是正常的
设置错误提示级别

步骤5:编写Contorller类
@RestController
@RequestMapping("/books")
public class BookController {

    @Autowired
    private BookService bookService;

    @PostMapping
    public boolean save(@RequestBody Book book) {
        return bookService.save(book);
    }

    @PutMapping
    public boolean update(@RequestBody Book book) {
        return bookService.update(book);
    }

    @DeleteMapping("/{id}")
    public boolean delete(@PathVariable Integer id) {
        return bookService.delete(id);
    }

    @GetMapping("/{id}")
    public Book getById(@PathVariable Integer id) {
        return bookService.getById(id);
    }

    @GetMapping
    public List<Book> getAll() {
        return bookService.getAll();
    }
}
业务层的代码使用Spring整合Junit 的知识点进行单元测试:
单元测试
步骤1:新建测试类
步骤2:注入Service类
步骤3:编写测试方法
@RunWith(SpringJUnit4ClassRunner.class)
@ContextConfiguration(classes = SpringConfig.class)
public class BookServiceTest {

    @Autowired
    private BookService bookService;

    @Test
    public void testGetById(){
        Book book = bookService.getById(1);
        System.out.println(book);
    }

    @Test
    public void testGetAll(){
        List<Book> books = bookService.getAll();
        System.out.println(books);
    }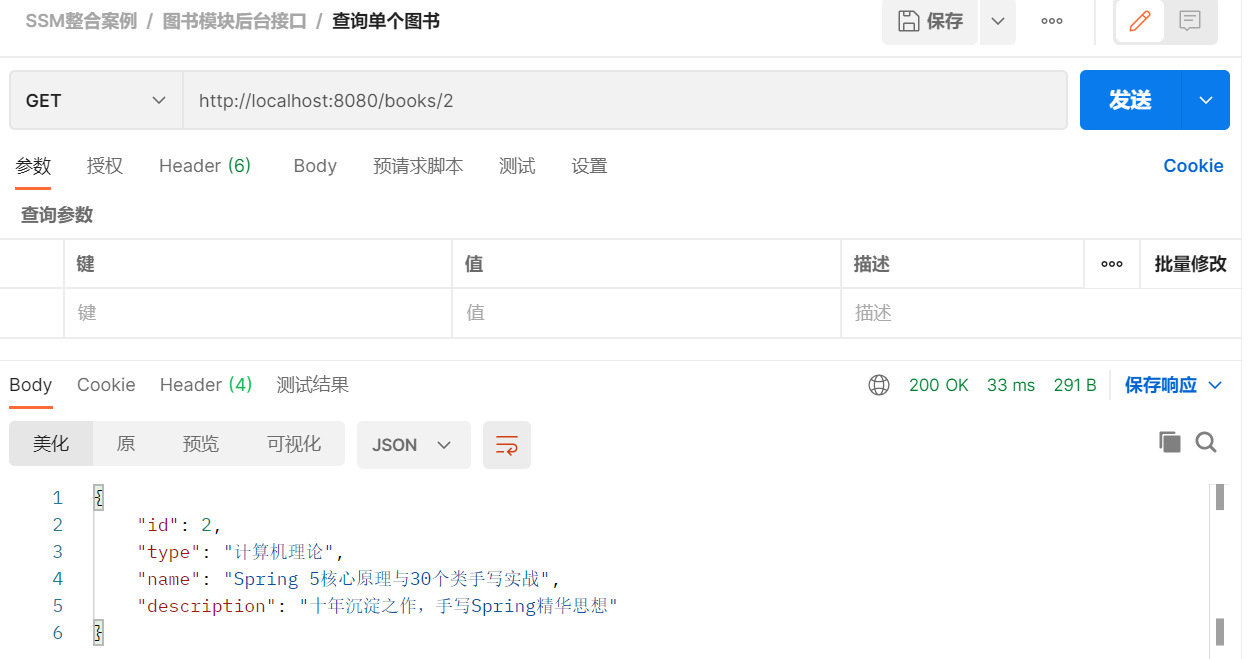
}根据ID查询,测试的结果为:

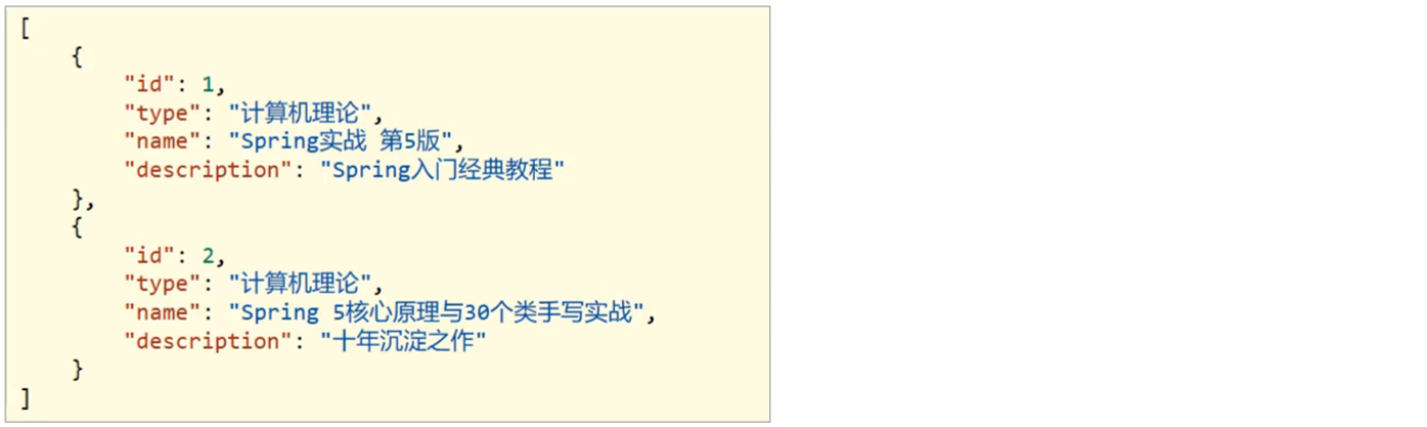
查询所有,测试的结果为:

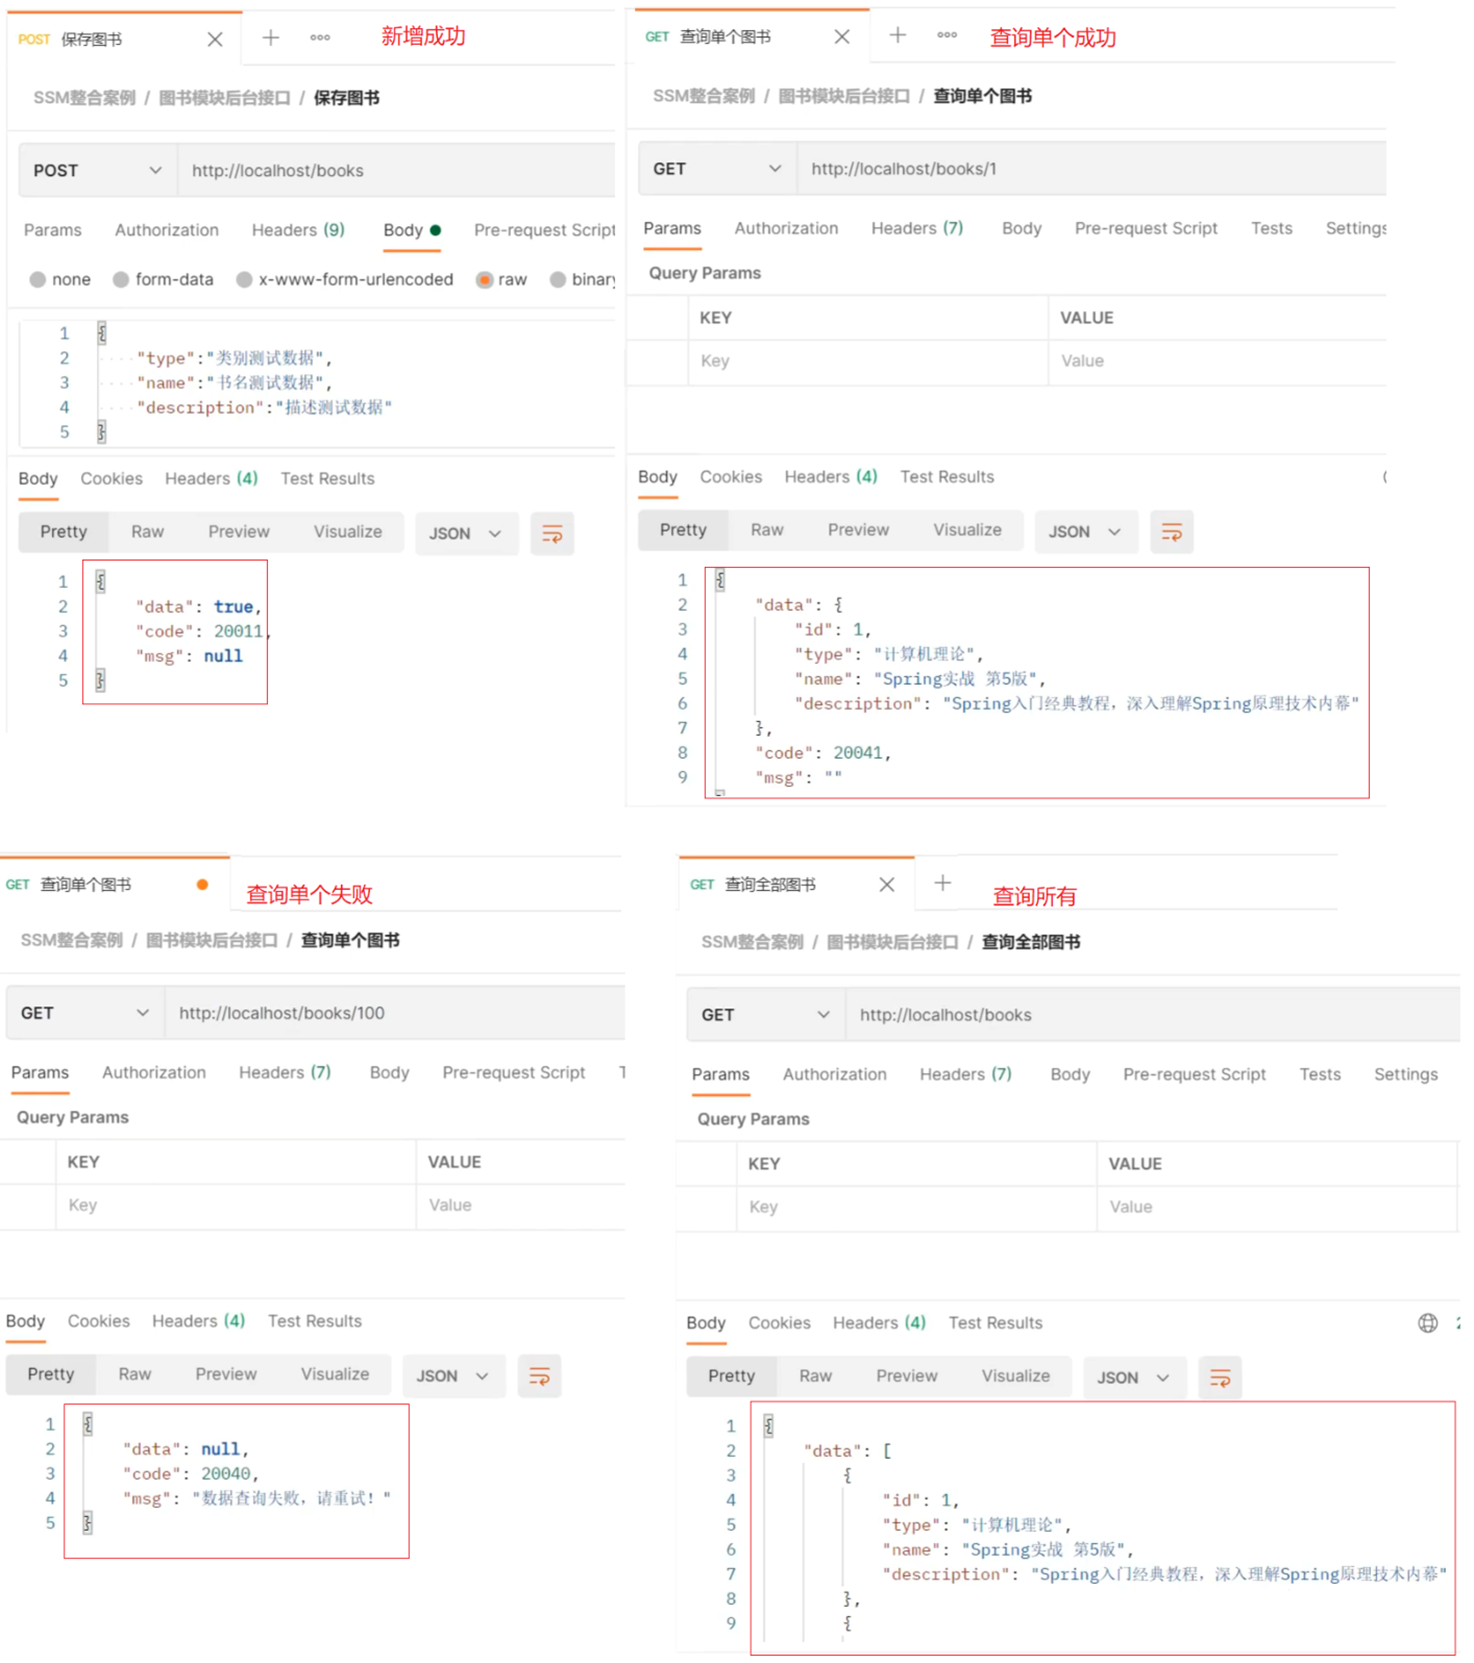
PostMan测试
新增
http://localhost:8080/books
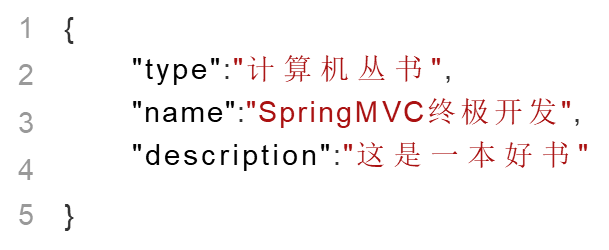
{
"type":"类别测试数据",
"name":"书名测试数据",
"description":"描述测试数据"
} 
修改
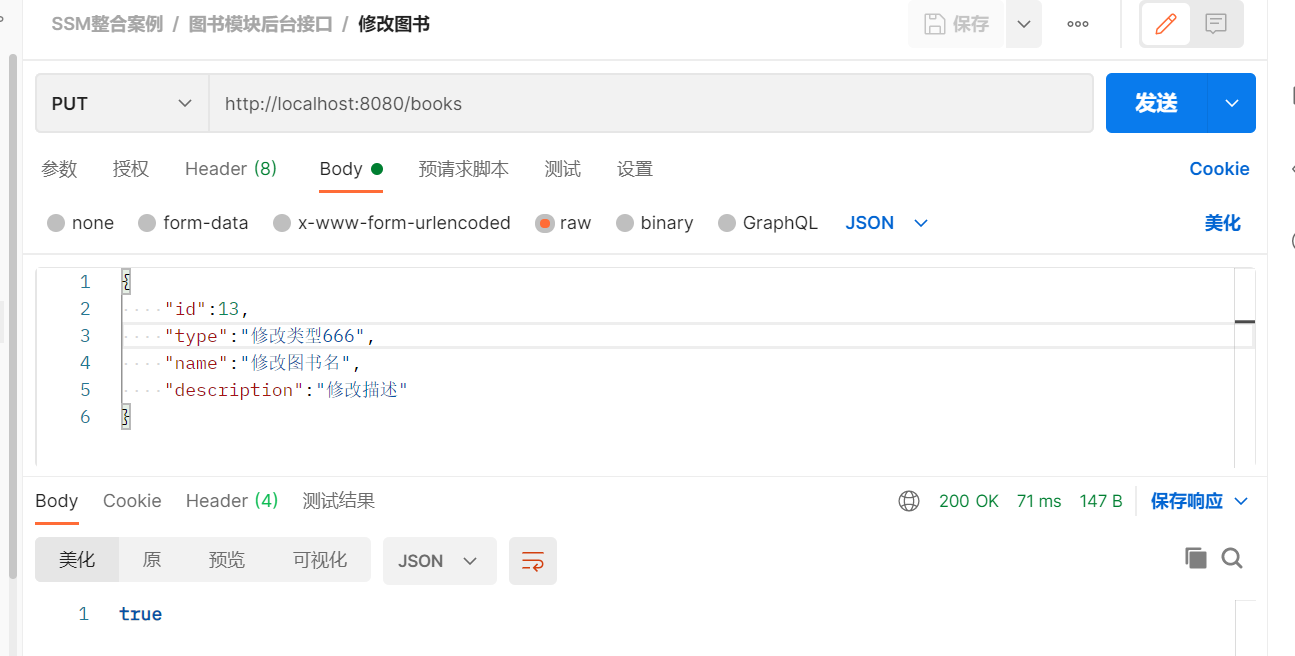
删除

查询单个
查询所有

表现层封装数据
表现层与前端数据传输协议定义
在Controller层增删改返回给前端的是boolean类型数据 ![]()
在Controller层查询单个返回给前端的是对象

在Controller层查询所有返回给前端的是集合对象
目前就已经有三种数据类型返回给前端,如果随着业务的增长,我们需要返回的数据类型会越来越多。
对于前端开发人员在解析数据的时候就比较凌乱了,所以对于前端来说,
如果后台能够返回一个统一的数据结果,前端在解析的时候就可以按照一种方式进行解析。
开发就会变得更加简单。
所以将返回结果的数据进行统一,具体如何来做,大体的思路为:
    为了封装返回的结果数据:创建结果模型类,封装数据到data属性中
    为了封装返回的数据是何种操作及是否操作成功:封装操作结果到code属性中
    操作失败后为了封装返回的错误信息:封装特殊消息到message(msg)属性中
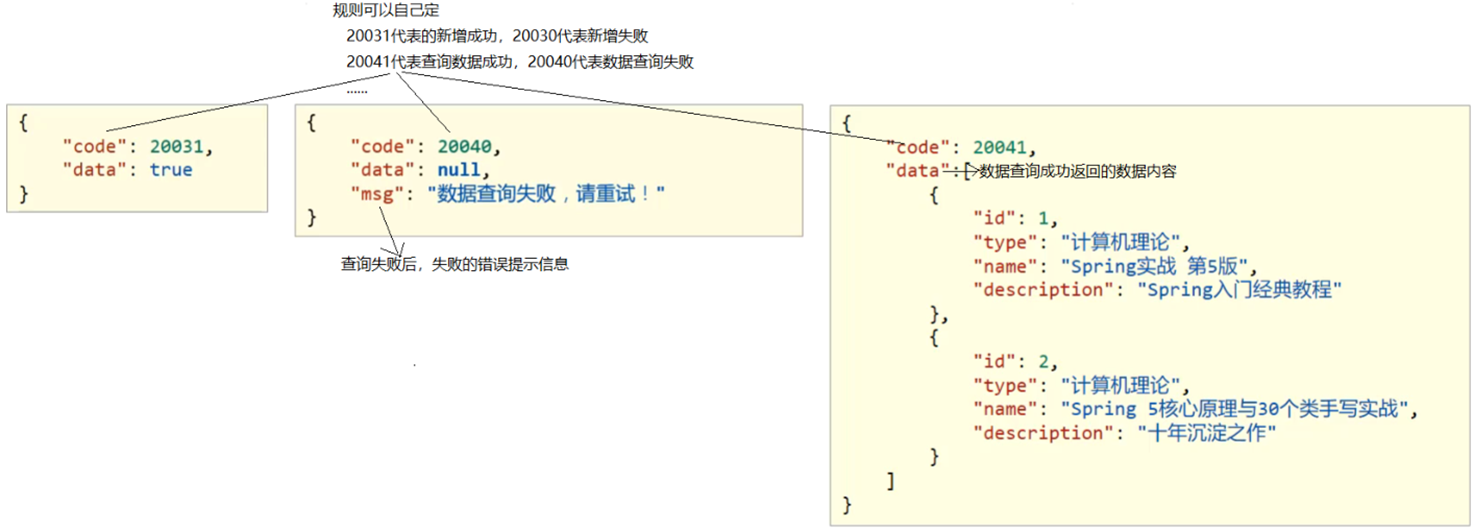
根据分析,我们可以设置统一数据返回结果类
public class Result{
    private Object data;
    private Integer code;
    private String msg;
}
注意:Result类名及类中的字段并不是固定的,可以根据需要自行增减提供若干个构造方法,方便操作。
创建一个Web的Maven项目
pom.xml添加SSM整合所需jar包
创建对应的配置类
编写Controller、Service接口、Service实现类、Dao接口和模型类
resources下提供jdbc.properties配置文件
表现层与前端数据传输协议实现
环境准备
创建一个Web的Maven项目pom.xml添加SSM整合所需jar包创建对应的配置类
编写Controller、Service接口、Service实现类、Dao接口和模型类
resources下提供jdbc.properties配置文件
结果封装
步骤1:创建Result类
public class Result {

    //描述统一格式中的数据
    private Object data;

    //描述统一格式中的编码,用于区分操作,可以简化配置0或1表示成功失败
    private Integer code;

    //描述统一格式中的消息,可选属性
    private String msg;

    public Result() {
    }

    //构造方法是方便对象的创建
    public Result(Integer code,Object data) {
        this.data = data;
        this.code = code;
    }

    //构造方法是方便对象的创建
    public Result(Integer code,Object data,  String msg) {
        this.data = data;
        this.code = code;
        this.msg = msg;
    }

    public Object getData() {
        return data;
    }

    public void setData(Object data) {
        this.data = data;
    }

    public Integer getCode() {
        return code;
    }

    public void setCode(Integer code) {
        this.code = code;
    }

    public String getMsg() {
        return msg;
    }

    public void setMsg(String msg) {
        this.msg = msg;
    }
}步骤2:定义返回码Code类
//格式编码,区分操作
public class Code {

    public static final Integer SAVE_OK = 20011;
    public static final Integer DELETE_OK = 20021;
    public static final Integer UPDATE_OK = 20031;
    public static final Integer GET_OK = 20041;

    public static final Integer SAVE_ERR = 20010;
    public static final Integer DELETE_ERR = 20020;
    public static final Integer UPDATE_ERR = 20030;
    public static final Integer GET_ERR = 20040;
}

注意:code类中的常量设计也不是固定的,可以根据需要自行增减,例如将查询再进行细分为
GET_OK,GET_ALL_OK,GET_PAGE_OK等。
步骤3:修改Controller类的返回值
@RestController//统一每一个控制器方法返回值
@RequestMapping("/books")
public class BookController {

    @Autowired
    private BookService bookService;

    @PostMapping
    public Result save(@RequestBody Book book) {
        boolean flag = bookService.save(book);
        return new Result(flag ? Code.SAVE_OK : Code.SAVE_ERR, flag);
    }

    @PutMapping
    public Result update(@RequestBody Book book) {
        boolean flag = bookService.update(book);
        return new Result(flag ? Code.UPDATE_OK : Code.UPDATE_ERR, flag);
    }

    @DeleteMapping("/{id}")
    public Result delete(@PathVariable Integer id) {
        boolean flag = bookService.delete(id);
        return new Result(flag ? Code.DELETE_OK : Code.DELETE_ERR, flag);
    }

    @GetMapping("/{id}")
    public Result getById(@PathVariable Integer id) {
        Book book = bookService.getById(id);
        Integer code = (book != null) ? Code.GET_OK : Code.GET_ERR;
        String msg = (book != null) ? "" : "数据查询失败,请重试!";
        return new Result(code,book,msg);
    }

    @GetMapping
    public Result getAll() {
        List<Book> books = bookService.getAll();
        Integer code = (books != null) ? Code.GET_OK : Code.GET_ERR;
        String msg = (books != null) ? "" : "数据查询失败,请重试!";
        return new Result(code,books,msg);
    }
}步骤4:启动服务测试
返回结果就已经能以一种统一的格式返回给前端。
前端根据返回的结果,先从中获取code ,根据code判断,
如果成功则取data 属性的值,如果失败,则取msg 中的值做提示。
异常处理器
问题描述
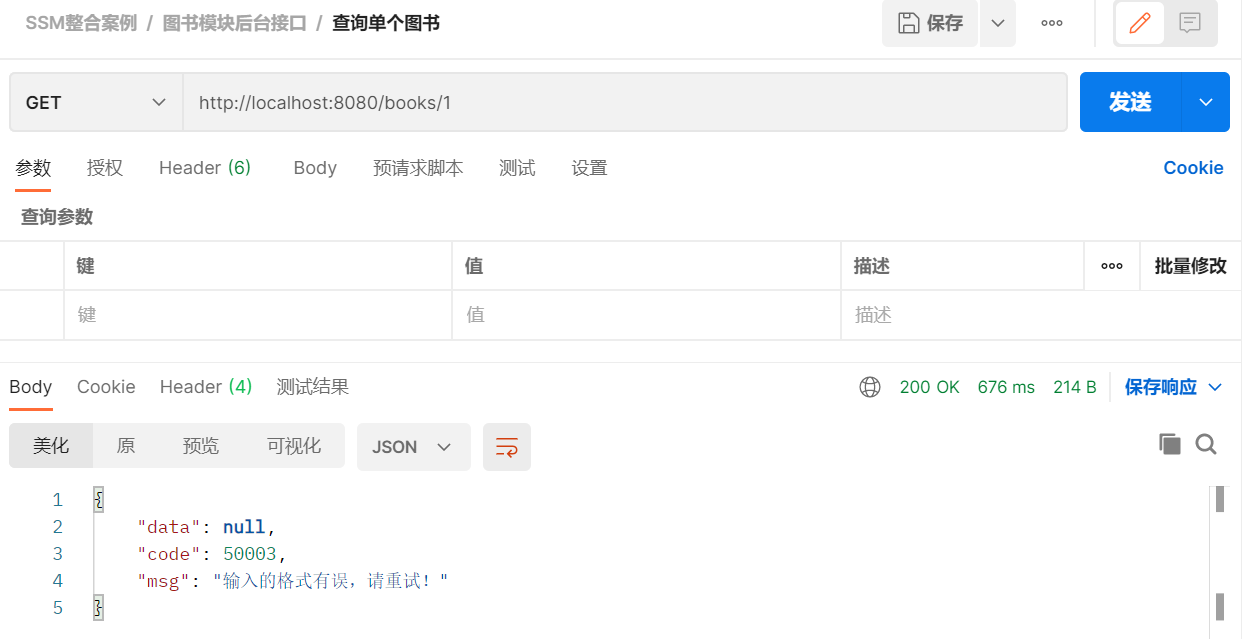
修改BookController类的getById 方法
@GetMapping("/{id}")
public Result getById(@PathVariable Integer id) {
    //手动添加一个错误信息
    if(id==1){
        int i = 1/0;
    }
    Book book = bookService.getById(id);
    Integer code = book != null ? Code.GET_OK : Code.GET_ERR;
    String msg = book != null ? "" : "数据查询失败,请重试!";
    return new Result(code,book,msg);
}
重新启动运行项目,使用PostMan发送请求,当传入的id为1,则会出现如下效果:

异常的种类及出现异常的原因:
框架内部抛出的异常:因使用不合规导致
数据层抛出的异常:因外部服务器故障导致(例如:服务器访问超时)
业务层抛出的异常:因业务逻辑书写错误导致(例如:遍历业务书写操作,导致索引异常等)
表现层抛出的异常:因数据收集、校验等规则导致(例如:不匹配的数据类型间导致异常)
工具类抛出的异常:因工具类书写不严谨不够健壮导致(例如:必要释放的连接长期未释放等)
思考
1.  各个层级均出现异常,异常处理代码书写在哪一层?
    所有的异常均抛出到表现层进行处理
2.  异常的种类很多,表现层如何将所有的异常都处理到呢?
    异常分类
3.  表现层处理异常,每个方法中单独书写,代码书写量巨大且意义不强,如何解决?
    AOP

异常处理器:
    集中的、统一的处理项目中出现的异常。
异常处理器的使用
环境准备
创建一个Web的Maven项目
pom.xml添加SSM整合所需jar包
创建对应的配置类
编写Controller、Service接口、Service实现类、Dao接口和模型类
resources下提供jdbc.properties配置文件
使用步骤
步骤1:创建异常处理器类
//@RestControllerAdvice用于标识当前类为REST风格对应的异常处理器
@RestControllerAdvice
public class ProjectExceptionAdvice {

    //除了自定义的异常处理器,保留对Exception类型的异常处理,用于处理非预期的异常
    @ExceptionHandler(Exception.class)//定义异常类型
    public Result doException(Exception ex){
        System.out.println(ex);
        return new Result(666,null,"出现异常!");
    }
}确保SpringMvcConfig能够扫描到异常处理器类
步骤2:让程序抛出异常
修改BookController 的getById方法,添加int i = 1/0 步骤3:运行程序,测试

异常处理器类返回结果给前端
| 名称 |
@RestControllerAdvice |
| 类型 |
类注解 |
| 位置 |
Rest风格开发的控制器增强类定义上方 |
| 作用 |
为Rest风格开发的控制器类做增强 |
说明:此注解自带@ResponseBody注解与@Component注解,具备对应的功能

| 名称 |
@ExceptionHandler |
| 类型 |
方法注解 |
| 位置 |
专用于异常处理的控制器方法上方 |
| 作用 |
设置指定异常的处理方案,功能等同于控制器方法, |
说明:此类方法可以根据处理的异常不同,制作多个方法分别处理对应的异常
项目异常处理方案
异常分类
业务异常(BusinessException)
    规范的用户行为产生的异常
        用户在页面输入内容的时候未按照指定格式进行数据填写,如在年龄框输入的是字符串
    不规范的用户行为操作产生的异常
        如用户故意传递错误数据
系统异常(SystemException)
    项目运行过程中可预计但无法避免的异常
        比如数据库或服务器宕机
其他异常(Exception)
    编程人员未预期到的异常,如:用到的文件不存在

异常解决方案
业务异常(BusinessException)
    发送对应消息传递给用户,提醒规范操作
    大家常见的就是提示用户名已存在或密码格式不正确等
系统异常(SystemException)
    发送固定消息传递给用户,安抚用户
        系统繁忙,请稍后再试
        系统正在维护升级,请稍后再试
        系统出问题,请联系系统管理员等
    发送特定消息给运维人员,提醒维护
        可以发送短信、邮箱或者是公司内部通信软件
    记录日志
        发消息和记录日志对用户来说是不可见的,属于后台程序
其他异常(Exception)
    发送固定消息传递给用户,安抚用户
    发送特定消息给编程人员,提醒维护(纳入预期范围内)
        一般是程序没有考虑全,比如未做非空校验等
    记录日志
异常解决方案的具体实现
思路:
1.先通过自定义异常,完成BusinessException和SystemException的定义
2.将其他异常包装成自定义异常类型
3.在异常处理器类中对不同的异常进行处理步骤1:自定义异常类
//自定义异常处理器,用于封装异常信息,对异常进行分类
public class SystemException extends RuntimeException {

    private Integer code;

    public Integer getCode() {
        return code;
    }

    public void setCode(Integer code) {
        this.code = code;
    }

    public SystemException(Integer code, String message) {
        super(message);
        this.code = code;
    }

    public SystemException(Integer code, String message, Throwable cause) {
        super(message, cause);
        this.code = code;
    }
}

public class BusinessException extends RuntimeException {

    private Integer code;

    public Integer getCode() {
        return code;
    }

    public void setCode(Integer code) {
        this.code = code;
    }

    public BusinessException(Integer code, String message) {
        super(message);
        this.code = code;
    }

    public BusinessException(Integer code, String message, Throwable cause) {
        super(message, cause);
        this.code = code;
    }
}
说明:
让自定义异常类继承RuntimeException 的好处是,后期在抛出这两个异常的时候,
就不用在try...catch...或throws了
自定义异常类中添加 code 属性的原因是为了更好的区分异常是来自哪个业务的步骤2:将其他异常包成自定义异常
假如在BookServiceImpl的getById方法抛异常了,该如何来包装呢?
具体的包装方式有:
方式一: try{}catch(){} 在catch中重新throw我们自定义异常即可。
方式二:直接throw自定义异常即可
@Override
public Book getById(Integer id) {
//模拟业务异常,包装成自定义异常
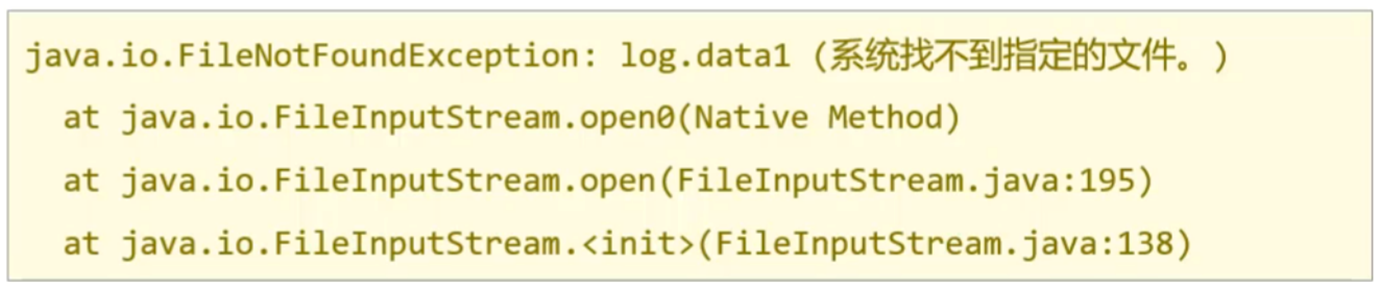
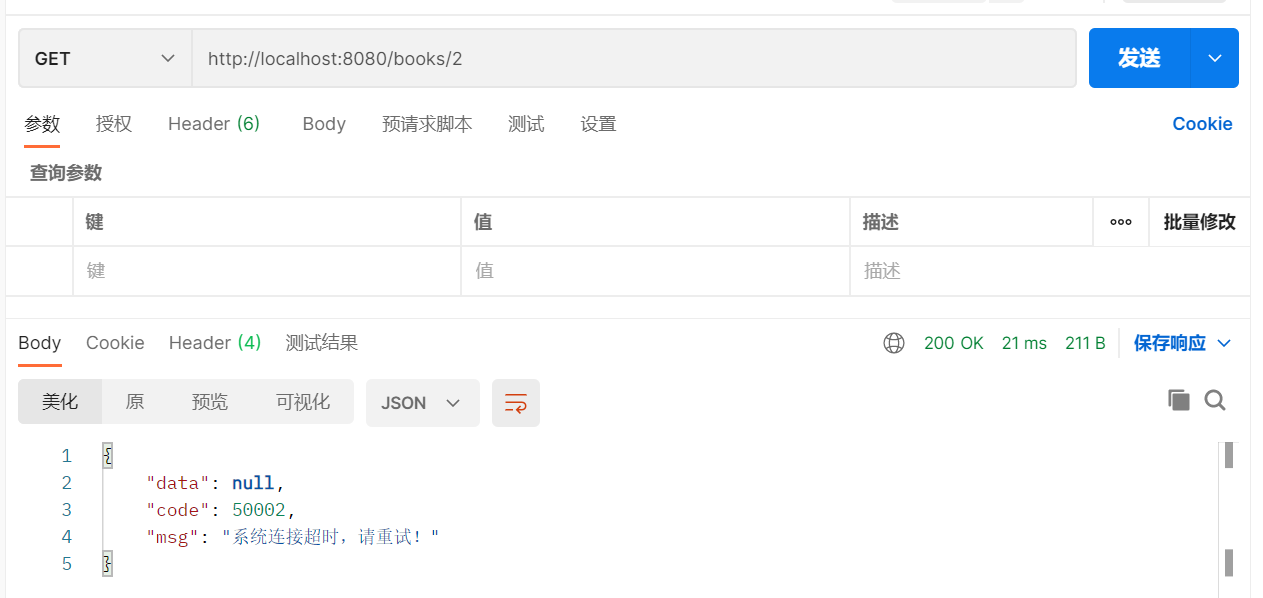
if (id == 1) {
throw new BusinessException(Code.BUSINESS_ERR, "输入的格式有误,请重试!");
}
//模拟系统异常,将可能出现的异常进行包装,转换成自定义异常
//将可能出现的异常进行包装,转换成自定义异常
try {
int i = 1 / 0;
} catch (Exception e) {
throw new SystemException(Code.SYSTEM_TIMOUT_ERR, "系统连接超时,请重试!");
}
return bookDao.getById(id);
}//格式编码,区分操作
//状态码
public class Code {
public static final Integer SAVE_OK = 20011;
public static final Integer DELETE_OK = 20021;
public static final Integer UPDATE_OK = 20031;
public static final Integer GET_OK = 20041;
public static final Integer SAVE_ERR = 20010;
public static final Integer DELETE_ERR = 20020;
public static final Integer UPDATE_ERR = 20030;
public static final Integer GET_ERR = 20040;
public static final Integer SYSTEM_ERR = 50001;
public static final Integer SYSTEM_TIMOUT_ERR = 50002;
public static final Integer BUSINESS_ERR = 50003;
public static final Integer SYSTEM_UNKNOW_ERR = 59999;
}步骤3:处理器类中处理自定义异常
//@RestControllerAdvice用于标识当前类为REST风格对应的异常处理器
@RestControllerAdvice
public class ProjectExceptionAdvice {

    //处理系统异常
    @ExceptionHandler(SystemException.class)//拦截系统异常
    public Result doSystemException(SystemException ex) {
        //记录日志
        //发送消息给运维人员
        //发送邮件给开发人员,ex对象发送给开发人员
        System.out.println(ex);
        return new Result(ex.getCode(), null, ex.getMessage());
    }

    //处理业务异常
    @ExceptionHandler(BusinessException.class)//拦截业务异常
    public Result doBusinessException(BusinessException ex) {
        System.out.println(ex);
        return new Result(ex.getCode(), null, ex.getMessage());
    }

    //处理其他异常
    //除了自定义的异常处理器,保留对Exception类型的异常处理,用于处理非预期的异常
    @ExceptionHandler(Exception.class)
    public Result doException(Exception ex) {
        //记录日志
        //发送消息给运维人员
        //发送邮件给开发人员,ex对象发送给开发人员
        System.out.println(ex);
        return new Result(Code.SYSTEM_UNKNOW_ERR, null, "系统繁忙,请稍后再试!");
    }
}步骤4:运行程序
如果传入的参数为1,会报BusinessException
如果传入的是其他参数,会报SystemException
小结
以后项目中的异常处理方式为:

案例:SSM整合标准开发
环境准备
创建一个Web的Maven项目
pom.xml添加SSM整合所需jar包
创建对应的配置类
编写Controller、Service接口、Service实现类、Dao接口和模型类
resources下提供jdbc.properties配置文件
因为添加了静态资源,SpringMVC会拦截,所有需要在SpringConfig的配置类中将静态资源进行放行。
新建SpringMvcSupport
@Configuration
public class SpringMvcSupport extends WebMvcConfigurationSupport {

    @Override
    protected void addResourceHandlers(ResourceHandlerRegistry registry) {
        registry.addResourceHandler("/pages/**").addResourceLocations("/pages/");
        registry.addResourceHandler("/css/**").addResourceLocations("/css/");
        registry.addResourceHandler("/js/**").addResourceLocations("/js/");
        registry.addResourceHandler("/plugins/**").addResourceLocations("/plugins/");
    }
}

在SpringMvcConfig中扫描SpringMvcSupport
@Configuration
@ComponentScan({"com.green.controller","com.green.config"})
@EnableWebMvc
public class SpringMvcConfig {
}
列表功能

需求:页面加载完后发送异步请求到后台获取列表数据进行展示。
1.找到页面的钩子函数,created()
2. created() 方法中调用了this.getAll() 方法
3.在getAll()方法中使用axios发送异步请求从后台获取数据
4.访问的路径为http://localhost/books
5.返回数据
返回数据res.data的内容如下:
{
    "data": [
        {
            "id": 1,
            "type": "计算机理论",
            "name": "Spring实战 第5版",
            "description": "Spring入门经典教程,深入理解Spring原理技术内幕"
        },
        {
            "id": 2,
            "type": "计算机理论",
            "name": "Spring 5核心原理与30个类手写实战",
            "description": "十年沉淀之作,手写Spring精华思想"
        },...
    ],
    "code": 20041,
    "msg": ""
}
发送方式:
//列表
getAll() {
//发送Ajax请求
axios.get("/books").then((res) => {
this.dataList = res.data.data;
});
}, 
添加功能
需求:完成图片的新增功能模块
1.找到页面上的新建 按钮,按钮上绑定了@click="handleCreate()" 方法
2.在method中找到handleCreate 方法,方法中打开新增面板
3.新增面板中找到确定 按钮,按钮上绑定了@click="handleAdd()" 方法
4.在method中找到handleAdd 方法
5.在方法中发送请求和数据,响应成功后将新增面板关闭并重新查询数据
handleCreate 打开新增面板
handleCreate() {
this.dialogFormVisible = true;
},
handleAdd 方法发送异步请求并携带数据
handleAdd () {
//发送ajax请求
//this.formData是表单中的数据,最后是一个json数据
axios.post("/books",this.formData).then((res)=>{
this.dialogFormVisible = false; this.getAll();
});
}
添加功能状态处理
需求:新增成功是关闭面板,重新查询数据,那么新增失败以后该如何处理?
1.在handlerAdd方法中根据后台返回的数据来进行不同的处理
2.如果后台返回的是成功,则提示成功信息,并关闭面板
3.如果后台返回的是失败,则提示错误信息
(1)修改前端页面
handleAdd() {
                //发送Ajax请求
                axios.post("/books", this.formData).then((res) => {
                    //控制台查看日志
                    // console.log(res.data)

                    if (res.data.code == 20011) {
                        //操作成功,关闭弹层
                        this.dialogFormVisible = false
                        this.$message.success("添加成功");
                    } else if (res.data.code == 20010) {
                        this.$message.error("添加失败");
                    } else {
                        this.$message.error(res.data.msg);
                    }
                }).finally(() => {
                    //刷新数据
                    this.getAll();
                });
            },
前端完整代码
<!DOCTYPE html>

<html>

<head>

    <!-- 页面meta -->

    <meta charset="utf-8">

    <meta http-equiv="X-UA-Compatible" content="IE=edge">

    <title>SpringMVC案例</title>

    <meta content="width=device-width,initial-scale=1,maximum-scale=1,user-scalable=no" name="viewport">

    <!-- 引入样式 -->

    <link rel="stylesheet" href="../plugins/elementui/index.css">

    <link rel="stylesheet" href="../plugins/font-awesome/css/font-awesome.min.css">

    <link rel="stylesheet" href="../css/style.css">

</head>

<body class="hold-transition">

<div id="app">

    <div class="content-header">

        <h1>图书管理</h1>

    </div>

    <div class="app-container">

        <div class="box">

            <div class="filter-container">

                <el-input placeholder="图书名称" v-model="pagination.queryString" style="width: 200px;"
                          class="filter-item"></el-input>

                <el-button @click="getAll()" class="dalfBut">查询</el-button>

                <el-button type="primary" class="butT" @click="handleCreate()">新建</el-button>

            </div>

            <el-table size="small" current-row-key="id" :data="dataList" stripe highlight-current-row>

                <el-table-column type="index" align="center" label="序号"></el-table-column>

                <el-table-column prop="type" label="图书类别" align="center"></el-table-column>

                <el-table-column prop="name" label="图书名称" align="center"></el-table-column>

                <el-table-column prop="description" label="描述" align="center"></el-table-column>

                <el-table-column label="操作" align="center">

                    <template slot-scope="scope">

                        <el-button type="primary" size="mini" @click="handleUpdate(scope.row)">编辑</el-button>

                        <el-button type="danger" size="mini" @click="handleDelete(scope.row)">删除</el-button>

                    </template>

                </el-table-column>

            </el-table>

            <!-- 新增标签弹层 -->

            <div class="add-form">

                <el-dialog title="新增图书" :visible.sync="dialogFormVisible">

                    <el-form ref="dataAddForm" :model="formData" :rules="rules" label-position="right"
                             label-width="100px">

                        <el-row>

                            <el-col :span="12">

                                <el-form-item label="图书类别" prop="type">

                                    <el-input v-model="formData.type"/>

                                </el-form-item>

                            </el-col>

                            <el-col :span="12">

                                <el-form-item label="图书名称" prop="name">

                                    <el-input v-model="formData.name"/>

                                </el-form-item>

                            </el-col>

                        </el-row>


                        <el-row>

                            <el-col :span="24">

                                <el-form-item label="描述">

                                    <el-input v-model="formData.description" type="textarea"></el-input>

                                </el-form-item>

                            </el-col>

                        </el-row>

                    </el-form>

                    <div slot="footer" class="dialog-footer">

                        <el-button @click="dialogFormVisible = false">取消</el-button>

                        <el-button type="primary" @click="handleAdd()">确定</el-button>

                    </div>

                </el-dialog>

            </div>

            <!-- 编辑标签弹层 -->

            <div class="add-form">

                <el-dialog title="编辑检查项" :visible.sync="dialogFormVisible4Edit">

                    <el-form ref="dataEditForm" :model="formData" :rules="rules" label-position="right"
                             label-width="100px">

                        <el-row>

                            <el-col :span="12">

                                <el-form-item label="图书类别" prop="type">

                                    <el-input v-model="formData.type"/>

                                </el-form-item>

                            </el-col>

                            <el-col :span="12">

                                <el-form-item label="图书名称" prop="name">

                                    <el-input v-model="formData.name"/>

                                </el-form-item>

                            </el-col>

                        </el-row>

                        <el-row>

                            <el-col :span="24">

                                <el-form-item label="描述">

                                    <el-input v-model="formData.description" type="textarea"></el-input>

                                </el-form-item>

                            </el-col>

                        </el-row>

                    </el-form>

                    <div slot="footer" class="dialog-footer">

                        <el-button @click="dialogFormVisible4Edit = false">取消</el-button>

                        <el-button type="primary" @click="handleEdit()">确定</el-button>

                    </div>

                </el-dialog>

            </div>

        </div>

    </div>

</div>

</body>

<!-- 引入组件库 -->

<script src="../js/vue.js"></script>

<script src="../plugins/elementui/index.js"></script>

<script type="text/javascript" src="../js/jquery.min.js"></script>

<script src="../js/axios-0.18.0.js"></script>

<script>
    var vue = new Vue({

        el: '#app',
        data: {
            pagination: {},
            dataList: [],//当前页要展示的列表数据
            formData: {},//表单数据
            dialogFormVisible: false,//控制表单是否可见
            dialogFormVisible4Edit: false,//编辑表单是否可见
            rules: {//校验规则
                type: [{required: true, message: '图书类别为必填项', trigger: 'blur'}],
                name: [{required: true, message: '图书名称为必填项', trigger: 'blur'}]
            }
        },

        //钩子函数,VUE对象初始化完成后自动执行
        created() {
            this.getAll();
        },

        methods: {
            //列表
            getAll() {
                //发送Ajax请求
                axios.get("/books").then((res) => {
                    this.dataList = res.data.data;
                });
            },

            //弹出添加窗口
            handleCreate() {
                this.resetForm();
                this.dialogFormVisible = true;
            },

            //重置表单
            resetForm() {
                this.formData = {};
            },

            //添加
            handleAdd() {
                //发送Ajax请求
                axios.post("/books", this.formData).then((res) => {
                    //控制台查看日志
                    // console.log(res.data)

                    if (res.data.code == 20011) {
                        //操作成功,关闭弹层
                        this.dialogFormVisible = false
                        this.$message.success("添加成功");
                    } else if (res.data.code == 20010) {
                        this.$message.error("添加失败");
                    } else {
                        this.$message.error(res.data.msg);
                    }
                }).finally(() => {
                    //刷新数据
                    this.getAll();
                });
            },

            //弹出编辑窗口
            handleUpdate(row) {
                //数据回显
                //this.formData = row;
                //console.log(row);   //row.id查询条件
                axios.get("/books/" + row.id).then((res) => {
                    if (res.data.code == 20041) {
                        //回显数据
                        this.formData = res.data.data;
                        //显示弹层
                        this.dialogFormVisible4Edit = true;
                    } else {
                        this.$message.error(res.data.msg);
                    }
                });
            },

            //编辑
            handleEdit() {
                axios.put("/books", this.formData).then((res) => {

                    if (res.data.code == 20031) {
                        //操作成功,关闭弹层
                        this.dialogFormVisible4Edit = false;
                        this.$message.success("修改成功");
                    } else if (res.data.code == 20030) {
                        this.$message.error("修改失败");
                    } else {
                        this.$message.error(res.data.msg);
                    }
                }).finally(() => {
                    //刷新数据
                    this.getAll();
                });
            },

            // 删除
            handleDelete(row) {
                //1.弹出提示框
                this.$confirm("此操作将永久删除当前数据,是否继续?", "提示", {
                    type: "info"
                }).then(() => {
                    //2.做删除业务
                    axios.delete("/books/" + row.id).then((res) => {
                        if (res.data.code == 20021) {
                            this.$message.success("删除成功");
                        } else {
                            this.$message.error("删除失败");
                        }
                    }).finally(() => {
                        //刷新数据
                        this.getAll();
                    });
                }).catch(() => {
                    //3.取消删除
                    this.$message.info("取消删除操作");
                });
            }
        }
    })

</script>

</html>
拦截器
拦截器概念
(1)浏览器发送一个请求会先到Tomcat的web服务器
(2)Tomcat服务器接收到请求以后,会去判断请求的是静态资源还是动态资源
(3)如果是静态资源,会直接到Tomcat的项目部署目录下去直接访问
(4)如果是动态资源,就需要交给项目的后台代码进行处理
(5)在找到具体的方法之前,我们可以去配置过滤器(可以配置多个),按照顺序进行执行
(6)然后进入到到中央处理器(SpringMVC中的内容),SpringMVC会根据配置的规则进行拦截
(7)如果满足规则,则进行处理,找到其对应的controller类中的方法进行执行,完成后返回结果
(8)如果不满足规则,则不进行处理
(9)这个时候,如果我们需要在每个Controller方法执行的前后添加业务,具体该如何来实现?
这个就是拦截器要做的事。
拦截器(Interceptor)是一种动态拦截方法调用的机制,在SpringMVC中动态拦截控制器方法的执行
作用:
    在指定的方法调用前后执行预先设定的代码
    阻止原始方法的执行
    总结:拦截器就是用来做增强
拦截器和过滤器在作用和执行顺序上也很相似
拦截器和过滤器之间的区别是什么?
归属不同:Filter属于Servlet技术,Interceptor属于SpringMVC技术
拦截内容不同:Filter对所有访问进行增强,Interceptor仅针对SpringMVC的访问进行增强
入门案例
环境准备
创建一个Web的Maven项目
pom.xml添加SSM整合所需jar包
<?xml version="1.0" encoding="UTF-8"?>
<project xmlns="http://maven.apache.org/POM/4.0.0"
         xmlns:xsi="http://www.w3.org/2001/XMLSchema-instance"
         xsi:schemaLocation="http://maven.apache.org/POM/4.0.0 http://maven.apache.org/xsd/maven-4.0.0.xsd">
    <modelVersion>4.0.0</modelVersion>

    <groupId>com.green</groupId>
    <artifactId>springmvc_12_interceptor</artifactId>
    <version>1.0-SNAPSHOT</version>
    <packaging>war</packaging>

    <properties>
        <maven.compiler.source>13</maven.compiler.source>
        <maven.compiler.target>13</maven.compiler.target>
    </properties>

    <dependencies>
        <dependency>
            <groupId>javax.servlet</groupId>
            <artifactId>javax.servlet-api</artifactId>
            <version>3.1.0</version>
            <scope>provided</scope>
        </dependency>

        <dependency>
            <groupId>org.springframework</groupId>
            <artifactId>spring-webmvc</artifactId>
            <version>5.2.10.RELEASE</version>
        </dependency>

        <dependency>
            <groupId>com.fasterxml.jackson.core</groupId>
            <artifactId>jackson-databind</artifactId>
            <version>2.9.0</version>
        </dependency>

    </dependencies>

    <build>
        <plugins>
            <plugin>
                <groupId>org.apache.tomcat.maven</groupId>
                <artifactId>tomcat7-maven-plugin</artifactId>
                <version>2.2</version>
                <configuration>
                    <!--                    <port>80</port>-->  <!--tomcat端口号-->
                    <path>/</path>  <!--虚拟目录-->
                    <uriEncoding>UTF-8</uriEncoding><!--get乱码处理 访问路径编解码字符集-->
                </configuration>
            </plugin>

            <plugin>
                <groupId>org.apache.maven.plugins</groupId>
                <artifactId>maven-compiler-plugin</artifactId>
                <configuration>
                    <source>8</source>
                    <target>8</target>
                </configuration>
            </plugin>

        </plugins>
    </build>

</project>
创建对应的配置类
public class ServletContainersInitConfig extends AbstractAnnotationConfigDispatcherServletInitializer {
//加载Spring配置类
@Override
protected Class<?>[] getRootConfigClasses() {
return new Class[0];
}
//加载SpringMVC配置类
@Override
protected Class<?>[] getServletConfigClasses() {
return new Class[]{SpringMvcConfig.class};
}
//设置SpringMVC请求地址拦截规则
@Override
protected String[] getServletMappings() {
return new String[]{"/"};
}
//post乱码处理
@Override
protected Filter[] getServletFilters() {
CharacterEncodingFilter filter = new CharacterEncodingFilter();
filter.setEncoding("UTF-8");
return new Filter[]{filter};
}
}
@Configuration
@ComponentScan({"com.itheima.controller"})
@EnableWebMvc
public class SpringMvcConfig{
}
创建模型类Book
public class Book {
    private String name;
    private double price;

    public String getName() {
        return name;
    }

    public void setName(String name) {
        this.name = name;
    }

    public double getPrice() {
        return price;
    }

    public void setPrice(double price) {
        this.price = price;
    }

    @Override
    public String toString() {
        return "Book{" +
                "书名='" + name + '\'' +
                ", 价格=" + price +
                '}';
    }
}
编写Controller
//@Controller
//@ResponseBody配置在类上可以简化配置,表示设置当前每个方法的返回值都作为响应体
//@ResponseBody
@RestController //使用@RestController注解替换@Controller与@ResponseBody注解,简化书写
@RequestMapping("/books")
public class BookController {
// @RequestMapping( method = RequestMethod.POST)
@PostMapping //使用@PostMapping简化Post请求方法对应的映射配置
public String save(@RequestBody Book book) {
System.out.println("book save..." + book);
return "{'module':'book save'}";
}
// @RequestMapping(value = "/{id}" ,method = RequestMethod.DELETE)
@DeleteMapping("/{id}") //使用@DeleteMapping简化DELETE请求方法对应的映射配置
public String delete(@PathVariable Integer id) {
System.out.println("book delete..." + id);
return "{'module':'book delete'}";
}
// @RequestMapping(method = RequestMethod.PUT)
@PutMapping //使用@PutMapping简化Put请求方法对应的映射配置
public String update(@RequestBody Book book) {
System.out.println("book update..." + book);
return "{'module':'book update'}";
}
// @RequestMapping(value = "/{id}" ,method = RequestMethod.GET)
@GetMapping("/{id}") //使用@GetMapping简化GET请求方法对应的映射配置
public String getById(@PathVariable Integer id) {
System.out.println("book getById..." + id);
return "{'module':'book getById'}";
}
// @RequestMapping(method = RequestMethod.GET)
@GetMapping //使用@GetMapping简化GET请求方法对应的映射配置
public String getAll() {
System.out.println("book getAll...");
return "{'module':'book getAll'}";
}
}拦截器开发
步骤1:创建拦截器类
//定义拦截器类,实现HandlerInterceptor接口
//注意当前类必须受Spring容器控制
@Component
public class ProjectInterceptor implements HandlerInterceptor {

    //原始方法调用前执行的内容
    @Override
    public boolean preHandle(HttpServletRequest request, HttpServletResponse response, Object handler) throws Exception {
        System.out.println("preHandle ...");
        return true;
    }

    //原始方法调用后执行的内容
    @Override
    public void postHandle(HttpServletRequest request, HttpServletResponse response, Object handler, ModelAndView modelAndView) throws Exception {
        System.out.println("postHandle ...");
    }

    //原始方法调用完成后执行的内容
    @Override
    public void afterCompletion(HttpServletRequest request, HttpServletResponse response, Object handler, Exception ex) throws Exception {
        System.out.println("afterCompletion ...");
    }
}注意:拦截器类要被SpringMVC容器扫描到。
步骤2:配置拦截器类
@Configuration
public class SpringMvcSupport extends WebMvcConfigurationSupport {

    @Autowired
    private ProjectInterceptor projectInterceptor;

    //过滤器
    //过滤访问的静态资源
    @Override
    protected void addResourceHandlers(ResourceHandlerRegistry registry) {
        registry.addResourceHandler("/pages/**").addResourceLocations("/pages/");
    }

    //拦截器
    @Override
    protected void addInterceptors(InterceptorRegistry registry) {
        //注册拦截器,访问??请求的时候需要拦截
        //registry.addInterceptor(projectInterceptor).addPathPatterns("/books");
        registry.addInterceptor(projectInterceptor).addPathPatterns("/books","/books/**");
    }
}步骤3:SpringMVC添加SpringMvcSupport包扫描
@Configuration
@ComponentScan({"com.green.controller","com.green.config"})
@EnableWebMvc
public class SpringMvcConfig{
}
步骤4:运行程序测试
使用PostMan发送http://localhost:8080/books

如果发送http://localhost/books/100 会发现拦截器没有被执行,
原因是拦截器的addPathPatterns 方法配置的拦截路径是/books ,
我们现在发送的是/books/100 ,所以没有匹配上,因此没有拦截,拦截器就不会执行。
步骤5:修改拦截器拦截规则
@Configuration
public class SpringMvcSupport extends WebMvcConfigurationSupport {

    @Autowired
    private ProjectInterceptor projectInterceptor;

    //过滤器
    //过滤访问的静态资源
    @Override
    protected void addResourceHandlers(ResourceHandlerRegistry registry) {
        registry.addResourceHandler("/pages/**").addResourceLocations("/pages/");
    }

    //拦截器
    @Override
    protected void addInterceptors(InterceptorRegistry registry) {
        //注册拦截器,访问??请求的时候需要拦截
        //registry.addInterceptor(projectInterceptor).addPathPatterns("/books");
        registry.addInterceptor(projectInterceptor).addPathPatterns("/books","/books/**");
    }
}
这个时候,如果再次访问http://localhost/books/100 ,拦截器就会被执行。
拦截器中的preHandler 方法,如果返回true,则代表放行,会执行原始Controller类中要请求的方法,
如果返回false,则代表拦截,后面的就不会再执行了。
步骤6:简化SpringMvcSupport的编写
@Configuration
//@ComponentScan({"com.green.controller","com.green.config"})
//实现WebMvcConfigurer接口可以简化开发,但具有一定的侵入性
@ComponentScan({"com.green.controller"})
@EnableWebMvc//json数据转换成Java对象功能
public class SpringMvcConfig implements WebMvcConfigurer {

    @Autowired
    private ProjectInterceptor projectInterceptor;

    @Override
    public void addInterceptors(InterceptorRegistry registry) {
        //注册拦截器,访问??请求的时候需要拦截
        //registry.addInterceptor(projectInterceptor).addPathPatterns("/books");
        registry.addInterceptor(projectInterceptor).addPathPatterns("/books","/books/**");
    }
}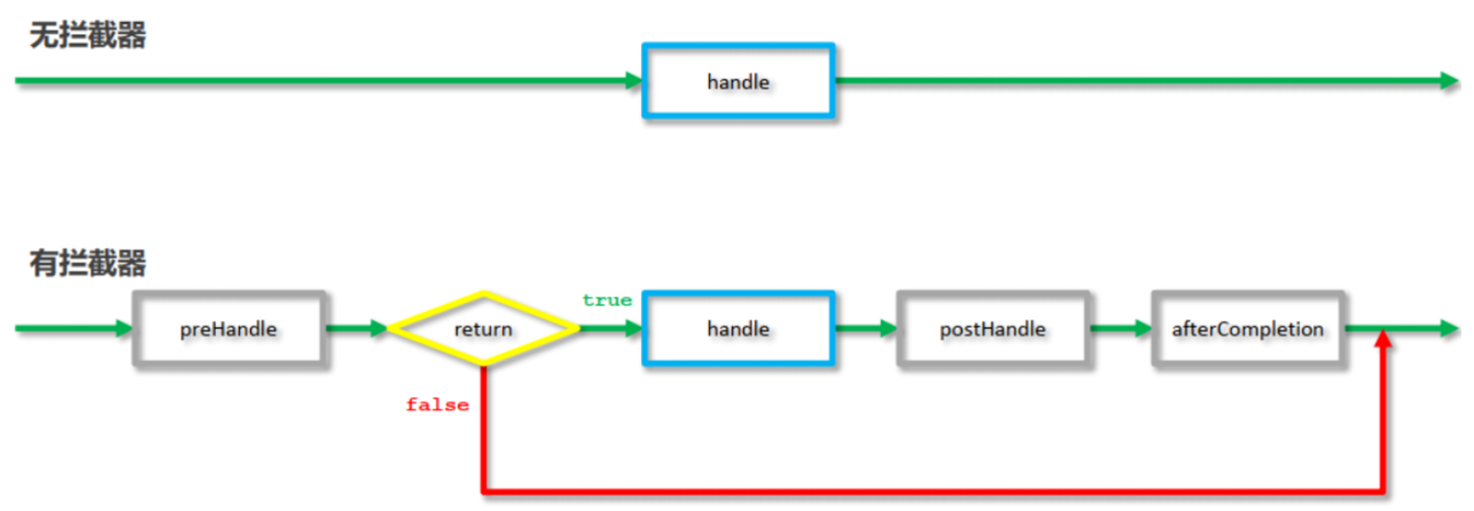
当有拦截器后,请求会先进入preHandle方法,
如果方法返回true,则放行继续执行后面的handle[controller的方法]和后面的方法
如果返回false,则直接跳过后面方法的执行。
拦截器参数
前置处理方法
原始方法之前运行preHandle
request:请求对象
response:响应对象
handler:被调用的处理器对象,本质上是一个方法对象,对反射中的Method对象进行了再包装使用
request对象可以获取请求数据中的内容,如获取请求头的Content-Type
使用handler参数,可以获取方法的相关信息
//原始方法调用前执行的内容
    @Override
    public boolean preHandle(HttpServletRequest request, HttpServletResponse response, Object handler) throws Exception {
        String contentType = request.getHeader("Content-Type");
        //System.out.println("preHandle..."+contentType);
        //System.out.println(handler.getClass());
        HandlerMethod hm = (HandlerMethod) handler;
        String methodName = hm.getMethod().getName();//可以获取方法的名称
        System.out.println("preHandle..."+methodName);
        return true;
    }
后置处理方法
原始方法运行后运行,如果原始方法被拦截,则不执行
前三个参数和上面的是一致的。
modelAndView:如果处理器执行完成具有返回结果,可以读取到对应数据与页面信息,并进行调整
因为现在都是返回json数据,所以该参数的使用率不高。
public void postHandle(HttpServletRequest request, HttpServletResponse response, Object handler, ModelAndView modelAndView) throws Exception {
        System.out.println("postHandle ...");
    }
完成处理方法
拦截器最后执行的方法,无论原始方法是否执行
前三个参数与上面的是一致的。
ex:如果处理器执行过程中出现异常对象,可以针对异常情况进行单独处理
因为我们现在已经有全局异常处理器类,所以该参数的使用率也不高。
这三个方法中,最常用的是preHandle,在这个方法中可以通过返回值来决定是否要进行放行,
我们可以把业务逻辑放在该方法中,如果满足业务则返回true放行,不满足则返回false拦截。
//原始方法调用完成后执行的内容
    @Override
    public void afterCompletion(HttpServletRequest request, HttpServletResponse response, Object handler, Exception ex) throws Exception {
        System.out.println("afterCompletion ...");
    }
拦截器链配置
配置多个拦截器
步骤1:创建拦截器类
实现接口,并重写接口中的方法
@Component
public class ProjectInterceptor2 implements HandlerInterceptor {

    //原始方法调用前执行的内容
    @Override
    public boolean preHandle(HttpServletRequest request, HttpServletResponse response, Object handler) throws Exception {
        System.out.println("preHandle...222");
        return true;
    }

    //原始方法调用后执行的内容
    @Override
    public void postHandle(HttpServletRequest request, HttpServletResponse response, Object handler, ModelAndView modelAndView) throws Exception {
        System.out.println("postHandle ...222");
    }

    //原始方法调用完成后执行的内容
    @Override
    public void afterCompletion(HttpServletRequest request, HttpServletResponse response, Object handler, Exception ex) throws Exception {
        System.out.println("afterCompletion ...222");
    }
}步骤2:配置拦截器类
@Configuration
//@ComponentScan({"com.green.controller","com.green.config"})
//实现WebMvcConfigurer接口可以简化开发,但具有一定的侵入性
@ComponentScan({"com.green.controller"})
@EnableWebMvc//json数据转换成Java对象功能
public class SpringMvcConfig implements WebMvcConfigurer {

    @Autowired
    private ProjectInterceptor projectInterceptor;

    @Autowired
    private ProjectInterceptor2 projectInterceptor2;

    //配置多拦截器
    @Override
    public void addInterceptors(InterceptorRegistry registry) {
        //注册拦截器,访问??请求的时候需要拦截
        //registry.addInterceptor(projectInterceptor).addPathPatterns("/books");
        registry.addInterceptor(projectInterceptor).addPathPatterns("/books","/books/**");
        registry.addInterceptor(projectInterceptor2).addPathPatterns("/books","/books/**");
    }
}步骤3:运行程序,观察顺序
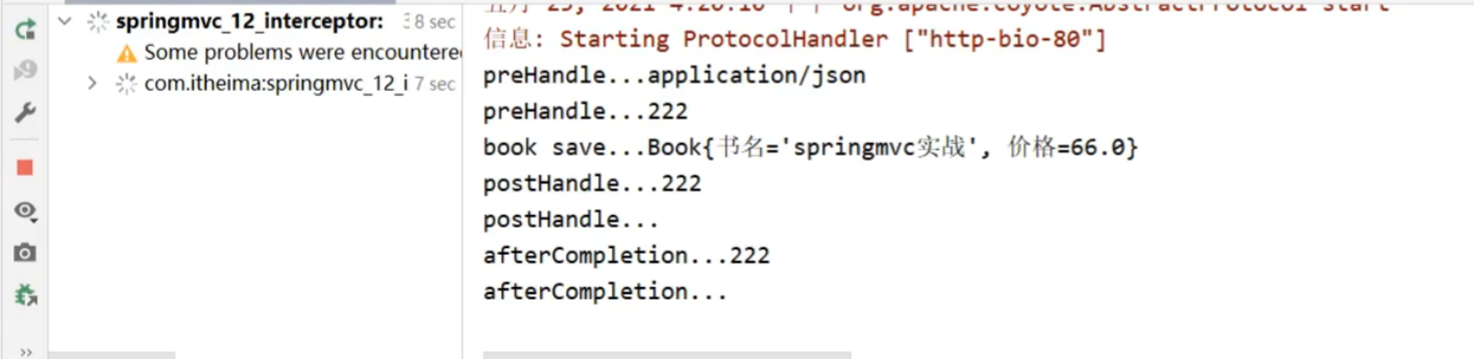
拦截器执行的顺序是和配置顺序有关。就和前面所提到的运维人员进入机房的案例,先进后出。
当配置多个拦截器时,形成拦截器链
拦截器链的运行顺序参照拦截器添加顺序为准
当拦截器中出现对原始处理器的拦截,后面的拦截器均终止运行
当拦截器运行中断,仅运行配置在前面的拦截器的afterCompletion操作

preHandle:与配置顺序相同,必定运行
postHandle:与配置顺序相反,可能不运行
afterCompletion:与配置顺序相反,可能不运行。
这个顺序不太好记,最终只需要把握住一个原则即可:以最终的运行结果为准