Table of contents
Character creation and rigid body settings
Layer Rendering Level Settings
Character collision box settings
Use code to control character movement
The manual is linked here: Unity User Manual (2019.3) - Unity Manual
A 2D game without controlling the movement of characters is too much to justify! Then, next, this article will teach you how to move 2D characters easily with a few lines of code. Don’t worry about not understanding the code. I will consult the API manual and nanny-level tutorials to help you understand! So let's get started!
Character creation and rigid body settings
First of all, choose an available character material as our mobile protagonist. Here I choose a nutcracker image as the protagonist.

Then obviously this picture material needs to be cut, and we found that the name of this picture is Idel, which is a common name for animation settings, which means the animation of the character when it is in standby, so it is convenient for us to realize the animation effect of the character after cutting.

The cutting size material is marked by the author very intimately, X16, Y24
Then our material has been cut, and the next step is to put it into the scene. We directly drag the picture of the first character into the scene, and then rename it to Player.

Then add two components to it, these two components allow us to easily control the movement of our characters, but it needs to be implemented in combination with the following code.

My settings are as follows

The reasons for each parameter setting are as follows:
Gravity Scale is set to 0, so that our character is no longer affected by Unity's default gravity, but can move up and down, left and right, which is the function we need.
Collision Detection is set to Continuous to ensure that collisions between collision bodies are always detected to prevent the problem of punching through the wall.
The Z axis of Freeze Rotation (freezing the Z axis) is to prevent our character from rotating due to physical collisions, as shown in the following GIF

Layer Rendering Level Settings
Because the game we made has RPG elements, I hope my characters can be displayed in front of the background and buildings, so let’s create a new layer and name it Player. In the Soritng Later option, select Add Sorting Layer from the drop-down menu

The order of rendering layers is rendered with priority from bottom to top. Don't forget to set the layer of our Player to Player after creating a new Layer.

Character collision box settings
Select the collision box component of our character and edit its collision box
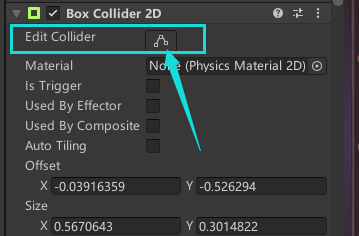
Set the hitbox to this size

Why is it set to this size? Because we hope that our character can successfully block the background and not collide with the scene objects too easily.
Use code to control character movement
So the next step is the highlight, how to use code to control the movement of our characters?
Create script file
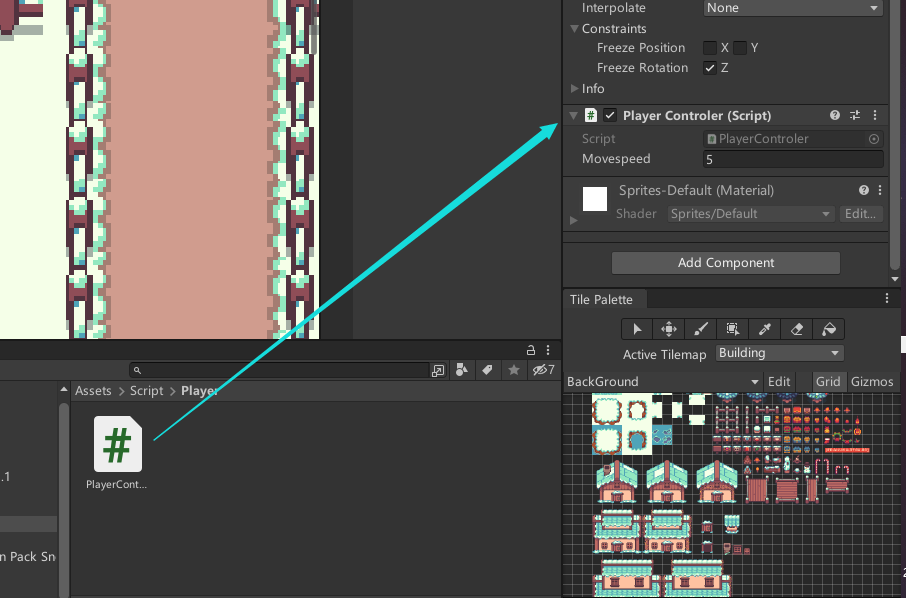
We create a new folder named Script in the project folder, in which we can easily manage and store our scripts, then we create a script file named PlayerController

Then drag and drop our script file to mount on our character.
Initial function explained
For each default C# script, Unity will store two default generated functions
     // Start is called before the first frame update
    void Start()
    {

    }

    // Update is called once per frame
    void Update()
    {

    }
The Strat function will be called when the game starts, and the Update function will be called once every frame. We will not delve into the in-depth usage of them.
control mobile code
Initialize variables
We have mounted rigid body components on our characters before, and the method of controlling movement needs to use rigid bodies, so how do we use scripts to control rigid body components?
Unity writes the name of each component as a class . With the help of class, we can generate an empty object rb
//获取刚体组件
private Rigidbody2D rb;
Then I hope I can control the parameters of the speed with the help of variables, use Pubilc to create a variable called Movespeed
    //人物移动速度
    public float Movespeed;
Since we can get the Rigibody2D component, it is also feasible to get other components, such as the Transform component. Here you can try to use the Transform type to generate a variable!
The private keyword means private, that is, the rb object is privatized, that is, it can only be accessed in the current class.
public is public, that is, the current variable can be accessed in the class outside the class. Take the Movespeed above as an example. After saving the code, we can also see it in the Unity editor interface.

- GetComponent, since each component has become a class, then with the help of GetComponent, set the template parameters to the same type to get the rigid body component on the object mounted by the current code, that is, to obtain the component on the currently mounted object in the form of a function Object we write this code in the Start function
    void Start()
    {
        rb = GetComponent<Rigidbody2D>();
    }
get keyboard input
To achieve movement, it needs to be linked with the input of the keyboard. The method of linkage is to call the function GetAxis in the Input class
Input.GetAxis
public static float GetAxis (string axisName);Returns the value of the virtual axis
axisNameidentified , the type of this value is a float (floating point type)
axisName:对应绑定的键位的输入字符串名称
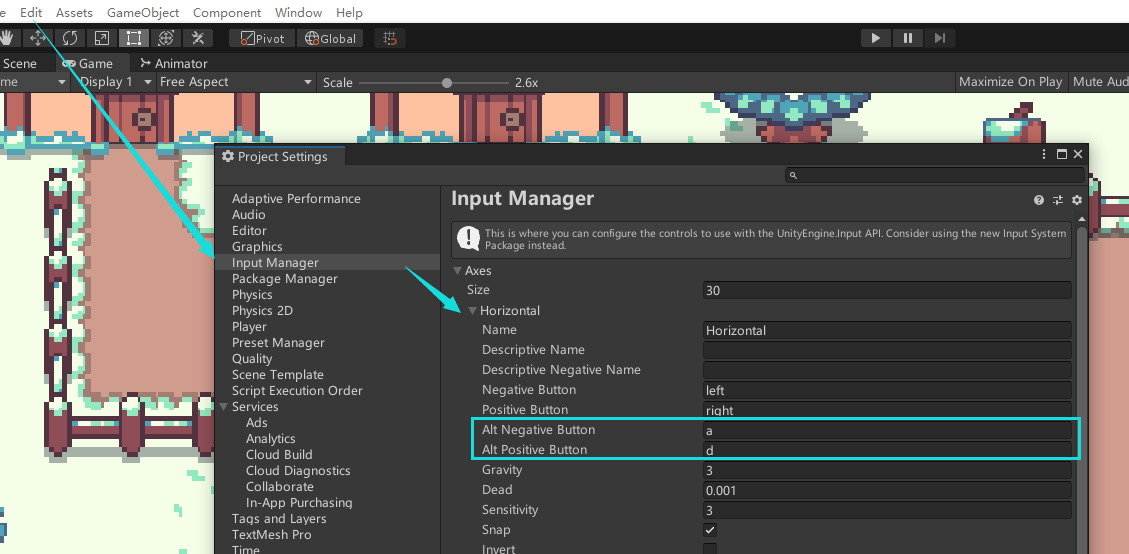
The specific explanation of GetAxis is difficult to understand, but in simple terms, it is to obtain the key input corresponding to the string binding. The string name we can find Hrizontal in Edit->Input Manager, this is the corresponding string name we want
In order to achieve movement, we create a new function called Movement. As mentioned earlier, the return value of GetAxis is a value of type float, so we also define a float to store its return value.
Notice! The corresponding name in the string must be the same as the name of the Input Manager! Otherwise this function call will fail! That is to say, our Horizontal must be right!
 void Movement()
    {

        float InputSpeedX = Input.GetAxis("Horizontal");
}- Then with the help of this function, we successfully obtained the value of the keyboard input, and after obtaining the current input speed, use the member function to shift the position of the current object.
- Use the member variable velocity in the rigid body class, which is the linear velocity of the rigid body, to control the left and right movement of the rigid body
- In the official API manual, the method of manipulating the velocity value is given, and a new variable of type vector2 is assigned a value
- The official usage example is as follows: Rigidbody-velocity - Unity scripting API

- vector2 is a class, use new to create a Vector2 object, and the initialization of the Vector2 object is to pass in two variables of floating point type. One is x and the other is y, then the two float variables set earlier can be used here to achieve the control effect, and simply realize horizontal movement without obtaining the Y value
rb.velocity = new Vector2(InputSpeedX * Movespeed, rb.velocity.y);Call functions
Then the approximate style of our movement function is as follows
    void Movement()
    {
        float InputSpeedX = Input.GetAxisRaw("Horizontal");
        rb.velocity = new Vector2(InputSpeedX * Movespeed, rb.velocity.y);
    }
In order to allow GetAxis to detect the input on the keyboard all the time, we need to use a function to call it FixedUpdate
FixedUpdate
Implementing the mobile function needs to be called continuously. It is also possible to use the Update function, but it is unstable. Since the number of frames that can be generated by different machines per second is not constant, calling the function once per frame will cause some problems and make Update not stable. Stablize
Whereas FixedUpdate calls this function every fixed frame rate frame with a default time of 0.02 seconds between calls (50 calls/second

    private void FixedUpdate()
    {
        Movement();
    }
Then set the Movespeed to 5, save our code and return to Unity, start the game, and our character can move!
But the feel is still weird, and the smooth movement feels very uncomfortable. Of course, if you like it, you can keep it, but I don’t need it. If you don’t like it, you can replace GetAxis with GetAxisRaw, so that it is not smooth movement.
The overall code is as follows:
using System.Collections;
using System.Collections.Generic;
using UnityEngine;

public class PlayerControler : MonoBehaviour
{

    private Rigidbody2D rb;
    public float Movespeed;
    void Start()
    {
        rb = GetComponent<Rigidbody2D>();
    }
    void Update()
    {
    }
    private void FixedUpdate()
    {
        Movement();
    }
    void Movement()
    {

        float InputSpeedX = Input.GetAxisRaw("Horizontal");

        rb.velocity = new Vector2(InputSpeedX * Movespeed, rb.velocity.y);

    }

}
How about it? Is not it simple? Of course, we haven't realized the method of moving up and down, but I believe that the above process of moving up and down will definitely not be a problem for you! Here's a little challenge! Hope you can make it happen!
Of course, you may also be a coder, so I still write it below! Don't peek!
using System.Collections;
using System.Collections.Generic;
using UnityEngine;

public class PlayerControler : MonoBehaviour
{

    private Rigidbody2D rb;
    public float Movespeed;
    void Start()
    {
        rb = GetComponent<Rigidbody2D>();
    }
    void Update()
    {
    }
    private void FixedUpdate()
    {
        Movement();
    }
    void Movement()
    {

        float InputSpeedX = Input.GetAxisRaw("Horizontal");
        float InputSpeedY = Input.GetAxis("Vertical");

        rb.velocity = new Vector2(InputSpeedX * Movespeed, rb.velocity.y);
        rb.velocity = new Vector2(rb.velocity.x,InputSpeedY * Movespeed);

    }

}
The second method achieves mobile
Then the way to achieve movement is not only to use the velocity inside the rigid body component, we can also control the movement control of the character by controlling the Positon of the rigid body component.
Instead of controlling the X and Y axis values of the component separately, we can declare a variable of type Vector2 to control. There are two member variables inside Vector2, one X and one Y, so in the same way, there are X, Y, Z in Vector3
Vector2 movement;Then we use the X and Y inside the movement object to accept the information input by the keyboard respectively.
 movement.x = Input.GetAxisRaw("Horizontal");
 movement.y=  Input.GetAxisRaw("Vertical");
Then we use the function MovePositon of the rigid body component to achieve

Then this function needs to pass in a value of type Vector2, then we multiply the Positon of the current component plus the movement of the Vector2 type obtained from the input, multiplied by the set speed value and the time per second (displacement = speed * time) And because we call this function in FixedUpdate, the time should also be FixedDeltaTime
rb.MovePosition(rb.position + movement * Movespeed*Time.fixedDeltaTime);This method can also achieve mobile, which is also a good method.
So that's it! The next step is to access the frame animation! Let our game characters become more vivid! Hope to help you a little bit! Thanks for reading!
