Physical movement characters in game development (2D)
Introduction
Yes, the name sounds strange. "Sports role". what is that? The reason for the name is that when physics engines came out, they were called "dynamic" engines (because they mainly deal with collision responses). In order to use the dynamic engine to create a character controller, many attempts have been made, but this is not as easy as it seems. Godot is one of the best dynamic character controller implementations you can find (as seen in the 2d/platformer demo), but using it requires a considerable level of skill and understanding of the physics engine (or very patient trial and error).
Some physics engines such as Havok seem to think that dynamic character controllers are the best choice, while other physics engines (PhysX) are more willing to promote kinematics engines.
So what is the difference? :
A dynamic character controller uses a rigid body with an infinite tensor of inertia. This is a rigid body that cannot be rotated. The physics engine always makes objects move and collide, and then resolve their collisions together. As shown in the platform game demo, this enables the dynamic character controller to interact seamlessly with other physical objects. However, these interactions are not always predictable. Collisions may take more than a frame to resolve, so some collisions seem to only shift a small part. These problems can be solved, but certain skills are required.
A moving character controller is assumed to always start in a non-collision state and will always move to a non-collision state. If it starts to collide, it will try to release itself like a rigid body, but this is the exception, not the rule. This makes their control and movement more predictable and easy to program. However, the disadvantage is that they cannot directly interact with other physical objects unless the code is manually written.
This short tutorial will focus on the motion character controller. Basically, this is the old-fashioned way of dealing with conflicts (not necessarily made simpler behind the scenes, but well hidden and presented as a good simple API).
Physical process
In order to manage the logic of a moving body or character, it is always recommended to use a physical process, because it is called before the physical step and its execution is synchronized with the physical server, which is always called the same number of times per second. This makes the way physics and motion calculation work more predictable than using the conventional process. If the frame rate is too high or too low, the conventional process may spike or lose accuracy.
using Godot;
using System;

public class PhysicsScript : KinematicBody2D
{


    public override void _PhysicsProcess(float delta)
    {


    }
}
Scene setting
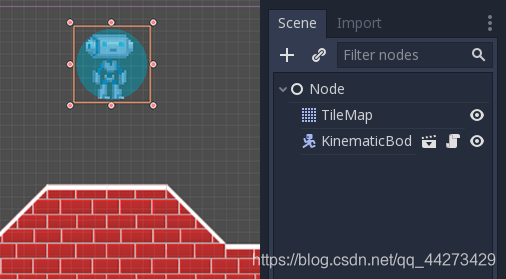
There are some tests for the scene here (from the tilemap tutorial) kbscene.zip. We will create a new scene for the character. Use robot sprites to create a scene like this:

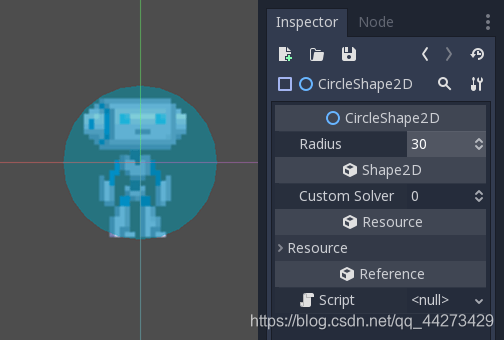
You will notice that there is a warning icon next to our CollisionShape2D node. This is because we have not yet defined a shape for it. Create a new CircleShape2D in the shape attribute of CollisionShape2D. Click to go to its option and set the radius to 30:
Note: As mentioned in the physics tutorial before, the physics engine cannot handle the scale of most shapes (only collision polygons, planes and line segments are valid), so always change the parameters of the shape (such as radius) instead of scaling it. The same is true for moving/rigid/static objects themselves, because their proportions affect the shape proportions.
Now, create a script for the character, and the script used as an example above should be used as a basis.
Finally, instantiate the character scene in the tilemap and use it as the main scene to run when play is pressed.
Kinematic characteristics
Go back to the character scene, open the script, and the magic begins! The moving body does not perform any operations by default, but it has a useful function called KinematicBody2D.move_and_collide(). This function uses Vector2 as a parameter, and then tries to apply the motion to the moving body. If there is a collision, it will stop immediately when the collision occurs.
So let's move the sprite down until it falls to the ground:
using Godot;
using System;

public class PhysicsScript : KinematicBody2D
{


    public override void _PhysicsProcess(float delta)
    {


        // Move down 1 pixel per physics frame
        MoveAndCollide(new Vector2(0, 1));
    }
}
The result is that the character will move, but will stop immediately when hitting the floor. Isn't it cool?
The next step is to add gravity to the mix so that it behaves a bit like a regular game character:
using Godot;
using System;

public class PhysicsScript : KinematicBody2D
{


    const float gravity = 200.0f;
    Vector2 velocity;

    public override void _PhysicsProcess(float delta)
    {


        velocity.y += delta * gravity;

        var motion = velocity * delta;
        MoveAndCollide(motion);
    }
}
Now the character slips smoothly. Let's walk to the left and right while touching the arrow keys. Remember that the value used (at least for speed) is pixels per second.
This can add simple walking support by pressing left and right:
using Godot;
using System;

public class PhysicsScript : KinematicBody2D
{


    const float gravity = 200.0f;
    const int walkSpeed = 200;

    Vector2 velocity;

    public override void _PhysicsProcess(float delta)
    {


        velocity.y += delta * gravity;

        if (Input.IsActionPressed("ui_left"))
        {


            velocity.x = -walkSpeed;
        }
        else if (Input.IsActionPressed("ui_right"))
        {


            velocity.x = walkSpeed;
        }
        else
        {


            velocity.x = 0;
        }

        // We don't need to multiply velocity by delta because "MoveAndSlide" already takes delta time into account.

        // The second parameter of "MoveAndSlide" is the normal pointing up.
        // In the case of a 2D platformer, in Godot, upward is negative y, which translates to -1 as a normal.
        MoveAndSlide(velocity, new Vector2(0, -1));
    }
}
And try it.
This is a good starting point for platform games. You can find a more complete demo in the demo zip distributed with the engine or https://github.com/godotengine/godot-demo-projects/tree/master/2d/kinematic_character .