C#/.net program calls python
The advantage of C# lies in the development under the window, which is not only powerful but also has a short development cycle. On the other hand, python has many third-party libraries, which can avoid making wheels by itself, and use C# to make the interface, and the specific implementation using python can greatly improve the development efficiency. This article introduces how to use it pythonnetto execute python scripts. Using it pythonnetcan not only have high interactivity, but also use third-party python libraries. At the same time, the python environment and third-party libraries required by the program can be packaged into the software to prevent users from operating the python environment. configuration.
Common methods of C# calling python
There are 4 common ways to call python
| Way | advantage | shortcoming |
|---|---|---|
| Using IronPython | No need to install python operating environment, strong interactivity, seamless connection between C# and python | Some python third-party libraries do not support, such as numpy |
| Use C++ to call Python, and then make the C++ program into a dynamic link library | Strong interactivity | The user needs to configure the Python environment, and the implementation method is complicated |
| Use the C# command line to call the py file | fast execution | Need the user to configure the Python environment, poor interactivity |
| Package python files into exe for calling | No need to install the python runtime environment, | Slow execution speed, complicated data transfer, and poor interactivity |
It can be seen that the four methods have limitations, and it is difficult to meet the requirements of strong interactivity, callable third-party python libraries, and no need for users to configure the Python environment at the same time, and these requirements are exactly necessary for a mature software. The use of pythonnetthe library can meet the above three requirements.
This article is tested in the .net 6 environment
use pythonnet
-
Nuget installation
pythonnet -
Set
Runtime.PythonDLLthe property, that is, the pythonxx.dll path, xx is the version number -
Setting
PythonEngine.PythonHome, that is, the path where python.exe is located -
Setting
PythonEngine.PythonPath, the directory where the python script is located, multiple paths can be placed, separated by semicolons, but pathToVirtualEnv\Lib\site-packages and pathToVirtualEnv\Lib should be placed at the end -
transfer
PythonEngine.Initialize();string pathToVirtualEnv = ".\envs\\pythonnetTest"; Runtime.PythonDLL = Path.Combine(pathToVirtualEnv, "python39.dll"); PythonEngine.PythonHome = Path.Combine(pathToVirtualEnv, "python.exe"); PythonEngine.PythonPath = $"{ pathToVirtualEnv}\\Lib\\site-packages;{ pathToVirtualEnv}\\Lib"; PythonEngine.Initialize(); //调用无参无返回值方法 using (Py.GIL()) //执行python的调用应该放在using (Py.GIL())块内 { //python对象应声明为dynamic类型 dynamic np = Py.Import("test"); np.hello(); } //调用有参有返回值方法 using (Py.GIL()) { dynamic np = Py.Import("test"); int r = np.add(1, 2); Console.WriteLine($"计算结果{ r}"); }
The python file must be placed PythonEngine.PythonPathin the set directory
def hello():
    print("hello")

def add(a,b):
    return a+b
Embed Python environment and use third-party libraries
The program contains all the environments required by Python scripts and third-party libraries, which can save users from custom configuration. This article uses Anaconda to build a dedicated virtual environment.
-
Create a dedicated virtual environment (under windows, first switch to the root directory of the virtual environment to be established), and
conda create --prefix=F:\condaenv\env_name python=3.7customize the execution path and python version as needed. -
Using Anaconda Prompt, activate the virtual environment
conda activate F:\condaenv\env_name -
This time test the third-party library Numpy (if you need other libraries, the installation method is the same), install Numpy
pip install numpystring pathToVirtualEnv = ".\\envs\\pythonnetTest"; Runtime.PythonDLL = Path.Combine(pathToVirtualEnv, "python39.dll"); PythonEngine.PythonHome = Path.Combine(pathToVirtualEnv, "python.exe"); PythonEngine.PythonPath = $"{ pathToVirtualEnv}\\Lib\\site-packages;{ pathToVirtualEnv}\\Lib"; PythonEngine.Initialize() //使用第三方库 using (Py.GIL()) { dynamic np = Py.Import("numpy"); Console.WriteLine(np.cos(np.pi * 2)); dynamic sin = np.sin; Console.WriteLine(sin(5)); double c = (double)(np.cos(5) + sin(5)); Console.WriteLine(c); dynamic a = np.array(new List<float> { 1, 2, 3 }); Console.WriteLine(a.dtype); dynamic b = np.array(new List<float> { 6, 5, 4 }, dtype: np.int32); Console.WriteLine(b.dtype); Console.WriteLine(a * b); Console.ReadKey(); }
注意:C#和python对象进行数学运算时,必须将Python对象放到前面,例如np.pi*2,不能是2*np.pi
transfer object
Can pass C# objects into python
Define objects in C#
public class Person
{


    public Person(string firstName, string lastName)
    {


        FirstName = firstName;
        LastName = lastName;
    }

    public string FirstName {

     get; set; }
    public string LastName {

     get; set; }
}
string pathToVirtualEnv = ".\\envs\\pythonnetTest";
Runtime.PythonDLL = Path.Combine(pathToVirtualEnv, "python39.dll");
PythonEngine.PythonHome = Path.Combine(pathToVirtualEnv, "python.exe");
PythonEngine.PythonPath = $"{
pathToVirtualEnv}\\Lib\\site-packages;{
pathToVirtualEnv}\\Lib";
PythonEngine.Initialize();
//将C#中定义的类型传入python
using (Py.GIL())
{
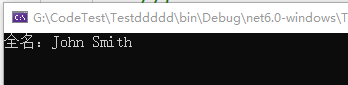
Person p = new Person("John", "Smith");
PyObject pyPerson = p.ToPython();
string r1 = test.FullName(pyPerson);
Console.WriteLine($"全名:{
r1}");
}
python script
def FullName(p):
    return p.FirstName+""+p.LastName
Call the pyd file
The pyd file mainly has the following two functions:
- Higher security: the file generated by pyd has become a dll file, and the source code cannot be viewed
- After compiling into pyd, the performance will be improved
The steps to compile a .py file into a pyd file are as follows:
pip install cython- Create a setup.py file in the .py file directory
from distutils.core import setup
from Cython.Build import cythonize

setup(
name = "testName",
ext_modules = cythonize("test.py"), #将test.py文件编译成pyd
)
- Execute the compile command
python setup.py build_ext --inplace
The final generated pyd file is generally the test+cpython version-the platform is the file name, which can be renamed to the test name, or it can be ignored, and can still be called by test when used.
Mobilizing the pyd file is the same as calling the py file, but the execution efficiency is greatly enhanced, and the execution speed will be compared below.
Execution speed comparison
Define a time-consuming function in test.py
import time


def Count():
    start = time.perf_counter()

    sum = 0
    for i in range(10000):
        for j in range(10000):
            sum = sum + i + j
    print("sum = ", sum)

    end = time.perf_counter()
    runTime = end - start
    runTime_ms = runTime * 1000

    print("运行时间:", runTime, "秒")
- Execute the test.py script directly, and the running results are as follows:

- Call the Conut() function in C#
//运行时间测试
Console.WriteLine("C#开始计时");
Stopwatch stopWatch = new Stopwatch();
stopWatch.Start();
test.Count();
stopWatch.Stop();
Console.WriteLine($"C#计时结束{

      stopWatch.ElapsedMilliseconds}");
The execution results are as follows:
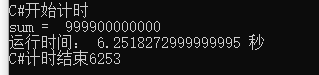
It can be seen that using pythonnet to call python scripts will have a certain performance loss, but it is acceptable under the condition that the performance requirements are not very high.
- Execute the test.pyd file, and the results are as follows:

It can be seen from the results that calling pyd is faster than native py files, so pythonnet can be used to execute pyd files, which not only realizes code protection but also improves execution efficiency.