Table of contents
One, yum - linux package manager
1. What is a software package?
2. Recommended development tools (centos 7.6)
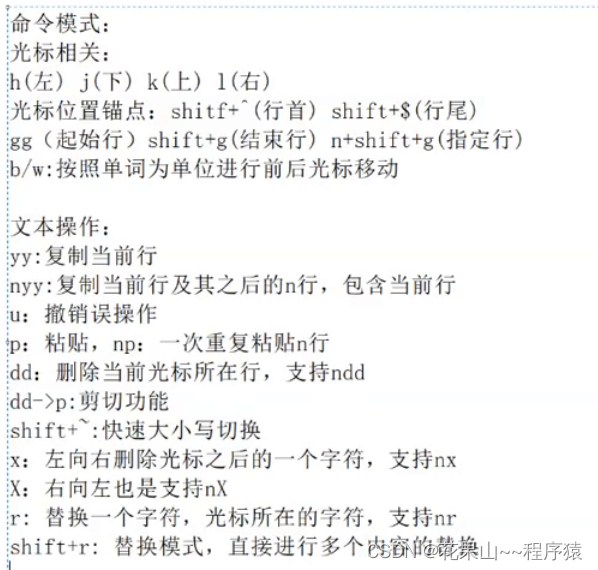
1. Normal mode —— command mode (it doesn’t matter if you can’t remember it, just practice more)
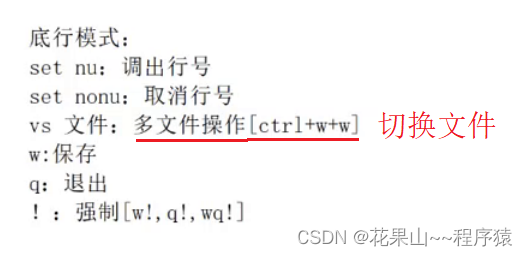
2. last line mode—— last line mode (how to enter; shift:)
3. Insert mode——insert mode (similar to the previous method of writing code, omitted)
2. Static library & dynamic library
Five, make & Makefile - automated build tool
6. Hand rubbing applet——progress bar
1. The concept of carriage return & line feed
3. Talk about input and output streams
One, yum - linux package manager
1. What is a software package?
To install software under Linux , a common way is to download the source code of the program and compile it to obtain an executable program. But this is too troublesome, so some people compile some commonly used software in advance and make it into a software package ( which can be understood as an installer on windows ) and put it on a server . This compilation can be easily obtained through the package manager. Good software package , install it directly.
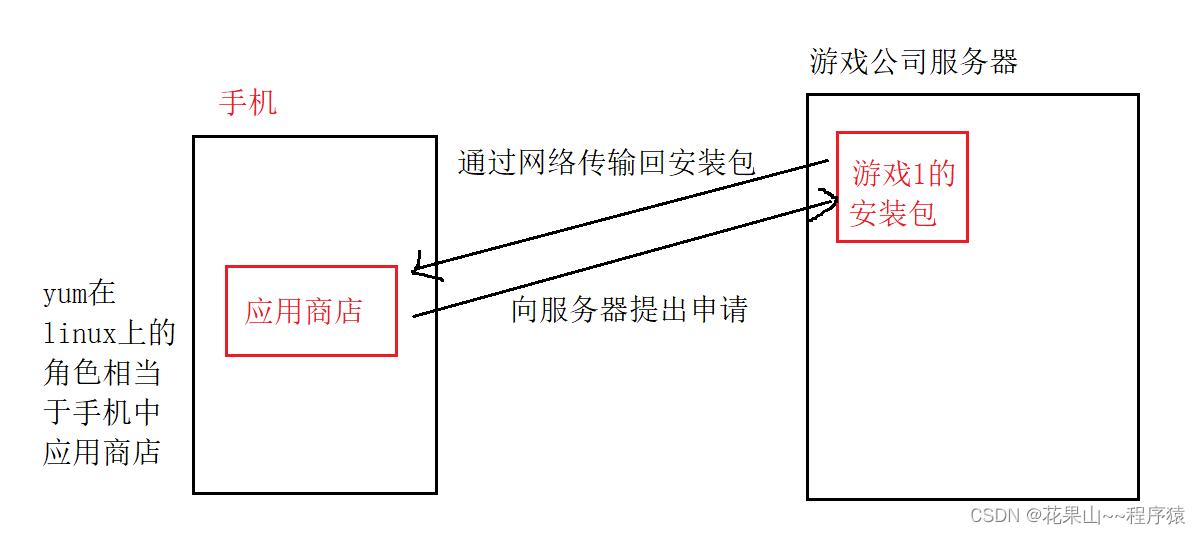
2. Basic use of yum
1. Steps:
Find:
yum list | grep 'software name' (first search from the package directory)
yum list 'sl.x86_64' (you can also search directly by file name)
Install:
yum install sl.x86_64 (install corresponding files)
Uninstall:
yum remove 'software name'

Add: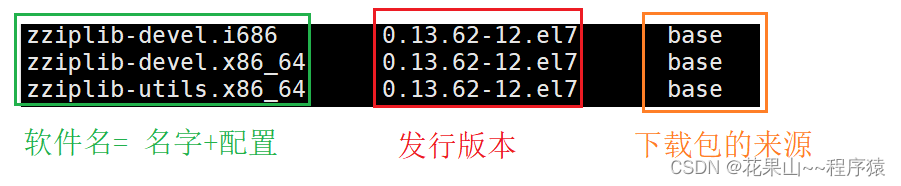
2. Recommended development tools (centos 7.6)
man manual:
Installation instructions: yum install -y man-ages
Drag and drop tools under windows and Linux:
yum install lrzsz.x86_64
Two, vim - linux text editor
Usage: vim text.c (if this file does not exist, a new one will be created)
vim has three modes:
(1. Normal/Normal/Command mode (Normal mode) - enter the default mode of vim
Control the movement of the screen cursor, delete characters, words or lines, move and copy a section and enter Insert mode, or go to last line mode
(2. Insert mode (Insert mode) - press the a, i, o keys in the default mode
(3. Last line mode (last line mode)
1. Normal mode —— command mode (it doesn’t matter if you can’t remember it, just practice more)
It is recommended to try it yourself:
2. last line mode—— last line mode (how to enter; shift:)
3. Insert mode——insert mode (similar to the previous method of writing code, omitted)
(note: there are more instructions in the vim editor, but these are also sufficient)
4. vim simple configuration
Function: We recalled that when we used vs, vs helped us to automatically complete, line number, and syntax highlighting, which made us very convenient and efficient to use; this effect can also be achieved by setting simple configurations under vim.
( Note : 1. root has its own vim configuration 2. Once vim is configured, it only affects the current user)
step:
1. Find out if there is a hidden file of .vimrc in the user, if not, create one, this file will be a collection of vim configuration data.
2 Open the .vimrc file with vim.
3. Go to the Internet to find the relevant configuration code of vim.
(Note: This is the plug-in vimforcpp that the boss has already done . Enter the following command under the user (not recommended to install under the root user):
curl -sLf https://gitee.com/HGtz2222/VimForCpp/raw/master/install.sh -o ./install.sh && bash ./install.sh
Just reconnect the server
5. sudo command
We have learned about the operation of sudo temporary ( privilege escalation ) login root, but it will return: the information is not a trust relationship. This time we modify the trust relationship by modifying vim.
Open the /etc/sudoers path with vim as root
vim /etc/sudoers

3. Use of gcc & g++
1. gcc compiler
A detailed explanation is not given here. For details on the compilation process, see this article for a detailed explanation of C language preprocessing & program environment
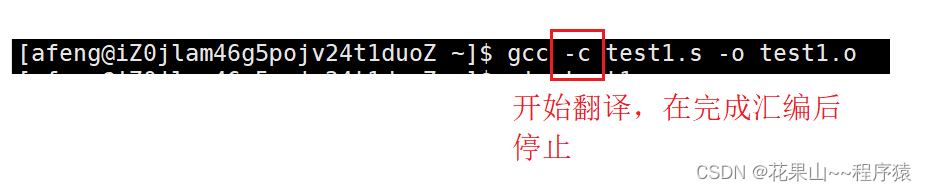
Here we only truncate and share the instructions. By truncating the process and storing it in a file, it is convenient for us to view the operation .
Usage: gcc [options] [object-file] -0 [new-file]
-o : can be understood as generating targets
(1. Preprocessing
for example:

(2. Compile
for example:

(3. Assembly
(4. link
Historical background: Most of the earliest programmers were a group of scientists. They operated by inputting binary language (that is, machine language) into the computer. Over time, they found that binary was too obscure, so scientists packaged some common binary instructions Then, Dennis Ritchie invented the C language. Later, when people used it, they found that the process-oriented efficiency was too low, and object-oriented languages such as c++, java, and python appeared. Along the way, the language has become more and more streamlined and encapsulated, but computers still only understand binary, and language translation will follow the timeline and use the efforts of the predecessors to gradually become low-level and difficult to understand. This is the accumulation process .
2. Static library & dynamic library
First of all, we use a picture to get acquainted with the static library & dynamic library

Then let's test a file to see if there is a dynamic library dependency.

So what if we want to compile with a static library ?
Use a static library to compile Usage: gcc [file] -o [new file] -static
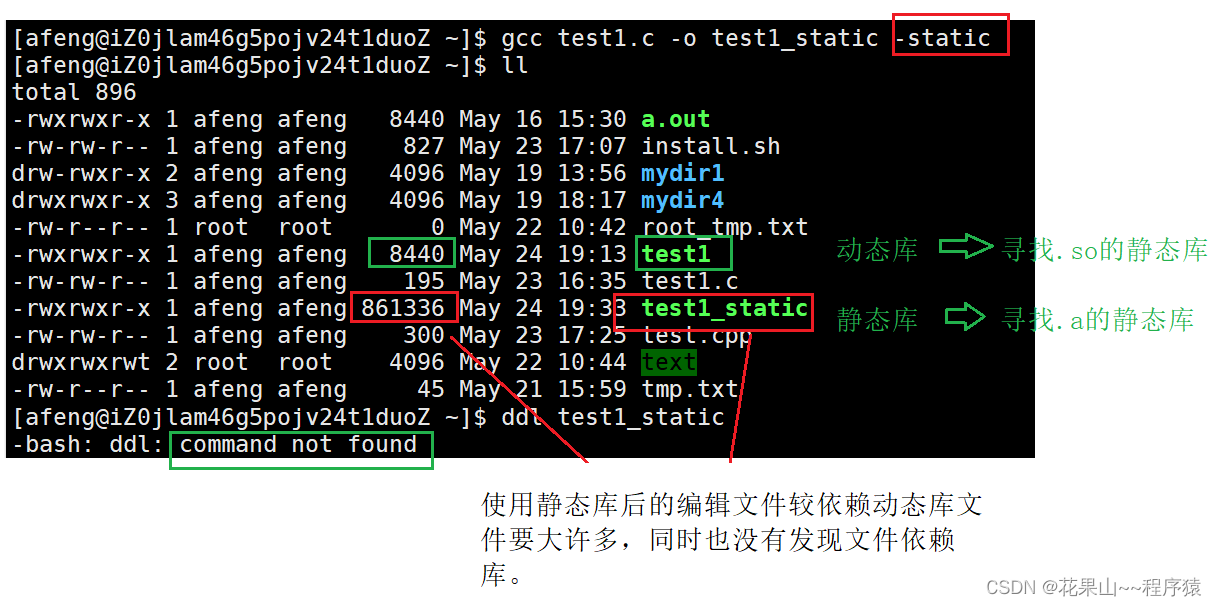
Note : If the following feedback appears, the static library is not installed

This is centos 7.6 C language static library
Enter as root: yum install glibc-static
3. g++ compiler
First we check to see if we have the g++ compiler
Enter the command: g++ -v
This appears to indicate that it is not installed

Not installed, now install the following command under the root identity of centos 7:
yum install gcc gcc-c++
Just wait for the installation to complete (note: C++ is backward compatible with C, so g++ can compile C source code, but we generally don’t use it like this)
Four, gdb - linux debugger
1. Install gdb (centos7)
Check if gdb is installed: gdb -v

Then enter the quick installation command sudo yum -y install gdb
Otherwise, the installation is successful.
2. Background
(1. There are two versions of program execution, debug and release.
(2. The g++ compiler compiles the release version by default , so if you want to compile the debug version, you must add debug information. Add -g at the end

3. Get started
list / l line number: display the source code of the compiled file , and then go down to the last position, and list 10 lines each time .
list / l function name: List the source code of a function.
r or run : run the program
n or next : single execution - understood as process by process
s or step : enter the function call - understood as statement by statement
break(b n) line number: set a breakpoint on a certain line
break function name (b function name): set a breakpoint at the beginning of a function
info break (i b) : view breakpoint information
delete breakpoints : delete all breakpoints
delete breakpoints n : delete the breakpoint with sequence number n
disable breakpoints : disable breakpoints
enable breakpoints : enable breakpoints
display variable name: track and view a variable, and display its value every time you stop
undisplay + trace value designator : undisplay those variables that were previously set
finish : Execute until the current function returns, then stop and wait for the command
continue ( or c) : Continuously execute the program from the current position, and stop when it reaches the next breakpoint
until X line number: jump to X line
print(p) : Print the value of the expression, the value of the variable can be modified or the function can be called through the expression
p variable: Print variable value.
set var : modify the value of a variable
info breakpoints (i b) : See which breakpoints are currently set
breaktrace ( or bt) : View function calls and parameters at all levels
info ( i) locals : View the value of local variables in the current stack frame
quit : quit gdb
Debugging under linux can achieve fast debugging without transplanting code. We need to have an understanding of linux debugging, know how to break breakpoints, and track variables.
Five, make & Makefile - automated build tool
1. Background
- Whether you can write a makefile or not shows from one aspect whether a person has the ability to complete large-scale projects.
- In VS the compiler will do it for us, but in Linux we have to build it ourselves. The source files in a project are not counted, and they are placed in several directories according to type, function, and module. The makefile defines a series of rules to specify which files need to be compiled first, which files need to be compiled later, and which files need to be re-compiled. Compile, and even perform more complex functional operations.
- The benefit brought by makefile is - " automatic compilation " . Once written, only one make command is needed, and the entire project is completely automatically compiled, which greatly improves the efficiency of software development.
- make is a command tool that explains the instructions in the makefile . Generally speaking, most IDEs have this command, such as: make in Delphi , nmake in Visual C++ , make in GNU under Linux . It can be seen that makefile has become a compilation method in engineering.
- make is a command , makefile is a file , and the two are used together to complete the automatic construction of the project.
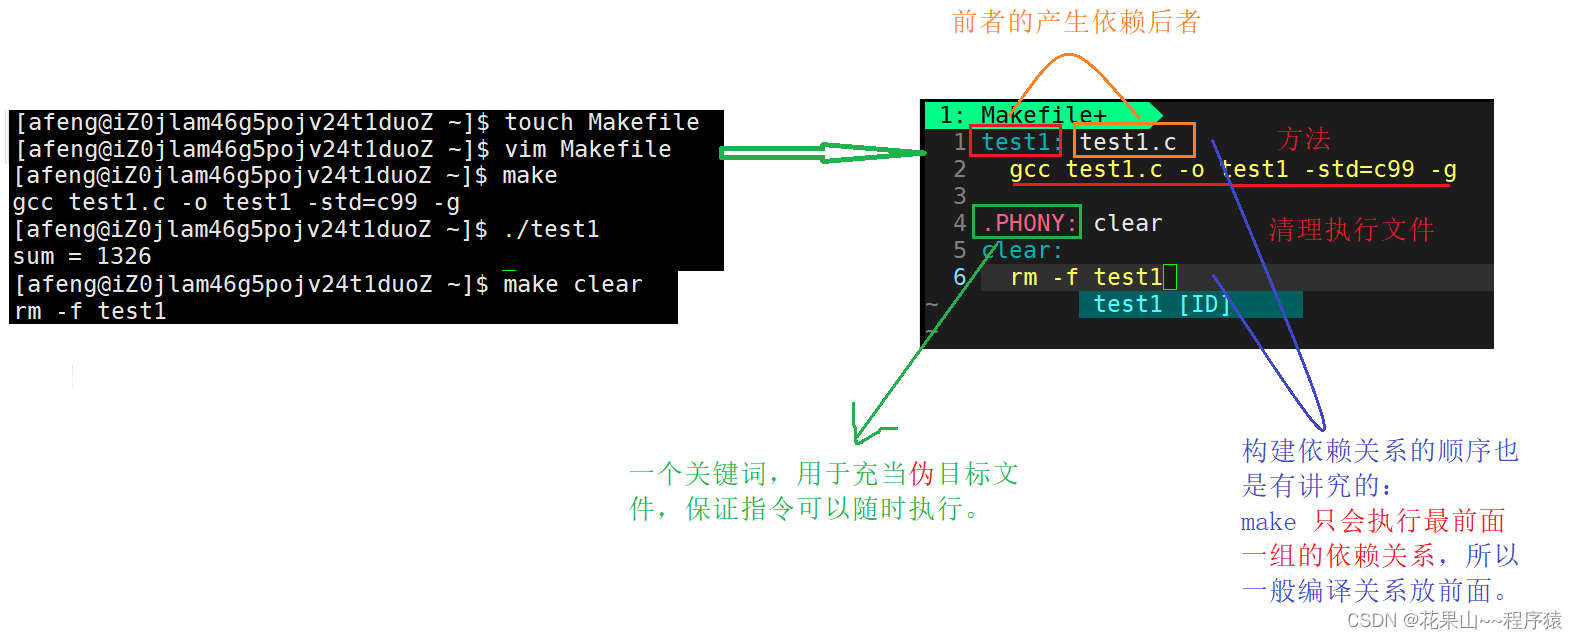
makefile This file stores the dependencies & dependent methods of the files

2. build
1. Create a Makefile.
2. Create dependencies & dependent methods in the Makefile.
3. The make command updates the data, so we don't need to compile the file with gcc every time, just execute the compiled file.
6. Hand rubbing applet——progress bar
1. The concept of carriage return & line feed
Carriage return: Go back to the beginning of the current line, which is "\r"
Line break: The column remains unchanged, and the cursor changes to the next line
" \n " means carriage return & line feed
2. Line buffer
We try to run the following code:
#include <stdio.h>
#include <unistd.h>
int main()
{
 printf("hello Makefile!\n");
 sleep(3);  // 停止执行3秒
 return 0;
}
We found that the string was printed immediately, and the program was executed after 3 seconds.
Let's look at the following code:
#include <stdio.h>
#include <unistd.h>
int main()
{
 printf("hello Makefile!"); // 我们将\n符去掉
 sleep(3);
 return 0;
}
At this time, we will find that the string is not output immediately, but after 3 seconds.
Conclusion: When printf prints a string, it will not print it immediately , it will be placed in the line buffer at the C language level , and the display will be refreshed only when the "\n" character is encountered.
(There is not only this knowledge here, only this is shared at present, and it will be gradually deepened later.)
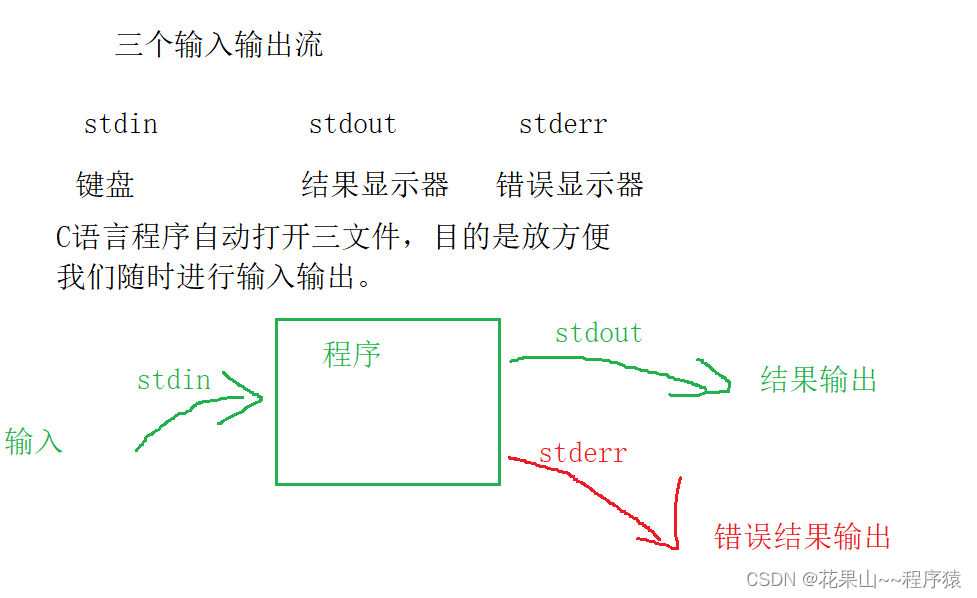
3. Talk about input and output streams
In the C language, we have talked about input and output streams. See this article for detailed explanations of file operations & related functions (super detailed!)
In C language, three input and output stream files are opened by default, namely stdin , stdout , stderr
Facing the line buffer in Section 2 , is there any way to refresh it immediately, what about the line buffer? some
int fflush(FILE *stream) - stream flush
Code modification:
#include <unistd.h>
#include <stdio.h>
int main()
{
 printf("hello Makefile!"); // 我们将\n符去掉
 fflush(stdout)   //刷新输出流
 sleep(3);
 return 0;
}
Judging from the performance of the results, the string is printed immediately , and fflush can indeed refresh the stream.
4. Hand rub a countdown
code:
#include <unistd.h>
#Inlcude <stdio.h>

int main()
{
 int i = 10;
while(i > -1)
{
  printf("%d\r", i);
  fflush(stdout);
  i--;
}

 return 0;
}
As a result, we will find such a result: 10 90 80 70 .... This is because 10 is printed first and occupies two characters, and the latter only occupies one character, so only one character is updated and \r is returned The first character of the line, so there will be such a result. (Note: The display will only display characters )
Optimization method: %d is written as %2d
5. Hand rub progress bar
After the bedding is completed, we start to make the progress bar
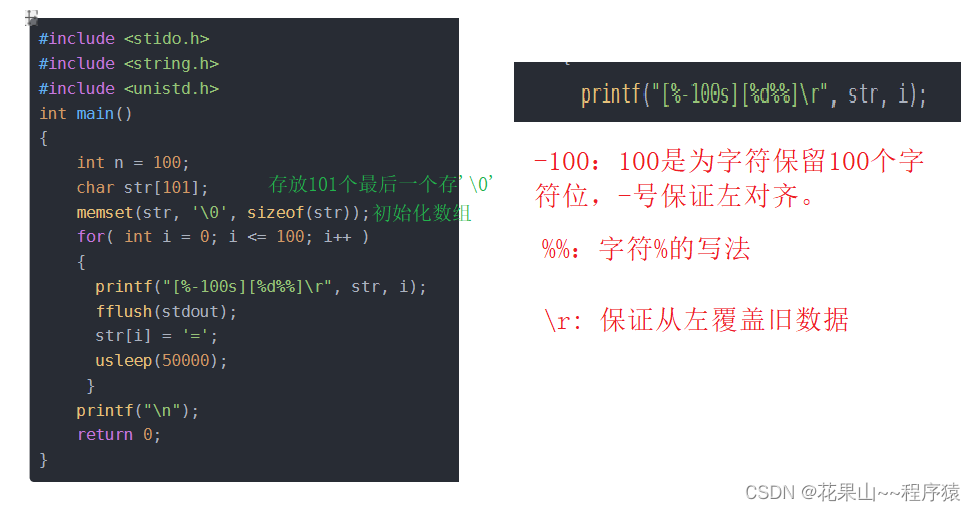
We use "=" as the progress unit, to achieve. Idea: Use a character array that stores 100+ 1 '\0' to store the progress bar. code show as below:
#include <stido.h>
#include <string.h>
#include <unistd.h>
int main()
{
    int n = 100;
    char str[101];
    memset(str, '\0', sizeof(str));
    for( int i = 0; i <= 100; i++ )
    {
      printf("[%-100s][%d%%]\r", str, i);
      fflush(stdout);
      str[i] = '=';
      usleep(50000);
     }
    printf("\n");
    return 0;
}
epilogue
This section is over here, thank you friends for browsing, if you have any suggestions, welcome to comment in the comment area; if you bring some gains to your friends, please leave your likes, your likes and concerns will become bloggers The driving force of the master's creation.