1. The login URL jumps to the slider verification code interface
Login URL:
url=https://account.zbj.com/login

Get this label first, and jump to the slider verification code interface.
from selenium import webdriver

driver=webdriver.Chrome()
driver.implicitly_wait(10)

#登录网址
driver.get('https://account.zbj.com/login')
driver.maximize_window()
#点击验证
driver.find_element_by_xpath('//*[@id="utopia_widget_10"]/ul/ol/a/span/img').click()
driver.find_element_by_class_name("geetest_radar_tip").click()
Jumped out result graph:

2. Processing of verification code pictures
The verification code picture consists of three pictures: a gap picture, a slider picture, and a complete picture.
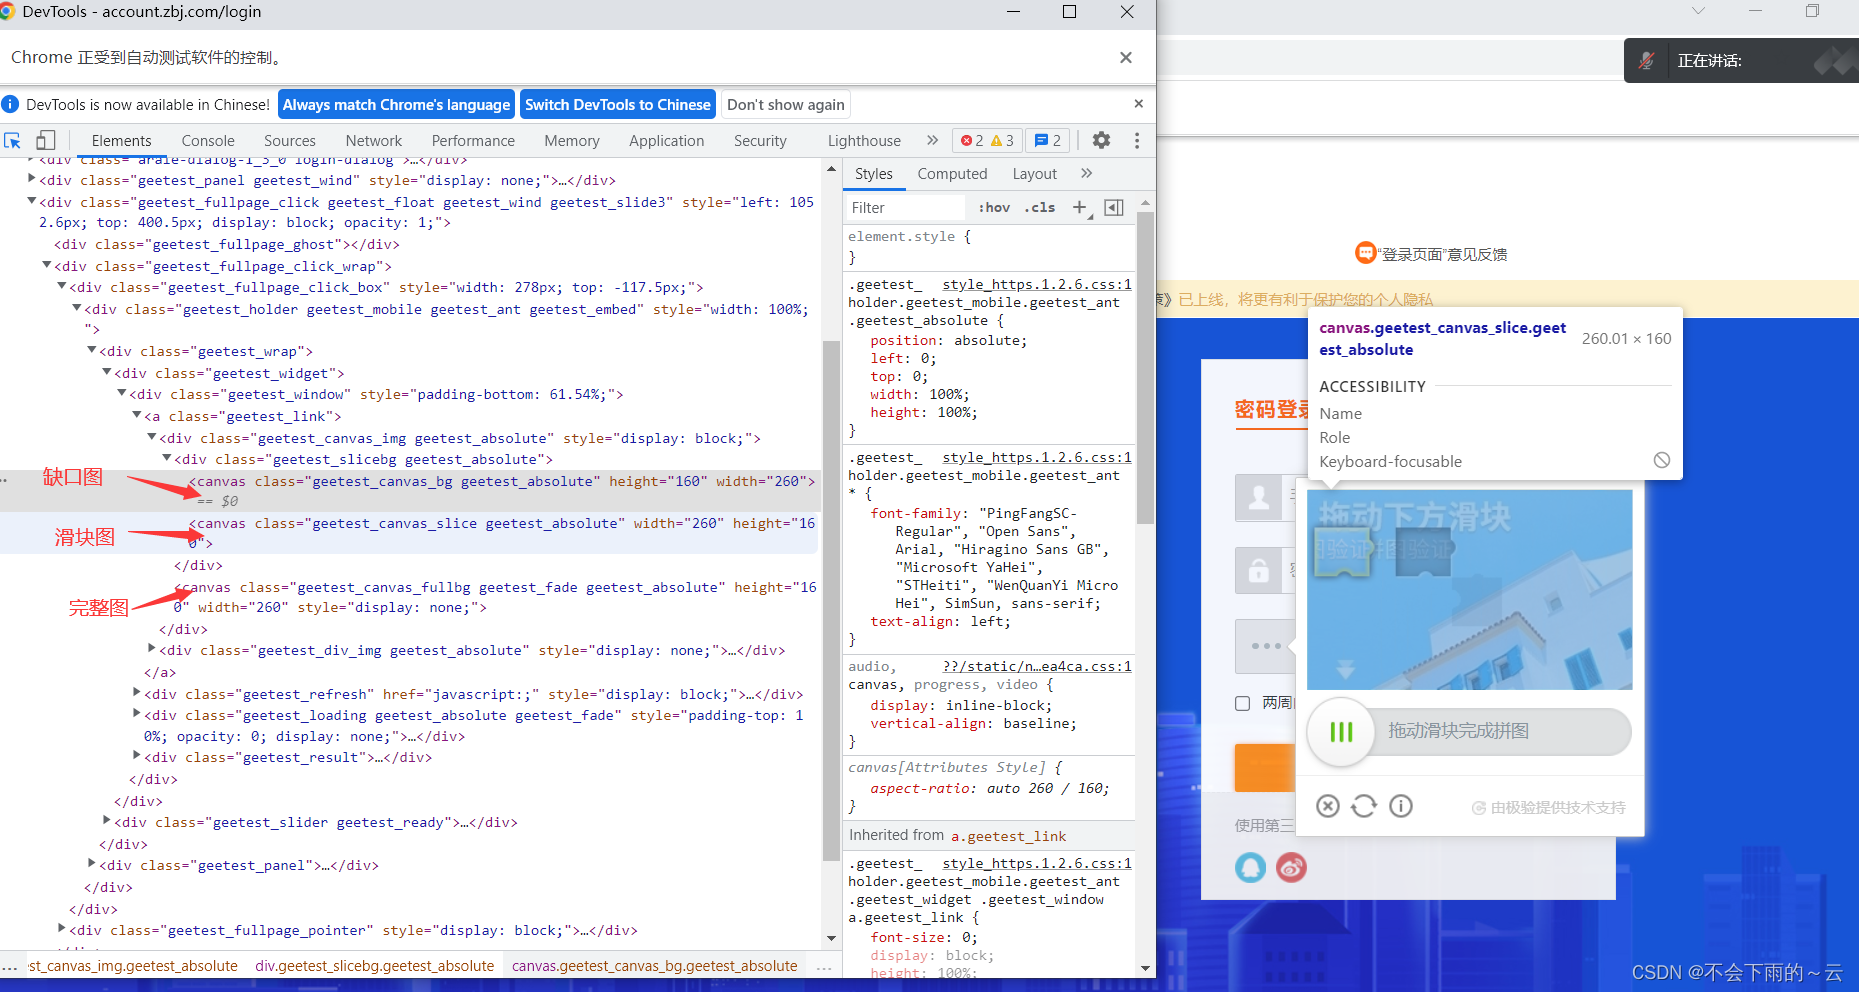
Logical thinking: 1. Let the slider hide and intercept the gap map;
2. Hide the gap map, display the slider map, and intercept the slider map;
3. Display the complete picture and intercept the complete picture.
import time
from selenium import webdriver

def get_captcha():
    '''取得验证码的图片'''
    time.sleep(2)
    #1、隐藏滑块,得到缺口图
    js_hide_slice = 'document.getElementsByClassName("geetest_canvas_slice")[0].style.display="none"'
    driver.execute_script(js_hide_slice)
    #截取缺口图
    part_imgpath='./part.png'
    driver.find_element_by_class_name("geetest_canvas_bg").screenshot(part_imgpath)
    #2、隐藏缺口图 ,得到滑块图
    js_show_slice='document.getElementsByClassName("geetest_canvas_slice")[0].style.display="block"'
    js_hide_part='document.getElementsByClassName("geetest_canvas_bg")[0].style.display="none"'
    driver.execute_script(js_show_slice+";"+js_hide_part)
    #截取滑块图
    slice_imgpath='./slice.png'
    driver.find_element_by_class_name("geetest_canvas_slice").screenshot(slice_imgpath)
    #3、显示完整图 geetest_canvas_fullbg
    js_show_full1='document.getElementsByClassName("geetest_canvas_fullbg")[0].style.opacity="1"'
    js_show_full2='document.getElementsByClassName("geetest_canvas_fullbg")[0].style.display="block"'
    driver.execute_script(js_show_full1+";"+js_show_full2)
    #截取完整图形
    full_imgpath='./full.png'
    driver.find_element_by_class_name("geetest_canvas_fullbg").screenshot(full_imgpath)
    #还原
    js_hide_full1='document.getElementsByClassName("geetest_canvas_fullbg")[0].style.opacity="0"'
    js_hide_full2='document.getElementsByClassName("geetest_canvas_fullbg")[0].style.display="none"'
    js_show_part='document.getElementsByClassName("geetest_canvas_bg")[0].style.display=""'
    driver.execute_script(js_hide_full1+";"+js_hide_full2+";"+js_show_part)

    return part_imgpath,slice_imgpath,full_imgpath

if __name__ == '__main__':

    driver=webdriver.Chrome()
    driver.implicitly_wait(10)
    #登录网址
    driver.get('https://account.zbj.com/login')
    driver.maximize_window()
    #点击验证
    driver.find_element_by_xpath('//*[@id="utopia_widget_10"]/ul/ol/a/span/img').click()
    driver.find_element_by_class_name("geetest_radar_tip").click()
    time.sleep(1)
    # 获取缺口图,滑块图,完整图
    part_imgpath, slice_imgpath, full_imgpath = get_captcha()
Got three pictures:

3. Calculate the distance
Logical thought:
#逻辑思路
def get_slice_X():
 '''获取滑块左边缘X'''
    pass


 def get_gap_X():
    '''获取缺口左边缘x坐标'''
    pass

def get_distance():
    '''计算距离'''
    pass
Next, write and test the obtained value of the left edge X of the slider: create a py file, put the following code into it, and run it.
from PIL import Image
part_imgpath='./part.png'
slice_imgpath='./slice.png'
full_imgpath = './full.png'
def get_slice_X(slice_imgpath):
    '''获取滑块左边缘X'''
    img=Image.open(slice_imgpath)
    w,h=img.size
    for i in range(w):
        for j in range(h):
            rgb=img.getpixel((i,j))
            print((i,j),rgb)
            if rgb[0]+rgb[1]+rgb[2]<250:
                return (i,j),rgb
data=get_slice_X(slice_imgpath)
print(data)
operation result:
Write and test the X coordinates of the left edge of the gap: create a .py file and put it into the code
from PIL import Image
part_imgpath='./part.png'
slice_imgpath='./slice.png'
full_imgpath = './full.png'


def get_gap_X(part_imgpath,full_imgpath):
    '''获取缺口左边缘x坐标'''
    part_img = Image.open(part_imgpath)
    full_img = Image.open(full_imgpath)
    w, h = part_img.size
    for i in range(w):
        for j in range(h):
            part_point = part_img.getpixel((i, j))
            full_point = full_img.getpixel((i, j))
            #比较缺口图与完整图,相同坐标点,颜色差,缺口位置色差比较大
            r = part_point[0] - full_point[0]
            g = part_point[1] - full_point[1]
            b = part_point[2] - full_point[2]
            abs_value = abs(r) + abs(g) + abs(b)
            if abs_value>120:
                return i,j
            print("abs_value",(r,g,b),abs_value,(i,j))
data=get_gap_X(part_imgpath,full_imgpath)
print(data)
operation result:
Calculate the distance:
def get_distance(slice_imgpath,part_imgpath,full_imgpath):
    slice_X = get_slice_X(slice_imgpath)[0][0]
    gap_X = get_gap_X(full_imgpath, part_imgpath)[0]
    distance = gap_X - slice_X
    return distance
4. Simulation of artificial movement
1. Move directly according to the obtained distance, the slider and the gap can fit but cannot pass
2. Newton's law of motion simulates artificial movement, and the probability of passage is low occasionally.
3. Increase the randomness to simulate the artificial movement trajectory, and the probability of passing is high.
5. Move the slider
def move_slider(tracks):
    element=driver.find_element_by_class_name("geetest_slider_button")
    ActionChains(driver).click_and_hold(element).perform()
    for x in tracks:
        ActionChains(driver).move_by_offset(xoffset=x,yoffset=0).perform()
    ActionChains(driver).release(element).perform()
    time.sleep(2)
Full code:
import time
from PIL import Image
from selenium import webdriver
import random
from selenium.webdriver.common.by import By
from shu import *            #我自己导的要输入的账号密码包
from selenium.webdriver import ActionChains

#一、获取图片
def get_captcha():
    '''取得验证码的图片'''
    time.sleep(2)
    #1、隐藏滑块,得到缺口图
    js_hide_slice = 'document.getElementsByClassName("geetest_canvas_slice")[0].style.display="none"'
    driver.execute_script(js_hide_slice)
    #截取缺口图
    part_imgpath='./part.png'
    driver.find_element_by_class_name("geetest_canvas_bg").screenshot(part_imgpath)
    #2、隐藏缺口图 ,得到滑块图
    js_show_slice='document.getElementsByClassName("geetest_canvas_slice")[0].style.display="block"'
    js_hide_part='document.getElementsByClassName("geetest_canvas_bg")[0].style.display="none"'
    driver.execute_script(js_show_slice+";"+js_hide_part)
    #截取滑块图
    slice_imgpath='./slice.png'
    driver.find_element_by_class_name("geetest_canvas_slice").screenshot(slice_imgpath)
    #3、显示完整图 geetest_canvas_fullbg
    js_show_full1='document.getElementsByClassName("geetest_canvas_fullbg")[0].style.opacity="1"'
    js_show_full2='document.getElementsByClassName("geetest_canvas_fullbg")[0].style.display="block"'
    driver.execute_script(js_show_full1+";"+js_show_full2)
    #截取完整图形
    full_imgpath='./full.png'
    driver.find_element_by_class_name("geetest_canvas_fullbg").screenshot(full_imgpath)
    #还原
    js_hide_full1 = 'document.getElementsByClassName("geetest_canvas_fullbg")[0].style.display="none"'
    js_hide_full2 = 'document.getElementsByClassName("geetest_canvas_fullbg")[0].style.opacity="0"'
    js_show_part='document.getElementsByClassName("geetest_canvas_bg")[0].style.display=""'
    driver.execute_script(js_hide_full1+";"+js_hide_full2+";"+js_show_part)

    return slice_imgpath,part_imgpath,full_imgpath
#二、计算距离
def get_slice_X(slice_imgpath):
    '''获取滑块左边缘X'''
    img = Image.open(slice_imgpath)
    w, h = img.size
    for i in range(w):
        for j in range(h):
            rgb = img.getpixel((i, j))
            print((i, j), rgb)
            if rgb[0] + rgb[1] + rgb[2] < 250:
                return (i, j), rgb
def get_gap_X(part_imgpath,full_imgpath):
    '''获取缺口左边缘x坐标'''
    part_img = Image.open(part_imgpath)
    full_img = Image.open(full_imgpath)
    w, h = part_img.size
    for i in range(w):
        for j in range(h):
            part_point = part_img.getpixel((i, j))
            full_point = full_img.getpixel((i, j))
            #比较缺口图与完整图,相同坐标点,颜色差,缺口位置色差比较大
            r = part_point[0] - full_point[0]
            g = part_point[1] - full_point[1]
            b = part_point[2] - full_point[2]
            abs_value = abs(r) + abs(g) + abs(b)
            if abs_value>110:
                return i,j

def get_distance(slice_imgpath,part_imgpath,full_imgpath):
    slice_X = get_slice_X(slice_imgpath)[0][0]
    gap_X = get_gap_X(full_imgpath, part_imgpath)[0]
    distance = gap_X - slice_X
    return distance

#三、模拟人工移动
def get_track(distance):
    #初速度
    v=0
    #单位时间为0.2s来统计轨迹,轨迹即0.2内的位移
    t=0.2
    # 位移/轨迹列表、列表内的一个元素代表0.2s的位移
    tracks = []
    #当前的位移
    current=0
    #到达mid值开始减速
    mid=distance*5/8
    distance+=10    #先滑过一点,最后再反着滑动回来
    while current<distance:
        t=random.randint(1,4)/10    #将时间设为随机,更符合人的行为
        if current<mid:
            #加速度越小,单位时间的位移越小,模拟的轨迹就越多越详细
            a=random.randint(1,3)#加速运动
        else:
            a=random.randint(2,4)#减速运动
        #初速度
        v0=v
        #t秒时间内的位移
        s=v0*t+0.5*a*(t**2)
        #当前的位置
        current+=s
        #添加到轨迹列表
        tracks.append(round(s))
        #速度已经达到v,该速度作为下次的初速度
        v=v0+a*t
    #反着滑动到大概准确位置
    temp=10+round(current-distance)#比原来正确的位置多了的像素
    for i in range(5):
        num=-random.randint(1,3)
        tracks.append(num)
        temp+=num
    #位移的补偿
    tracks.append(abs(temp))if temp<0 else tracks.append(-temp)
    # random.shuffle(tracks)
    print(tracks)
    return tracks
# selenium操作
#移动滑块
def move_slider(tracks):
    element=driver.find_element_by_class_name("geetest_slider_button")
    ActionChains(driver).click_and_hold(element).perform()
    for x in tracks:
        ActionChains(driver).move_by_offset(xoffset=x,yoffset=0).perform()
    ActionChains(driver).release(element).perform()
    time.sleep(2)


if __name__ == '__main__':

    driver=webdriver.Chrome()
    driver.implicitly_wait(10)
    #登录网址
    driver.get('https://account.zbj.com/login')
    driver.maximize_window()
    #点击验证
    driver.find_element_by_xpath('//*[@id="utopia_widget_10"]/ul/ol/a/span/img').click()
    driver.find_element_by_class_name("geetest_radar_tip_content").click()
    time.sleep(1)
    #账号和密码
    name = driver.find_element(By.NAME, 'username').send_keys(USER)
    password = driver.find_element(By.NAME, 'password').send_keys(PASSWORD)
    time.sleep(2)
    # 获取缺口图,滑块图,完整图
    part_imgpath, slice_imgpath, full_imgpath = get_captcha()

    # 获取距离
    distance = get_distance(part_imgpath, slice_imgpath, full_imgpath)
    print(distance)


    count=6
    while count>0:
        # 获取轨迹
        tracks = get_track(distance)
        # selenium操作
        move_slider(tracks)
        success=driver.find_element_by_class_name("geetest_success_radar_tip_content").text
        if success:
            print("校验成功",success)
            time.sleep(1)
            driver.find_element_by_class_name("zbj-btn-primary").click()
            break
        else:
            count+=1
        #出现被怪兽吃掉,网络不给力
        info_tag=driver.find_element_by_class_name("geetest_reset_tip_content")
        internet_info=info_tag.text
        if "点击重试" in internet_info:
            info_tag.click()
            # 获取缺口图,滑块图,完整图
            part_imgpath, slice_imgpath, full_imgpath = get_captcha()
            # 获取距离
            distance = get_distance(part_imgpath, slice_imgpath, full_imgpath)
            print(distance)


    # element = driver.find_element_by_class_name("geetest_slider_button")
    # ActionChains(driver).click_and_hold(element).perform()
    # ActionChains(driver).move_by_offset(xoffset=distance, yoffset=0).perform()
    # ActionChains(driver).release(element).perform()
    time.sleep(10)

    # driver.close()
py file of account number and password
USER='xxxxx'            #你自己注册的账号
PASSWORD='xxxxx'         #密码
The last thing to say is that the value of 250 in line 49 is an approximate range value, and it may take a few more runs to succeed, but the logic and code are okay.
def get_slice_X(slice_imgpath):
    '''Get the left edge X of the slider'''
A lot of steps are saved, it is the code directly, just refer to it for learning. Ha ha!