What I am learning today is OpenCV for photo face detection. All reference blog posts, documents, videos, and codes will be attached with links or file compression packages at the end of the article.
The content of this article is as follows:
content directory
1. Introduction to OpenCV
1. What. OpenCV
OpenCV is a cross-platform computer vision library released based on BSD license (open source). It has a rich library of commonly used image processing functions. It is written in C/C++ language and can run on Linux/Windows/Mac and other operating systems. It can be quickly implemented. Some image processing and recognition tasks. In addition, OpenCV also provides interfaces such as Java, python, cuda, and basic algorithm calls for machine learning, which makes image processing and image analysis easier to use and allows developers to spend more energy on algorithm design.
2. Why use OpenCV?
Although python is very powerful and has its own image processing library PIL, it is still much weaker than OpenCV. Like many open source software, OpenCV also provides a complete python interface, which is very convenient to call. It contains more than 2,500 algorithms and functions, and almost any imaginable mature algorithm can be implemented by calling OpenCV functions, which is super convenient.
Two, Opencv for photo face detection
1. Code
# -*- coding: utf-8 -*-


import cv2 as cv


def face_detect_demo(img):
    img = cv.resize(img, dsize=(800, 800))
    gary = cv.cvtColor(img, cv.COLOR_BGR2GRAY)
    face_detect = cv.CascadeClassifier("./opencv/sources/data/haarcascades/haarcascade_frontalface_alt2.xml")#haarcascade_frontalface_default.xml")
    face = face_detect.detectMultiScale(gary, 1.004, 28, 6, (60, 60), (70, 70))
    for x, y, w, h in face:
        cv.rectangle(img, (x, y), (x + w, y + h), color=(0, 0, 225), thickness=4)
    cv.imshow("result", img)
    # img.save("result.jpg")  # 保存图片
    cv.imwrite(r"final_result.jpg", img)

img = cv.imread("photo.jpg")
face_detect_demo(img)  # 检测单个图片

while True:
    if ord("q") == cv.waitKey(1):
        break
cv.destroyAllWindows()
2. Code explanation
The detectMultiScale() function is explained in detail
1. import cv2 as cv
First import the necessary package opencv we need, the corresponding command is import cv2 as cv, the as here is equivalent to giving this module an alias.
If opencv is not installed, you can pip install opencv-python in the terminal.
2. def face_detect_demo(img):
Next, we define a function face_detect_demo, which has a parameter img, which is the picture we want to detect, which is a formal parameter.
3. img = cv.resize(img, dsize=(800, 800))
Call the function resize in cv to change the size of the picture.
The first parameter of resize is the picture to be processed, and the second parameter is the size you want to change to the picture.
Here (800, 800) is such a picture changed to 800*800. The result of the processing is returned to img.
4. gary = cv.cvtColor(img, cv.COLOR_BGR2GRAY)
Next, to change the color of the picture, call the cvtColor function directly.
Similarly, the first parameter is the picture to be processed, and the second parameter is the color type to be changed. There
are many color types here, and I set the COLOR_BGR2GRAY type here.
The first few steps can be understood as standardizing pictures, that is, passing pictures of different sizes and colors can be converted into pictures of the same size and color type. The advantage of this operation is that it is easier to adjust the parameters later.
5. face_detect = cv.CascadeClassifier("./opencv/sources/data/haarcascades/haarcascade_frontalface_default.xml")
The main event is coming!=, this is a face detection model trained by opencv official, it can be called directly, very convenient!
File link: https://pan.baidu.com/s/1FV3NWT3Vayq3eKq2QsB3mg?pwd=tsvd Extraction code: tsvd
file and code extraction link, there are also some other trained models, if you are interested, you can also try other models .
6. face = face_detect.detectMultiScale(gary, 1.004, 10, 0, (40, 40), (50, 50))
Next, we detect the face in the picture, face_detect.detectMultiScale, is to call the detectMultiScale in the model.
detectMultiScale(image[, scaleFactor[, minNeighbors[, flags[, minSize[, maxSize]]]]]) -> objects
The first parameter image is the image to be processed, generally a grayscale image to speed up detection;
the second The parameter scaleFactor is the scale factor of the search window in two successive scans. The default is 1.1, that is, the search window is expanded by 10% each time; the smaller the ratio, the more iterations.
The working principle of Haar cascade is a "sliding window" method, which matches the face by continuously "sliding the detection window" in the image.
Because the pixels of the image are large or small, the face in the image will also be large or small due to the difference in distance, so it is necessary to set a reduction ratio through the scaleFactor parameter, and gradually reduce the image for detection. The larger the parameter setting, The calculation is faster, but may miss a face of a certain size.
In fact, this parameter can be set according to the pixel value of the image, and the speed of pixel reduction can be faster, usually between 1 and 1.5.
Then, after many iterations, many faces will actually be detected, which can be verified by setting minNeighbors to 0.
The third parameter minNeighbors-indicates the minimum number of adjacent rectangles that constitute the detection target (the default is 3). If the sum of the number of small rectangles that make up the detection target is less than min_neighbors - 1, it will be excluded. If min_neighbors is 0, the function returns all checked candidate rectangles without any operation.
It's a bit difficult to understand here. The adjacent rectangle refers to the frame recognized after multiple iterations of the same candidate face (not yet determined). Only when the number of adjacent frames is greater than the minneighbor set by yourself will it be determined. This candidate face frame is correct.
The following example illustrates:
minNeighbors=0 can be understood as each portrait needs to be recognized only once, because each time corresponds to a box. For example, referring to the face detection in these pictures in the blog post , Li Si in the upper right corner of the picture below is recognized once, and the number of neighbors in this box is 0.
But if minNeighbors=1, there is at least one neighbor box, which means it has been identified at least twice. In the picture below, Li Si was not recognized, because there is no "neighbor" in her recognition result;
minNeighbors=3, there are at least 3 neighbor boxes, which means it has been recognized at least 4 times. Meng Jia in the picture below was not recognized either, because there was only one "neighbor" in her recognition results.
The fourth parameter flag parameter is the same as in the old cascade method cvHaarDetectObjects, and it is not used in the new cascade. (This parameter is not used) You can take any value. But it cannot be deleted directly. Will report an error.
error: OpenCV(4.7.0) :-1: error: (-5:Bad argument) in function 'detectMultiScale'
> Overload resolution failed:
>  - Argument 'flags' is required to be an integer
>  - Argument 'flags' is required to be an integer
The fifth parameter minSize is the minimum rectangle size, and
the sixth parameter maxSize is the maximum rectangle size. These six parameters need to be adjusted by yourself for the best match.
The detectMultiScale method will directly use the model to detect pictures and return multiple x, y, w, h. (x, y) are the coordinates of the left vertex, w is the width of the rectangle, and h is the height of the rectangle.
7. for x, y, w, h in face:
    cv.rectangle(img, (x, y), (x + w, y + h), color=(0, 0, 225), thickness=4)
   cv.imshow("result", img)
   cv.imwrite(r"final_result.jpg", img)
The function of the for loop is to draw a rectangular frame on the original picture. The corresponding function is cv.rectangle. The parameters here are very simple and will not be introduced one by one.
cv.imshow to display, cv.imwrite to save, note that when imwrite saves pictures, add .jpg to the name
The function ends here, and the next step is to call the function:
8. img = cv.imread("photo.jpg")
   face_detect_demo(img)  # 检测单个图片
First read the picture, put the program and the picture in a folder, you can read it directly by name, if you don’t put it in a file home, you need to use the absolute path to read it.
Call the function written above to check the face.
9. while True:
       if ord("q") == cv.waitKey(1):
           break
   cv.destroyAllWindows()
Finally, make a keyboard related event to exit, press the keyboard q key to exit the loop, and the program ends. cv.destroyAllWindows destroys all windows.
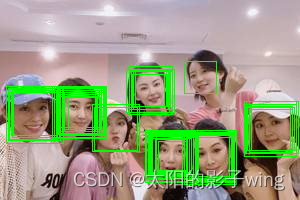
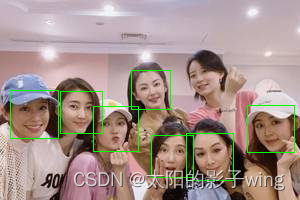
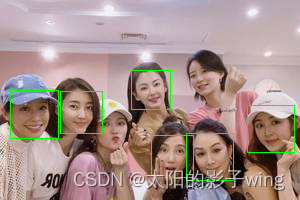
3. Effect Analysis
I found the pictures from the night on Weibo a few days ago, and I can basically detect the position of the face when facing the camera.

But the side facing the camera failed to detect it accurately, that is the fairy sister! ! ! Anyone who knows how to adjust the parameters welcomes advice in the comment area! ! ! !
What I use here is: face = face_detect.detectMultiScale(gary, 1.029, 3, 6, (90, 90), (120, 120))

Reference blog and code
The detectMultiScale parameter
is based on opencv's face detection (picture, video, camera)
based on opencv's face detection
Opencv official open source code link: https://pan.baidu.com/s/1FV3NWT3Vayq3eKq2QsB3mg?pwd=tsvd Extraction code: tsvd
Finally, I would like to thank all seniors for their sharing. This article will be written here first. Comments and corrections are welcome!