I recently signed up for the official Rising Star Project Python track. When the camp opened, I saw many outstanding seniors share their experiences as bloggers, transforming from an ordinary novice to a blogger with thousands of fans, which greatly encouraged me. OK. So I decided to start with the artificial intelligence that I am interested in recently --- convolutional neural network for image recognition. While learning, I will record the learning process so that I can review and summarize it for myself. To provide a little bit of help, all reference blog posts, documents, videos, and codes will be linked at the end of the article.
The content of this article is as follows:
content directory
1. Easy to understand and understand convolution
When it comes to convolution, there are many too professional and complicated explanations, often with one head and two big ones. There is no need to explain convolution such as "reversal/flip/defold/symmetry" here.
Refer to Zhihu and Bowen Convolution
1. The physical meaning of convolution
First clear:
The important physical meaning of convolution is: the weighted superposition of a function (such as: unit response) on another function (such as: input signal).
Why do you say this way? Please see
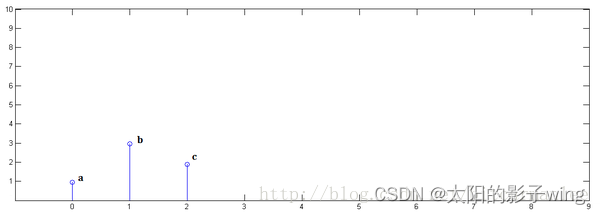
Known x[0] = a, x[1] = b, x[2]=c,
known y[0] = i, y[1] = j, y[2]=k,
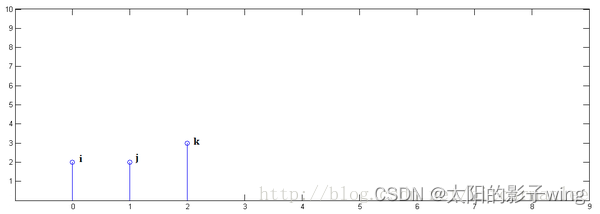
the following pass Demonstrate the process of finding x[n] * y[n] and reveal the physical meaning of convolution.
In the first step, x[n] is multiplied by y[0] and translated to position 0:
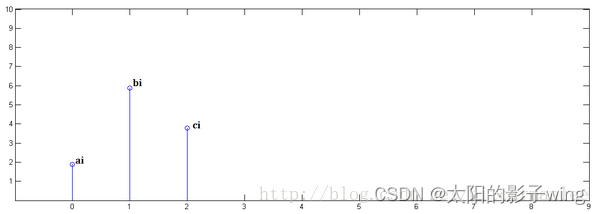
In the second step, x[n] is multiplied by y[1] and translated to position 1.
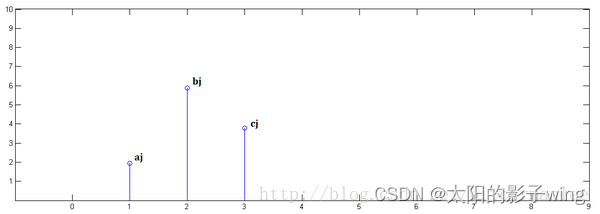
In the third step, x[n] is multiplied by y[2] and translated to position 2:
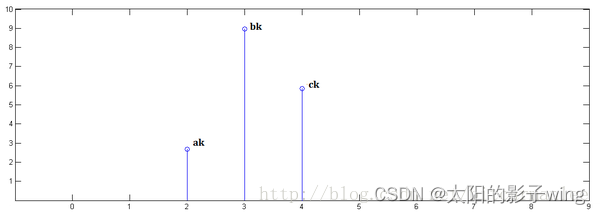
Finally, the above three images are superimposed to get x[n] * y[n]:

Yes, convolution is nothing more than translation and superposition.
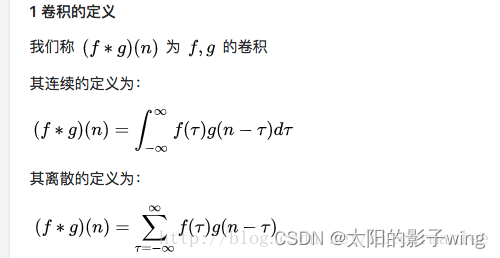
2. The definition of convolution
The definition of convolution in the textbook is like this, we can understand it as an operation. We all know that primary school learns addition first, and then learns multiplication. The essence of multiplication is addition, so this is why we said above that the physical meaning of convolution is: a function (such as: unit response) in another function (such as: input signal) Weighted superposition on .
Let's look back at the definition in the textbook, the volume integral is continuous and discrete.
1) Discrete convolution
For discrete signals, we can understand it as a weighted superposition of multiple signals.
Example of throwing dice
I have two dice, throw them both out, and ask: What is the probability that the points of the two dice add up to 4? The key to the problem
here is that the sum of the two dice must be equal to 4, which is the roll Extensive application scenarios.
We express the probability of each point of the dice:

Then, the cases where the points of the two dice add up to 4 are:


Therefore, the probability of the points of the two dice adding up to 4 is:
f ( 1 ) g ( 3 ) + f ( 2 ) g ( 2 ) + f ( 3 ) g ( 1 ) f(1)g(3)+f(2)g(2)+f(3)g(1) f(1)g(3)+f(2)g(2)+f(3)g(1)
Conforming to the definition of convolution, writing it in a standard form is:
( f ∗ g ) ( 4 ) = ∑ m = 1 3 f ( 4 − m ) g ( m ) (f∗g)(4)=∑_{m=1}^3f(4−m)g(m) (f∗g)(4)=∑m=13f(4−m)g(m)
2) Convolution in image processing
 )
)
2D convolution is a fairly simple operation:
we start with a small weight matrix, namelyConvolution kernel (kernel)To start, let it gradually "scan" over the 2D input data. While the convolution kernel "slides", it calculates the product of the weight matrix and the scanned data matrix (from the input image), and then aggregates the results into one output pixel.
2. Neural network
Artificial neurons and neural networks mimic the brain's neurons and their connections.
The loss is calculated by forward propagation, the error is returned by backpropagation, the weight of each layer is corrected according to the error signal, and iteratively updated multiple times until the condition is met.

1. The neural network is divided into three types of layers:
Input layer: The leftmost layer of the neural network, through which neurons input the samples that need to be trained and observed, that is, the layer of initial input data.
Hidden layer: A layer consisting of all nodes between the input and output. Helps neural networks learn complex relationships between data, that is, layers that process data.
Output layer: The last layer of the neural network is obtained from the first two layers, which is the layer of the final result output.
2. The input of each layer in front of the transfer function/activation function is linearly transformed wx + b wx+bwx+After b , the sigmoid function is also used, which is called the transfer function or activation function in the structure of the neural network. In addition to sigmoid, there are activation functions such as tanh and relu. Activation functions make linear results nonlinear.
3. Why is the transfer function needed? Simple understanding, if no activation function is added, no matter how many layers of hidden layers, the final result is still a linear change of the original input, so that one layer of hidden layer can achieve the result, and there is no meaning of multi-layer perceptron up. Therefore, each hidden layer will be equipped with an activation function to provide nonlinear changes.
3. CNN Convolutional Neural Network
Analogous to a general neural network, the input of CNN is image pixel information. The picture seen by the computer is a number representing light and dark. Color pictures are composed of RGB three colors.

CNN convolutional neural network needs to be trained to get the best model parameters.

1. Input data:
Suppose the input pixel information of a cat is 100 ∗ 100 ∗ 3 100*100*3100∗100∗3 , where 3 is the RGB three-color channel, and any color picture can be regarded as a superposition of three colors.


If all the input pixel information is used as input, in the case of a two-layer network, the first layer has 3 ∗ 1 0 4 3*10^43∗10There are 4 nodes, and there are 1000 nodes in the second layer. Considering the full connection, the calculation amount has reached3 ∗ 1 0 7 3*10^73∗107 . If there are multi-layer networks, the amount of computation increases exponentially.
We consider that
some patterns are much smaller than the entire image, and it is not necessary to see the entire image to discover patterns, but to connect to small regions with fewer parameters.
For example, cats are typically characterized by pointy ears. We just need to do the "cat ears" detector.

At the same time,
 and,
and,

in summary, we can design CNN models.
2. Model
 )
)
 )
)
3. Convolution layer
1) Convolution kernel:
The convolution kernel in the convolution layer is a parameter that needs to be learned, and different convolution kernels will have different effects. As follows: edge detection or sharpening etc.


As shown above, the original image is 8 ∗ 8 8*88∗8 pixels, the convolution result is6 ∗ 6 6*66∗6 pixels. Then in order to obtain the same pixels as the original picture, we need to process the border.
The specific method is to add 0 around the data matrix to be scanned, and how many circles to add depends on different situations. Or change the step size of the convolution move.
2) Padding: processing boundaries

3) Stride: The step size of the convolution kernel movement

4. Maximum pooling layer
In addition to the above method of changing the boundary and step size, you can also find a way in the pooling layer part. We can have a max pooling layer which, as the name suggests, takes as output the maximum value in each fraction.

5、Flatten
The new image data after convolution is flattened and input into the fully connected network.

Summarize:
1. The main design idea of the convolutional neural network is to make better use of the nature of the picture.
●The pattern in the picture is much smaller than the picture
● Patterns in pictures appear in different areas of the image
●Scaling does not affect objects in the picture
2. The convolution layer is to scan the features in the picture.
3. The maximum pooling layer is to scale the picture and reduce the parameters.
4. After multiple convolutions and pooling, connect a fully connected layer through flatten
4. Realization of cat and dog recognition code
The code is divided into two parts, 1) training the model; 2) testing the classification effect.
1. Code
1) Training model
#!/usr/bin/env python
# -*- coding: UTF-8 -*-
"""
@File :CNN_train.py
"""
import sys
from matplotlib import pyplot
from keras.utils import to_categorical
from keras.models import Sequential
from keras.layers import Conv2D
from keras.layers import MaxPool2D
from keras.layers import Dense
from keras.layers import Flatten
from keras.optimizers import SGD
from keras.preprocessing.image import ImageDataGenerator
from keras.models import load_model
import tensorflow as tf
tf.compat.v1.logging.set_verbosity(tf.compat.v1.logging.ERROR)

def define_cnn_model():
    # 使用Sequential序列模型
    model = Sequential()
    # 卷积层
    model.add(Conv2D(32,(3,3),activation="relu",padding="same",input_shape=(200,200,3)))
    # 添加一个卷积层,第一个参数32是卷积核的数量,第二个是卷积核的规格,(3,3)即为3*3的,3是颜色通道个数。第三个参数relu是激活函数类型,第四个是same边缘的处理办法,第五个因为第一层即为卷积层,要定义输入图片的规格(200,200,3)即为200*200,3说明是彩色图片。
    # 最大池化层
    model.add(MaxPool2D((2,2)))  # 池化窗格  (2,2)说明每2*2化作一个窗格。
    # Flatten层
    model.add(Flatten())   # 再添加一个Flatten层,将池化后的结果展开。
    # 全连接层
    model.add(Dense(128,activation="relu"))  # 再添加一个全连接层,第一个参数是神经元个数,第二个参数是激活函数的类型;
    model.add(Dense(1,activation="sigmoid"))  # 最后再添加一个全连接层输出结果,注意我们的结果需判断猫狗就行,因此一个神经元就行。二分类,所以只需要一个神经元就够了。
    # 编译模型
    opt = SGD(lr= 0.001,momentum=0.9)  # 随机梯度,最后用随机梯度编译模型。
    model.compile(optimizer=opt,loss="binary_crossentropy",metrics=["accuracy"])
    return model

def train_cnn_model():
    # 实例化模型
    model = define_cnn_model()
    # 创建图片生成器
    datagen = ImageDataGenerator(rescale=1.0/255.0)
    train_it = datagen.flow_from_directory(
        "./ma1ogo3ushu4ju4ji2/dogs_cats/data/train/",
        class_mode="binary",
        batch_size=64,
        target_size=(200, 200))  # batch_size:一次拿出多少张照片 targe_size:将图片缩放到一定比例
    # 训练模型
    model.fit_generator(train_it,
                        steps_per_epoch=len(train_it),
                        epochs=20,                   #  !!!!!!!!!!!!20次结果较准确
                        verbose=1)
    model.save("my_model.h5")
train_cnn_model()
#首先调用define_cnn_model(),紧接着创建图片生成器:这个作用就是把文件夹中的图片传入模型中训练。里面的参数batch_size是规定一次只能传入64张图片,这样可以有效地避免内存的问题。训练模型中一个重要参数epochs,这里设置为20,说明传入的图片他要学习20次。比如,这里我总共传入了2500张图片,它学习了20次,也就是50000张图片。这样的重复学习,可以有效提高进度,但是当你值调整比较大时,会非常耗时。最后将训练好的模型保存到项目文件夹下。
2) Test classification effect
#!/usr/bin/env python
# -*- coding: UTF-8 -*-
"""
@File :CNN_test.py
"""
import os,random
import matplotlib.pyplot as plt
from keras.models import load_model
from matplotlib.pyplot import imshow
import numpy as np
from PIL import Image
model_path = "my_model.h5"
model = load_model(model_path)
import pylab
plt.rcParams['font.sans-serif']=['SimHei']
def read_random_image():
folder = r"./ma1ogo3ushu4ju4ji2/dogs_cats/data/test/"
file_path = folder + random.choice(os.listdir(folder))
pil_im = Image.open(file_path, 'r')
return pil_im
def get_predict(pil_im,model):
# 首先更改图片的大小
name = ''
pil_im = pil_im.resize((200,200))
# 将格式转为numpy array格式
array_im = np.asarray(pil_im)
# array_im = array_im.resize((4,4))
array_im = array_im[np.newaxis,:] # 注意上一行的array_im 是一个三维数组,不符合运行规范,这里要将其转化为四位数组,否则会报错!
#对图像检测
result = model.predict([[array_im]])
if result[0][0]>0.5:
name = "它是狗!"
print("预测结果是:狗")
else:
name = "它是猫!"
print("预测结果是:猫")
return name
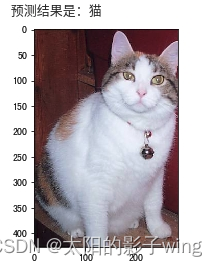
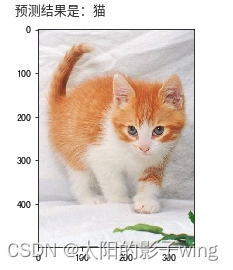
pil_im =read_random_image()
imshow(np.asarray(pil_im))
plt.title(get_predict(pil_im,model))
pylab.show()
2. Code explanation
1)hard

2) sequential model


import keras
from keras import layers
model = keras.Sequential()  #建立模型
model.add(layers.Dense(20,activation="relu",input_shape=(10,))) # 加了一个全连接层 (神经元数量,激活函数,输入的参数值数量:10个参数)
model.add(layers.Dense(20,activation="relu"))  # 再加一个全连接层
model.add(layers.Dense(10,activation="softmax")) # 同上
model.fit(x,y,epochs=10,batch_size=32)  #模型训练: x是图片,y是图形标签 epochs:每张图片看、训练10遍 batch_size:一次只传入32张图片
keras. Sequential() 建立函数

model.add() 添加层

model.fit() 训练模型
3) Conv2D
keras.layers.Conv2D(filters,kernel_size,strides=(1,1),padding="valid",data_formt=None))
filters:整数,输出空间的维度,卷积核的数量

kernel_size:一个整数,或者2个整数代表的元组或列表,指明2D卷积窗口的宽度和高度,可以是一个整数,为所有空间维度指定相同的值。

strides:一个整数,或者2个整数代表的元组或列表,指明卷积沿宽度和高度方向的步长。可以是一个整数,为所有空间维度指定相同的值。

padding:"valid"或者"same",大小写敏感,用于边缘处理部分。
4) MaxPooling2D
keras.layers.MaxPooling2D(pool_size=(2,2),strides=None,padding="valid",data_format =None)
pool_size:整数,或者2个整数表示的元组,沿(垂直,水平)方向缩小比例的因数。(2,2)会把输入张量的两个维度都缩小一半。如果只使用一个整数,那么两个维度都会使用同样的窗口长度。

strides:整数,2个整数表示的元组,或者是None。表示步长值。如果是None,那么默认值是pool_size。

padding:"valid"或者“same"
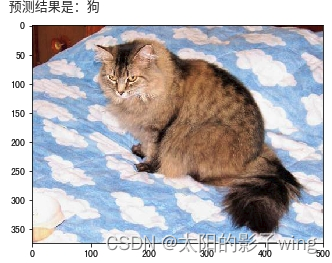
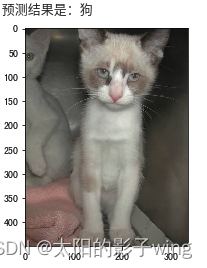
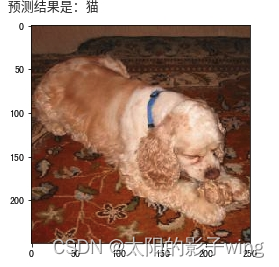
3. Analysis of results
It can be seen that most cases can still be accurately identified.
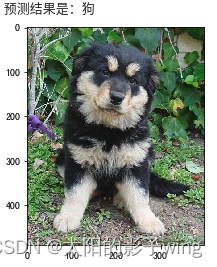
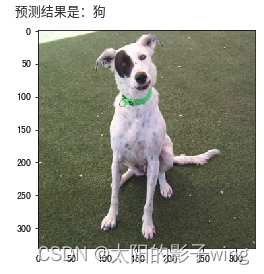
But there are also individual cases where the recognition is wrong. It is certain that increasing the number of repetitions of epochs, that is, the fourth line from the bottom of the trained CNN_test.py, can improve the accuracy.
for example:
Dataset source:

Reference article:
The most understandable explanation of convolution for cat and dog recognition based on convolutional neural network (CNN)
Reference video:
Finally, I would like to thank all seniors for their sharing. This article will be written here first. Comments and corrections are welcome!