Recently, I learned that the super-resolution algorithm uses the PyTorch framework, and there are many small bugs, such as inconsistent versions, cuda+cudnn download speed is too slow and so on. So write a blog here to record the installation process in detail. Comes with CUDA + cudnn installation packages for each version

Table of contents
2. Download, install and configure Cuda
2.1.1 Check whether the machine has an independent graphics card
2.1.2 Download CUDA installation package
2.2 Configure cuda environment
2.2.1 Test whether the installation is successful
3. Download and configuration of CUDNN
6. Baidu network disk download link
1 Introduction
Since the cpu version has already been installed, installing the gpu version in this environment will cause environmental pollution.
Therefore, when installing the gpu version again, you need to create a new virtual environment to install successfully.
Then go to the official website to download the adapted version. After installing cuda and cudnn, start installing the gpu version of pytorch.
2. Download, install and configure Cuda
2.1 Install Cuda
2.1.1 Check whether the machine has an independent graphics card
First of all, we need to determine whether the machine has a discrete graphics card. In Computer-Management-Device Manager-Display Adapter, check if there is a discrete graphics card.

It can be seen that this machine has an integrated graphics card and a discrete graphics card NVIDIA GeForce RTX 2080 SUPER
2.1.2 Download CUDA installation package
Test whether the local independent graphics card supports CUDA installation (click here )


From the above picture, you can see that my local discrete graphics card supports CUDA installation, and the computing power is 7.5.
Then, the next step is to choose CUDA to install, click here

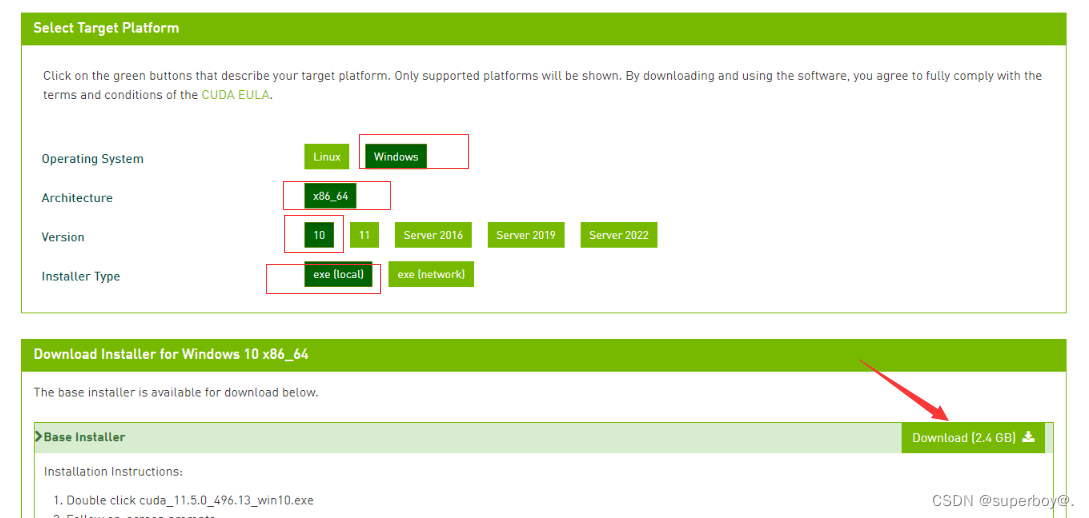
Select the corresponding option according to the computer system, select local for exe, download and install
2.1.3 Start the installation
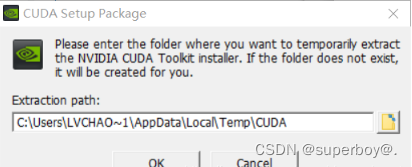
Then there is the installation process, double-click to open and display the temporary decompression directory, no need to change, the default is fine.
Next, enter the NVIDIA installation process. During the installation process, I directly chose the streamlined installation at the beginning, but due to the reason of VS, it failed to install normally, so I changed to the custom installation method and ticked VS to Remove it, and it can be installed normally. As for the installation directory of CUDA, you can install it on the C drive by default.
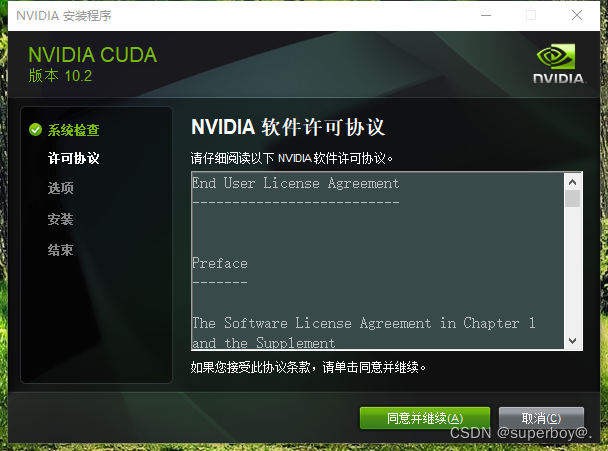

Remove the VS hook.

The installation location is best to default because the system environment path needs to be configured later. Of course this is just a suggestion

The following is installed.

2.2 Configure cuda environment
After the installation is complete, the environment variables are configured. The environment variable configuration is shown in the figure below.
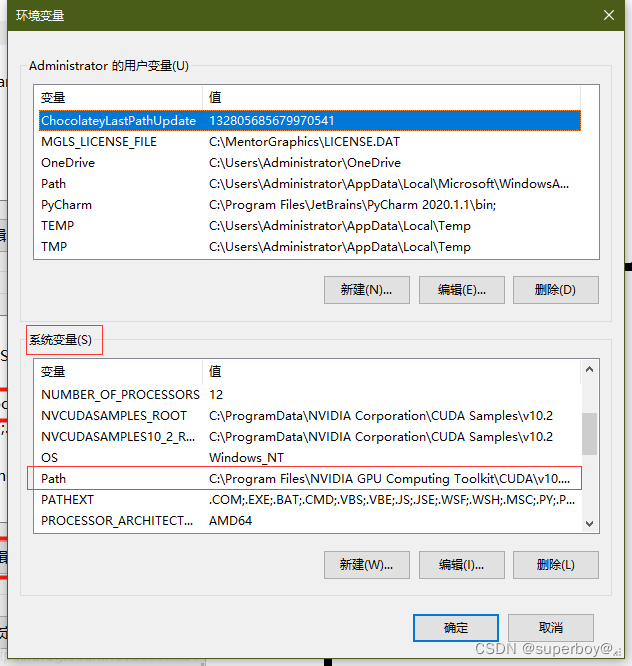
Go to the environment variable Path to create and insert the corresponding path.

C:\Program Files\NVIDIA GPU Computing Toolkit\CUDA\v10.2\lib\x64
C:\Program Files\NVIDIA GPU Computing Toolkit\CUDA\v10.2\include
C:\Program Files\NVIDIA GPU Computing Toolkit\CUDA\v10.2\extras\CUPTI\lib64
C:\ProgramData\NVIDIA Corporation\CUDA Samples\v10.2\bin\win64
C:\ProgramData\NVIDIA Corporation\CUDA Samples\v10.2\common\lib\x64

2.2.1 Test whether the installation is successful
The last step is to test whether CUDA is installed normally.
1. Press "windows key + R" on the keyboard at the same time, enter "cmd" and press Enter to enter the Windows command line interface.
2. Enter "nvcc -V" in the command line and press Enter
3. If CUDA has been successfully installed, the version number of CUDA will be displayed.
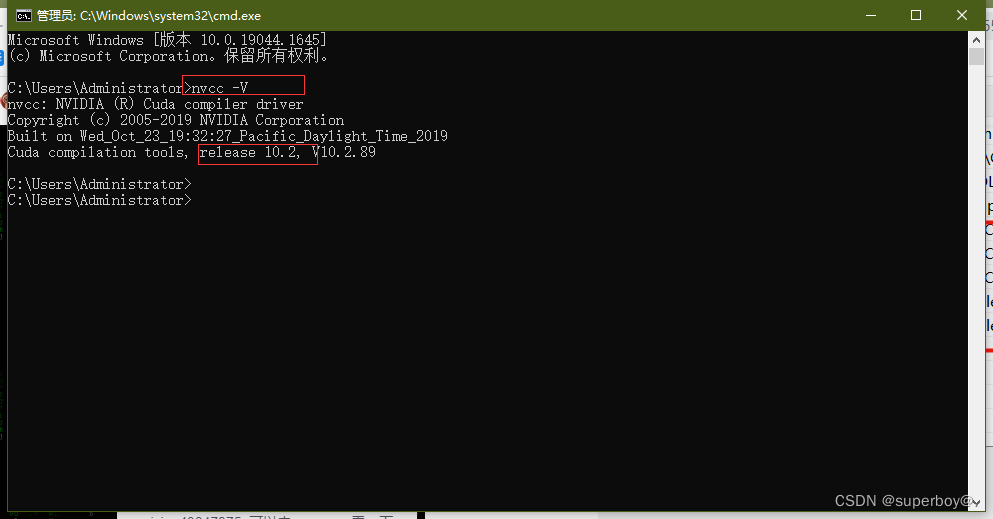
You can see that the test is successful, and then download cudnn.
3. Download and configuration of CUDNN
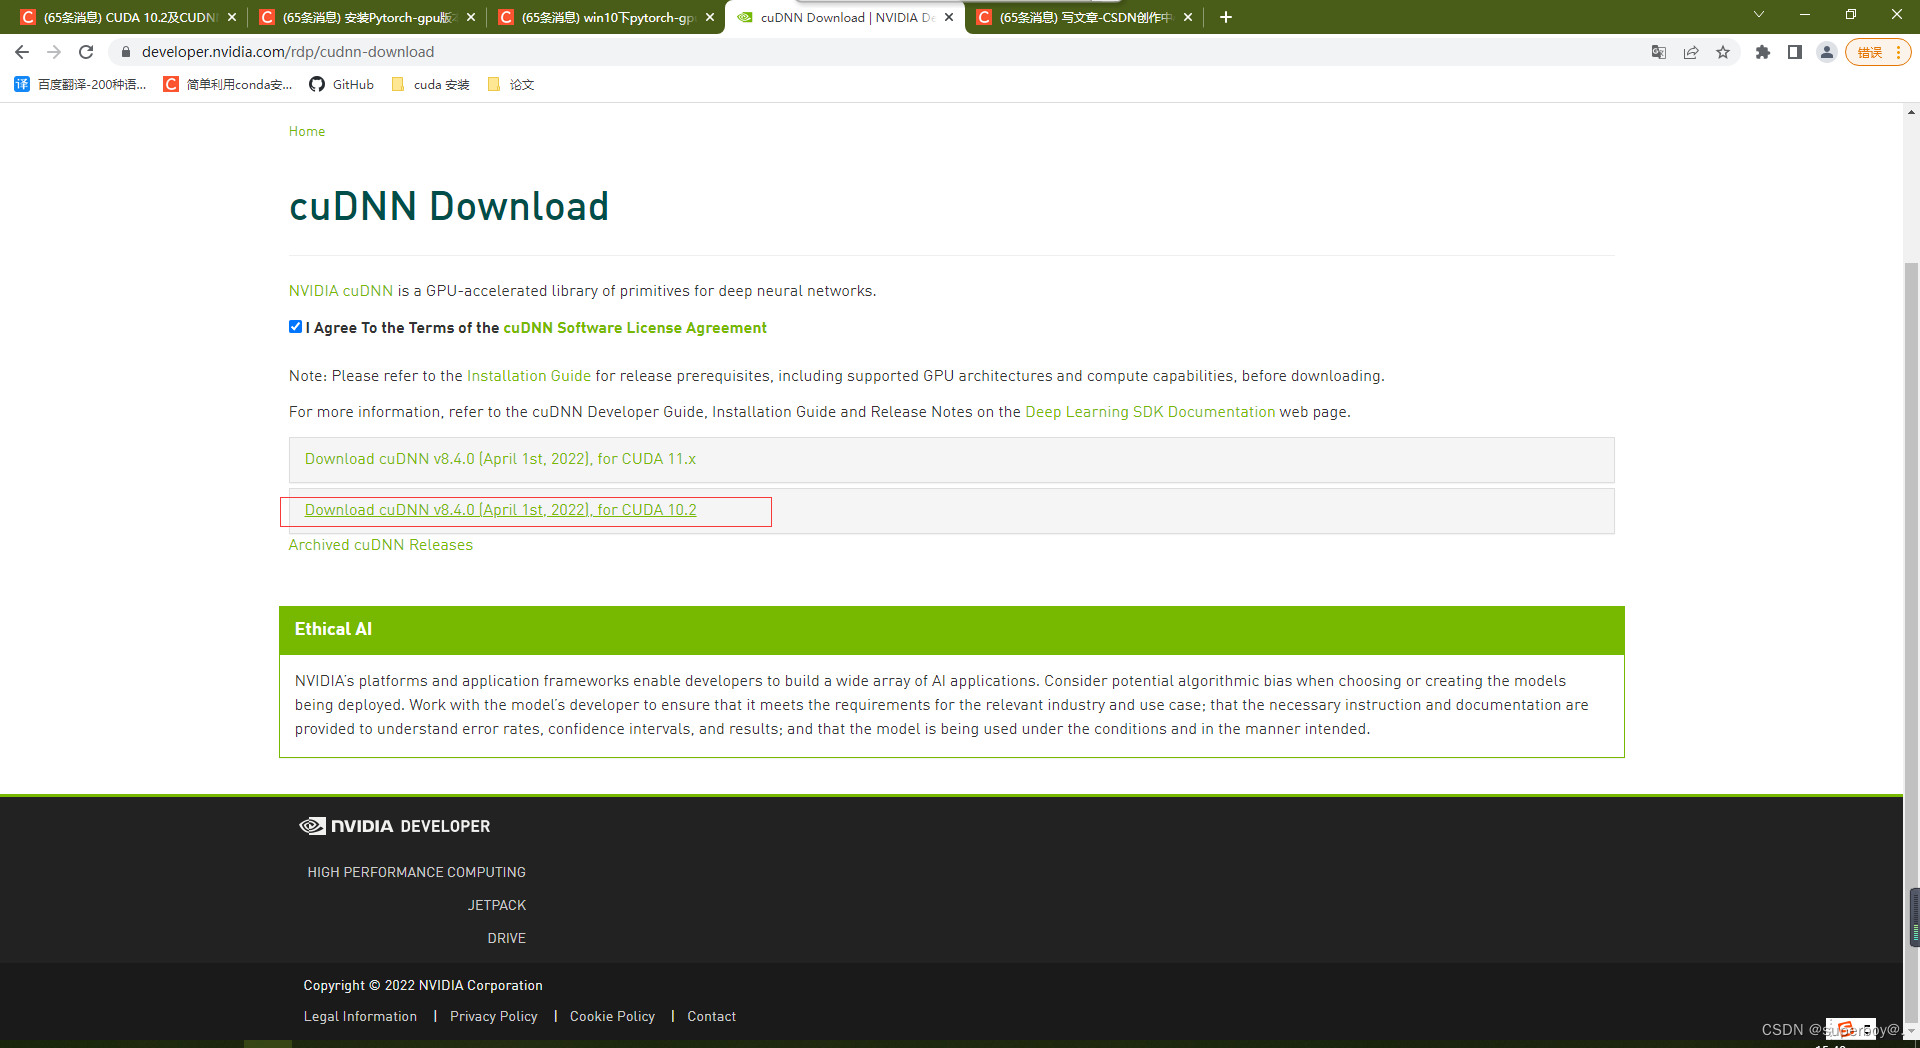
3.1. Download CUDNN
Click here and select download cudnn, but you need to register an account here, and then you can download the page after completing the questionnaire, anyway, you can do it step by step.
Then because the version of CUDA in my last step is 10.2, and the version of CUDNN must be consistent with the CUDA version.
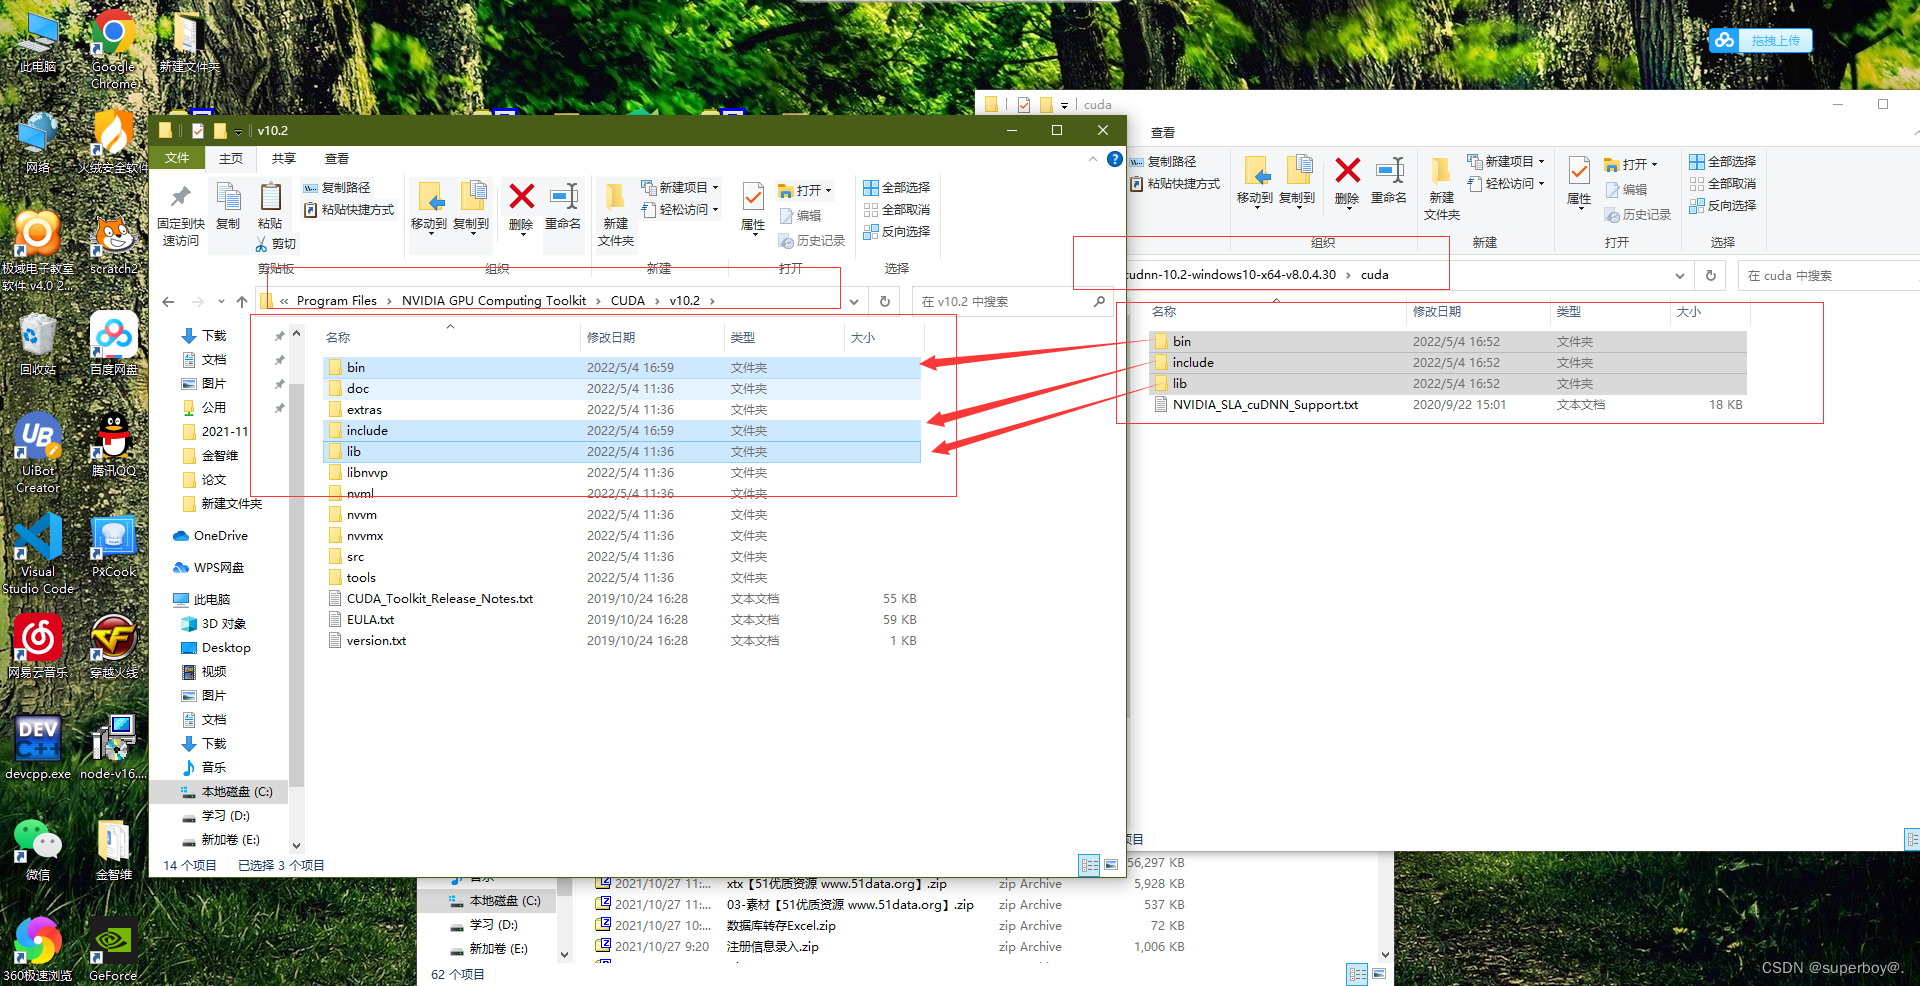
3.2. Configure cudnn
After downloading, unzip, copy the bin, include, and lib files in the CUDNN compressed package directly to the CUDA installation directory, and directly overwrite the installation.
4. Install pytorch-gpu
Go directly to Pytorch's official website, here , because I choose according to my own configuration, I tried to install it with conda, but the conda installation was always unsuccessful, and I also replaced the Tsinghua mirror source, but the speed is really slow, and there is no movement for a long time . Although the pip download is also quite slow, at least it can be installed successfully.

4.1 Conda installation
Choose the version that suits you, but if you use the conda method to download, you cannot download successfully with this statement directly, because its server is abroad, so you must choose a domestic mirror source. (The ladder has already given the link above)
In the activated environment, enter the command in the red box above: (you can directly select the mirror image)
conda install pytorch torchvision torchaudio cudatoolkit=11.3 -c pytorchThe default pytorch official website is the download source, the download speed is too slow, it is easy to report an error
Change to the image of Tsinghua University, enter the following command on the command line:
# 添加Anaconda的清华镜像
conda config --add channels https://mirrors.tuna.tsinghua.edu.cn/anaconda/cloud/msys2/
conda config --add channels https://mirrors.tuna.tsinghua.edu.cn/anaconda/cloud/conda-forge/
conda config --add channels https://mirrors.tuna.tsinghua.edu.cn/anaconda/cloud/pytorch/
# 设置搜索时显示通道地址
conda config --set show_channel_urls yes
Then enter:
conda install pytorch torchvision torchaudio cudatoolkit=11.3Note that the following -c pytorch should be removed, otherwise the default source download will still be used.
Waiting for download and installation:

Successful installation. .
4.2. Install via pip
Update pip first
python -m pip install --upgrade pip -i http://mirrors.aliyun.com/pypi/simple/ --trusted-host mirrors.aliyun.comYou can directly use the download link on his official website, but it is best to add Tsinghua source.
pip3 install torch torchvision torchaudio --extra-index-url https://download.pytorch.org/whl/cu113 -i https://pypi.tuna.tsinghua.edu.cn/simple some-packageWait for the installation to succeed.
5. Testing PyTorch
import torch
print(torch.cuda.device_count())
#可用gpu数量
print(torch.cuda.is_available()) # #是否可用gpu
true means that PyTorch is successfully installed and configured to use Gpu.

6. Baidu network disk download link
Link: https://pan.baidu.com/s/1GDokaoclNaTbJEeoQrrcaw
Extraction code: 4lla
--Share from Baidu Netdisk super member V5