Idea description: first open the DS18B20 data sheet to find the following pictures and drive step by step in order.

1. This is the timing diagram of DS18B20 initialization. After analysis, the following code (code comment) can be obtained.
void Init_DS18B20(void)
{
	unsigned char t = 0;
	DS_DIR_OUT();  //让GPIO口为推挽输出模式
	GPIO_ResetBits(GPIOB,GPIO_Pin_9);  //发送复位脉冲 ds18b20 DQ管脚接到单片机的PB9
	delay_us(600); 		//延时(>480us)
	GPIO_SetBits(GPIOB,GPIO_Pin_9);		//拉高数据线
	delay_us(55); 				//等待(15~60us)
	DS_DIR_IN(); //配置GPIO口为浮空输入模式
	while(GPIO_ReadInputDataBit(GPIOB,GPIO_Pin_9) == SET) //等待拉低
	{
		delay_us(1);
		t++;
		if(t >= 240)//如果超过240us还是高电平 代表ds18b20没发数据回来 丢失连接了
			return;
	}
	t = 0;
	while(GPIO_ReadInputDataBit(GPIOB,GPIO_Pin_9) == RESET) //等待拉高
	{
		delay_us(1);
		t++;
		if(t >= 240)//如果超过240us还是低电平 代表ds18b20没发数据回来 丢失连接了
			return;
	}
	printf("温度初始化完成!"); //我的printf函数是跟串口结合了,用于看ds18b20是否初始化完成
}
void DS_DIR_IN(void) //让PB9为浮空输入模式
{
GPIO_InitTypeDef GPIO_InitStruct;
RCC_APB2PeriphClockCmd(RCC_APB2Periph_GPIOB,ENABLE);
GPIO_InitStruct.GPIO_Mode = GPIO_Mode_IN_FLOATING;
GPIO_InitStruct.GPIO_Pin = GPIO_Pin_9;
GPIO_InitStruct.GPIO_Speed = GPIO_Speed_50MHz;
GPIO_Init(GPIOB,&GPIO_InitStruct);
}
void DS_DIR_OUT(void) //让PB9为推挽输出模式
{
GPIO_InitTypeDef GPIO_InitStruct;
RCC_APB2PeriphClockCmd(RCC_APB2Periph_GPIOB,ENABLE);
GPIO_InitStruct.GPIO_Mode = GPIO_Mode_Out_PP;
GPIO_InitStruct.GPIO_Pin = GPIO_Pin_9;
GPIO_InitStruct.GPIO_Speed = GPIO_Speed_50MHz;
GPIO_Init(GPIOB,&GPIO_InitStruct);
}2. This is the timing diagram of DS18B20 writing and reading 0/1

The analysis code is as follows:
//单片机向DS18B20写一位  0  对应上图里面 左上方的图
void Write_Bit_0(void)
{
	GPIO_ResetBits(GPIOB,GPIO_Pin_9); //拉低
	delay_us(90);  //在60us --- 120us之间
	GPIO_SetBits(GPIOB,GPIO_Pin_9);  //拉高
	delay_us(10);  //拉高大于1us 这里选用10us
}
//单片机向DS18B20写一位 1
void Write_Bit_1(void)
{
	GPIO_ResetBits(GPIOB,GPIO_Pin_9); //拉低
	delay_us(10);  //拉低大于1us
	GPIO_SetBits(GPIOB,GPIO_Pin_9);  //拉高
	delay_us(90); //我的理解是 拉高大于60us就是写1 所以选用90us
}

//单片机向DS18B20读一位
unsigned char Read_Bit(void)
{
	DS_DIR_OUT(); //PB9为推挽输出模式
	GPIO_ResetBits(GPIOB,GPIO_Pin_9);  //拉低
	delay_us(10); //大于1us 选用10us
	DS_DIR_IN(); //PB9为浮空输入模式
	delay_us(10); //等待一会 用于后面判断该管脚返回的是高电平还是低电平 太大不好试过80us返回的数据就奇怪了
	if(GPIO_ReadInputDataBit(GPIOB,GPIO_Pin_9) == SET)
	{
		return 1; //高电平返回1
	}
	else
	{
		return 0; //低电平返回0
	}
}
Usually we send or receive commands to a device in the form of 1 byte. So I used the code:
//读一个字节
unsigned char ReadOneChar(void)
{
unsigned char i=0;
unsigned char dat=0;
for (i=0;i<8;i++)
{
dat = dat | (Read_Bit() << i); //DS18B20经手册查的是低位开始传输回来的,要获取一个完整的字节,这样子就可以。
}
return(dat);
}
//写一个字节
void WriteOneChar(unsigned char dat) //dat要发送的数据
{
unsigned char i=0;
DS_DIR_OUT(); //推挽输出
for(i=8;i>0;i--) //在15~60us之间对数据线进行采样,如果是高电平就写1,低写0发生。
{
if((dat & 0x01) == 1)
{
Write_Bit_1();
}
else
{
Write_Bit_0();
}
dat >>= 1;
}
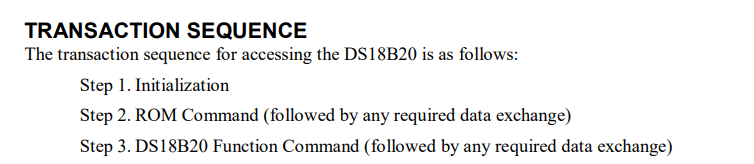
}Finally saw this picture. Follow this sequence step by step to start driving and acquire temperature data.
//读温度值(低位放tempL;高位放tempH;)
void ReadTemperature(void)
{
	Init_DS18B20(); 					//初始化
	WriteOneChar(0xcc); 				//跳过读序列号的操作
	WriteOneChar(0x44); 				//启动温度转换
	delay_us(1000);					    //转换需要一点时间,延时
	Init_DS18B20(); 					//初始化
	WriteOneChar(0xcc); 				//跳过读序列号的操作
	WriteOneChar(0xbe); 				//读温度寄存器(头两个值分别为温度的低位和高位)
	tempL=ReadOneChar(); 				//读出温度的低位LSB
	tempH=ReadOneChar(); 				//读出温度的高位MSB
	if(tempH>0x7f)      				//最高位为1时温度是负
	{
		tempL=~tempL;					//补码转换,取反加一
		tempH=~tempH+1;
		fg=0;      						//读取温度为负时fg=0
	}
	sdata = (tempH << 8) + tempL;
	sdata = (sdata * 0.0625) * 100;  //这里×100 用于保留两位小数了,因为我是unsigned int类型不是float。
	printf("%d  \r\n",sdata);
}
Supplementary note: The definition in the main.c file is as follows:
unsigned char tempL=0; //set global variable
unsigned char tempH=0;
unsigned int sdata; //part of temperature
unsigned char fg=1; //sign of positive and negative temperature
int main()
{
ReadTemperature(); //It can be used in this way.
}