Table of contents
PC
The upper computer refers to the computer that can directly issue control commands, generally PC/host computer/master computer/upper computer, and various signal changes (hydraulic pressure, water level, temperature, etc.) are displayed on the screen . The lower computer is a computer that directly controls the device to obtain the status of the device , usually a PLC/ single chip microcomputer/slave computer/lower computer and the like. The command issued by the upper computer is first given to the lower computer, and then the lower computer interprets the command into a corresponding timing signal to directly control the corresponding equipment. The two methods of data communication between the lower computer (single chip microcomputer) and the upper computer are based on the serial port
serial communication
The serial interface (serial port) is a device that can convert the parallel data characters received from the CPU into continuous serial data streams and send them out, and at the same time convert the received serial data streams into parallel data characters and supply them to the CPU. Generally, the circuit that completes this function is called a serial interface circuit.
The concept of serial communication (Serial Communications) is very simple, the serial port sends and receives bytes bit by bit. Although slower than byte-wise parallel communication, a serial port can send data on one wire while receiving data on the other. The most important parameters of serial communication are baud rate, data bits, stop bits and parity. For two ports to communicate, these parameters must match.
-
Baud rate: refers to the change of the signal within a unit time after being modulated, that is, the number of carrier parameter changes per unit time, which is a parameter to measure the symbol transmission rate.
For example, 960 characters are transmitted per second, and each character format contains 10 bits (1 start bit, 1 stop bit, 8 data bits), then the baud rate is 960Bd, and the bit rate is 10 bits* 960 / second = 9600bps.
-
Data bits: When a computer sends a packet of information, the actual data is often not 8 bits, the standard values are 6, 7, and 8 bits. The standard ASCII code is 0~127 (7 bits), and the extended ASCII code is 0~255 (8 bits).
-
Stop bit: Indicates the last few bits of a single data packet, which is the flag used for the end of the data packet. The commonly used values are 1, 1.5, and 2 bits
-
Parity check: a way of checking
C# serial port communication: SerialPort class
Refer to the official documentation: SerialPort Class (System.IO.Ports) | Microsoft Docs
Commonly used fields, methods, and events:
For the SerialPort class, if you want to create an instance, the most common settings for its parameters are as follows:
| name | type | illustrate |
|---|---|---|
| PortName | String | Communication port, (eg COM1) |
| BaudRate | Int32 | serial baud rate |
| DataBits | Int32 | Data bit value, standard data bit length per byte |
| Parity | Parity | One of the Parity values, the table parity check protocol |
| StopBits | StopBits | One of the StopBits values, representing the standard number of stop bits per byte |
Common methods:
| name | illustrate |
|---|---|
| Close | Close the port connection, set the IsOpen property to false, and release the internal Stream object. |
| GetPortNames | Get an array of serial port names for the current computer |
| Open | Open a new serial port connection |
| Read | Read from SerialPort input buffer |
| Write | Write data to the serial port output buffer |
Common events:
| name | illustrate |
|---|---|
| DataReceived | Indicates that data has been received through the port represented by the SerialPort object. |
list all serial ports
Encapsulate a serial port number detection method and display it in the serial port number component (the component name is cbxCOMPort):
string[] portNamesArray = SerialPort.GetPortNames();//获取所有可用串口名字
cbxCOMPort.Items.Clear();       //清除当前串口号中的所有串口名称
foreach (string port in portNamesArray)
{


    cbxCOMPort.Items.Add(port);
}
C# serial communication: read and write data
Write data:
| function | illustrate |
|---|---|
| void Write(string text); | Writes the specified string to the serial port. |
| void Write(byte[] buffer, int offset, int count); | Writes the specified number of bytes to the serial port using the data in the buffer. |
| void Write(char[] buffer, int offset, int count); | Writes the specified number of characters to the serial port using the data in the buffer. |
| void WriteLine (string text); | Writes the specified String and NewLine values to the output buffer. |
Usage details:
-
The Write function is synchronous. The Write function will not return until the data is sent. For example: at a baud rate of 1200, it takes about 9 seconds to send 1024 bytes. If this code is in the main thread, the entire program will be in a state of suspended animation within 9 seconds, that is, the main function cannot respond to the user's keyboard and mouse input;
-
The WriteTimeout property is used to control the longest time-consuming of the Write function. Its default value is System.IO.Ports.SerialPort.InfiniteTimeout, which is -1. Its meaning is: the Write function will never return until all the data is written. This property can be modified:
port.WriteTimeout = 5000//Write 函数最多耗时 5秒
//Write写数据时最多耗时5秒,超过这个时间未发的数据将被舍弃,Write函数抛出异常TimeoutException后立即返回。
Read data:
- SerialPort.Read
- SerialPort.ReadByte
- SerialPort.ReadChar
- SerialPort.ReadExisting
- SerialPort.ReadLine
- SerialPort.ReadTo
| function | illustrate |
|---|---|
| int Read(byte[] buffer, int offset, int count); | Reads some bytes from the SerialPort input buffer and writes those bytes at the specified offset in the byte array. |
| int Read(char[] buffer, int offset, int count); | Reads some characters from the SerialPort input buffer and writes those characters at the specified offset into the character array. |
| int ReadByte (); | Synchronously reads a byte from the SerialPort input buffer. |
| int ReadChar (); | Synchronously reads a character from the SerialPort input buffer. |
| string ReadExisting(); | On an encoded basis, reads the SerialPort object's stream and all immediately available bytes in the input buffer. |
| string ReadLine(); | Reads until the value of NewLine in the input buffer . |
| string ReadTo(string value); | Reads up to the valuespecified . |
Usage details:
-
The Read function is synchronous, and the function will not return until the data is read. If this code is in the main thread, the whole program will be in a state of suspended animation;
-
The ReadTimeout property is used to control the longest time-consuming of the Read function. Its default value is System.IO.Ports.SerialPort.InfiniteTimeout, which is -1. Its meaning is: the Read function will not return until the serial port data is read. This property can be modified:
port.ReadTimeout = 2000;//read函数最多耗时2秒,超过这个时间未读取到数据,Read函数将抛出异常TimeoutException,然后返回。
DataReceived event:
After the serial port input buffer obtains new data, it will notify the System.IO.Ports.SerialPort object with the DataReceived event, and the serial port data can be read at this time.
port.ReceivedBytesThreshold = 1;//串口输入缓冲区获得新数据后,将检查缓冲区内已有的字节数,大于等于ReceivedBytesThreshold就会触发DataReceived事件.这里设置为1,显然就是一旦获得新数据后,立即触发DataReceived事件。

port.DataReceived += new System.IO.Ports.SerialDataReceivedEventHandler(port_DataReceived);//对于DataReceived事件,用函数port_DataReceived进行处理。
//回调函数port_DataReceived用于响应DataReceived事件,通常在这个函数里读取串口数据。
//参数sender就是事件的发起者(这里就是port),也就是说:多个串口对象可以共用一个回调函数,通过sender可以区分是哪个串口对象。
//回调函数是被一个多线程调用的,它不在主线程内。所以,不要在这个回调函数里直接访问界面控件。如果一定要用,那么就需要使用Invoke或BeginInvoke来使用
void port_DataReceived(object sender, System.IO.Ports.SerialDataReceivedEventArgs e)
{


    int nRead = port.BytesToRead;
    if (nRead > 0)
    {


        byte[] data = new byte[nRead];
        port.Read(data, 0, nRead);
    }
}
Data sending asynchronous problem:
Description: For both parties in serial communication, if one party responds slowly, the other party keeps sending data regardless, which may cause data loss. To prevent this from happening, flow control needs to be used.
Flow control is also called handshake, use the value in Handshake to get or set the handshake protocol of serial port data transmission.
There are four values:
| value | illustrate |
|---|---|
| System.IO.Ports.Handshake.None | none |
| System.IO.Ports.Handshake.XOnXOff | software |
| System.IO.Ports.Handshake.RequestToSend | hardware |
| System.IO.Ports.Handshake.RequestToSendXOnXOff | hardware and software |
(1) Software flow control (XON/XOFF)
Handshake will not send XOff characters if this property is set to RequestToSendXOnXOff and CtsHolding is set to falsethis property. If CtsHolding is set true, more data must be sent before the XOff character is sent.
Serial device A sends data to serial device B. When B is too busy (B's serial port input buffer is almost full), A will send the character XOFF (usually 13H), and A will suspend sending data; when B's serial port input buffer is almost empty, it will send A the character XON (Generally 11H), A will continue to send data.
The biggest problem with software flow control is that the two sides of the communication cannot transmit the characters XON and XOFF.
(2) Hardware flow control (RTS/CTS) requires certain hardware knowledge, which is not well understood
interface design
First of all, for the use of C#, it can be done by dragging and dropping. The main design:
- (form properties, events, methods)
- layout of controls,
- event monitoring,
- The method that needs to be executed when an event is listened to.
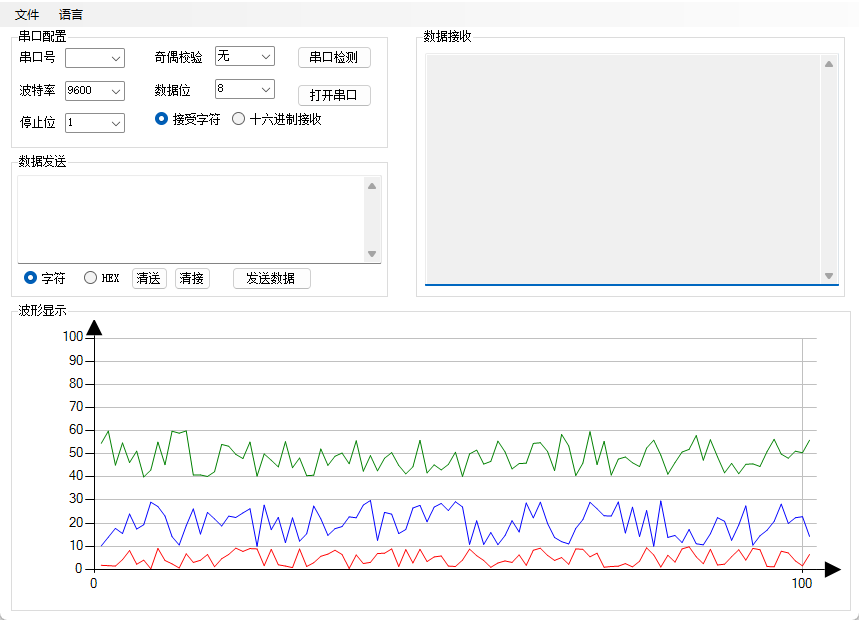
For the design of the upper computer, the interface is as follows:
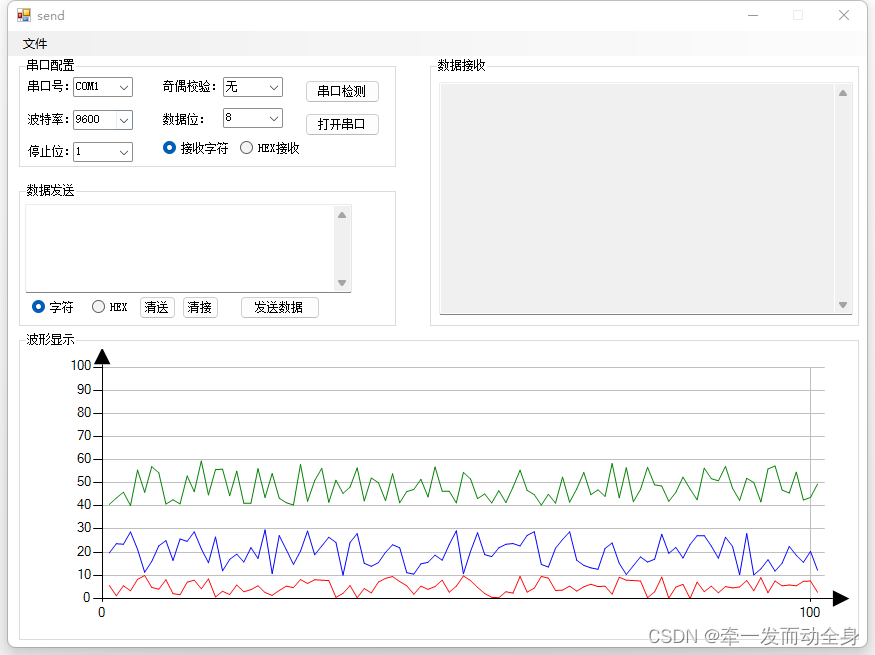
主要是通过拖拽控件,并且设计布局达到上面的效果。而数据是通过Random函数随机生成的,只要将数据写入的处理放到数据接收的函数里面就可以实时接收数据并显示出来。由于我目前没有在实体机器上测试过,也不知道数据格式是啥。后面有机会实体机器上测试在补充。
波形显示(chart控件的使用)
参考:C#–图表控件(Chart)_北极星小王子的博客-CSDN博客_c# chart
C#之Chart控件系列教程——一(转载)_hellohake的博客-CSDN博客_c# chart控件
chart控件的五大核心属性:
- Annotations
- ChartAreas
- Legends
- Series
- Titles
其中最为核心的三个属性是ChartAreas、Series、Legends
初始化图像设置封装成函数有:
private void InitChart()
{


    //定义图表区域
    this.chart1.ChartAreas.Clear();
    ChartArea chartArea1 = new ChartArea("C1");
    this.chart1.ChartAreas.Add(chartArea1);
    //定义存储和显示点的容器
    this.chart1.Series.Clear();
    Series series1 = new Series("S1");
    Series series2 = new Series("S2");
    Series series3 = new Series("S3");
    series1.ChartArea = "C1";
    series2.ChartArea = "C1";
    series3.ChartArea = "C1";
    this.chart1.Series.Add(series1);
    this.chart1.Series.Add(series2);
    this.chart1.Series.Add(series3);
    //设置图表显示样式
    this.chart1.ChartAreas[0].AxisX.ArrowStyle = AxisArrowStyle.Triangle;//设置坐标x轴箭头为三角
    this.chart1.ChartAreas[0].AxisY.ArrowStyle = AxisArrowStyle.Triangle;//设置坐标y轴箭头为三角

    //设置x轴的最大最小值
    //this.chart1.ChartAreas[0].AxisX.Minimum = 0;
    //this.chart1.ChartAreas[0].AxisX.Maximum = 100;
    this.chart1.ChartAreas[0].AxisX.Interval = 100;//x轴刻度间隔大小

    //设置y轴的最大最小值
    this.chart1.ChartAreas[0].AxisY.Minimum = 0;
    this.chart1.ChartAreas[0].AxisY.Maximum = 100;
    this.chart1.ChartAreas[0].AxisY.Interval = 10;//x轴刻度间隔大小

    //设置xy轴的颜色
    this.chart1.ChartAreas[0].AxisX.MajorGrid.LineColor = System.Drawing.Color.Silver;
    this.chart1.ChartAreas[0].AxisY.MajorGrid.LineColor = System.Drawing.Color.Silver;

    //不设置标题
    this.chart1.Titles.Clear();

    //设置图表显示样式
    this.chart1.Series[0].Color = Color.Red;
    this.chart1.Series[1].Color = Color.Blue;
    this.chart1.Series[2].Color = Color.Green;

    //设置线形:
    //SeriesChartType.Spline
    //SeriesChartType.Line
    this.chart1.Series[0].ChartType = SeriesChartType.Line;
    this.chart1.Series[1].ChartType = SeriesChartType.Line;
    this.chart1.Series[2].ChartType = SeriesChartType.Line;

    //开始清空数据
    this.chart1.Series[0].Points.Clear();
    this.chart1.Series[1].Points.Clear();
    this.chart1.Series[2].Points.Clear();

}
设计思路
需求:
- 通过SerialPort接收到数据,然后处理,分别保存到data_display1,data_display2,data_display3中,分别表示三个波形数据
- 将三个波形数据画到chart中。也就是将数据添加到Series中
- 实时更新数据
思路:
将传输过来的数据保存到私有变量data_display1,data_display2,data_display3。
通过定时器函数,将私有变量的数据打印成波形。
这里有个问题,如果定时器函数一直开着会不会导致设备性能变差???
定时器介绍:
主要属性有:
- Enabled:如果 Timer 应引发 Elapsed 事件,则为
true;否则,为false。 默认值为false。 - Interval:获取或设置引发 Elapsed 事件的间隔(以毫秒为单位)
绑定事件:点击进去就行。
这里有个疑问,不知道是不是版本问题,在编写代码的时候添加事件是aTimer.Tick += OnTimedEvent;
但是查官方文档的时候发现是:aTimer.Elapsed += OnTimedEvent;
波形显示函数介绍:
| 函数 | 说明 |
|---|---|
| AddXY(Double, Double) | 向集合的末尾添加一个具有指定的 X 值和 Y 值的 DataPoint 对象。 |
| Clear() | 从 Collection 中移除所有元素。(继承自 Collection) |
波形显示
对于data_display1,data_display2,data_display3数据可以采用两种方式:数组类型(全部显示数据),队列类型(显示最后的定长数据)
-
数组类型:代码(github.com)
//创建list
private List<double> list = new List<double>();

// 使用add()方法添加元素
list.Add(obj);

//返回list中存在的元素总数
list.Count;

//获取list中第i个元素
data_display1.ElementAt(i);
data_display1[i]
定时器的案例,创建两个定时器,一个定时器用与生成数据,一个定时器用于显示波形。
通过设置两个定时器可以模拟数据传输不同步的时候是否会发生问题。设置两个定时器的Interval属性,看一下波形产生的效果
//定义的成员变量,用于保存波形数据
private List<double> data_display1 = new List<double>();
private List<double> data_display2 = new List<double>();
private List<double> data_display3 = new List<double>();
//定时器1: //接收数据到list中,假的数据 Random r = new Random(); data_display1.Add(r.NextDouble() * 10); data_display2.Add(r.NextDouble() * 20 + 10); data_display3.Add(r.NextDouble() * 20 + 40);//定时器2,显示波形数据 //更新显示波形,先删除之前的数据,然后将目前的数据显示出来 this.chart1.Series[0].Points.Clear(); this.chart1.Series[1].Points.Clear(); this.chart1.Series[2].Points.Clear(); for (int i = 0; i < data_display1.Count; i++) { this.chart1.Series[0].Points.AddXY((i + 1), data_display1.ElementAt(i)); this.chart1.Series[1].Points.AddXY((i + 1), data_display2.ElementAt(i)); this.chart1.Series[2].Points.AddXY((i + 1), data_display3.ElementAt(i)); } -
队列类型:代码(github.com)
//创建队列queue
private Queue<double> queue = new Queue<double>(show_len);

//出队操作
queue.Dequeue();

//入队操作
queue.Enqueue(obj);

//获取队列中的数据个数data_display1
queue.Count;

//队列中第i个数据
queue.ElementAt(i);
定时器的案例,创建两个定时器,一个定时器用与生成数据,一个定时器用于显示波形。
//定义的成员变量,用于保存波形数据
private static int show_len = 100;//定义每次显示数据的长度
private Queue<double> data_display1 = new Queue<double>(show_len);
private Queue<double> data_display2 = new Queue<double>(show_len);
private Queue<double> data_display3 = new Queue<double>(show_len);
//定时器1: //接收数据到queue中,假的数据 Random r = new Random(); int len = r.Next(0, 5); for (int i = 0;i<len;i++) { if (data_display1.Count>show_len) { data_display1.Dequeue(); data_display2.Dequeue(); data_display3.Dequeue(); } data_display1.Enqueue(r.NextDouble() * 10); data_display2.Enqueue(r.NextDouble() * 20+10); data_display3.Enqueue(r.NextDouble() * 20+40); }//更新显示波形,先删除之前的数据,然后将目前的数据显示出来 this.chart1.Series[0].Points.Clear(); this.chart1.Series[1].Points.Clear(); this.chart1.Series[2].Points.Clear(); for (int i = 0; i < data_display1.Count; i++) { this.chart1.Series[0].Points.AddXY((i + 1), data_display1.ElementAt(i)); this.chart1.Series[1].Points.AddXY((i + 1), data_display2.ElementAt(i)); this.chart1.Series[2].Points.AddXY((i + 1), data_display3.ElementAt(i)); }
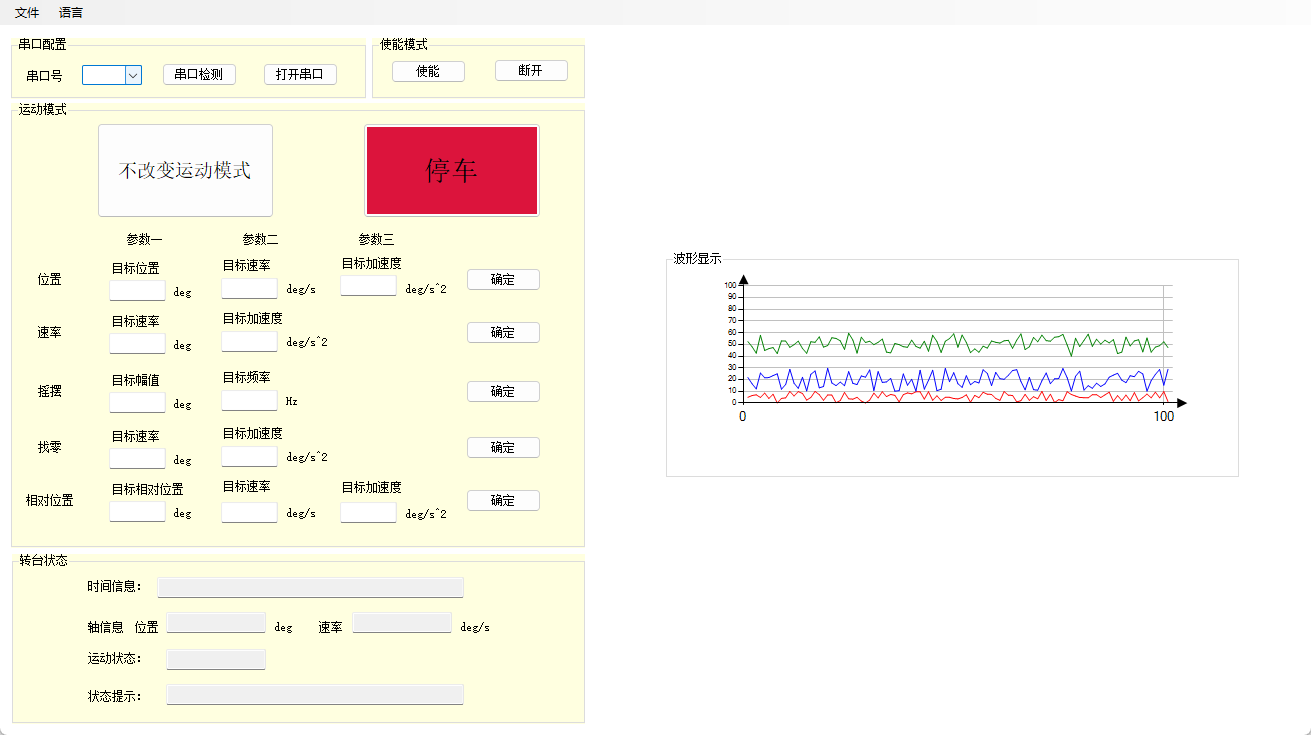
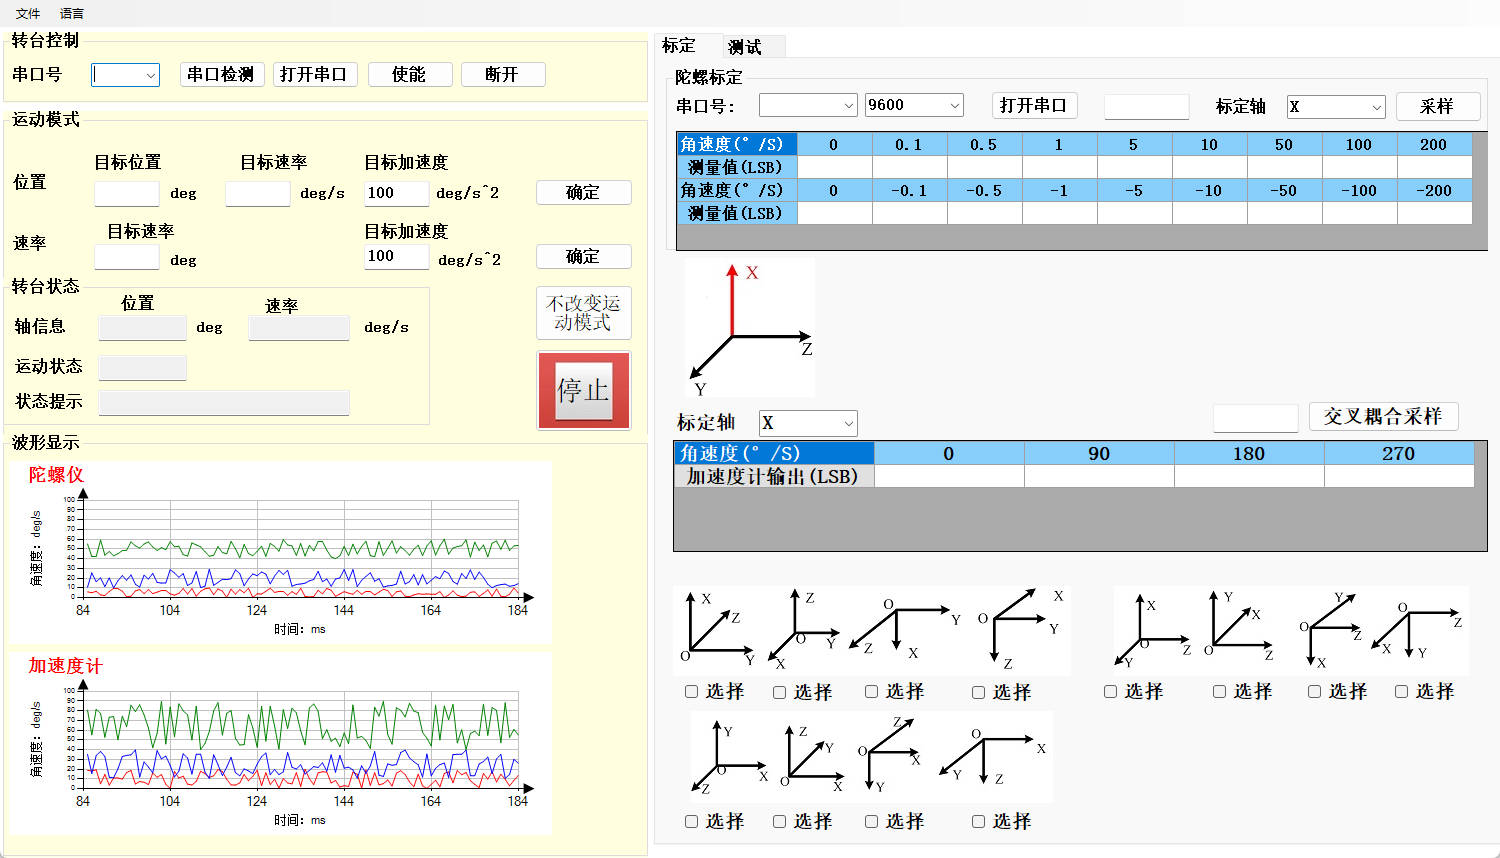
更新ing。。。
软件设计都是有需求确定,然后不断迭代,这里保存几张迭代过程的图片作为参考。。