Article Directory
2.1 View control
All UI elements of Android are built through View controls and ViewGroup containers, and ViewGroup serves as a container to hold all controls in the interface
Note: Each interface in an Android application has one and only one ViewGroup container
2.2 Interface layout writing method
Written in XML
Most of them are written in this way, effectively isolated from the Java code, making the structure of the entire program clearer
The corresponding interface XML file can be written in the res/layout folder
<?xml version="1.0" encoding="utf-8"?>
<LinearLayout xmlns:android="http://schemas.android.com/apk/res/android"
    android:layout_width="match_parent"
    android:layout_height="match_parent"
    android:orientation="vertical">
    <Button
        android:id="@+id/btn_textview"
        android:layout_width="match_parent"
        android:layout_height="wrap_content"
        android:textAllCaps="false"
        android:text="TextView"/>
    <Button
        android:id="@+id/btn_button"
        android:layout_width="match_parent"
        android:layout_height="wrap_content"
        android:text="Button"
        android:textColor="@color/black"
        android:textAllCaps="false"

        />
    <Button
        android:id="@+id/btn_edittext1"
        android:layout_width="match_parent"
        android:layout_height="wrap_content"
        android:text="TextView"
        android:textAllCaps="false"
        />

</LinearLayout>
written in Java
Add the created View control to the ViewGroup container by using the new keyword to create a key control, thereby realizing the display of the View control in the layout interface
        RelativeLayout ralativelayout = new RelativeLayout(this);//创键RelativeLayout对象
        RelativeLayout.LayoutParams params = new 				RelativeLayout.LayoutParams(RelativeLayout.LayoutParams.WRAP_CONTENT,RelativeLayout.LayoutParams.WRAP_CONTENT);
        params.addRule(RelativeLayout.CENTER_IN_PARENT);//设置居中显示,至此LayoutParams创键完成
        TextView textview = new TextView(this);
        textview.setText("text");
        ralativelayout.addView(textview,params);//将两个对象装进RelativeLayout中
        setContentView(ralativelayout);//设置在Activity中显示
2.3 General properties of interface layout
The four commonly used layouts provided by Android inherit from ViewGroup and have some properties in ViewGroup
android:id="@+id/属性名称"	 设置布局标识
android:layout_width=""		设置布局宽度
android:layout_height=""	设置布局高度
android:background=""		设置布局背景
android:layout_margin=""	设置margin
android:padding=""			设置padding
android:id
This attribute is the unique identifier of the current layout. It is defined in XML by @+id/attribute name. After the attribute is set, the corresponding int value will be generated in R.java, which can be passed in through the findViewById() method in Java code The int value to get the layout object
mBtnTextView = (Button) findViewById(R.id.btn_textview);
android:layout_width&&android:layout_height
Set the width and height of the layout
Optional system-defined values are also available:
- fill_parent: Indicates that the height of the layout is the same as the height of the parent container
- match_parent: Same as the former, this method is recommended
- wrap_content: match the contained content
android:backgroud
Set the layout background, which can be a color or a picture
android:layout_margin&&android:padding
Similar to HTML
2.4 Linear layout
<LinearLayout>内容</LinearLayout>
2.4.1 Introduction to Linear Layout
-
android:orientation: Set the order of the controls in the layout
Attribute value: vertical (vertical arrangement), horizontal (horizontal arrangement)
-
android:layout_weight: Setting the weight of the space can make the controls in the layout display the size according to the weight ratio, which plays a key role in screen adaptation
Example of setting control weight
    <LinearLayout
        android:layout_below="@id/Btn_4"
        android:layout_width="match_parent"
        android:layout_height="match_parent">
        <Button
            android:layout_width="0dp"
            android:text="按钮1"
            android:layout_weight="1"
            android:layout_height="wrap_content"/>
        <Button
            android:layout_width="0dp"
            android:layout_height="wrap_content"
            android:layout_weight="1"
            android:text="按钮2"/>
        <Button
            android:layout_width="0dp"
            android:layout_height="wrap_content"
            android:text="按钮3"
            android:layout_weight="2"/>
    </LinearLayout>
Set three Button controls, the width is 0dp, the weights are set to 1, 1, 2 respectively, and the actual width ratio is 1:1:2

2.4.2 Practical exercise - Imitation of Animal Lianliankan game interface
themes.xml
<style name="btnStyle">
    <item name="android:layout_weight">70</item>
    <item name="android:layout_height">70dp</item>
    <item name="android:layout_marginRight">15dp</item>
</style>
activity_main.xml
    <LinearLayout
        android:layout_width="wrap_content"
        android:layout_height="wrap_content"
        android:orientation="horizontal">
        <Button
            style="@style/btnStyle"
            android:background="@drawable/a"/>
        <Button
            style="@style/btnStyle"
            android:background="@drawable/b"/>
        <Button
            style="@style/btnStyle"
            android:background="@drawable/c"/>

    </LinearLayout>
This question is mainly about typesetting pictures
be careful:
- The picture must start with a letter and cannot contain Chinese, otherwise an error will be reported
- The picture is placed in the drawable-hdpi folder
2.5 Relative Layout
<RelativeLayout>内容</RelativeLayout>
2.5.1 Introduction to RelativeLayout
RelativeLayout uses the parent container or other child controls as a reference to specify the position of the child controls in the layout. The related properties are shown in the figure

Relative layout example
<?xml version="1.0" encoding="utf-8"?>
<RelativeLayout xmlns:android="http://schemas.android.com/apk/res/android"
    xmlns:app="http://schemas.android.com/apk/res-auto"
    xmlns:tools="http://schemas.android.com/tools"
    android:layout_width="match_parent"
    android:layout_height="match_parent"
    tools:context=".MainActivity">
        android:layout_width="wrap_content"
        android:layout_height="wrap_content">
        <Button

            android:layout_width="wrap_content"
            android:layout_height="wrap_content"
            android:background="@color/white"
            android:text="按钮1"
            android:layout_alignParentBottom="true"
            android:layout_marginBottom="10dp"
            android:textSize="30sp"/>
        <Button
            android:id="@+id/bt_1"
            android:layout_width="wrap_content"
            android:layout_height="wrap_content"
            android:background="@color/white"
            android:layout_centerInParent="true"
            android:text="按钮1"
            android:textSize="30sp"/>
        <Button
            android:layout_width="wrap_content"
            android:layout_height="wrap_content"
            android:background="@color/white"
            android:layout_alignParentRight="true"
            android:layout_alignBottom="@+id/bt_1"
            android:text="按钮1"
            android:layout_marginRight="20dp"
            android:layout_marginBottom="100dp"
            android:textSize="30sp"/>
</RelativeLayout>
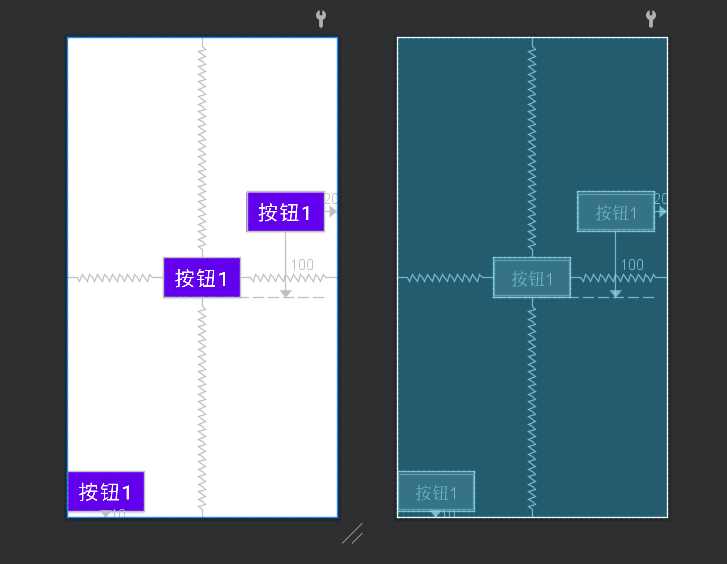
Note: In order to make Android have better screen adaptability, it is best to use wrap_parent, match_parent, and try to avoid setting the length and width to a fixed value
2.5.2 Practical exercise - music player interface
<?xml version="1.0" encoding="utf-8"?>
<RelativeLayout xmlns:android="http://schemas.android.com/apk/res/android"
    xmlns:app="http://schemas.android.com/apk/res-auto"
    xmlns:tools="http://schemas.android.com/tools"
    android:layout_width="match_parent"
    android:layout_height="match_parent"
    android:padding="10dp"
    tools:context=".MainActivity">
    <RelativeLayout
        android:id="@+id/head"
        android:layout_width="wrap_content"
        android:layout_height="wrap_content">

        <Button
            android:layout_width="20dp"
            android:layout_height="20dp"
            android:background="@drawable/q" />

            <Button
                android:layout_width="20dp"
                android:layout_height="20dp"
                android:background="@drawable/w"
                android:layout_alignParentRight="true" />
            <TextView
                android:layout_width="wrap_content"
                android:layout_height="wrap_content"
                android:layout_marginTop="30dp"
                android:textSize="20sp"
                android:layout_centerHorizontal="true"
                android:text="这里是音乐名"/>
    </RelativeLayout>

        <Button
            android:id="@+id/imga"
            android:layout_width="wrap_content"
            android:layout_height="wrap_content"
            android:layout_centerInParent="true"
            android:background="@drawable/s" />
    <RelativeLayout
        android:id="@+id/foot"
        android:layout_width="wrap_content"
        android:layout_height="wrap_content"
        android:layout_centerHorizontal="true"
        android:layout_marginBottom="80dp"
        android:layout_alignParentBottom="true">
            <Button
                android:id="@+id/bt11"
                android:background="@drawable/w"
                android:layout_width="40dp"
                android:layout_height="40dp"/>
            <Button
                android:id="@+id/bt22"
                android:layout_toRightOf="@id/bt11"
                android:background="@drawable/w"
                android:layout_marginRight="20dp"
                android:layout_marginLeft="20dp"
                android:layout_width="40dp"
                android:layout_height="40dp"/>
            <Button
                android:id="@+id/bt33"
                android:layout_toRightOf="@id/bt22"
                android:background="@drawable/w"
                android:layout_width="40dp"
                android:layout_height="40dp" />
    </RelativeLayout>

</RelativeLayout>
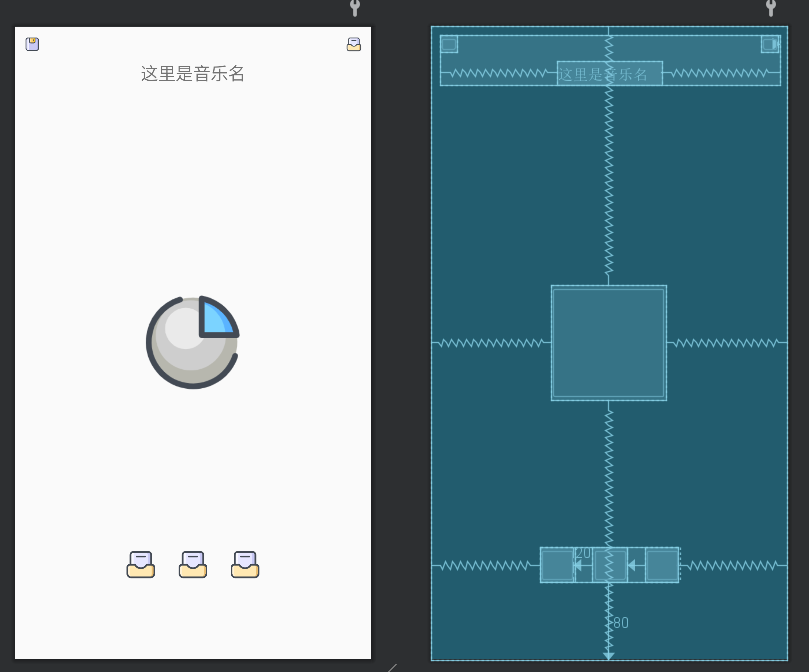
There is no corresponding picture, so I randomly found a few pictures and made a general appearance (the album picture is in the middle, and the next song and the previous song are played below)
Note: The solution that the Button color or background image cannot be changed:
Change the Style attribute in themes.xmlparent="Theme.MaterialComponents.DayNight.Bridge"
2.6 Table Layout
<TableLayout>内容</TableLayout>
The table layout inherits from the linear layout class and fully supports the properties of the linear layout. Other properties are shown in the figure

Note: the width of the column is determined by the largest cell in the column, and the width of the entire table depends on the width of the parent component
Table layout example
    <TableLayout
        android:layout_width="wrap_content"
        android:layout_height="wrap_content">
        <TableRow>
            <Button
                android:layout_width="wrap_content"
                android:layout_height="wrap_content"/>
            <Button
                android:layout_width="wrap_content"
                android:layout_height="wrap_content"/>
            <Button
                android:layout_width="wrap_content"
                android:layout_height="wrap_content"/>
        </TableRow>
        <TableRow>
            <Button
                android:layout_width="wrap_content"
                android:layout_height="wrap_content"
                android:layout_column="2"/>
            <Button
            android:layout_width="wrap_content"
            android:layout_height="wrap_content"/>
        </TableRow>
    </TableLayout>

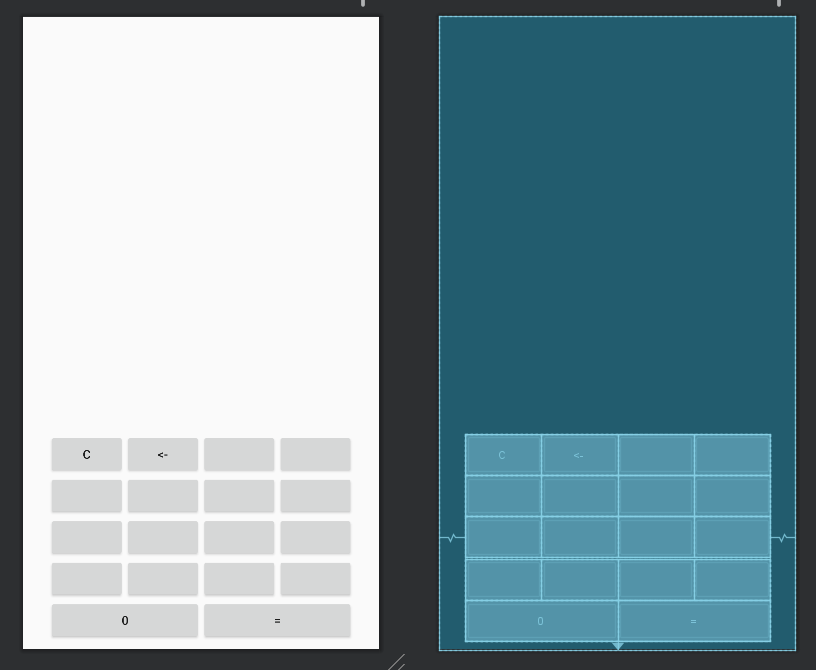
2.6.2 Practical exercise - computer interface
<?xml version="1.0" encoding="utf-8"?>
<RelativeLayout xmlns:android="http://schemas.android.com/apk/res/android"
    xmlns:app="http://schemas.android.com/apk/res-auto"
    xmlns:tools="http://schemas.android.com/tools"
    android:layout_width="match_parent"
    android:layout_height="match_parent"
    android:padding="10dp"
    tools:context=".MainActivity">


    <TableLayout
        android:layout_width="wrap_content"
        android:layout_height="wrap_content"
        android:layout_alignParentBottom="true"
        android:layout_centerHorizontal="true">
        <TableRow>
            <Button
                android:layout_width="wrap_content"
                android:layout_height="wrap_content"
                android:text="C"/>
            <Button
                android:layout_width="wrap_content"
                android:layout_height="wrap_content"
                android:text="<-">
            <Button
                android:layout_width="wrap_content"
                android:layout_height="wrap_content"/>
            <Button
                android:layout_width="wrap_content"
                android:layout_height="wrap_content"/>
        </TableRow>
        <TableRow>
            <Button
                android:layout_width="wrap_content"
                android:layout_height="wrap_content"/>
            <Button
                android:layout_width="wrap_content"
                android:layout_height="wrap_content"/>
            <Button
                android:layout_width="wrap_content"
                android:layout_height="wrap_content"/>
            <Button
                android:layout_width="wrap_content"
                android:layout_height="wrap_content"/>
        </TableRow>
        <TableRow>
            <Button
                android:layout_width="wrap_content"
                android:layout_height="wrap_content"
                android:layout_span="2"
                android:text="0"/>
            <Button
            android:layout_width="wrap_content"
            android:layout_height="wrap_content"
                android:layout_span="2"
                android:text="="/>
        </TableRow>
    </TableLayout>
</RelativeLayout>
2.7 Frame Layout
<FrameLayout></FrameLayout>
Frame layout is used to create a blank area on the screen. Each sub-control added to this area occupies one frame, and each frame will be overlaid on top of the previous frame.
Two attributes
- android:foreground: Set the foreground image of the FrameLayout container, which is always displayed on the child control
- android:foreground: Set the location where the foreground image is displayed
Frame layout example
    <FrameLayout
        android:layout_width="wrap_content"
        android:layout_height="wrap_content">
        <Button
        android:layout_width="200dp"
        android:layout_height="200dp"/>
        <Button
            android:layout_width="50dp"
            android:layout_height="50dp"
            android:background="#000000" />
    </FrameLayout>
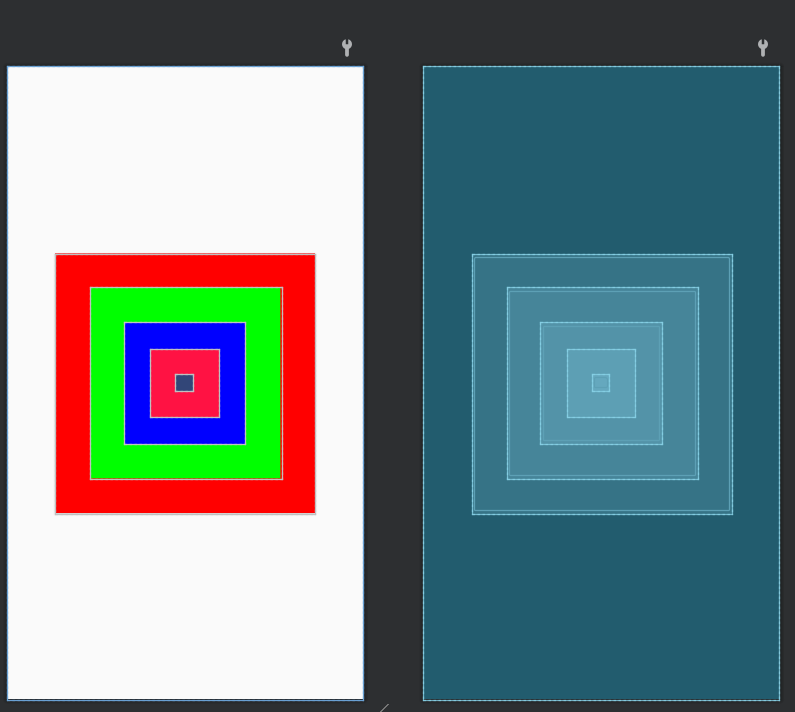
2.7.2 Practical exercise - neon interface
<FrameLayout xmlns:android="http://schemas.android.com/apk/res/android"
    android:layout_width="match_parent"
    android:layout_height="match_parent">
    <Button
        android:id="@+id/btn_one"
        android:layout_width="300dp"
        android:layout_height="300dp"
        android:layout_gravity="center"
        android:background="#ff0000" />
    <Button
        android:id="@+id/btn_two"
        android:layout_width="220dp"
        android:layout_height="220dp"
        android:layout_gravity="center"
        android:background="#00ff00" />
    <Button
        android:id="@+id/btn_three"
        android:layout_width="140dp"
        android:layout_height="140dp"
        android:layout_gravity="center"
        android:background="#0000ff" />
    <Button
        android:id="@+id/btn_four"
        android:layout_width="80dp"
        android:layout_height="80dp"
        android:layout_gravity="center"
        android:background="#ff1243" />
    <Button
        android:id="@+id/btn_five"
        android:layout_width="20dp"
        android:layout_height="20dp"
        android:layout_gravity="center"
        android:background="#324678" />
</FrameLayout>