Contents: Guide
How Postman does interface testing 1: How to import swagger interface documents
How Postman does interface testing 2: How to switch the test environment
How Postman does interface testing 3: what? Postman can also do stress tests?
How Postman does interface testing 4: How to automatically add request headers
How Postman does interface testing 5: How to automatically verify interface response
How Postman does interface testing 6: How to use external json file data
How Postman does interface testing 7: How to run it through the command line
How Postman does interface testing 8: How to generate HTML test reports
How Postman does interface testing 9: How to generate allure test reports
foreword
Postman is generally used for interface testing, so I won’t introduce too much here. Now I will share some postman usage skills with you, hoping to help you master it faster.

How Postman does interface testing 1: How to import swagger interface documents
In the process of using postman to do interface testing, the test engineer will fill in a lot of parameters in the interface, including a series of data such as url address, request method, message header and message body, which takes a lot of time when there are many request parameters .
We can use postman's document import function to directly import open documents such as swagger, and postman will automatically generate request-related data according to document content and parameter restrictions, which can save a lot of time for manually filling in parameters.
And there are only 2 steps to import the swagger document, which is very convenient.
First of all, the first step is to open the address of the swagger document, click export, and export the online document, you can choose json format or yaml format. The exported document will be saved locally.
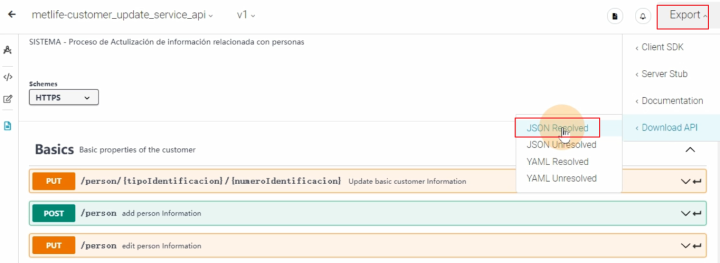
The second step is to open postman, select the "file" menu, click "import", select the file to import, and import the json file just downloaded.
The imported document will automatically generate request request information, and then you only need to make simple modifications to these parameters to send the request, no need to manually fill in one by one.
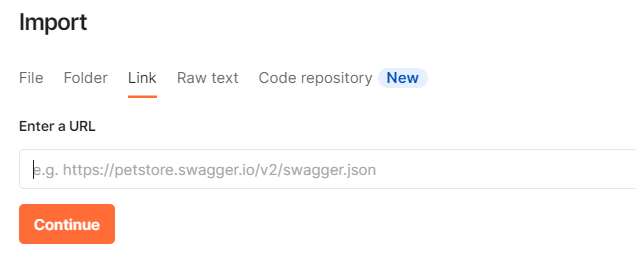
Swagger also supports online link import, just fill in the json format online address of the document directly in the url column in the link.
Follow me, GET the next postman tips.
How Postman does interface testing 2: How to switch the test environment
When using postman for interface testing, we often fill in the full path of the interface address in the url address bar. The bad thing about this approach is that when you need to switch from one test environment to another, you need to modify all the urls. When you have 500 use cases that need to be modified, it will be exhausting.
So in postman, how to modify the test environment more conveniently? In fact, it only takes two steps.
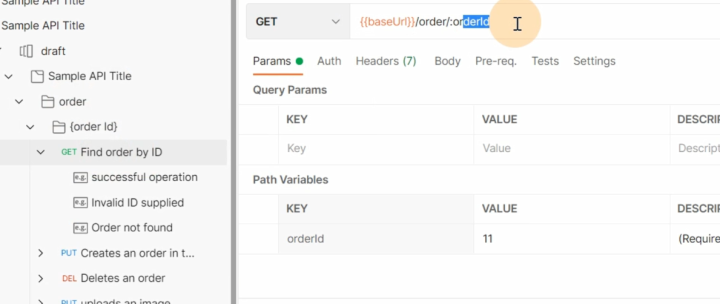
The first step is to click the environment on the left toolbar of postman, and click the + sign to add a new test environment. Many environment variables can be created in a test environment. With environment variables, these variables can be referenced in the request data.
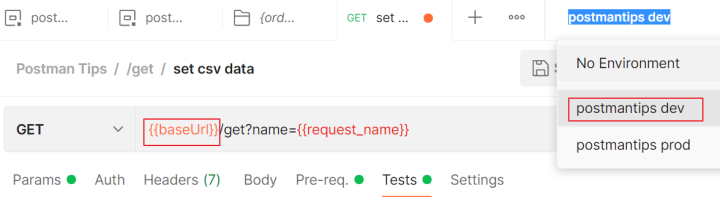
Here, I created a development environment and an online environment, each of which has a variable called baseUrl.

The second step, on the request sending interface, click the "Select Environment" button in the upper right corner to switch the environment you want to use. Let's set it up as a dev environment first. Then in the url, use double curly braces to refer to the baseUrl variable in the environment. When you need to switch the environment, just click to switch to the prod environment.
Follow me, GET the next postman tips.
How Postman does interface testing 3: what? Postman can also do stress tests?
We all know that postman is a very useful interface testing tool. However, postman can also do simple stress tests, and the steps only need 2 steps.
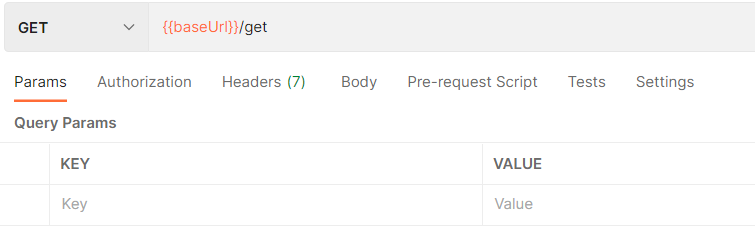
First, open postman and write the request parameters of the interface.
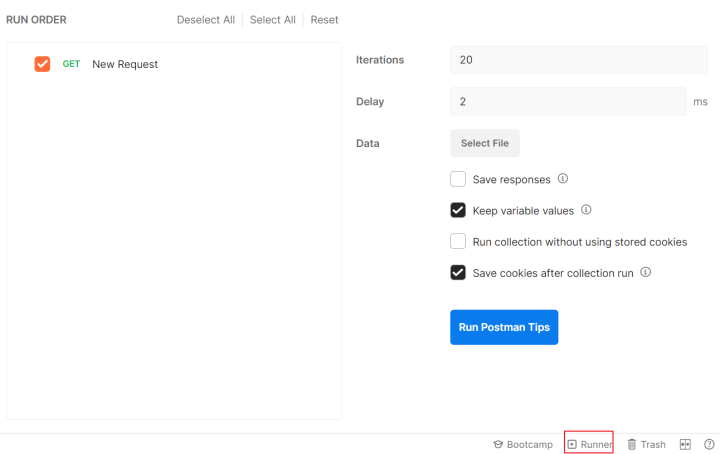
Then, click the runner at the bottom right, drag the interface to be tested to the display box on the left, and set the parameters of the stress test on the right.
iterations indicates the number of request initiations, and Delay indicates the request interval time, click to run.
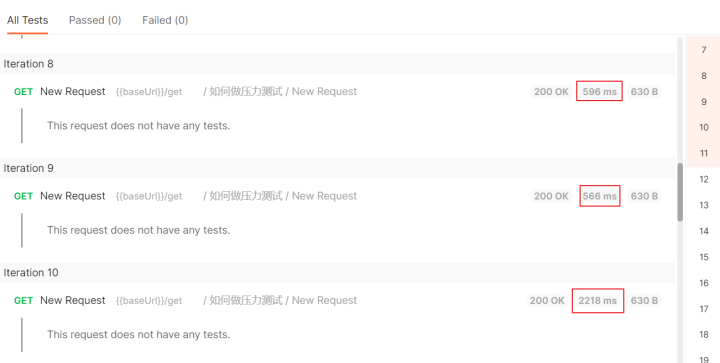
After running, you can view the real-time response results, and we can judge the processing performance of the server according to the response time.
Of course, postman is not a professional performance testing tool after all. These performance data and indicators need to be calculated by ourselves. They are only suitable for testing the performance and getting a general impression of the processing capacity of the server. If you want to do performance testing specifically, it is more convenient to use tools like jmeter.
Follow me, GET the next postman tips.
How Postman does interface testing 4: How to automatically add request headers
Before sending a request, testers often need to preprocess the request data so as to meet the request sending requirements. In summary, there are mainly:
-
read data from outside
-
Data format conversion
-
Add, modify, delete request fields
-
Add pre-requests and more.
These operations are basically processed on the postman's pre-request page, using javascript programming. Operations that are not frequently used only require basic javascript syntax, and can be used without too much in-depth study.
Let's take the addition of request headers as an example.
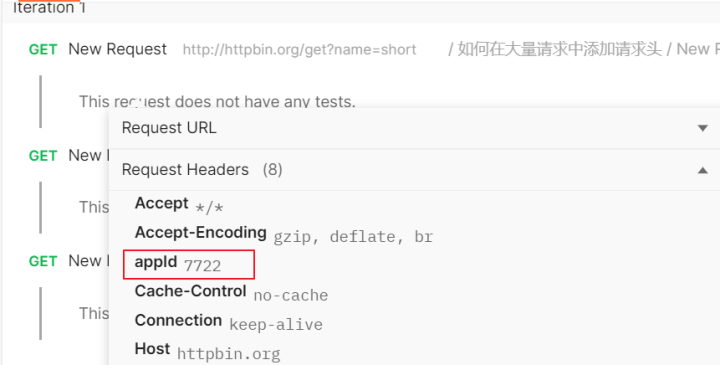
The first step is to add a simple request, and then replicate it several times to simulate the situation where a large number of requests need to be processed.
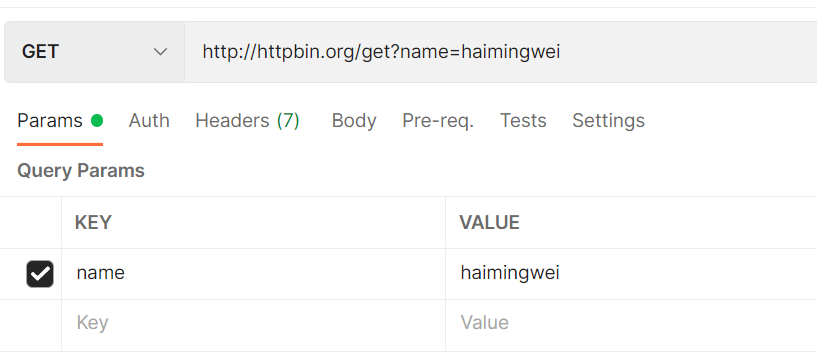
The second step is to open the directory to which the request belongs. Click pre-request, write the following code to add appId request header.
pm.request.addHeader({key: "appId", value: "7722"})The third step, click run to run. Click on the request headers during the running process to find that the appId request header is automatically added to each request.
In addition to adding request headers, pre-request also has a large number of application scenarios. We will explain them one by one later. If you don’t want to miss it, you can pay attention to it.
How Postman does interface testing 5: How to automatically verify interface response
Postman is a pure automated testing tool, but people who use it are called manual testing because a large number of testers still use it manually.
For example, after using postman to send a test case, we still manually check the test results, which is very labor-intensive when a large number of test cases need to be run. In fact, we only need to add one more step to realize automatic verification.
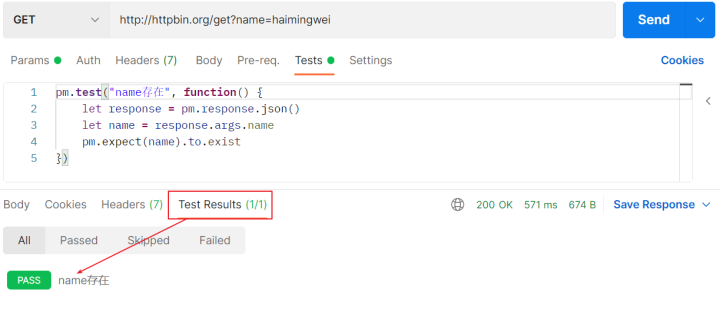
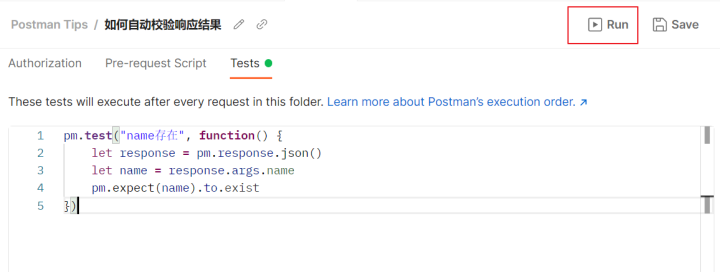
First, write the request data for the test case, then click the tests tab.

We need to verify whether there is a name field in the args field in the response result
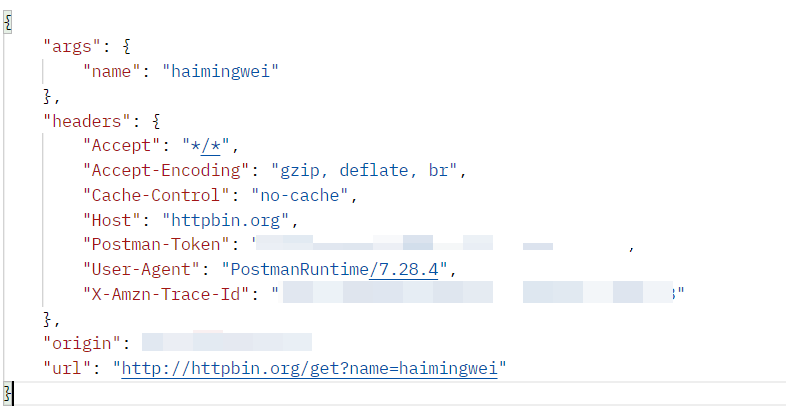
Now write the following code assertion to realize automatic verification
pm.test("name存在", function() { let response = pm.response.json() let name = response.args.name pm.expect(name).to.exist })After running, you can view the results of automatic verification
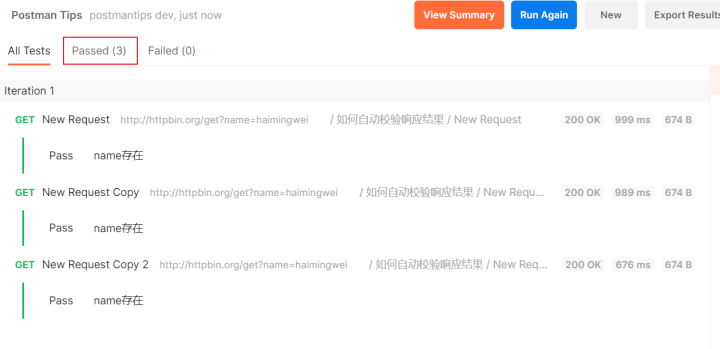
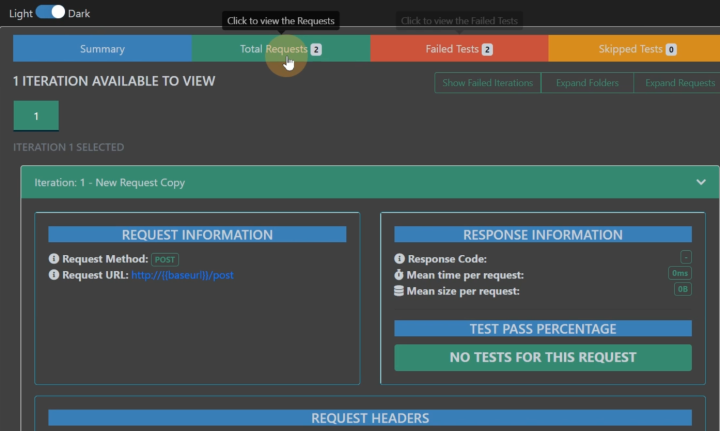
If there are a large number of requests that require the same automatic verification, they can be written uniformly in the file directory, and then click run to run
After running, you can visually see which use cases passed and which ones failed.
Follow me, GET the next postman tips.
How Postman does interface testing 6: How to use external json file data
In the process of software testing, you may have configured some environmental data in advance and put them in common configuration files. You want to import these files directly and use them in postman. In this way, you don’t need to repeat the settings in postman software.
For example, you can get a configuration file directly from the developer, which contains the host address, database address, and list limit information for each page. Can we directly import these data into postman for use? Follow the steps below.
First, prepare the external data file. Postman currently supports data in csv format and json format. If it is another type of file, you can convert it into these two formats first. Let's take the json format as an example, where host, dbname, and perpage three data are stored in the file
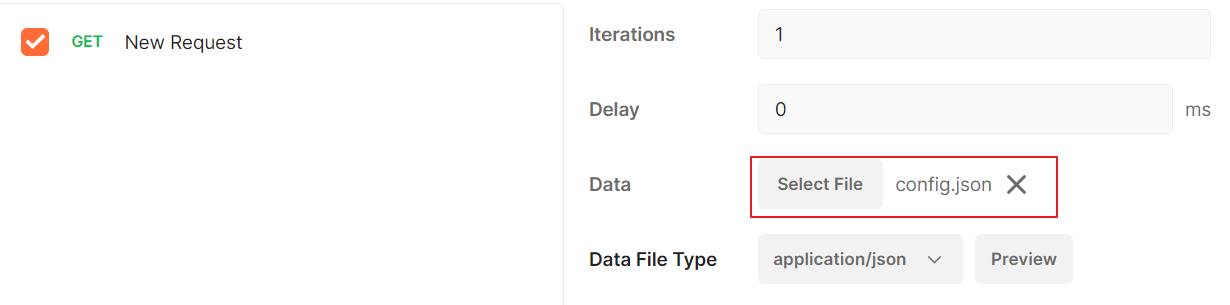
[ { "host": "http://httpbin.org", "dbname": "demodb", "perpage": 10 } ]Next, open the directory where the request belongs, click run, select the json file prepared in advance, and ensure that postman can read data from the file.
Click Pre-req and write the following code. Read data from the file and set it as a variable recognized by postman.
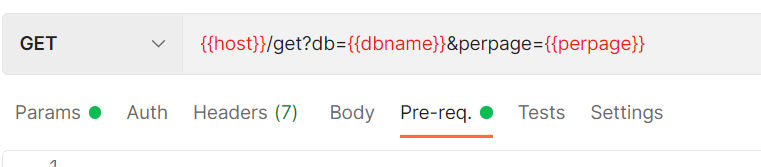
pm.variables.set('host', pm.iterationData.get('host')) pm.variables.set('dbname', pm.iterationData.get('dbname')) pm.variables.set('perpage', pm.iterationData.get('perpage'))Finally, open postman and write the request. The host, dbname, and perpage parameters required in the request are directly expressed in curly braces. Click run to run and you are done.
Follow me, GET the next postman tips.
How Postman does interface testing 7: How to run it through the command line
1. Export the data in postman, and the exported postman data is stored as a json format file. These files can be re-imported into the postman tool, and can also be imported into other testing software, such as use case management platforms such as yapi.
2. Install the command line tool newman
newman is the command line version of postman, which is developed by nodejs. If you need to use this command line tool, install nodejs first, and then enter the following command on the command line to install newman
npm install newman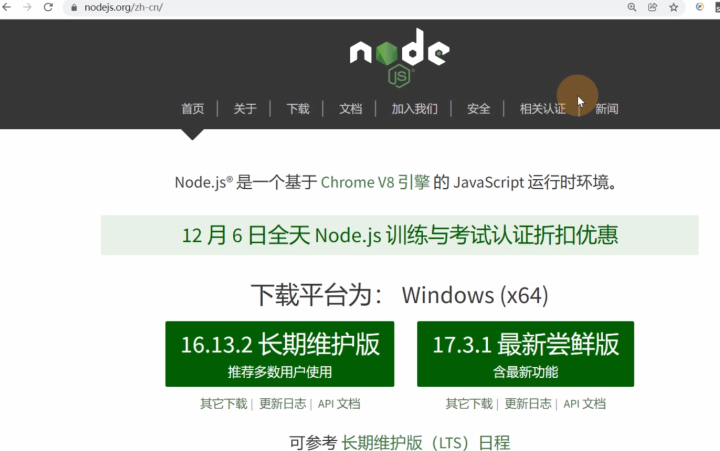
3. Use newman to run the json data. If it is installed locally, use npx to run it. If it is installed globally, you can directly use the newman command.
npx run newman 'postman.json'It should be noted that the json file imported by postman does not contain environment variables. If you need to use environment variables in the JSON file, you need to export the json file of the environment variables first, and then run:
npx run newman -e "env.json" "postman.json"Follow me, GET the next postman tips.
How Postman does interface testing 8: How to generate HTML test reports
1. Install the html report plugin
Enter the following command on the command line to complete the installation of the html report template:
npm install newman-reporter-htmlextraThe specific usage instructions of the report can be viewed in the official document: newman-reporter-htmlextra - npm
2. Run the use case with parameters, and automatically generate an html report after running. The test report will be saved in the local newman directory by default.
npx run newman "postman.json" -r htmlextra3. Check the test report
Follow me, GET the next postman tips.
How Postman does interface testing 9: How to generate allure test reports
1. Install the allure report plugin
Enter the following command on the command line to complete the installation of the allure report template:
npm install newman-reporter-allureThe specific usage instructions of the report can be viewed in the official document: newman-reporter-allure - npm
2. Run the use case with parameters, and automatically generate an allure report after running. The test report will be saved in the local newman directory by default.
npx run newman "postman.json" -r allure3. Start the allure service, and install the allure command line tool before starting. After installing the plug-in in jenkins, you don't need to install it manually.
allure serve allure-results4. Check the test report
Follow me, GET the next postman tips.
A video tutorial about postman: Stewart
write at the end
All these methods need to be practiced by us to have a deep feeling and understanding, but the most fundamental method is to maintain our enthusiasm for this industry and the pursuit of best practices. This is how we can constantly break through ourselves and climb the peak An inexhaustible source of motivation!
This post ends here, and finally, I hope that friends who read this post can gain something.
It's all here, remember to support Sanlian .