This article mainly introduces how to connect JIRA to PostgreSQL database.
first
- Check if your PostgreSQL version is supported. See Supported Platforms .
- If you are transferring JIRA to another server, export the data as an XML backup first, and then transfer the data from the old database to the new database.
- Close JIRA before starting unless you are running the Setup Wizard.
1. Create and configure the PostgreSQL database
- Create a database user (login role) to connect with JIRA eg: jiradbuser .
- Create a database for storing JIRA issues using Unicode collation, like: jiradb .
CREATE DATABASE jiradb WITH ENCODING 'UNICODE' LC_COLLATE 'C' LC_CTYPE 'C' TEMPLATE template0;
or via the command line:$ createdb -E UNICODE -l C -T template0 jiradb - Make sure the user has permissions to connect to the database and create and edit tables.
2. Copy the PostgreSQL JDBC driver to your application server (JIRA WAR only)
![]() Skip this step if you have a JIRA 'Recommended' distribution that includes the PostgreSQL JDBC driver installed. The JIRA WAR distribution does not contain this driver.
Skip this step if you have a JIRA 'Recommended' distribution that includes the PostgreSQL JDBC driver installed. The JIRA WAR distribution does not contain this driver.
- Download the PostgreSQL JDBC driver from http://jdbc.postgresql.org/download.html .
- Add the PostgreSQL JDBC driver jar to the lib/ directory of the application server.
3. Configure the JIRA server to connect to the PostgreSQL database
There are three ways to configure a JIRA server to link to a PostgreSQL database:
- Using the JIRA installation wizard (not available for JIRA WAR) - if you have already installed JIRA and are setting it up for the first time, the settings will be saved to the dbconfig.xml file in the JIRA home directory.
- Using the JIRA configuration tool (not available for JIRA WAR) - if there is an existing JIRA instance, the settings will be saved to the dbconfig.xml file in the JIRA home directory.
- Manual configuration - use this method to link to the JIRA server only if you have a JIRA WAR instance or console. The dbconfig.xml file in the JIRA home directory needs to be updated manually.
Description of each configuration method:
| JIRA setup wizard | The JIRA setup wizard is only displayed when you first access JIRA on your browser.
|
| JIRA configuration tool |
|
| Manually |
|
Database connection fields:
| setup wizard/configuration tool | dbconfig.xml | describe |
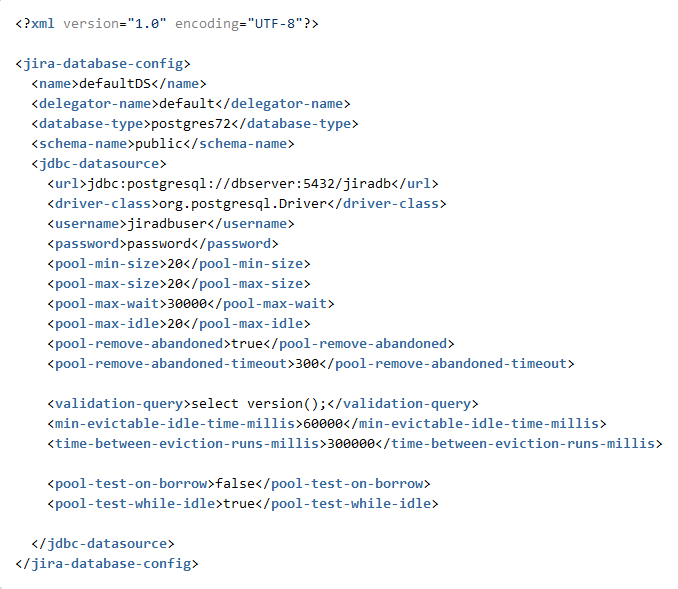
| Hostname | Located in the <url> tag (eg bold text below): <url>jdbc:postgresql:// dbserver :5432/jiradb</url> |
The machine name or IP address where the PostgreSQL server is installed. |
| Port | Located in the <url> tag (eg bold text below): <url>jdbc:postgresql://dbserver: 5432 /jiradb</url> |
The TCP/IP port on which the PostgreSQL server is listening. Can also be left blank to use the default port. |
| Database | Located in the <url> tag (eg bold text below): <url>jdbc:postgresql://dbserver:5432/ jiradb </url> |
The name of the PostgreSQL database (where the JIRA data will be saved). It should be created in the first step above. |
| Username | 位于< username>标记(例如下面的粗体字): < username>jiradbuser< /username> |
JIRA用于连接PostgreSQL服务器的用户。应在上面第一步时创建。 |
| Password | 位于< password>标记(例如下面的粗体字): < password>jiradbuser< /password> |
用于与PostgreSQL服务器身份验证的用户密码。 |
| Schema | 位于< schema-name>标记(例如下面的粗体字): < schema-name>public< /schema-name> |
PostgreSQL数据库使用的模式名称。 PostgreSQL 7.2及以后的版本要求在<schema-name/>中指定模式。如果你的PostgreSQL使用默认'public'模式,这需要在<schema-name/>元素中指定。 确保你的数据库模式名称是小写,因为JIRA不支持PostgreSQL数据库中的模式名称包含大写字符。 |
dbconfig.xml文件示例
4.启动JIRA
现在JIRA连接到PostgreSQL数据库就配置好了。下一步就是启动JIRA。
- 如果正在使用JIRA的'recommended'分配,启动它,并观察日志中是否存在错误。
- 如果使用的是JIRA WAR分配,重建并重新部署在应用服务器的Web应用程序。
Click to view>> More JIRA Chinese tutorials