Basic introduction and use of Docker
1. Introduction to Docker
Docker is an open platform for developing, publishing, and running applications. Docker can decouple the application from the infrastructure (i.e. less need for underlying support) so that we can deliver software quickly. With Docker, we can manage infrastructure just like we manage applications. Docker Official
Docker advantages:
- Flexible: Even if the application is too complex, we can use Docker to containerize the application.
- Lightweight: Because Docker containers use a kernel shared by the host, no additional hardware support is required.
- Application isolation: Containers run using Docker can isolate the interaction between different applications (ie, each container is independent)
1. Docker Architecture
Docker uses the C/S architecture , and the Docker Client is used to communicate with the Docker daemon (the daemon is the Server). The daemon can be used to build, run, and distribute Docker containers. The Docker Client and the daemon can run on the same system, or the Docker Client can be connected to the daemon remotely. Use the REST APIprotocol and communicate via UNIXsockets or network interfaces. Another Docker Client is Docker Compose (which allows us to compose an application into a set of containers)
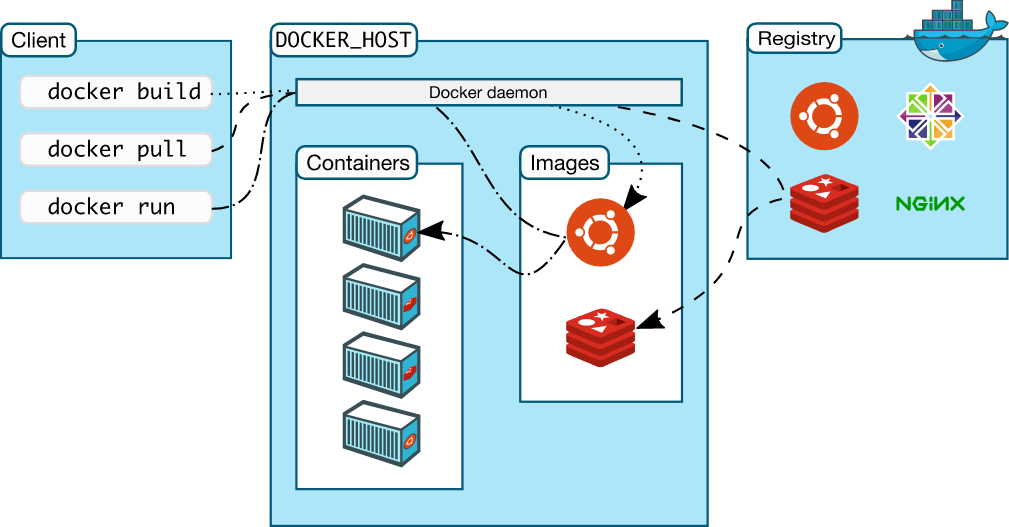
. We don't need to pay too much attention to Docker's architecture, because in general Docker Client and Docker daemon run on the same server.
2. Three cores of Docker
The three cores of Docker here are imageimages , containercontainers, and repositorywarehouses; this can be said to be the most important part of Docker.
1) Mirror
Docker images are read-only templates for the Docker container runtime that can be used to create Docker containers (each image consists of a series of layers)
2) Container
Docker mainly uses containers to run applications. A Docker container can be said to contain the environment required to run an application. Every Docker container is created from an image. It can be said that a container is a running instance created by an image , which can be started, stopped, deleted, etc. And each container is isolated from each other, ensuring a secure platform.
3) Warehouse
The Docker repository is mainly used to centrally save images . When we create our own image, we can use the pushcommand to upload it to a public repository (Public) or a private repository (Private). When using this image on another server, it can be pulled directly from the repository (relatively fast)
2. Docker installation
Ready to work:
| CPU name | operating system | IP address | package |
|---|---|---|---|
| Docker | CentOS7.x |
192.168.1.4 | docker-ce-19.03.12 docker-ce-cli-19.03.12 |
1. Download the Docker package
1) Install the base package
[root@Docker ~]# yum -y install yum-utils device-mapper-persistent-data lvm2
2) Configure the yumsource
[root@Docker ~]# wget -O /etc/yum.repos.d/CentOS-Base.repo http://mirrors.aliyun.com/repo/Centos-7.repo
[root@Docker ~]# yum-config-manager \
--add-repo \
https://download.docker.com/linux/centos/docker-ce.repo
3) Install Docker
- We can use the
yum list docker-ce --showduplicates | sort -rcommand to view all versions of Docker.
[root@Docker ~]# yum -y install docker-ce-19.03.12 docker-ce-cli-19.03.12
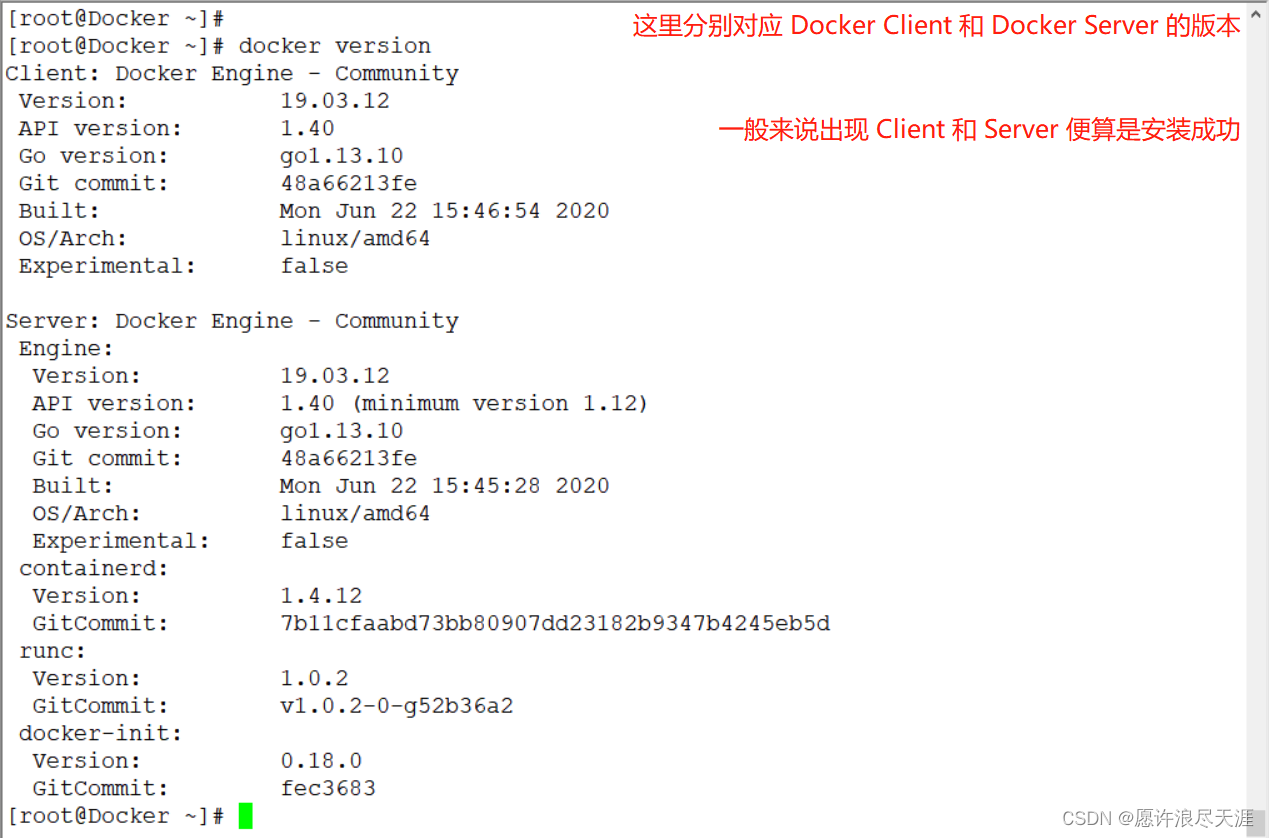
4) Start Docker and verify
[root@Docker ~]# systemctl enable docker --now										# 配置开机自启并启动
[root@Docker ~]# docker version														# 查看 Docker 版本
5) Configure Docker accelerator
[root@Docker ~]# cat <<END > /etc/docker/daemon.json
{


    "registry-mirrors": [
        "https://ipbtg5l0.mirror.aliyuncs.com"
    ]
}
END
[root@Docker ~]# systemctl daemon-reload && systemctl restart docker				# 重启 Docker
2. Docker basic command introduction
Below we mainly introduce the commands related to images and containers, because there are not many warehouse-related commands, that is pull push, and other commands.
1) Mirror related commands
1) View all images of the current Docker
// 因为我们的 Docker 是刚安装的. 所以没有显示任何镜像
[root@Docker ~]# docker images
REPOSITORY          TAG                 IMAGE ID            CREATED             SIZE
- The above output results are: image name, image corresponding label, image ID number, creation time, and image size.
2) View the busyboximage
[root@Docker ~]# docker search busybox
NAME                      DESCRIPTION                                     STARS               OFFICIAL            AUTOMATED
busybox                   Busybox base image.                             2447                [OK]
progrium/busybox                                                          70                                      [OK]
radial/busyboxplus        Full-chain, Internet enabled, busybox made f…   45                                      [OK]
......
- We can use
searchto search for images in the Docker repository. The above output results are: image name, description information, star, official image, and automatic build.
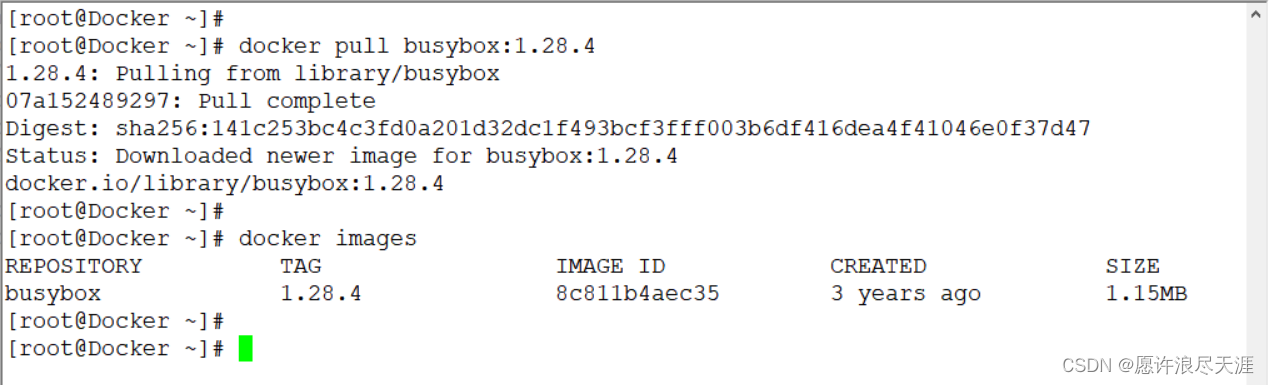
3) Pull the busyboximage
[root@Docker ~]# docker pull busybox:1.28.4								# 指定镜像版本号拉取 (latest 表示最新版)
1.28.4: Pulling from library/busybox									# 从这个仓库进行拉取
07a152489297: Pull complete												# 拉取完成
Digest: sha256:141c253bc4c3fd0a201d32dc1f493bcf3fff003b6df416dea4f41046e0f37d47		# 这就是镜像的层 (也算是个标识符)
Status: Downloaded newer image for busybox:1.28.4						# 下载的新镜像名称和版本号
docker.io/library/busybox:1.28.4										# 完整仓库地址
4) Label the image (similar to an alias operation)
[root@Docker ~]# docker tag busybox:1.28.4 testbusybox:test
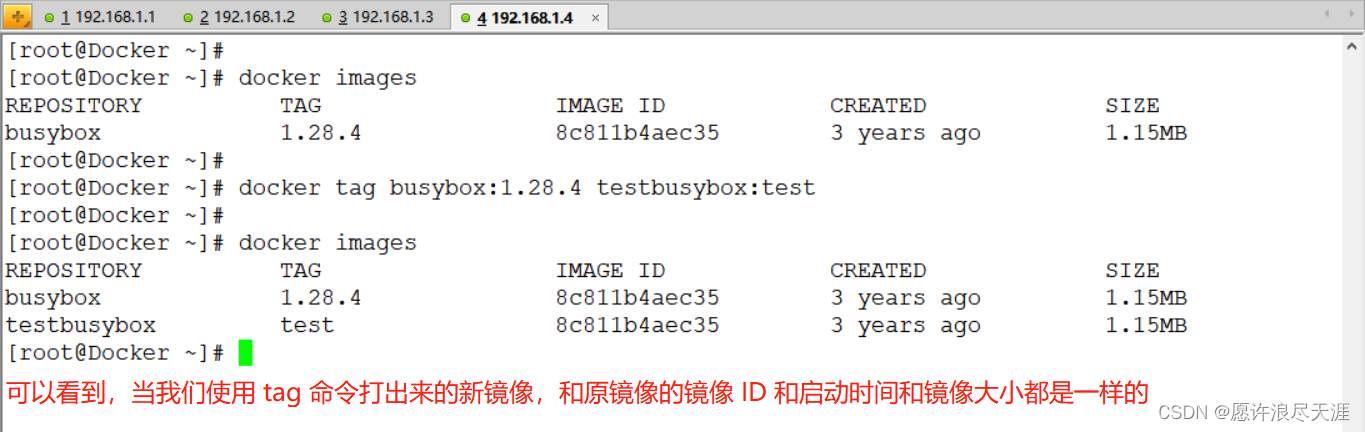
tagCommands are quite critical sometimes. For example, the image we want to pull is abroad, but due to network reasons, we cannot pull it. At this time, we can pull the same image from the domestic mirror warehouse, and then come to Use the tagcommand to perform the labeling operation, and change it to the name of the foreign mirror to be pulled.
5) Export the busyboximage
[root@Docker ~]# docker save -o busybox.tgz busybox:1.28.4
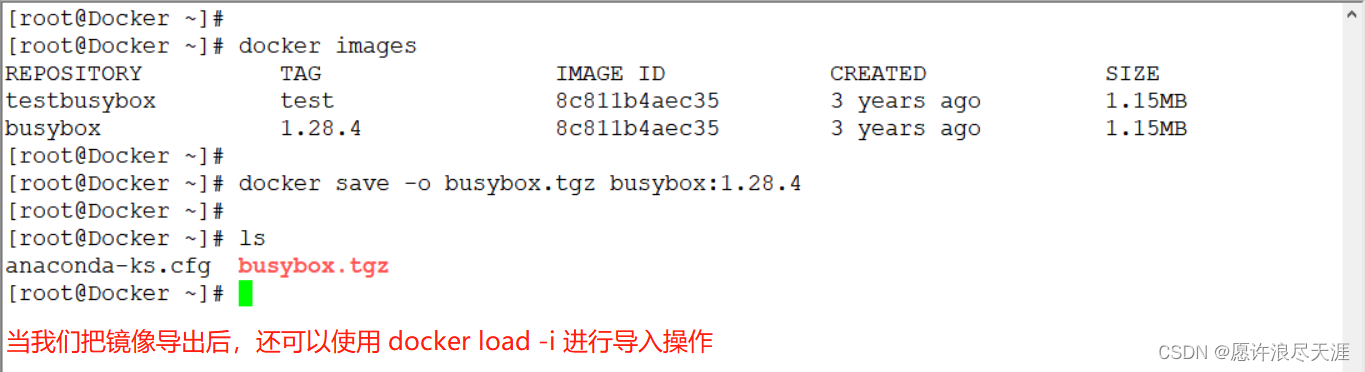
6) Import the busyboximage
[root@Docker ~]# docker load -i busybox.tgz
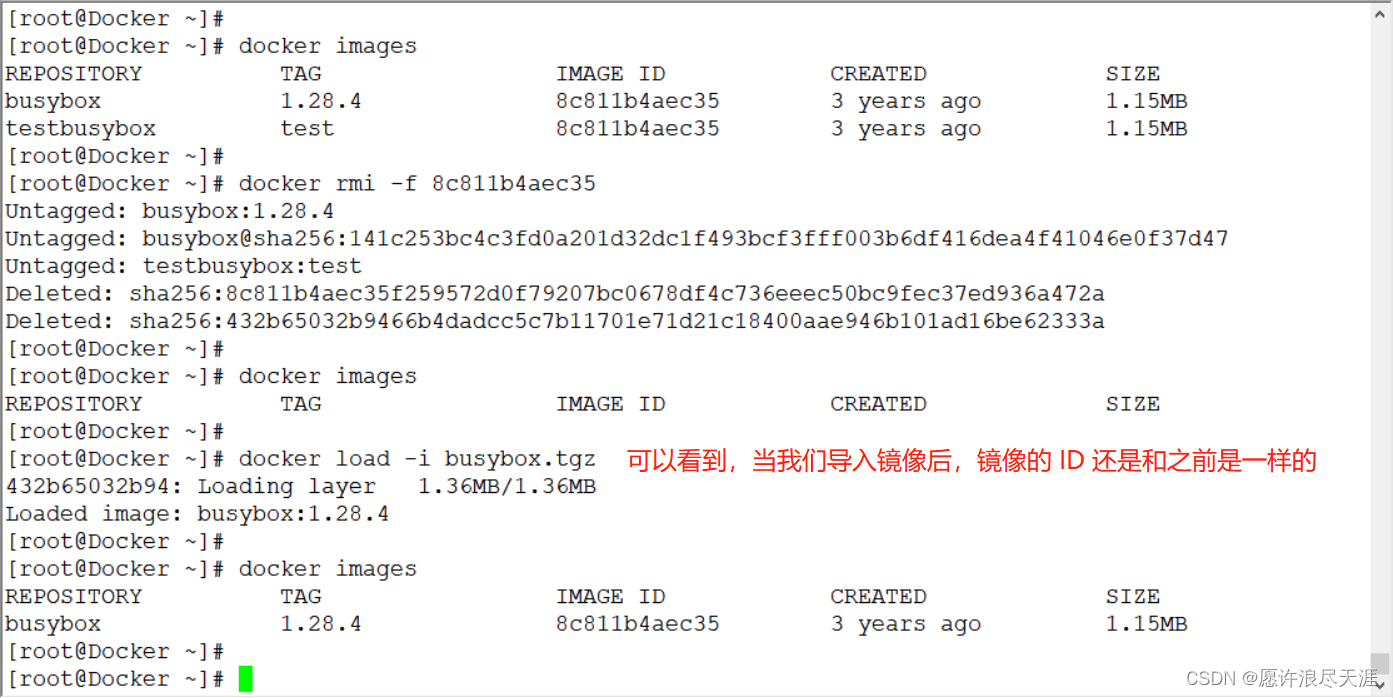
docker rmi: delete by image name (plus-fcan realize deletion based on image ID)
2) Container related commands
1) Create a container
[root@Docker ~]# docker create -it --name busybox busybox:1.28.4 /bin/sh
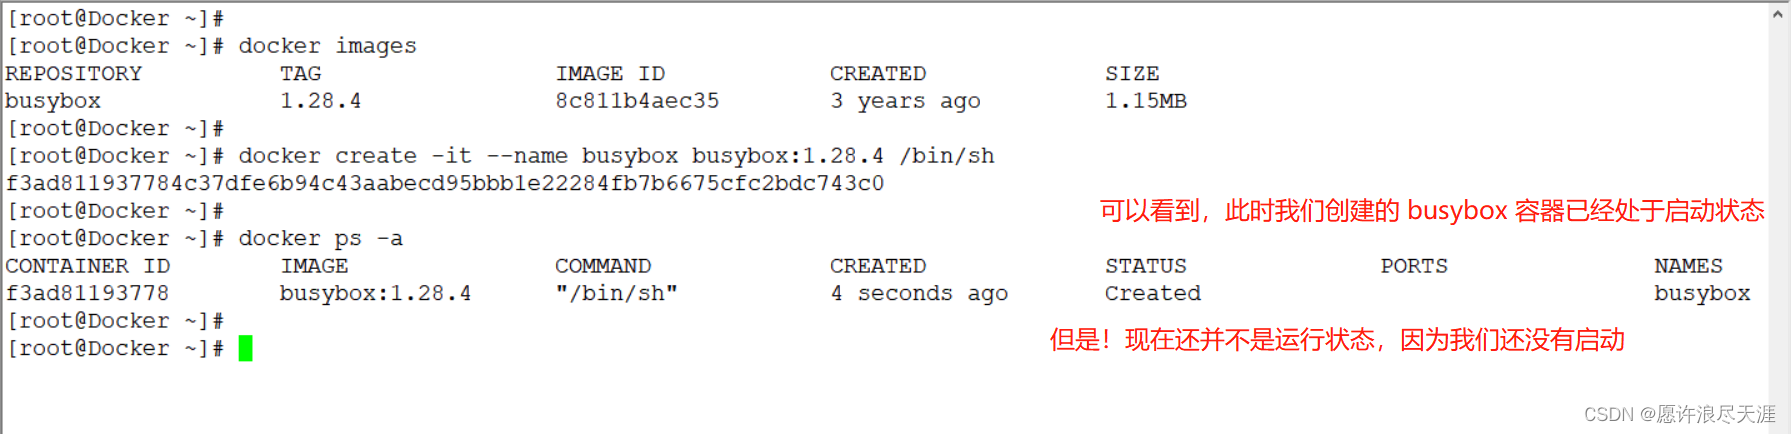
-i: indicates that the input of the container is kept open;-t: indicates that a pseudo-terminal is allocated to the container (that is, we add it later/bin/bash)docker ps -a: means to view all running containers (no matter what state the container is in, it will be displayed)
2) Start a container
[root@Docker ~]# docker start busybox
[root@Docker ~]# docker ps													# 查看当前处于运行状态的容器

- When we want to shut down the container, we can use it
stop; when we restart, we can use therestartcommand to operate.
3) Delete the container
[root@Docker ~]# docker stop busybox
[root@Docker ~]# docker rm busybox											# 我们可以通过容器名或者容器 ID 来进行删除

4) Run the container directly
[root@Docker ~]# docker run -it -d --name busybox busybox:1.28.4 /bin/sh
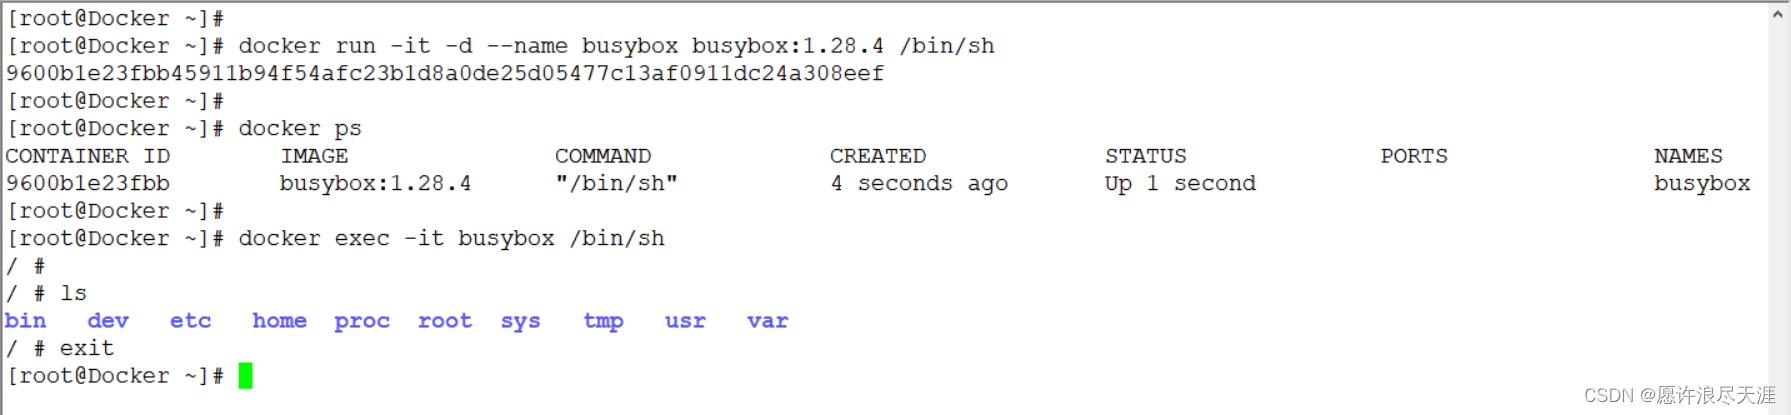
docker exec -it busybox /bin/shThe role of the command is to allow us to enter the container.
3. Use Docker to implement Nginx website
[root@Docker ~]# docker pull nginx:1.18.0
[root@Docker ~]# docker images
[root@Docker ~]# docker run -d --name nginx -p 1888:80 -v /zhangsan:/usr/share/nginx/html/ nginx:1.18.0
[root@Docker ~]# echo "Hello 河北彭于晏" > /zhangsan/index.html
[root@Docker ~]# curl 127.0.0.1:1888
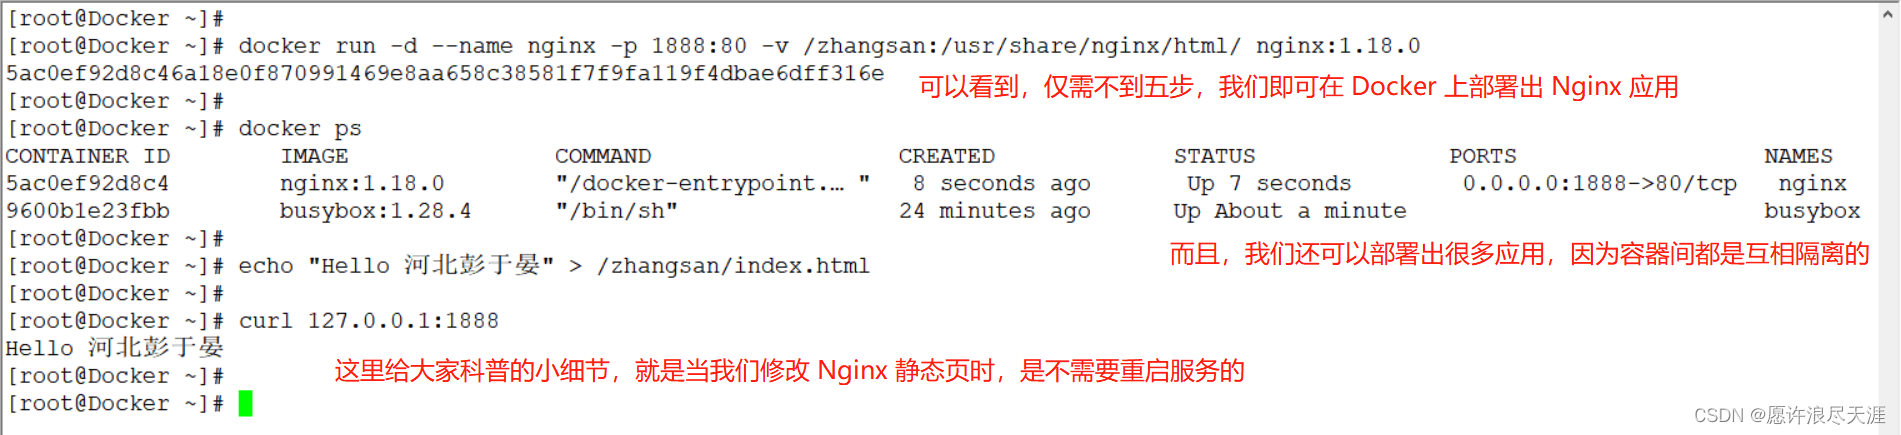
-p: Specifies the port when the container is running (the front is the host port, and the latter is the port in the container;-Pthis single letter is used to allow the container to implement random port mapping )-v: Specify a data volume, which is equivalent to a mount command. We can mount the host's directory into the container (multiple can be added-vto configure multiple data volumes)
Well, this article is about to end here. If you encounter problems during the operation, or want to correct the blogger's article, you can leave a message in the comment area.