System partition
1. MBR information 1. MBR
main boot partition 446 bytes
2. MPT main partition table 64 bytes
3. The hard disk is effectively marked "55aa" 2 bytes
4. The partition size is 16 bytes, so there are 4 partitions
among them 3 primary partitions, 1 extended partition, and the extended partition becomes a logical partition
5. Note: MBR partition can only be divided into a maximum of 2TB, the total number of all identifiable partitions is 16, and the available number is 14 (among which there are several main partitions in the front, and one extended partition for several main partitions)
The command opens the partition interface for fdisk /dev/vdb
main partition 1

main partition 3

The following figure shows the extended partition

The following figure shows the logical partition

Partition list

2. System device type
1./dev/xdxn
x: hard disk type (s: sata hard disk h: serial hard disk v: virtual hard disk)
x: a..z, the number of hard disks
n: 1..16, where the partition is located Number
2./dev/cdrom system optical drive
/dev/mapper/files virtual hard disk files
3. Hard disk partition
1. Partition command
d delete a partition delete partition
l list known partition types list
m print this menu help description
n add a new partition Add a new partition
p print the partition table Display the partition
q quit without saving changes Exit without saving
t change a partition's system id Modify the partition id
w write table to disk and exit Write the current operation to the partition table
2. Partition management on the hard disk
Enter the hard disk partition fdisk /dev/vdb
[root@server48 ~]# fdisk /dev/vdb
Welcome to fdisk (util-linux 2.23.2).
Changes will remain in memory only, until you decide to write them.
Be careful before using the write command.
Command (m for help):
3. Check the real devices in the system
fdisk -l
4. Check the system identifiable partitions
cat /proc/partitions
[root@server48 ~]# cat /proc/partitions
major minor blocks name
253 0 10485760 vda
253 1 10484142 vda1
253 16 10485760 vdb
253 17 204800 vdb1
253 18 204800 vdb2
253 19 204800 vdb3
253 20 1 vdb4
253 21 102400 vdb5

5.查看系统可用分区
[root@server48 ~]# blkid
/dev/vda1: UUID="9bf6b9f7-92ad-441b-848e-0257cbb883d1" TYPE="xfs"

1.文件系统类型
ext4 支持1EB(1EB=1024PB 1PB=1024TB)的文件系统和单个16TB的文件
linux 6的标准文件系统
ext2 支持最大分区4TB,最大文件2GB
适合小型存储设备
vfat 支持包括一系列相关文件系统(VFAT/FAT16/FAT32),针对较旧版本的Microsoft Windows开发
xfs 支持最大分区9EB
linux 7的标准文件系统,数据完全、性能稳定、扩展性强(8E-1b),传输效率(7G/s)
2.格式化分区
mkfs.xfs /dev/vdb5 ##文件系统类型xfs
注意:可用mkfs -t xfs /dev/vdb5进行格式化
[root@server48 ~]# mkfs.xfs /dev/vdb5
meta-data=/dev/vdb5 isize=256 agcount=4, agsize=6400 blks
= sectsz=512 attr=2, projid32bit=1
= crc=0
data = bsize=4096 blocks=25600, imaxpct=25
= sunit=0 swidth=0 blks
naming =version 2 bsize=4096 ascii-ci=0 ftype=0
log =internal log bsize=4096 blocks=853, version=2
= sectsz=512 sunit=0 blks, lazy-count=1
realtime =none extsz=4096 blocks=0, rtextents=0

[root@server48 ~]# blkid
/dev/vda1: UUID="9bf6b9f7-92ad-441b-848e-0257cbb883d1" TYPE="xfs"
/dev/vdb5: UUID="c412c527-b0af-487b-817f-a6078c757ede" TYPE="xfs"

普通挂载
mount /dev/vdb5 /mnt
参数挂载
mount -o ro /dev/vdb5 /mnt
挂载后修改参数
mount -o remount,rw /dev/vdb5 /mnt (不卸载直接修改/dev/vdb5 /mnt/的rw权限)

当/mnt被占用时,不能正常卸载
[root@server48 ~]# umount /mnt
umount: /mnt: target is busy.
(In some cases useful info about processes that use
the device is found by lsof(8) or fuser(1))
可用lsof(8)查看不能卸载原因
[root@server48 ~]# lsof /mnt (lfos查看不能卸载原因)
COMMAND PID USER FD TYPE DEVICE SIZE/OFF NODE NAME
vim 4569 root 3u REG 253,21 4096 131 /mnt/.hello.swp
或者用fuser(1)查看
[root@server48 ~]# fuser -vmK /mnt (vmk意思为扫描显示并关闭异常进程)
vmK: unknown signal; fuser -l lists signals.
[root@server48 ~]# fuser -vmk /mnt
USER PID ACCESS COMMAND
/mnt: root kernel mount /mnt
root 4639 F.... vim
[2]+ Killed vim /mnt/hello
五、gpt分区
1.GUID磁碟分割表
GUID Partition Table:全盘唯一标识磁盘分区表
特性对比:
MBR: 3个主分区,1个扩展分区(下含逻辑分区),最多识别16个
GPT:128个分区,管理硬盘大小18EB
ext3:最多支持32TB
ext4:最多支持1EB
xfs:容量8EB-1byte
2.修改前准备
(例/dev/vdb)
把要分区的硬盘停止(卸载所有设备)将该磁盘格式化 (有三种磁盘格式种类) 1— mkfs.ext3 2—mkfs.ext4 3—mkfs.xfs
3.修改MBR分区改为GPT分区
[root@server48 ~]# parted /dev/vdb
(parted) mklabel
New disk label type?
aix amiga bsd dvh gpt loop mac msdos pc98 sun

六、Swap分区
1.swapon -s ##查看系统的swap分区信息
[root@localhost ~]# swapon -s
Filename Type Size Used Priority
/dev/vdb1 partition 1023996 0 -1
2.新建swap分区
fdisk /dev/vdb
先建立P分区
Device Boot Start End Blocks Id System
/dev/vdb1 2048 2050047 1024000 83 Linux
修改分区类型
Command (m for help): t
Selected partition 1
Hex code (type L to list all codes): L查看所有分区类型的id(82)

Device Boot Start End Blocks Id System
/dev/vdb1 2048 2050047 1024000 82 Linux swap / Solaris

[root@localhost ~]# mkswap /dev/vdb1
Setting up swapspace version 1, size = 1023996 KiB
no label, UUID=006ca68c-ab1d-46d6-a454-8bca41b33c26

[root@localhost ~]# swapon -a /dev/vdb1 (-a执行)
[root@localhost ~]# swapon -s /dev/vdb1(-s列出)
Filename Type Size Used Priority
/dev/vdb1 partition 1023996 0 -1

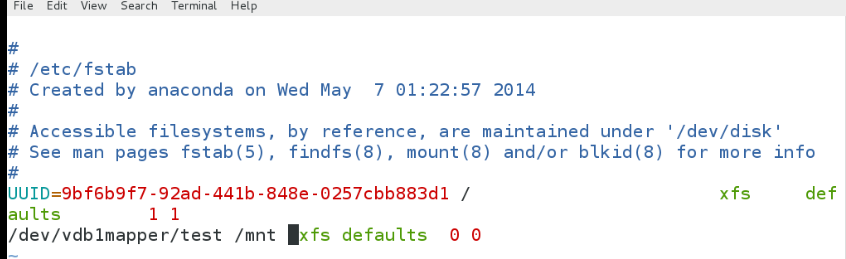
5.修改配置文件,永久设置swap分区 /etc/fstab
UUID=9bf6b9f7-92ad-441b-848e-0257cbb883d1 / xfs defaults 1 1
/dev/vdb1 swap swap defaults 0 0
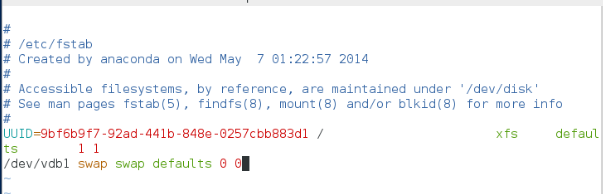
defaults 挂载参数,默认 0 不备份 0 不检测
修改后 swapon -a 检查报错
七、分区配额
1.挂载时设置配额参数
(如果没有vdb2的话要先建 fdisk /dev/vdb n p 2 +100M , p查看新建分区是否成功,wq保存退出)
partprobe (分区同步)
mkfs.xfs /dev/vdb2 (新建分区格式化)
mount -o usrquota /dev/vdb2 /mnt(挂载)
2.进行配额设置
Disk quotas for user student (uid 1000):
Filesystem blocks soft hard inodes soft hard
/dev/vdb2 10240 0 10240 1 0 0
blocks 文件已占用分区大小 soft 文件超出配额大小,报警
hard 文件不能超出配额大小 inodes 文件个数
soft文件目录个数超额报警 hard文件目录个数不能超额

此处hard设定为10M (hard 文件不能超出配额大小)

注意:xfs文件系统默认配额功能开启,ext4之前的文件系统需要quotan -n /dev/vdb 命令激活
3.切换到student用户实验
配额正常时
[student@localhost ~]$ dd if=/dev/zero of=/mnt/studentfile bs=1M count=6
(从/dev/zero of截取6快数据,每块数据大小为1M,放到/mnt/studentfile这里)
6+0 records in6+0 records out
6291456 bytes (6.3 MB) copied, 0.00311684 s, 2.0 GB/s
注意:如果截取不成功报错,修改权限 chmod 777 /mnt/

(因hard设定为10M,文件不能超出设定配额10M,此截取总量为60M,在设定值范围内,所以截取成功)
超出配置时,只能截取配额大小的容量
dd: error writing ‘/mnt/studentfile’: Disk quota exceeded
11+0 records in
10+0 records out
10485760 bytes (10 MB) copied, 0.00603514 s, 1.7 GB/s

(因hard设定为10M,文件不能超出设定配额10M,此截取总量为110M,超出设定值范围内,所以截取不成功)
注意:该配额设置是临时的,若需要永久修改
vim /etc/fstab
UUID=9bf6b9f7-92ad-441b-848e-0257cbb883d1 / xfs defaults 1 1/dev/vdb1 xfs /mnt defaults,usrquota 0 0

八、还原设备
1.卸载所有挂载点
umount /mnt (卸载)
swapoff /dev/vdb1 (关闭swap分区)
2.查看是否全部移除
df
swapon -s (因上步以关闭swap分区,所有-s显示没有内容)
3.修改配置文件,还原设置 /etc/fstab4.删除分区
fdisk /dev/vdb
Command (m for help): d
Partition number (1,2, default 2):
Partition 2 is deleted
九、磁盘加密
1.建立分区
fdisk /dev/vdb
2.设置磁盘密码
[root@localhost ~]# cryptsetup luksFormat /dev/vdb1
WARNING!
========
This will overwrite data on /dev/vdb1 irrevocably.
Are you sure? (Type uppercase yes): YES
后输入密码,密码位数必须大于8位
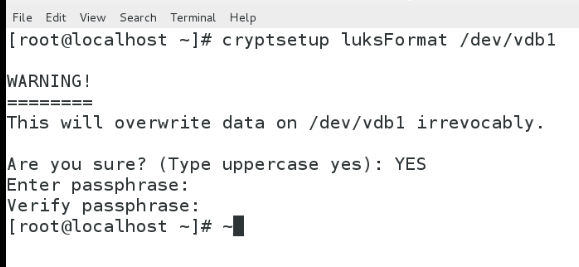
注意,注意:YES是大写,大写,大写
3.打开磁盘文件
Enter passphrase for /dev/vdb1: 需要输入密码

[root@localhost ~]# mkfs.xfs /dev/mapper/test
meta-data=/dev/mapper/test isize=256 agcount=4, agsize=6272 blks
= sectsz=512 attr=2, projid32bit=1
= crc=0
data = bsize=4096 blocks=25088, imaxpct=25
= sunit=0 swidth=0 blks
naming =version 2 bsize=4096 ascii-ci=0 ftype=0
log =internal log bsize=4096 blocks=853, version=2
= sectsz=512 sunit=0 blks, lazy-count=1
realtime =none extsz=4096 blocks=0, rtextents=0

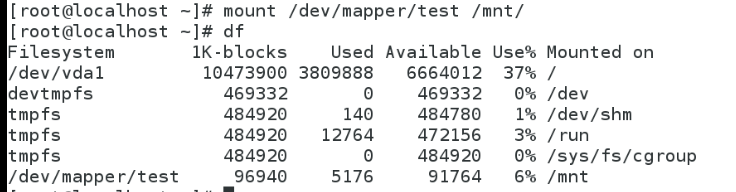
mount /dev/mapper/test /mnt
[root@localhost ~]# ls /mnt
file1 file2 file3 file4 file5
[root@localhost ~]# umount /mnt
[root@localhost ~]# ls /mnt
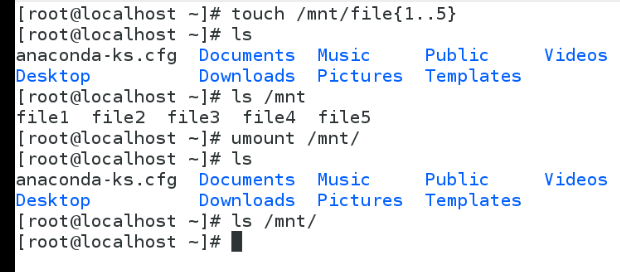
[root@localhost ~]# cryptsetup close test
[root@localhost ~]# mount /dev/mapper/test /mnt
mount: special device /dev/mapper/test does not exist

注意:关闭之后,若再次挂载,需重新打开、建立磁盘文件

建立密码文件
vim /root/diskpass (输入之前设置密码后自动读取密码)
修改文件权限,设置root只读
chmod 600 /root/diskpass
修改文件,使磁盘识别密码(test为磁盘文件名)
vim /etc/crypttab
test /dev/vdb1 /root/diskpass
磁盘加密时读取密码文件
cryptsetup luksAddKey /dev/vdb1 /root/diskpass
修改开机自启动文件

/dev/mapper/test /mnt xfs defaults 0 0
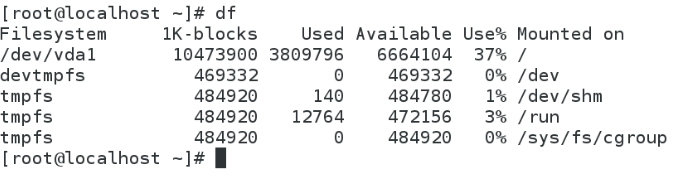
[root@localhost ~]# df
Filesystem 1K-blocks Used Available Use% Mounted on
/dev/vda1 10473900 3808664 6665236 37% /
devtmpfs 469344 0 469344 0% /dev
tmpfs 484932 80 484852 1% /dev/shm
tmpfs 484932 12772 472160 3% /run
tmpfs 484932 0 484932 0% /sys/fs/cgroup
/dev/mapper/test 96940 5176 91764 6% /mnt
注意:若磁盘不能识别密码,则不能正常开机
8.取消磁盘加密
卸载 umount /mnt
关闭磁盘文件 cryptsetup close test
格式化磁盘 ##磁盘已加密,须强制删除
[root@localhost ~]# mkfs.xfs /dev/vdb1
mkfs.xfs: /dev/vdb1 appears to contain an existing filesystem (crypto_LUKS).
mkfs.xfs: Use the -f option to force overwrite.
[root@localhost ~]# mkfs.xfs /dev/vdb1 -f
修改配置文件,还原设置
vim /etc/crypttab
vim /etc/fstab
密码文件删除(可做可不做)
rm -fr /root/diskpass
十、磁盘阵列管理
0:1/2 + 1/2 写入 1:1+1 读取 5:0 + 1 至少3块磁盘,如2个0,1个1
1.建立3个分区,类型改为raid
Command (m for help): t
Partition number (1-5, default 5): 2
Hex code (type L to list all codes): fd (改完后wq保存退出)
**建完分区改完类型后要partprobe分区同步后才可进行下一步
2、管理raid磁盘
mdadm -C /dev/md0 -a yes -l 1 -n 2 -x 1 /dev/vdb{2,3,5}-C 新建 -a 表示若目录/dev/md0不存在,建立新的
-l 磁盘等级 -n 使用磁盘个数 -x 闲置磁盘个数

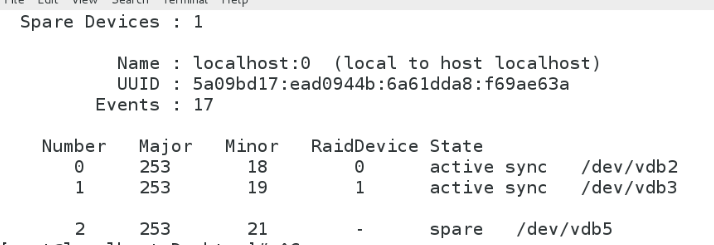
mdadm -D /dev/md0
查看信息显示vdb2,vdb3处于工作状态 ,vdb5闲置
0 253 18 0 active sync /dev/vdb2
1 253 19 1 active sync /dev/vdb3
2 253 21 - spare /dev/vdb5
或者 cat /proc/mdstat
显示vdb2闲置,vdb5,vdb3处于工作状态
md0 : active raid1 vdb2[3](S) vdb5[2] vdb3[1]
1048000 blocks super 1.2 [2/2] [UU]

mdadm /dev/md0 -f /dev/vdb2
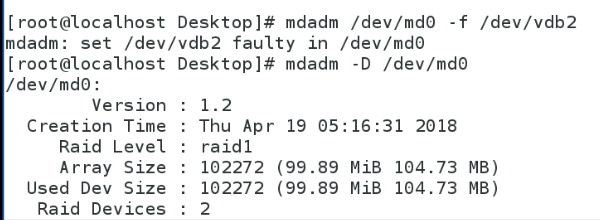
mdadm -D /dev/md0 (查看谁被干掉,/dev/vdb2/被干掉)
Number Major Minor RaidDevice State
2 253 21 0 active sync /dev/vdb51 253 19 1 active sync /dev/vdb3
0 253 18 - faulty /dev/vdb2

[root@localhost ~]# mdadm /dev/md0 -r /dev/vdb2
mdadm: hot removed /dev/vdb2 from /dev/md0
6. Add a new raid disk
[root@localhost ~]# mdadm /dev/md0 -a /dev/vdb2
mdadm: added /dev/vdb2
7. Format the disk array, mount
mkfs.xfs /dev/md0
mount /dev/md0 /mnt
8. Close the raid disk, Stop using
mdadm -S /dev/md0
to delete partitions
Sync partition table partprobe
suggestion: restart after experiment, clear all cache disks