HDFS
1. Overview
HDFS is a Hadoop distributed file system, which is used for distributed storage of massive data, and has high reliability, high performance, and scalability.
HDFS shields the details of distributed storage, provides a standard access method, and can access files in HDFS in a manner similar to accessing the local file system.
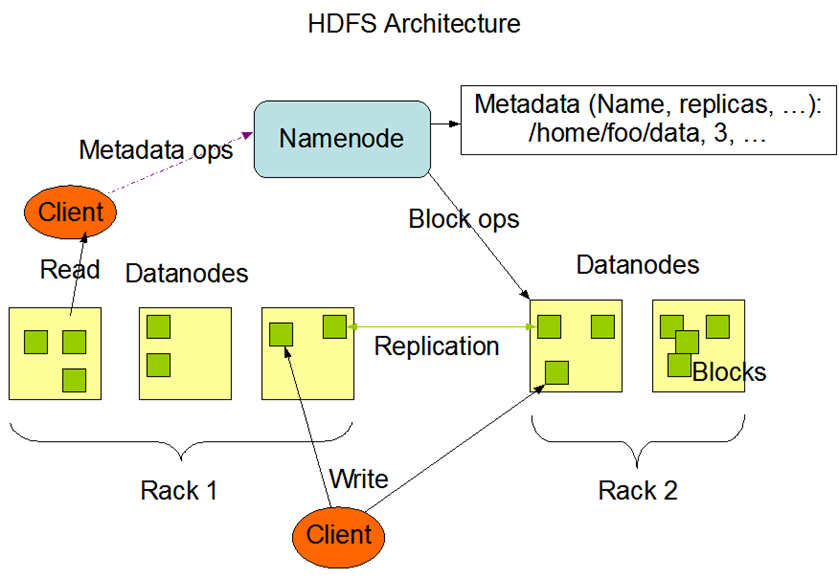
The following is the overall process architecture of HDFS:
2. Related operations of HDFS
Data in HDFS can be manipulated through shell or Java API.
1. shell command
The data in hdfs is written once, read many times, and does not support row-level additions, deletions, and changes. Version 2.0 adds the function of appending content in the file. So there is no corresponding line-level command.
hadoop fs -ls /user #查看目录。
hadoop fs -mkdir /user/trunk #创建目录。
hadoop fs -lsr /user #递归查看目录。
hadoop fs -put test.txt /user/trunk #上传文件。
hadoop fs -put test.txt #复制到hdfs当前目录下,首先要创建当前目录。
hadoop fs -get /user/trunk/test.txt #复制到本地当前目录下,即下载到本地当前目录
hadoop fs -cat /user/trunk/test.txt #查看文件内容。
hadoop fs -tail /user/trunk/test.txt #监控,查看最后1000字节。
hadoop fs -rm /user/trunk/test.txt #删除文件。
hadoop fs -rmdir /user/trunk #删除目录。
hadoop fs -help ls #查看ls命令的帮助文档。
2. The use of Hadoop plugin in Eclipse
1> Install stand-alone mode
In the Windows environment, decompress a Hadoop installation package and use it as the Hadoop stand-alone mode under Windows.
If you want to use remote Hadoop, you need to configure the Hadoop environment variables under Windows, as well as the user name environment variables. Configuring this item may require restarting the computer.
The content is as follows:
HADOOP_HOME=路径
PATH=%HADOOP_HOME%/bin;%HADOOP_HOME%/sbin
HADOOP_USER_NAME=root
2> Add plugin
Put the plugin file hadoop-eclipse-plugin-2.7.1.jar in the eclipse/plugins directory and restart eclipse.
3> Configure Eclipse
Find Hadoop Map/Reduce in Window's preferences, and fill in the Hadoop path in stand-alone mode, as shown below:

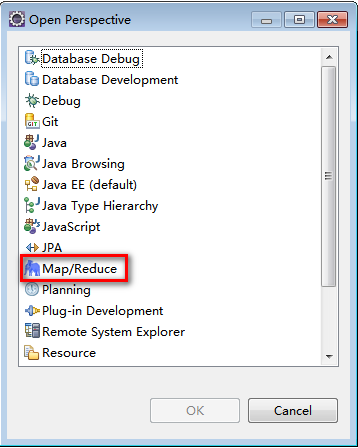
Find the following interface in Eclipse and display the Map/Reduce mode.
In the Hadoop configuration interface, fill in the following data:
Location name: Fill in the host name where the Hadoop server is installed.
Map/Reduce(V2) Master Host: Fill in the host name of the Hadoop server.
DFS Master Port: Change to the port number configured in the core configuration file of the Hadoop server, which is generally 9000 by default.
User name: The super administrator who installs the Hadoop server, usually root.
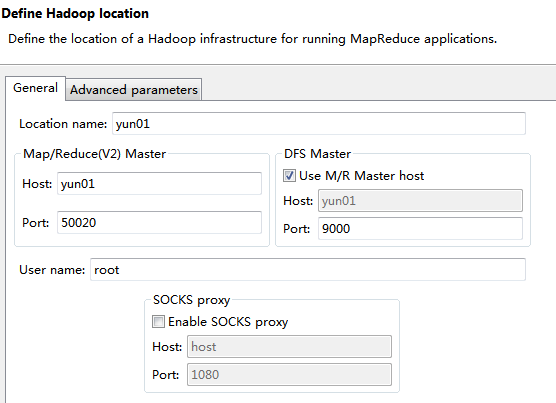
After the configuration is complete, click Finish. Then it's ready to use.
4> Questions
When encountering permission denial, you can modify the configuration dfs.permissions in hdfs-site.xml to false to disable hadoop's permission authentication.
You can also configure HADOOP_USER_NAME in the Windows environment variable to specify the name used when connecting to hadoop. After this configuration, restart eclipse.
3. Java API for HDFS
1> import jar
hadoop/share/hadoop/common/*.jar
hadoop/share/hadoop/common/lib/*.jar
hadoop/share/hadoop/hdfs/*.jar
2>FileSystem
File system class, the main class of HDFS API, all related operations are basically in this class.
① Important method
1) get (URI uri, Configuration conf);
Get a FileSystem object.
2)open(Path path);
Open the connection. Returns an InputStream object.
3)create(Path path);
Create a file. Returns an OutputStream object.
4)delete(Path path,boolean recursive);
Whether to delete a file or path recursively. Returns a boolean value, true if the deletion is successful, and false if the deletion fails.
5)mkdirs(Path path);
Create folders, you can create multi-level directories. Returns a boolean value, true if the creation is successful, and false if the creation fails.
3>IOUtils
A tool class for HDFS related operations.
① Important method
1)copyBytes(InputStream in,OutputStream out,int buffersize);
Docking data, integrating input and output streams, and transferring files directly to the destination.
4> Code demo
	@Test
	public void mkdir() throws Exception {
		FileSystem fs = FileSystem.get(new URI("hdfs://yun01:9000"), new Configuration());
		fs.mkdirs(new Path("/test2/xx/yy/zzz"));
		fs.close();
	}

	@Test
	public void delete() throws Exception {
		// 1.创建文件系统对象
		FileSystem fs = FileSystem.get(new URI("hdfs://yun01:9000"), new Configuration());
		// 2.删除文件
		// fs.delete(new Path("/test/3.txt"));
		fs.delete(new Path("/test/1.txt"), true);
		// 3.关闭连接
		fs.close();
	}

	@Test
	public void upload() throws Exception {
		// 1.创建文件系统对象
		FileSystem fs = FileSystem.get(new URI("hdfs://yun01:9000"), new Configuration());
		// 2.创建文件
		FSDataOutputStream out = fs.create(new Path("/test/3.txt"));
		// 3.创建输入流
		InputStream in = new FileInputStream("2.txt");
		// 4.对接流
		IOUtils.copyBytes(in, out, 1024);
		// 5.关闭流关闭文件系统
		in.close();
		out.close();
		fs.close();
	}

	@Test
	public void download() throws Exception {
		// 1.创建文件系统对象
		FileSystem fs = FileSystem.get(new URI("hdfs://yun01:9000"), new Configuration());
		// 2.获取连接文件的流
		FSDataInputStream in = fs.open(new Path("/test/jt-对象存储地址.txt"));
		// 3.创建输出流
		OutputStream out = new FileOutputStream("2.txt");
		// 对接流,传输数据
		IOUtils.copyBytes(in, out, 1024);
		// 5.关闭流,关闭连接
		out.close();
		in.close();
		fs.close();
	}
3. HDFS technical details
1. Main principles of HDFS
After the data is cut into blocks, it is copied and stored in multiple nodes of the cluster, thereby realizing the distributed storage of massive data, and ensuring reliability through block copies.
The block cut out is called Block.
The node responsible for storing the Block is called the DataNode node.
The node responsible for storing metadata is called the NameNode node.
There is also a separate process called SecondaryNameNode responsible for helping the NameNode to perform metadata merge operations.
2.Block
Block is the basic unit of storage in HDFS.
When a file is stored in HDFS, it will first cut the file into blocks according to the specified size, that is, block, copy the specified number of copies (the default is 3), and store them in a distributed manner in the cluster. The default block size in version 2.0 is 128M, and in version 1.0 it is 64M.
1> The purpose of file dicing
1. A large file is divided into several small blocks to facilitate distributed storage in different disks.
2. The difference between data is shielded, and only block operations are required, thereby simplifying the storage system.
3. Conducive to data replication. Each copy is a smaller block instead of a large file, which is more efficient.
If the remaining data is not enough to 128MB after segmentation, the remaining data will be stored as a block alone. The size of the block is as big as the data. 128MB is only the maximum size, not a fixed size.
E.g:
A 256MB file has a total of 256/128=2 blocks.
A 258MB file has a total of 258/128=2 and the remaining 2MB, then the remaining 2MB will exclusively occupy a block with a size of 2MB, and then separate two 128MB blocks and one 2MB block.
A 1MB file occupies a block alone, and this block is 1MB in size.
2> Block copy placement strategy
The first copy: If it is submitted within the cluster, it will be placed on the DataNode where the file is uploaded. If it is submitted outside the cluster, a node with a less full disk and a less busy CPU will be randomly selected for uploading.
Second replica: placed on a node on a different rack than the first replica. (Using rack-aware strategy)
Third replica: placed on a node on the same rack as the second replica.
More replicas: random nodes.
Rack Awareness Policy:
In fact, it is to add a relationship table that records the ip and hostname mapping racks in the Hadoop configuration file, and use this relationship table to determine which host is a different rack.
3.DataNode
DataNode is mainly a function of storing data in the entire HDFS. Data is stored in the DataNode in the form of Block.
The DataNode node will continue to send heartbeat reports to the NameNode node to keep in touch with it. The frequency of the heartbeat report is once every 3 seconds. It reports information to the NameNode in the heartbeat report, accepts the NameNode's instructions from the heartbeat response, and executes block copying, moving, and deleting. and so on.
If the NameNode does not receive the heartbeat of the DataNode within 10 minutes, it considers that the DataNode has been lost, and sends a backup block instruction to other DataNodes to complete the replication of the data copies in the lost node to ensure that the number of data copies is consistent in the entire HDFS. .
All DataNodes actively contact the NameNode, and the NameNode does not actively contact the DataNode.
4.NameNode
The NameNode maintains metadata information in HDFS. At the same time, it also takes into account various external requests and the management of data storage in the DataNode.
The metadata information includes: file information, directory structure information, copy quantity information, information about the relationship between files and Blocks, and information about the relationship between Blocks and DataNodes. The data format is as follows:
FileName replicas block-Ids id2host
For example: /test/a.log,3,{b1,b2},[{b1:[h0,h1,h3]},{b2:[h0,h2,h4]}]
1> Storage of metadata
The metadata information in the NameNode is stored in memory and files. The memory contains complete real-time information, and the file contains data mirroring as persistent storage. The relationship information between blocks and DataNodes is not stored in the file.
①Metadata in memory
File information, directory structure information, number of copies information, information about the relationship between files and Blocks, and information about the relationship between Blocks and DataNodes.
②Metadata in the file
File information, directory structure information, copy number information, and information about the relationship between files and blocks.
It can be found that the metadata in the file lacks the correspondence between the block and the DataNode compared to the memory. This is because the HDFS cluster changes frequently, and it is normal for the DataNode to increase or decrease, so this information is temporarily stored in the memory. is organized in the disk image file instead of being stored.
2> File of NameNode
①fsimage
Metadata image file. Storing metadata information of a NameNode does not synchronize data in memory in real time.
②edits
A log file that records NameNode's data operations.
③fstime
Save the time of the last checkpoint. That is, the time of the last metadata merge.
3> Working principle
When there is a write request, the NameNode will first write the request operation to the edit log to the disk edits file, and only after success will it modify the memory and return the operation result to the client.
Therefore, the data in the fsimage is not real-time data, but must be merged with the edits file when the conditions are met. The merging process is completed by the SecondaryNameNode.
The reason why the fsimage is not changed directly but is recorded in edits is because logging is a continuous disk IO operation, which can save time. If you directly modify the fsimage file, a large number of discontinuous disk IO operations will be performed, which will greatly reduce the efficiency.
5.SecondaryNameNode
SecondaryNameNode is not a hot backup of NameNode, but an assistant that helps NameNode merge metadata.
From another point of view, it can provide a certain backup function, but it is not a hot backup. If you use it directly, you may lose the data that occurred after the last merge! Part of the data can be recovered from the SecondaryNameNode, but not all of it.
1> Conditions for merging data
When to start data merging?
The interval set according to the configuration file: fs.checkpoint.period defaults to 3600 seconds.
Edits log size set according to the configuration file: fs.checkpoint.size defaults to 64MB.
2> Merge process
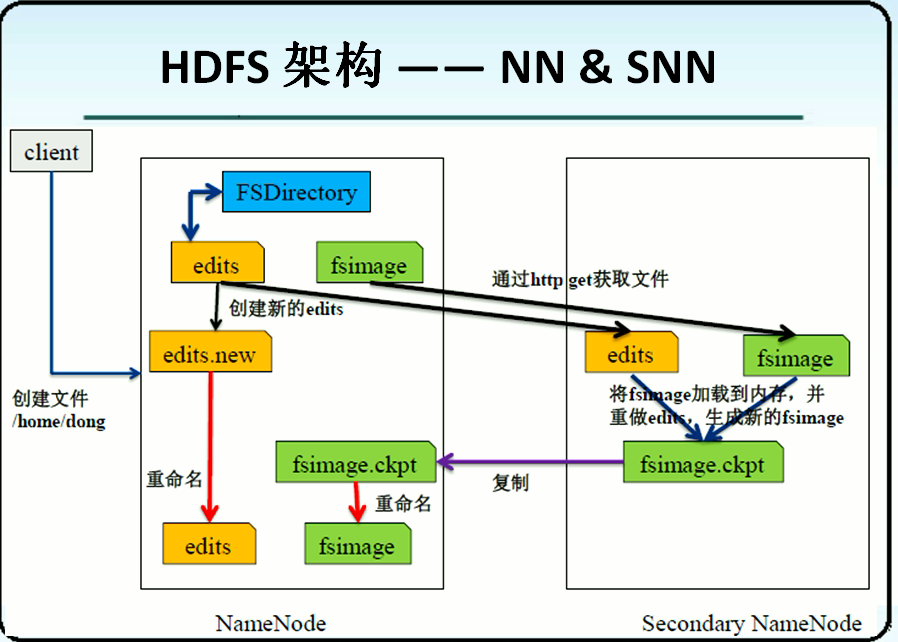
①Copy files
When the conditions for merging data are met, the SecondrayNameNode will copy the fsimage and edits files in the NameNode, and a new edits.new file will be created in the NameNode to record new read and write requests.
② Combined data
Combine the copied fsimage and edits into a new fsimage.ckpt file in the SecondrayNameNode.
③ Return data
SecondrayNameNode copies the merged fsimage.ckpt file back to NameNode, then deletes the previous fsimage file, renames the fsimage.ckpt file to fsimage, and NameNode deletes the original edtis file, and then changes edtis.new to edits to complete the merge.
④Record the merge operation
Finally, add this merged record to the fstime file.
Since NameNode real-time data is in memory, the merge here refers to the processing of persistent data in disk.
3> Apply
Judgment: SNN can backup metadata to a certain extent, but it is not a hot backup, right?
Thinking: Under what circumstances might the metadata information of the NameNode be lost?
Snn is not a hot backup of nn, but it can save most of the backup data. The reason is that the data in edits.new is lost and cannot be retrieved
Usually NameNode and SecondrayNameNode should be placed on different machines to improve performance and provide certain metadata security.
4. HDFS execution process
There are different execution processes for different operations of HDFS, which are described as follows.
1. HDFS read process
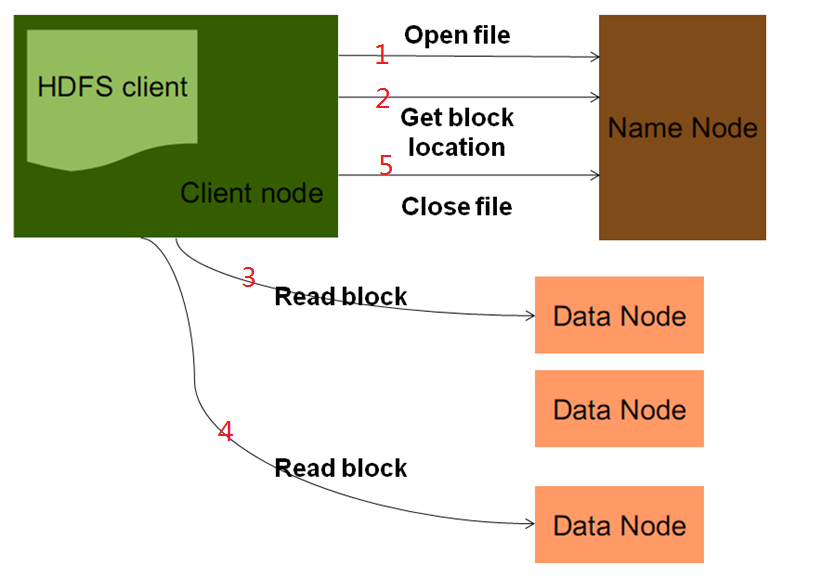
1> send request
Use the client development library Client provided by HDFS to initiate an RPC request to the remote Namenode; the NameNode will check whether the current file exists and whether the current client has permission to read the file. If only one of the two checks does not meet the conditions, it will Throws an exception and does not proceed to the next step.
2> Response resource metadata
If there is no problem with the above verification, Namenode will return part or all of the block list of the file as appropriate. For each block, Namenode will return the address of the DataNode with a copy of the block.
3> Download resources
The client development library Client will select the DataNode that is closest to the client (not physically closest, but with the lowest latency and the lowest load) to read the block; if the client itself is a DataNode, the data will be obtained directly from the local.
4> Resource verification
After reading the data of the current block, checksum verification will be performed. If there is an error in reading the datanode, the client will notify the Namenode, and then continue reading from the next datanode that has a copy of the block.
After reading the correct block data, close the connection with the current DataNode, and find the best DataNode for reading the next block; when the block in the list is read, and the file reading is not over, the client development library will Continue to get the next batch of block list from Namenode.
5> Download end notification
When the last block of the file is also read, the datanode will connect to the namenode to tell the file to close.
The NameNode does not participate in the process of reading the actual data transfer.
2. The writing process of HDFS

1> send request
Use the client development library Client provided by HDFS to initiate an RPC request to the remote Namenode; the Namenode will check whether the file to be created already exists and whether the creator has permission to operate. If one of these two conditions does not meet, the client will be called The terminal throws an exception, terminating the operation. Passing the conditional validation creates a record for the file.
2> Data dicing
When the client starts to write the file, the development library client will divide the file into multiple packets, and manage these packets internally in the form of a data queue "data queue", and then apply for new blocks to the Namenode to obtain A list of appropriate datanodes to store replicas, the size of the list depends on the replication settings in the Namenode.
3> Upload data
Connect the DataNode nodes according to the DataNode list, and start writing packets to all replicas in the form of a pipeline. The client writes the packet to the first datanode in a streaming manner. After the datanode stores the packet, it passes it to the next datanode in the pipeline until the last datanode completes the storage. This way of writing data In the form of pipeline.
4> Response upload result
After the last datanode is successfully stored, it will return an ack packet, which will be delivered to the client in the pipeline. The "ack queue" is maintained in the client's development library. After the ack packet returned by the datanode is successfully received, it will be removed from the "ack queue" the corresponding packet.
If a datanode fails during transmission, the current pipeline will be closed, the failed datanode will be removed from the current pipeline, and the remaining blocks will continue to be transmitted in the remaining datanodes in the form of pipelines , and the Namenode will allocate a new datanode to keep the number of replicas set.
5> Upload result notification
When all packges are uploaded successfully, the client informs NameNoe that the file upload is complete, NameNode makes the file available and closes the file.
NameNode does not participate in the process of real data storage and transmission.
3. The deletion process of HDFS
1> send request
The client initiates a request to connect to the NameNode to indicate that the file is to be deleted. The NameNode checks whether the file exists and whether it has permission to delete the file. If the condition verification fails, an exception is thrown and the operation is terminated. If it passes, go to the next step.
2> perform a pseudo delete operation and respond
The NameNode performs the deletion of the metadata, but only sets the metadata to the deleted state, and then indicates to the client that the file deletion was successful.
3> Issue a delete instruction
When the DataNode node that saves these data blocks sends a heartbeat to the NameNode node, in the heartbeat response, the NameNode node will send an instruction to the DataNode to delete these blocks. DataNode deletes the corresponding Block after receiving the instruction. Therefore, within a period of time after the delete method is executed, the data block can be really deleted.
4> Delete completely
When all blocks and their replicas corresponding to the file are deleted, the metadata previously marked as deleted is deleted in the NameNode.
4. The startup process of HDFS
1> Import metadata
When HDFS starts, NameNode first merges the fsImage and edits files to generate a new fsimage and an empty edits file. This process is carried out by NameNode itself. Then restore the data in the fsimage to the memory, but the metadata in the memory is not enough at this time, and the mapping relationship between the block and the datanode is still missing. This information does not exist in the fsimage and needs to be temporarily organized in the memory.
2> Integrate metadata
At this time, the NameNode is waiting for the connection of the DataNode, and the DataNode will send a heartbeat report to the NameNode when it starts, which carries the number information of the Block it has, and the NameNode organizes the metadata information in the memory based on this information.
3> Open the service
Until the NameNode reaches the minimum startup conditions, the necessary block replicas are copied and deleted, and then services are provided to the outside world. During the whole process, HDFS does not work properly, it is called in safe mode.
NameNode minimum startup condition: At least one replica of each block is found.
5. safe mode
When HDFS is started, it will immediately enter the safe mode. At this time, the files in hdfs cannot be operated, only the directory file name can be viewed, and neither read or write operations can be performed.
During the normal operation of HDFS, if due to unexpected circumstances, there is a block that cannot find any copies, HDFS enters safe mode.
org.apache.hadoop.dfs.SafeModeException: Cannot delete /user/hadoop/input. Name node is in safe mode
Safe mode is actually a protection mechanism of HDFS for metadata, preventing accidental operations from damaging metadata.
When encountering Safe Mode, the easiest thing to do is to wait a while.
If you can't exit safe mode for a long time, you should check the reason for entering safe mode, find the cause of the problem and solve it, and Hadoop will automatically exit safe mode.
If you have to force quit safe mode, you can use the following command, but use it with caution. If the metadata is accidentally damaged, the data in hdsf cannot be used:
hadoop dfsadmin -safemode leaveUse with caution!
5. Advantages and disadvantages of HDFS
1. Advantages of HDFS
1> Support oversized files
Supports very large files. Very large files here refer to files of hundreds of megabytes, hundreds of gigabytes, or even several terabytes in size. Generally speaking, the Hadoop file system will store terabytes or petabytes of data. Therefore, in enterprise applications, there may be thousands of data nodes.
2> Detect and quickly respond to hardware failures
In a clustered environment, hardware failure is a common problem. Because there are thousands of servers connected together, this can lead to a high failure rate. Therefore failure detection and automatic recovery is a design goal of the HDFS file system.
3> Streaming data access
The data processing scale of HDFS is relatively large, and applications need to access a large amount of data at a time. At the same time, these applications are generally processed in batches, rather than interactive processing by users. Applications can access datasets as streams. The main thing is data throughput, not access speed.
4> Simplified consistency model
Most HDFS operations on files require one write and multiple reads. In HDFS, once a file is created, written, and closed, it generally does not need to be modified. Such a simple consistency model is conducive to improving throughput.
5> High fault tolerance
The data is automatically saved in multiple copies, and the copies are automatically recovered after loss.
6> Can be built on cheap machines
Built on cheap machines, it is easy to increase the cluster storage capacity nearly linearly by expanding the number of machines.
2. Disadvantages of HDFS
1> Cannot achieve low-latency data access
Low-latency data, such as applications that interact with users, require data to be responded to in the millisecond or second range. Since Hadoop is optimized for high data throughput and sacrifices the latency of data acquisition, it is not suitable to use Hadoop for low latency.
2> A large number of small files will affect performance
HDFS supports very large files, which are distributed on data nodes through data, and the metadata of the data is stored on the name node. The memory size of the name node determines the number of files that the HDFS file system can save. Although the current system memory is relatively large, a large number of small files will still affect the performance of the name node.
3> Does not support multi-user writing files, modifying files
HDFS files can only be written once, and do not support modification and additional writing (version 2.0 supports appending), nor does it support modification. Only in this way can the throughput of data be large.
4> Does not support super transaction
There is no robust support for transactions like relational databases.