Interim Cluster Architecture - Chapter 9 - Interim Architecture LNMP Chapter
========================================= =================================
01. LNMP architecture description
1) Connect front-end web services and back-end storage services in series
2) Mainly realize processing dynamic requests of PHP programs
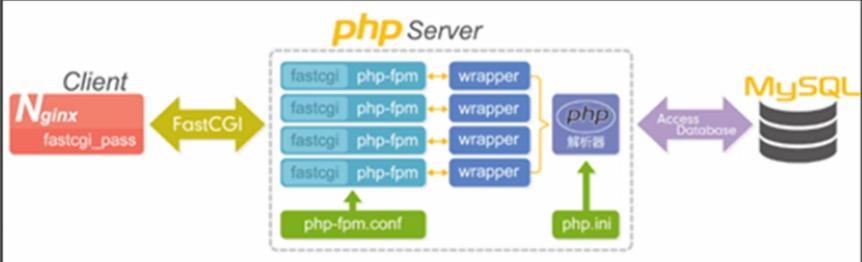
02. LNMP architecture works
L--Linux N--nginx M--mysql P--php
03. LNMP architecture deployment
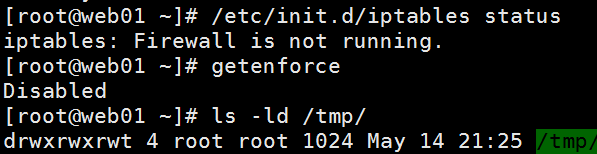
1) Install LNMP related software 1. The basic optimization operation of deploying the Linux system must be completed (the firewall is closed and the selinux /tmp permission is 1777)
② . Deploy the nginx service and
ignore it for the time being ③. Deploy the mysql service andyum deploy the software
Compile and install software
Deploy mysql service by binary package
The first mileage : Download and unzip the mysql software program
mysql official download link address: ftp://ftp.jaist.ac.jp/pub/mysql/Downloads/MySQL-5.6/Upload the
mysql software program, Upload using xftp software
tar xf mysql-5.6.34-linux-glibc2.5-x86_64.tar.gz
mv mysql-5.6.34-linux-glibc2.5-x86_64 /application/mysql-5.6.34
second Mileage : Create a software program soft link
ln -sf /application/mysql-5.6.34/ /application/mysql
If the soft link already exists -f Force creation
The third mileage : Create a database management user and authorize the data directory useradd mysql -M -s /sbin/nologin chown -R mysql.mysql /application/mysql/data/ Fourth Mile : Initialize the database service /application/mysql/scripts/mysql_install_db --basedir=/application/mysql --datadir=/ application/mysql/data/ --user=mysql
Which database is basedir to initialize, and later learn how to deploy several databases in a system, so you need to specify
datadir specifies the data directory user specifies the database directory management account
Fifth mile : start mysql service cp /application/mysql/support-files/mysql.server /etc/init.d/mysqld
mysql.server startup script file Copy the file to the startup startup folder
sed -ri 's#/usr/local#/application#g' /etc/init.d/mysqld /application/mysql/bin/mysqld_safe
vim mysql.server sees that the default basedir is not in the application we created and needs to be modified
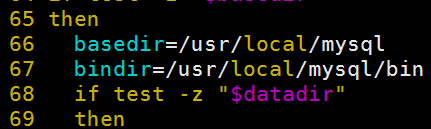
vim mysqld_safe command to control whether the mysql service can be started normally See the program directory recognized by default
Also not /application needs to be modified

cp /application/mysql/support-files/my-default.cnf /etc/my.cnf
The mysql configuration file that comes with the /etc/my.cnf system may not match our version
The configuration file in cp mysql is in the past
Finally start mysql /etc/init.d/mysqld start

The sixth mileage : set the database root user login password
set the password /application/mysql/bin/mysqladmin -uroot password "oldboy123"
login /application/mysql/bin/mysql -uroot -poldboy123
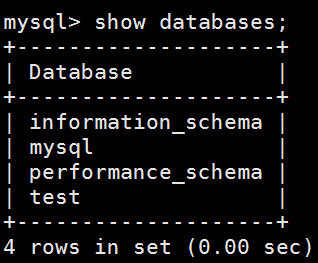
to enter the database All operations are using sql statement
show databases; 显示所有的数据库内容
④. PHP软件安装部署过程
第一里程:解决PHP软件的依赖关系
yum install -y zlib-devel libxml2-devel libjpeg-devel libjpeg-turbo-devel libiconv-devel freetype-devel libpng-devel gd-devel libcurl-devel libxslt-devel
libiconv软件安装---字符集转换库(默认可以不进行安装了)
cd /server/tools
#wget http://ftp.gnu.org/pub/gnu/libiconv/libiconv-1.14.tar.gz
tar zxf libiconv-1.14.tar.gz 解压
cd libiconv-1.14 进入
./configure --prefix=/usr/local/libiconv 配置
make
make install
cd ../
#wget -O /etc/yum.repos.d/epel.repo http://mirrors.aliyun.com/repo/epel-6.repo
部署repo源之前已经操作过了
yum -y install libmcrypt-devel mhash mcrypt 加密相关软件
rpm -qa libmcrypt-devel mhash mcrypt
第二个里程:下载解压PHP软件
php官方网站下载:php.net
cd /server/tools/
tar xf php-5.5.32.tar.gz
cd php-5.5.32 进入目录配置php 不需要区了解每个配置的类容
以下配置方法是汇总实际工作的一个配置
./configure \
--prefix=/application/php-5.5.32 \
--with-mysql=/application/mysql-5.6.34 \
--with-pdo-mysql=mysqlnd \
--with-iconv-dir=/usr/local/libiconv \
--with-freetype-dir \
--with-jpeg-dir \
--with-png-dir \
--with-zlib \
--with-libxml-dir=/usr \
--enable-xml \
--disable-rpath \
--enable-bcmath \
--enable-shmop \
--enable-sysvsem \
--enable-inline-optimization \
--with-curl \
--enable-mbregex \
--enable-fpm \
--enable-mbstring \
--with-mcrypt \
--with-gd \
--enable-gd-native-ttf \
--with-openssl \
--with-mhash \
--enable-pcntl \
--enable-sockets \
--with-xmlrpc \
--enable-soap \
--enable-short-tags \
--enable-static \
--with-xsl \
--with-fpm-user=www \
--with-fpm-group=www \
--enable-ftp \
--enable-opcache=no

配置成功
##防错(以下信息可以不进行配置了)
ln -s /application/mysql/lib/libmysqlclient.so.18 /usr/lib64/
touch ext/phar/phar.phar
/server/tools/php-5.5.32/ext/phar/phar.phar
make
make install
ln -s /application/php-5.5.32/ /application/php
第三个里程:设置PHP程序配置文件
php.ini php-fpm.ini两个配置文件
php.ini 放在安装包里面
cp php.ini-production /application/php-5.5.32/lib/
一下命令是因为创建了软链接

cd /application/php/etc/
里面有个php-fpm.conf.default 备份文件程序不能加载
所以备份重命名
cp php-fpm.conf.default php-fpm.conf
第四个里程:启动php程序服务
/application/php/sbin/php-fpm
netstat -lntup|grep php
添加到、vim /etc/rc.local 开机自动开启
tcp 0 0 127.0.0.1:9000 0.0.0.0:* LISTEN 6251/php-fpm
2)进行软件直接的结合
nginx与php结合:编写nginx配置文件
location ~* .*\.(php|php5)?$ {
fastcgi_pass 127.0.0.1:9000;
fastcgi_index index.php;
include fastcgi.conf;
}
以上匹配到php或php5的都给9000端口,默认使用这个配置即可不用过多关注

然后重启

测试
cd /application/nginx/html/blog/ 进入blog站点目录
\rm ./* -fr清空里面的类容
vim test_info.php编写php的测试网页

http://blog.etiantian.org/test_info.php 浏览器打开

动态解析成功!
php与mysql结合:编写php程序代码
编写生成到相应站点目录下如 /application/nginx/html/blog
# vim test_mysql.php
<?php
//$link_id=mysql_connect('主机名','用户','密码');
//mysql -u用户 -p密码 -h 主机
$link_id=mysql_connect('localhost','root','oldboy123') or mysql_error();
if($link_id){
echo "mysql successful by oldboy !\n";
}else{
echo mysql_error();
}
?>
解释:
$link_id=mysql_connect 设置变量=调用了一个php调用mysql的函数
localhost---mysql服务器在哪 哪儿登陆过去的 这里设置的本地
root---登陆数据库的用户 后面为密码
if判断如果成功 则显示 echo " "
如果失败echo 就调用or后面的mysql_error()函数
==========================================
测试浏览器打开http://blog.etiantian.org/test_mysql.php
显示 
结合成功!
3)部署一个真的网站
第一个里程:下载与上传网站代码
wordpress-4.7.3-zh_CN.tar.gz 一个开源的博客网站代码
第二个里程:解压程序代码,将程序代码保存到站点目录并进行授权
tar xf wordpress-4.7.3-zh_CN.tar.gz
mv wordpress/* /application/nginx/html/blog/
移动过去的文件很多都是nobody的权限,需要修改
修改成nginx: worker进程的用户
![]()
chown -R www.www /application/nginx/html/blog/
不管客户端是什么身份访问网站都会做一个映射,转换成www用户
第三个里程:直接访问blog网站,进行初始化操作
http://blog.etiantian.org/ 出错

配置文件里默认没有请求指定文件时返回的是index.html
但此时在/application/nginx/html/blog里并没有index.html首页存在
所以报错403
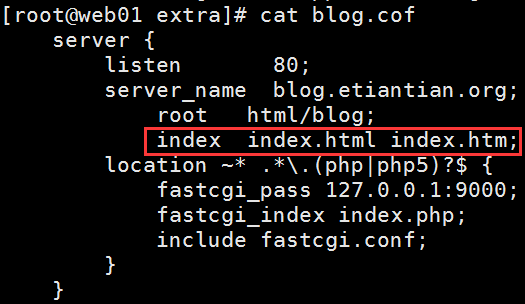
我们现在不是默认访问静态资源 ,现在是动态资源所以加上index.php

重启reload 再次进入网站
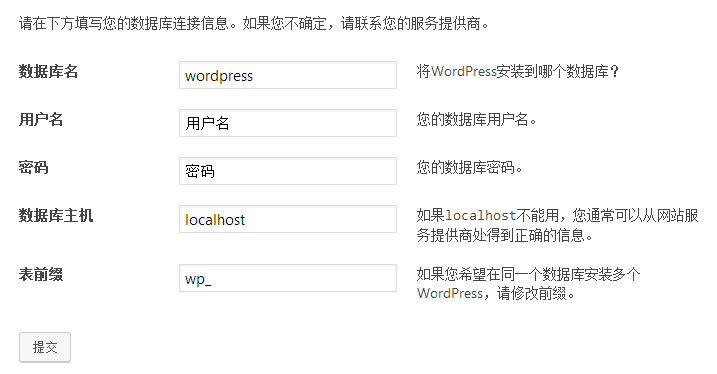
创建数据库:
进入mysql
# /application/mysql/bin/mysql -uroot -poldboy123
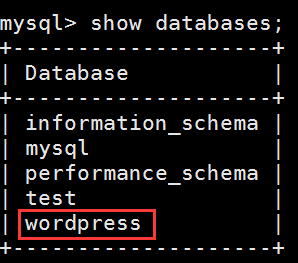
create database wordpress; 创建一个数据库
show databases; 检查 WordPress数据库是否创建好了
grant all on wordpress.* to 'wordpress'@'localhost' identified by 'oldboy123';
创建链接数据库用户 和密码
select user,host from mysql.user;
检查mysql自带的用户表看有没有创建的信息

接着安装

提示"要执行请求的操作,WordPress需要访问您网页服务器的权限。 请输入您的FTP登录凭据以继续。 如果您忘记了您的登录凭据(如用户名、密码),请联系您的网站托管商。"
添加好网站目录权限与nginx进程权限一致
下一个章节:
01. LNMP架构数据库服务的迁移
02. LNMP架构数据资源迁移到NFS服务器存储
03. nginx反向代理与负载均衡功能