1. First of all, please download Oracle 11g and plsql.
Here is the link to download the Baidu cloud network disk. You can also go to the official website to download. Both compressed packages are required. My Baidu cloud only needs to download and unzip.
https://pan .baidu.com/s/1wRBk79ugCvlHA6g53-p45w Extraction code: exgz
contains Oracle database and plsql, there is also a compressed package that solves plsql can’t find Oracle, it may not be called big, please wait patiently
One, the installation of the Oracle database
This operation solves the problem
that the environment does not meet the minimum requirements when you click to install. Note: If you are using a windows10 system, please find the stage folder in the oracle installation package,
then find cvu and then find cvu_prereq in cvu, open it with Notepad,
<OPERATING_SYSTEM RELEASE="6.1">
         	 <VERSION VALUE="3"/>
         	 <ARCHITECTURE VALUE="64-bit"/>
         	 <NAME VALUE="WindowsServer2008R2"/>
         	 <ENV_VAR_LIST>
         	     <ENV_VAR NAME="PATH" MAX_LENGTH="1023" />
         	 </ENV_VAR_LIST>
         </OPERATING_SYSTEM>
Add the following
<OPERATING_SYSTEM RELEASE="6.2">
           <VERSION VALUE="3"/>
           <ARCHITECTURE VALUE="32-bit"/>
           <NAME VALUE="Windows 10"/>
           <ENV_VAR_LIST>
               <ENV_VAR NAME="PATH" MAX_LENGTH="1023" />
           </ENV_VAR_LIST>

</OPERATING_SYSTEM>
The main difference between this paragraph and the above is how you install 64-bit version of 6.2 and window10, just change the 32-bit to 64-bit, and save it after modification. Re-click setup.exe to stop this error prompt.
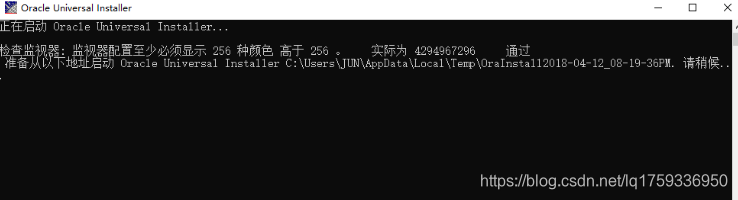
1. Install Oracle first ( please turn off the network and your anti-virus software before installation, or you won’t be able to use Oracle if you don’t connect to the Internet in the future ), after decompression, open the setup.exe installation program [preferably right-click to run with administrator privileges], and then The following interface will appear, **don’t close it,** just wait
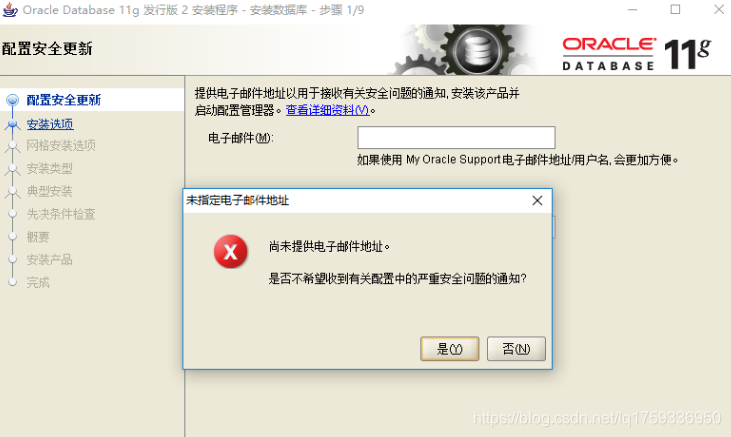
. 3. Configure security updates. If you
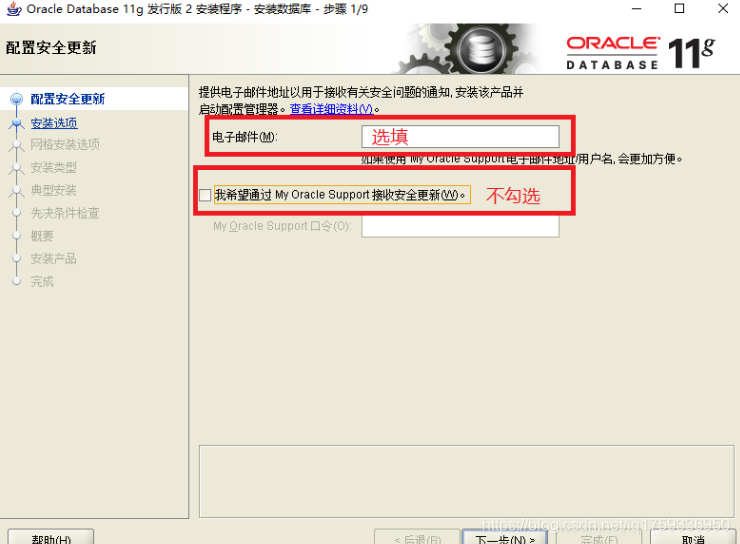
don’t fill in the mailbox, the warning as shown in the figure below will appear, click Yes!
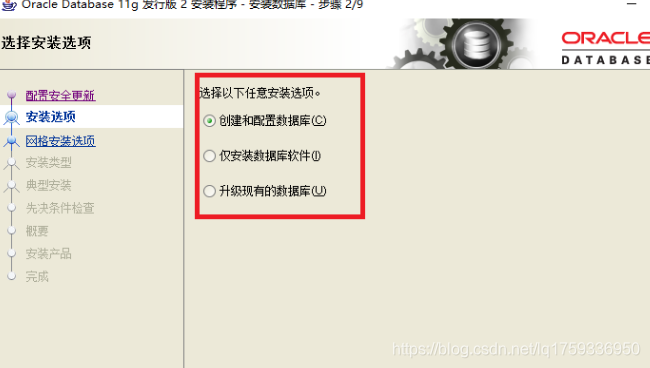
4. Select the installation option and
select the first item'Create And configure the database', and then click Next
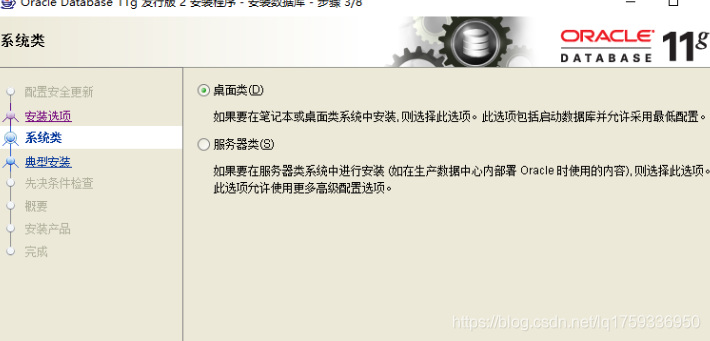
5. System category
Desktop category: suitable for notebooks and desktops, limited to personal use, others cannot remotely access, and its configuration requirements are minimal.
Server class: suitable for servers, supporting enterprise-level applications and some services.
Select the first desktop category, click Next
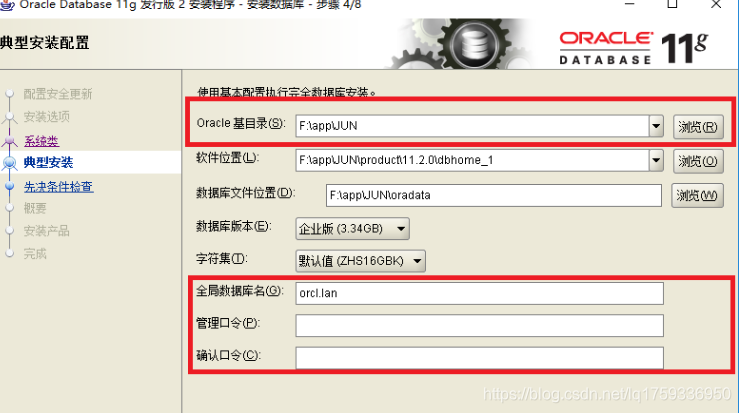
6. Typical installation configuration (it is recommended to default it, he will automatically select your largest disk)
Oracle base directory: You can choose the default display path, or you can change the path
global database name according to your needs : You can choose the default or change the
password: the password for logging in to the system account after the installation is successful. Password requirements: contain at least one uppercase letter, one lowercase letter, and one number, and the length is at least 8 characters. You can use underscores, dollar signs and pound signs, but you must enclose double quotes. It is not recommended to use characters, mainly because of trouble~
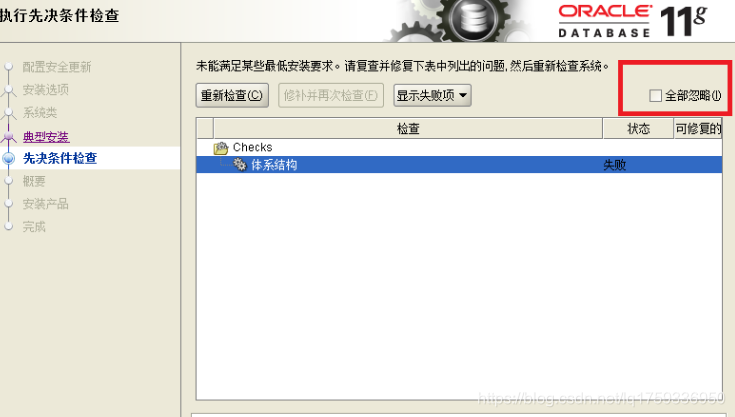
7. Prerequisite check
Check whether the computer meets the minimum configuration requirements for Oracle database installation
Some users will fail with multiple items [This error does not matter], select Ignore all, and then click Finish to finish
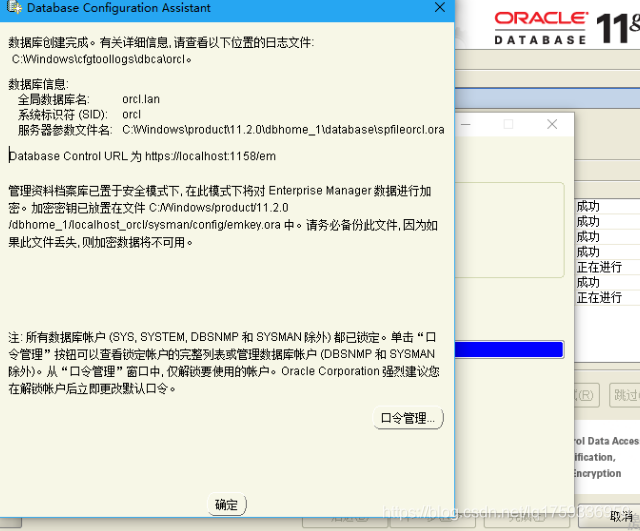
8. During the product
installation process, there will be a firewall blocking prompt and click [Allow Access]! The rest are all clicked to complete, When the log file information is prompted after the installation is complete, click OK and click OK!
Second, the login and verification of the Oracle database
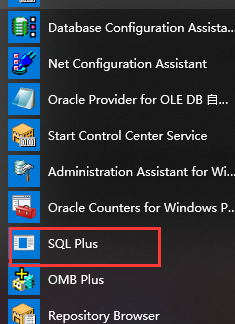
1. Open the Oracle database
Find the installed Oracle in the start menu, and then open SQL Plus, as shown in Figure
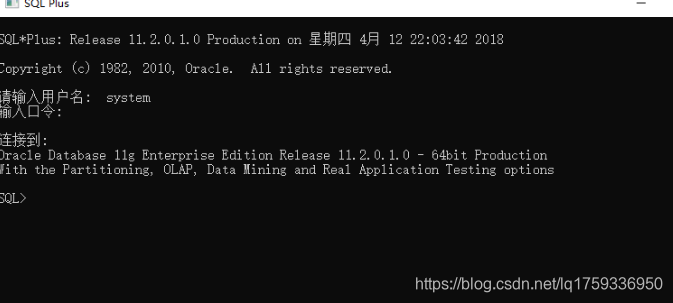
2. Account login
User name: system
password: the password entered in the previous installation [The password is hidden and the input is not visible]
[The ordinary account scott at this time Not unlocked]
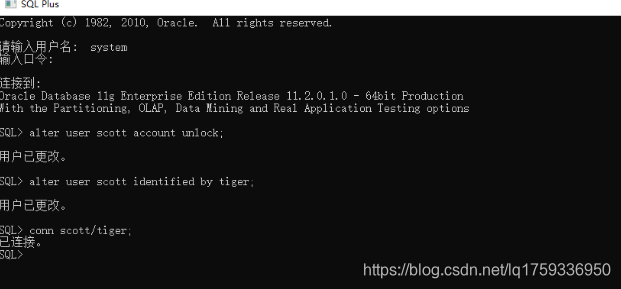
3. Unlock ordinary user scott
alter user scott account unlock; --Unlock scott user
alter user scott identified by tiger; --Set scott user password
conn scott/tiger; --Switch to scott user
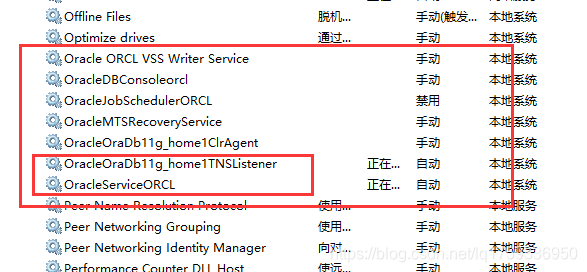
Finally, after the installation is complete, because Its startup will take up a lot of memory, so when you do not use the Oracle database, turn off the Oracle service to free up memory [seven services]
When you need to use the Oracle database, you only need to turn on the last two services shown in the figure.
Third, unzip the downloaded plsql
1. Enter the directory D:\PLSQL\PLSQL Developer\instantclient_11_2 to open the tnsnames.ora file, modify the database connection address
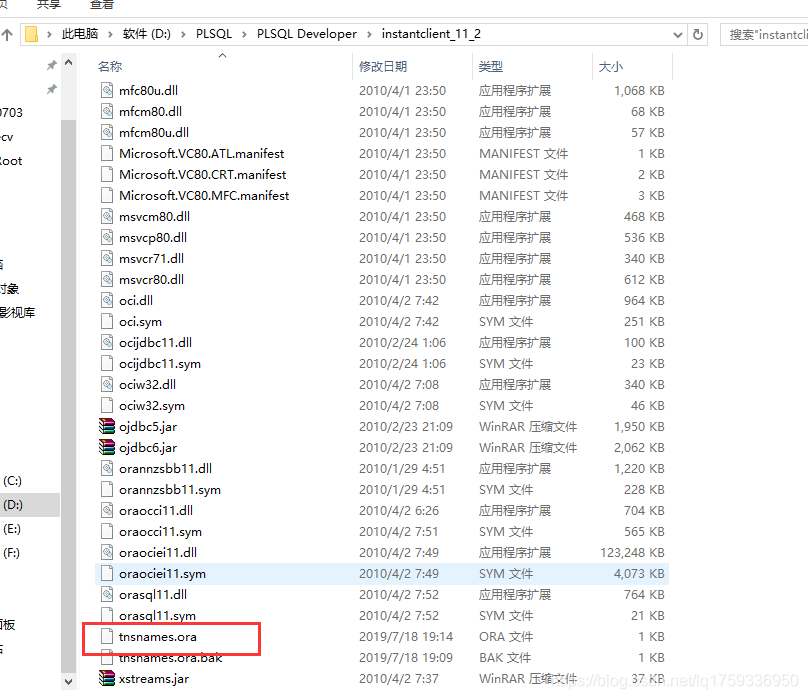
and open it with a notepad and other files, modify 172.16.6.01 to the address where you need to connect to the database, and let everyone disconnect from the network during the installation just now , Here you can directly change the cost machine address 127.0.0.1!
# tnsnames.ora Network Configuration File: E:\PLSQL Developer\instantclient_11_2\tnsnames.ora
# Generated by Oracle configuration tools.

ORCL =
  (DESCRIPTION =
    (ADDRESS = (PROTOCOL = TCP)(HOST = 127.0.0.1)(PORT = 1521))
    (CONNECT_DATA =
      (SERVER = DEDICATED)
      (SERVICE_NAME = orcl)
    )
  )
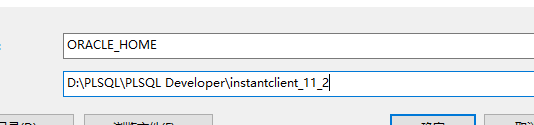
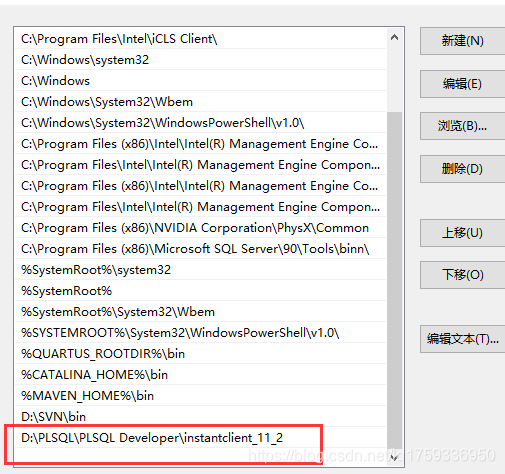
3. Modify environment variables
Variable name: ORACLE_HOME Variable value: D:\PLSQL\PLSQL Developer\instantclient_11_2
Variable name: TNS_ADMIN Variable value: D:\PLSQL\PLSQL Developer\instantclient_11_2
Variable name: NLS_LANG Variable value: SIMPLIFIED CHINESE_CHINA.ZHS16GBK
Modify Path Variable: add D:\PLSQL\PLSQL Developer\instantclient_11_2 at the back.


Here, some people’s computers may be installed successfully, and some of them will appear that PLSQL_Developer cannot connect to the database normally, and there is no initial content of the database, as shown in the following figure:
At this time, solve He!!!
There is an instantclient-basic-win32-10.2.0.5 in the Baidu cloud link I gave.
Note: The instantclient-basic-win32-10.2.0.5 file is used here for configuration
1. Please download instantclient-basic- Unzip the win32-10.2.0.5 file and copy it to the product folder under your Oracle database installation file, as follows:

2. Then find two files listener.ora and tnsnames.ora under the Oracle installation file, mine is in D :\app\family\product\11.2.0\dbhome_1\NETWORK\ADMIN, please refer to the search, all copied to D:\app\family\product\instantclient_10_2. These two paths are my installation path, go to your path.

3. Then find the directory where your PLSQL_Developer is installed, mine is: D:\PLSQL\PLSQL Developer
, create a new notepad in it, and write the following similar code:
@echo off
set path=D:\app\family\product\instantclient_10_2
set ORACLE_HOME=D:\app\family\product\instantclient_10_2
set TNS_ADMIN=D:\app\family\product\instantclient_10_2
set NLS_LANG=AMERICAN_AMERICA.AL32UTF8
Find your own path (instantclient_10_2 under product under Oracle's installation folder)
. The path address is my PLSQL installation path. Change it to your installation PLSQL path here.
Then change the file name to start.bat.
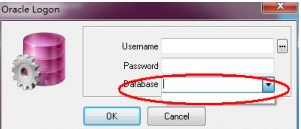
Finally, after opening PLSQL_Developer, cancel the login and enter the main interface.
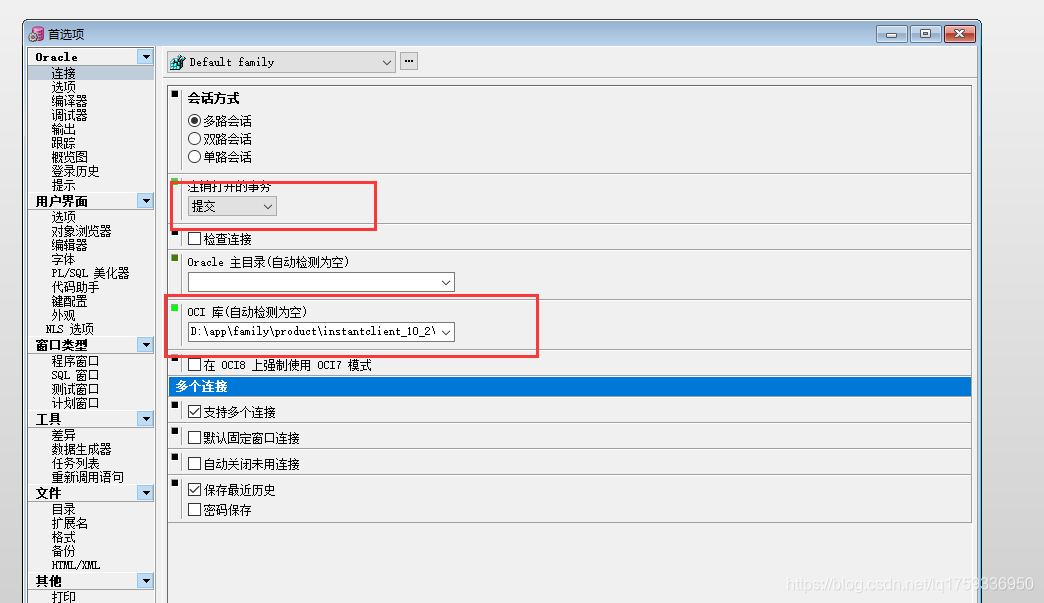
1. Click-Tools-Preferences-Connect:
2.
Change the above logout to submit 3. Change the OCI library to a path with instantclient_10_2 (this file is in D:\app\family\product\instantclient_10_2).
4. Apply-OK-close PLSQL_Developer and run it again.
My oci.dll path: D:\app\family\product\instantclient_10_2\oci.dll
Note: Don’t forget the oci.dll later!
Finally, click the start.bat file just created,
congratulations! Now you can run normally and perfectly solve the problem of win7_oracle11g_64-bit connecting to 32-bit PLSQL_Developer!