It’s so shallow on the paper, I don’t know that I have to do it by myself~ It really looks very easy, and it’s all kinds of pits by myself~ Everybody, let me talk slowly~
I won't talk nonsense about what springcloud is~
Eureka
Eureka (I thought it was an abbreviation, it turned out to be a word, translated as: I found it, I found it! 0.0) is a Netflix open source product that provides service registration and discovery. It provides a complete implementation of Service Registry and Service Discovery. . It is also one of the most important and core components in the springcloud system.
The popular understanding of this thing is like a Taobao. Whether you are a seller or a buyer, if you want to trade, you have to register an account with me.
1. Create a new maven project first
2. Introduce the relevant jar package in the pom file
After learning the tutorial of the boss, the result is directly reported with the demo of the boss, and the startup program always prompts:
Caused by: java.lang.ClassNotFoundException: com.sun.jersey.api.core.DefaultResourceConfig
Depressed, check the spring-cloud-starter-eureka-server jar package

I found that the jersey jar introduced was 1.19.1, and then I researched it myself and found that 1.19 can be used, so I introduced it in the pom file. According to my understanding, 1.19.1 is definitely higher than the 1.19 version. How can it not work?
Restart, and then the error disappeared, and an error was reported later, and another class under the servo package could not be found. The mmp~ is a version problem again, and then the servo package is introduced, ok~
Finally, the following pom configuration file is formed

 1 <parent>
 2        <groupId>org.springframework.boot</groupId>
 3        <artifactId>spring-boot-starter-parent</artifactId>
 4        <version>1.5.8.RELEASE</version>
 5    </parent>
 6
 7    <dependencies>
 8     <dependency>
 9         <groupId>org.springframework.cloud</groupId>
10         <artifactId>spring-cloud-starter</artifactId>
11     </dependency>
12     <dependency>
13         <groupId>com.sun.jersey</groupId>
14            <artifactId>jersey-bundle</artifactId>
15              <version>1.19</version>
16          </dependency>
17
18         <dependency>
19             <groupId>com.netflix.servo</groupId>
20             <artifactId>servo-core</artifactId>
21             <version>0.12.7</version>
22         </dependency>
23        <dependency>
24         <groupId>org.springframework.cloud</groupId>
25         <artifactId>spring-cloud-starter-eureka-server</artifactId>
26         </dependency>
27    </dependencies>
28    <dependencyManagement>
29     <dependencies>
30       <dependency>
31         <groupId>org.springframework.cloud</groupId>
32         <artifactId>spring-cloud-dependencies</artifactId>
33         <version>Dalston.RC1</version>
34         <type>pom</type>
35         <scope>import</scope>
36       </dependency>
37     </dependencies>
38   </dependencyManagement>
39    <repositories>
40     <repository>
41       <id>spring-milestones</id>
42       <name>Spring Milestones</name>
43       <url>https://repo.spring.io/milestone</url>
44       <snapshots>
45         <enabled>false</enabled>
46       </snapshots>
47     </repository>
48   </repositories>
3. Write startup code
1 @SpringBootApplication
2 @EnableEurekaServer
3 public class App {
4
5     public static void main(String[] args) {
6         SpringApplication.run(App.class, args);
7     }
8 }
Pay attention to adding EnableEurekaServer annotation
4. Add configuration file
There are two formats for adding this configuration file, one is application.properties and the other is application.yaml. We will not compare the difference between the two formats. But for the location of this file, I still wondered for a while, and finally after trying, the location as shown
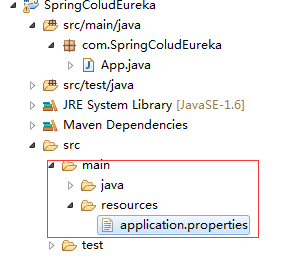
And you need to pay attention to the file name that there is no less than 0.0 for a letter, because I didn't pay attention to writing a letter, I also reported an error. . . .
Application.properties format, the file content is as follows:
1 spring.application.name=spring-cloud-eureka
2 server.port=8000
3 eureka.client.register-with-eureka=false
4 eureka.client.fetch-registry=false
5 eureka.client.serviceUrl.defaultZone=http://localhost:${server.port}/eureka/
Note that the third line is true by default, that is, if you do not add this false, an error will be reported at startup, because he will want to register himself to himself! ! ! The fourth line is also true by default, which means whether he wants to get the information registered to the service center
5. Start the registry
Enter localhost:8000 in the browser to check whether the registry is started normally, the following screenshot appears, indicating that it is ok

With the registration center, we are going to engage in a service provider and service consumer.
service providers
1. Create a new maven project
2. Introduce the same jar package as the registry service in the pom file.
3. Write application.properties
The content is as follows:
1 spring.application.name=spring-cloud-producer
2 server.port=9000
3 eureka.client.serviceUrl.defaultZone=http://localhost:8000/eureka/
The first line is to name your own service, the second line is to set your own access port, and the third line is to set up which registry you want to register to. Because we set the eureka registry to be the local 8000 port, so we write this address
4. Write startup code
1 @SpringBootApplication
2 @EnableDiscoveryClient
3 public class App
4 {
5     public static void main( String[] args )
6     {
7         SpringApplication.run(App.class, args);
8     }
9 }
Pay attention to adding EnableDiscoveryClient annotation
5. Write the service controller class code
1 @RestController
2 public class HelloController {
3
4     @RequestMapping("/hello")
5     public String hello(@RequestParam String name) {
6         return "hello "+name+",nice to meet you!";
7     }
8 }
Here the service provider is complete, start the program, no error is reported, refresh the page of the registration center, you will see the currently registered service in the Application.
Service caller
1. Create a new maven project
2. Also introduce the same content as before in the pom file.
3. Write application.properties
1 spring.application.name=spring-cloud-consumer
2 server.port=9001
3 eureka.client.serviceUrl.defaultZone=http://localhost:8000/eureka/
The first line also names the current service, the second line sets the port, and the third line sets the registry url.
4. Write startup code
 1 @SpringBootApplication
 2 @EnableDiscoveryClient
 3 @EnableFeignClients
 4 public class App
 5 {
 6     public static void main( String[] args )
 7     {
 8         SpringApplication.run(App.class, args);
 9     }
10 }
Note that this startup class has one more EnableFeignClients annotation than the service provider. The function of this annotation is to enable feign for remote calls.
5. Write feign call implementation
1 @FeignClient(name= "spring-cloud-producer")
2 public interface HelloRemote {
3     @RequestMapping(value = "/hello")
4     public String hello(@RequestParam(value = "name") String name);
5 }
Note that this is an interface. The annotation parameter name above is to specify the name of the service provider you are currently calling. Also note that the parameter name in the method is consistent with the parameter in the service provider
6. Write the service caller controller class
 1 @RestController
 2 public class ConsumerController {
 3
 4     @Autowired
 5     HelloRemote HelloRemote;
 6
 7     @RequestMapping("/hello/{name}")
 8     public String hello(@PathVariable("name") String name) {
 9         return HelloRemote.hello(name);
10     }
11
12 }
Introduce the HelloRemote interface into the current class, by calling the local hello method, and then calling the methods in the HelloRemote interface
Start the program and no error is reported.
Refresh the registry at this time, you should see that 2 services have been registered

Test verification
Open the browser and enter: http://localhost:9001/hello/JJ

As shown in the above figure, the result is returned normally, indicating that the entire service call and provider are ok! ! !