Before the tutorial, let's show everyone the achievements of the editor!
Figure 1: 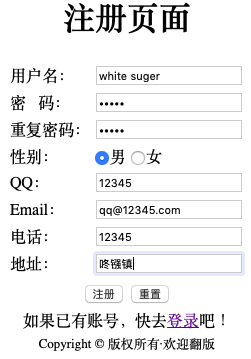
Figure 2: 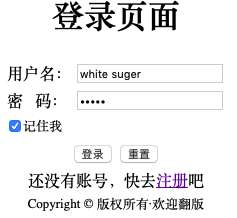
Figure 3: 
Tutorial: To
implement this function we need five php files:
login.php
(login interface, as shown in Figure 2)
<!DOCTYPE html>
<html><head>
<title>登录</title>
<meta name="content-type"; charset="UTF-8">
</head><body>
<div class="content" align="center"> <!--头部-->
 <div class="header"> <h1>登录页面</h1> </div>
<!--中部-->
<div class="middle">
 <form id="loginform" action="loginaction.php" method="post">
<table border="0"> <tr>
    <td>用户名:</td>
<td> <input type="text" id="name" name="username"
required="required" value="<?php
echo isset($_COOKIE[""]) ? $_COOKIE[""] : ""; ?>"> </td> </tr>
<tr> <td>密   码:</td> <td><input type="password" id="password" name="password"></td>
</tr> <tr> <td colspan="2"> <input type="checkbox" name="remember"><small>记住我 </td> </tr> <tr> <td
colspan="2" align="center" style="color:red;font-size:10px;"> <!--提示信息--> <?php
$err = isset($_GET["err"]) ? $_GET["err"] : "";
switch ($err) {
    case 1:
        echo "用户名或密码错误!";
        break;

    case 2:
        echo "用户名或密码不能为空!";
        break;
} ?> </td> </tr> <tr> <td colspan="2" align="center">
<input type="submit" id="login" name="login" value="登录"> <input type="reset" id="reset"
name="reset" value="重置"> </td> </tr>
<tr>
    <td colspan="2" align="center"> No account yet, go to <a href="register.php">register</a></td>
<!--Foot-->
</div>
</form>
</tr>
</table>
<div class="footer"> <small>Copyright © All rights reserved. Welcome to copy </div> </div>
</body>
</html>
12345678910111213141516171819202122232425262728293031323334353637383940
loginaction.php
(make login.php realize the connection with the database, and correct the input)
<?php
// $Id:$ //Declare variables
$username = isset($_POST['username'])? $_POST['username']: "";
$password = isset($_POST['password'] )? $_POST['password']: "";
$remember = isset($_POST['remember'])? $_POST['remember']: ""; //Determine whether the username and password are empty
if (! empty($username) && !empty($password)) {//Establish a connection
    $conn = mysqli_connect('localhost','','','user'); //Prepare SQL statement
    $sql_select = "SELECT username, password FROM usertext WHERE username ='$username' AND password ='$password'"; //Execute SQL statement
    $ret = mysqli_query($conn, $sql_select);
    $row = mysqli_fetch_array($ret);//Judging whether the username or password is correct
    if ($username == $row['username'] && $password == $row['password'])
    {//Select "remember me"
        if ($remember == "on")
        {//Create cookie
            setcookie("", $username, time() + 7 * 24 * 3600);
        } //Open session
        session_start(); //Create session
        $_SESSION['user'] = $username; // Write log
        $ip = $_SERVER['REMOTE_ADDR'];
        $date = date('Ymd H:m:s');
        $info = sprintf("Current user: %s, IP address: %s, time: %s /n", $username, $ip, $date);
        $sql_logs = "INSERT INTO logs(username,ip,date) VALUES('$username','$ip','$date')";
        / /Log write files, if you want to achieve this function, you need to create a file directory logs
        $f = fopen('./logs/'. Date('Ymd').'.Log','a+');
        fwrite($f, $info);); //Close the database and jump to loginsucc.php
        mysqli_close($conn);
    }
        fclose($f); //Jump to loginsucc.php page
        header("Location:loginsucc.php"); //Close the database and jump to loginsucc.php
    else
    {
        //User name or password is wrong, assign err to 1
        header("Location:login.php?err=1") ;
    }
} else {//User name or password is empty, assign err to 2
    header("Location:login.php?err=2");
} ?>12345678910111213141516171819202122232425262728293031323334353637
loginsucc.php
(Interface after successful login, as shown in Figure 3)
<!DOCTYPE html>
<html>
<head>
<title>Successful login</title>
<meta name="content-type";
 charset="UTF-8">
</head>
<body>
<div>
<? php
// $Id:$ //Open session
session_start(); //Declare variable
$username = isset($_SESSION['user'])? $_SESSION['user']: ""; // Determine whether session is Empty
if (!empty($username)) {?>
<h1>Login is successful! </h1> Welcome!
<?php
    echo $username; ?>
<br/> <a href="login.php">Exit</a> //Jump to the main page
<?php
} else {//Not logged in, no access
     ? >
 <h1>You do not have permission to access! ! ! </h1>
<
register.php
(Registration interface, as shown in Figure 1)
<!DOCTYPE html>
<html>
<head><title>注册</title>
<meta name="content-type"; charset="UTF-8">
</head><body>
<div class="content" align="center"> <!--头部-->
<div class="header"> <h1>注册页面</h1> </div> <!--中部-->
<div class="middle">
<form action="registeraction.php" method="post"> <table border="0">
<tr> <td>用户名:</td>
<td><input type="text" id="id_name" name="username" required="required"></td>
</tr> <tr>
 <td>密   码:</td> <td><input type="password" id="password" name="password"
required="required"></td>
</tr> <tr>
 <td>重复密码:</td> <td><input type="password" id="re_password"
name="re_password" required="required"></td> </tr> <tr>
 <td>性别:</td> <td> <input type="radio" id="sex" name="sex" value="mam">男 <input type="radio" id="sex" name="sex" value="woman">女 </td> </tr> <tr>
 <td>QQ:</td> <td><input type="text" id="qq" name="qq" required="required"></td> </tr> <tr>
<td>Email:</td> <td><input type="email" id="email" name="email" required="required"></td> </tr> <tr>
<td>电话:</td> <td><input type="text" id="phone" name="phone" required="required"></td> </tr> <tr>
<td>地址:</td> <td><input type="text" id="address" name="address" required="required"></td> </tr>
<tr> <td colspan="2" align="center" style="color:red;font-size:10px;"> <!--提示信息-->
<?php
$err = isset($_GET["err"]) ? $_GET["err"] : "";
switch ($err) {
    case 1:
        echo "Username already exists!";
        break;

    case 2:
        echo "The password is not the same as the repeated password!";
        break;

    case 3:
        echo "Registered successfully!";
        break;
}
?>
</td> </tr> <tr> <td colspan="2" align="center">
<input type="submit" id="register" name="register" value="register">
 <input type="reset" id="reset" name="reset" value="重Set"> </td></tr>
 <tr> <td colspan="2" align="center">
If you already have an account, go to <a href="login.php">login</a> ! </td> </tr> </table> </form> </div>
<!--foot-->
registeraction.php
(implement register.php to connect to the database and insert data into the specified form)
<?php
// $Id:$ //声明变量
$username = isset($_POST['username']) ? $_POST['username'] : "";
$password = isset($_POST['password']) ? $_POST['password'] : "";
$re_password = isset($_POST['re_password']) ? $_POST['re_password'] : "";
$sex = isset($_POST['sex']) ? $_POST['sex'] : "";
$qq = isset($_POST['qq']) ? $_POST['qq'] : "";
$email = isset($_POST['email']) ? $_POST['email'] : "";
$phone = isset($_POST['phone']) ? $_POST['phone'] : "";
$address = isset($_POST['address']) ? $_POST['address'] : "";
    $conn = mysqli_connect("localhost", "", "", "user"); //Prepare SQL statement, query user name
if ($password == $re_password) {//Establish connection
    $ret = mysqli_query($conn, $sql_select);
    $sql_select = "SELECT username FROM usertext WHERE username ='$username'"; //Execute SQL statement
    $row = mysqli_fetch_array($ret); //Determine whether the
    username already exists if ($username == $row['username ']) {//User name already exists, display prompt message
        header("Location:register.php?err=1");
    } else {//User name does not exist, insert data //Prepare SQL statement
        $sql_insert = " INSERT INTO usertext(username,password,sex,qq,email,phone,address)
VALUES('$username','$password','$sex','$qq','$email','$phone', '$address')"; //Execute SQL statement
        mysqli_query($conn, $sql_insert);
        header("Location:register.php?err=3");
    } //Close the database
    mysqli_close($conn);
} else {
    header("Location:register.php?err=2");
} ?>123456789101112131415161718192021222324252627
It is recommended to save the five files locally for easy modification. Of course, you don’t mind using a linux text editor to upload them directly and modify them on the server side. After saving the file:
1. Create a database and form
The editor here is the database and form created through the phpmyadmin visual interface. After entering ip/phpmyadmin, log in to the database: 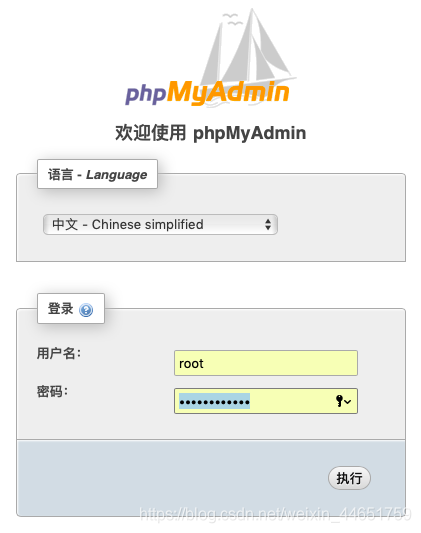
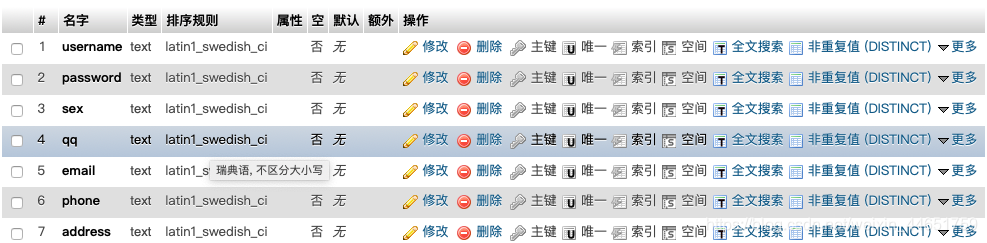
create the database user and form usertext after logging in to myadmin: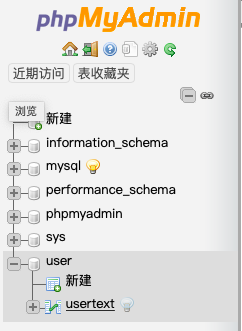
2. The function of operating the database in the php file
The editor here first explains the role of the following php database operation functions:
(1) mysqli_connect("localhost", "server name", "database password", "connected database name");
parameter description:
"localhost", no need to change , Novices should not change the server ip address, because the default authorized user to create a database is: 
"Connected database name", which is the database, do not fill in the form. The user in the first step is the database, and the usertext is the form.
(2) The mysqli_query() function executes a query against the database:
mysqli_query(connection,query,resultmode);
Parameter description:
connection is required. Specifies the MySQL connection to be used.
query Required, specifies the query string.
(This is a string that stores mysql commands, and the content of the command can only be realized with this function)
resultmode is
optional. A constant. It can be any of the following values:
MYSQLI_USE_RESULT (if you need to retrieve a lot of data, please use this)
MYSQLI_STORE_RESULT (default)
eg:
(3) The mysqli_fetch_array() function gets
a row from the result set as an associative array, or a numeric array, or both Both.
mysqli_fetch_array(result,resulttype);
Parameter description:
result is required. Specifies the result set identifier returned by mysqli_query(), mysqli_store_result(), or mysqli_use_result().
resulttype is optional. Specifies which type of array should be generated. Can be one of the following values:
MYSQLI_ASSOC
MYSQLI_NUM
MYSQLI_BOTH
3 modify the php file to achieve login and registration
Let’s make changes to the loginaction.php and registeraction.php files.
If the database creation is the same as in step 1, then you only need to modify the two files:
mysqli_connect("localhost", "server name", "database password ", "user");
Just fill in user information.
If the database name or form is not the same, you need to find the following statement:
mysqli_connect ( "localhost", "Server Name", "database password," "the User");
the SELECT;
INSERT INTO; (only in registeraction.php)
above Modify the (database name) user and (form name) usertext in the statement to your database name and form name.
4 further improvement
Interested friends can try to create a hyperlink like the editor, and jump to the specified webpage after successful login;
find the exit in loginsucc.php and change login.php to other webpages (you need to put the file name directly in the same directory Bottom) 
Click on the link: 
Of course, if there is an entry, there must be an exit. Here, the editor has set a logout modal
(bootstrap use: https://getbootstrap.com/docs/4.3/getting-started/introduction/)