Some of the content in this article, such as field verification and project structure, are written in another article: Node.js: The use of express + MySQL
1. Realize registration
1. Registration needs to write the account number and password of the new user into the database. The account number can be directly written into the database, but the password is generally not directly stored in the database. The password will be encrypted and stored in the database, which can improve the security of the account .
2. When logging in, encrypt the password in the same way, and compare it with the stored password in the database. If they are the same, the login is successful.
3. Realize
(1), first create a table in the database to store information, the name of the table I created is user_login

(2), password encryption uses a package bcryptjs , this package can encrypt passwords, and install it into the project with npm.
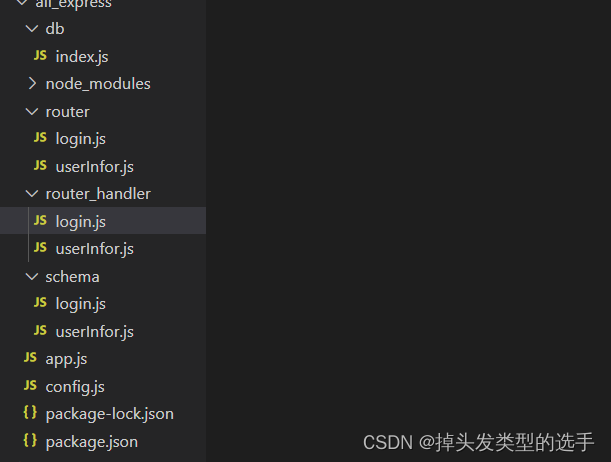
(3) In the directory structure, create a new file under the routing module, processing function module, and field verification module to complete this part of the content.

app.js
// 引入express
const express = require("express");
// 创建服务器的实例对象
const app = express();
// 引入校验规则的包,在定义错误级别的中间件时会用到
const joi = require("joi");

// 配置解析表单数据的中间件  内置中间件,只能解析application/x-www-form-urlencoded格式的数据
app.use(express.urlencoded({ extended: false }));

// 封装res.send() ,必须在路由之前封装
/**
 * 不管是输出正确的数据还是错误的信息,每次都需要写这么多东西
 * res.send({ state: 0, message: "查询成功", data: result })
 * 封装之后不需要写这么多
 */
app.use((req, res, next) => {
  // 定义一个输出的函数
  res.output = function (err, status = 1, data) {
    res.send({
      status,
      message: err instanceof Error ? err.message : err,
      data,
    });
  };
  next();
});

// 导入并使用登录,注册的路由模块
const loginRouter = require("./router/login");
app.use(loginRouter);
// 导入并使用路由模块
const inforRouter = require("./router/userInfor");
app.use(inforRouter);

// 在所有路由下面调用错误级别的中间件
app.use((err, req, res, next) => {
  // 验证失败导致的错误
  if (err instanceof joi.ValidationError) return res.output(err);
  // // 身份认证失败后的错误
  // if(err.name === 'UnauthorizedError') return res.cc('身份认证失败!')

  // 未知的错误
  res.output(err);
  next();
});

// 启动服务器
app.listen(3007, () => {
  console.log("Server running at http://127.0.0.1:3007");
});
Because app.js is the entry file of the entire project, all routes should be imported and used in this file.
The login.js file under the router folder
const express = require("express");
const router = express.Router();

// 导入校验规则的中间价
const expressJoi = require("@escook/express-joi");
// 引入规则
const { login_rules } = require("../schema/login");

// 引入处理函数
const login_handler = require("../router_handler/login");

// 注册
router.post("/register", expressJoi(login_rules), login_handler.userRegister);

// 将路由导出
module.exports = router;
Same as the previous article, register routes in this file, import processing functions from router_handler, import middleware and rules for verification rules, and finally export routes for use in app.js files.
The login.js file under the router_handler folder (handling function)
// 导入数据库模块
const db = require("../db/index");
// 引入对密码进行加密的包
const bcryptjs = require("bcryptjs");

// 注册处理函数并导出
exports.userRegister = (req, res) => {
  // 先取到从客户端传来的值
  let { username, password } = req.body;
  /**
   *  注册的时候用户名是唯一的,不能与其他人的用户名一样
   *  在将信息写入数据库之前,要先检查用户名是否被占用
   */
  // 查询有无相同的用户名
  const sql = "select username from user_login where username=?";
  // 执行查找sql语句
  db.query(sql, username, (err, results) => {
    // sql语句执行失败
    if (err) return res.output(err);
    // 执行成功,如果有数据,则说明有相同的用户名
    if (results.length === 1) return res.output("用户名被占用");
    // 执行成功,用户名没被占用

    console.log('加密之前', password);
    // 对密码进行加密,第二个参数可以提高密码的安全性,几也行
    password = bcryptjs.hashSync(password, 10);
    console.log('加密过后', password);

    // 定义新语句,增加用户
    const sqlStr = "insert into user_login set ?";
    // 执行增加sql语句
    db.query(sqlStr, { username, password }, (err, results) => {
      // 执行sql语句失败
      if (err) return res.output(err);
      // 执行sql语句成功 但影响行数不为1
      if (results.affectedRows !== 1) return res.output("用户注册失败!");
      // 执行成功,影响行数为1
      res.output("注册成功!");
    });
  });
};
(1), first obtain the user name and password to be registered from the client, and use let when deconstructing the user name and password, because the password needs to be encrypted in the following operations, and the variables are modified. With const, you can redefine a value.
(2) The registration process is divided into three steps. The first step is to check whether the user name has the same value in the database. The user name cannot be the same. If there is the same value, the user name is returned.
(3) If you do not have the same user name and password, you can use it to encrypt the password set by the user and use the bcryptjs package for encryption. Using the hashSync() method, the first parameter is the original password, and the second parameter can improve the security of the password, which is a number.
(4) After encryption, you can view the encrypted password on the terminal output, store the data in the database, and use the insert statement. If the database statement is executed successfully, but the number of affected rows is not 1, it is also a failure.
The login.js file under the schema folder (validation rules, used in the login.js file under the router directory)
// 导入校验规则的包
const joi = require("joi");
// 确定规则
const username = joi.string().alphanum().min(1).max(16).required();
const password = joi.string().pattern(/^[\S]{6,12}$/).required();

// 导出规则
exports.login_rules = {
  body: {
    username,
    password,
  },
};
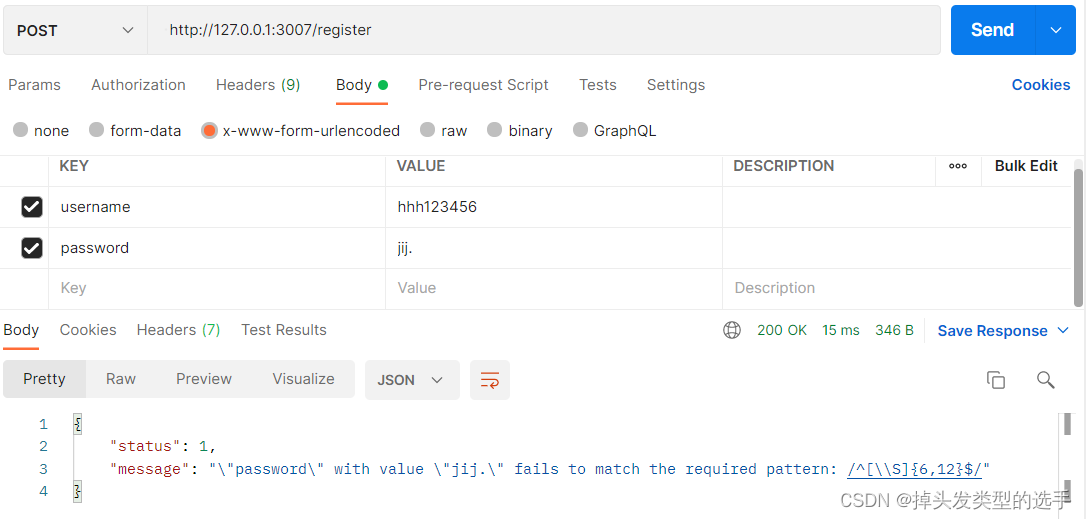
After everything is written, use postman to test it. First, test whether the verification rules can be used. If you enter a wrong one, the error password does not conform to the rules.
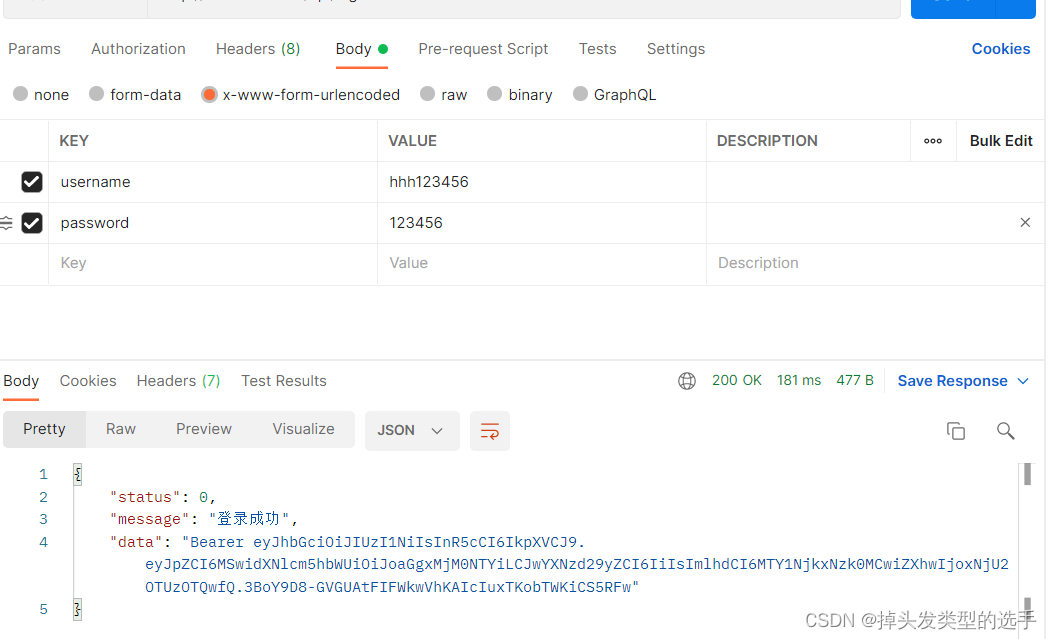
Then replace the password with a valid one:
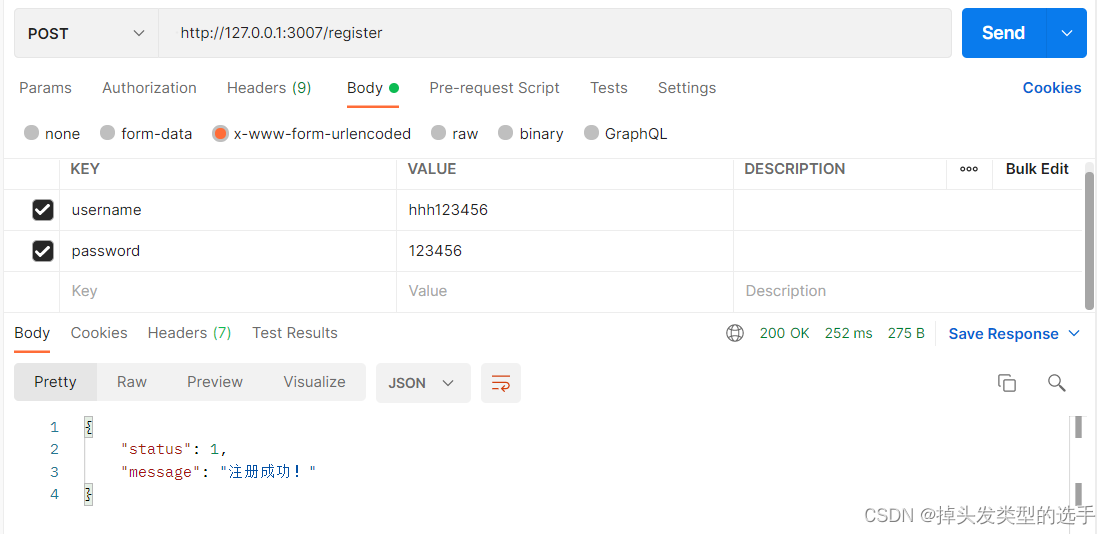

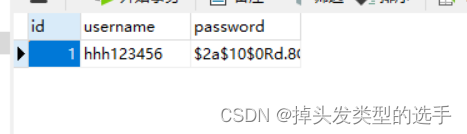
The registration is successful. Check the password before and after encryption on the terminal, and there is a new piece of data in the database.
Then click send again, this time there is already data in the database when registering, and the user name is occupied.

Error, username is taken.
Second, realize the login
To achieve login, a package jsonwebtoken will be used, which can generate token.
file structure:
This time there is an additional global configuration file, config.js, this file sets the encryption key when generating the token, and the duration of the token, the key and time can also be written directly in the file, but encryption needs to be used , Decryption also needs to be used, for the convenience of pulling him out. The key can be set at will.
config.js file
// 全局的配置文件
module.exports = {
    /**
     * 设置token加密和解密用到的密钥
     */
    jwtSecretKey: 'c^_^h',
    /**
     * 设置token的有效期
     */
    expiresIn: '10h',
}
The login.js file under the router folder (configure the routing in this file)
const express = require("express");
const router = express.Router();

// 导入校验规则的中间价
const expressJoi = require("@escook/express-joi");
// 引入规则
const { login_rules } = require("../schema/login");

// 引入处理函数
const login_handler = require("../router_handler/login");

// 注册
router.post("/register", expressJoi(login_rules), login_handler.userRegister);
// 登录,登录的时候字段也是相同的规则
router.post("/login", expressJoi(login_rules), login_handler.userLogin);

// 将路由导出
module.exports = router;
Both registration and login use a username and password, and the rules for both are the same.
The login.js file under the router_handler folder (login processing function)
// 导入数据库模块
const db = require("../db/index");
// 引入对密码进行加密的包
const bcryptjs = require("bcryptjs");
// 导入生成token的包
const jwt = require("jsonwebtoken");
// 导入全局的配置文件,密文
const config = require("../config");

// 注册处理函数
exports.userRegister = (req, res) => {
  // 先取到从客户端传来的值
  let { username, password } = req.body;
  /**
   *  注册的时候用户名是唯一的,不能与其他人的用户名一样
   *  在将信息写入数据库之前,要先检查用户名是否被占用
   */
  // 查询有无相同的用户名
  const sql = "select username from user_login where username=?";
  // 执行查找sql语句
  db.query(sql, username, (err, results) => {
    // sql语句执行失败
    if (err) return res.output(err);
    // 执行成功,如果有数据,则说明有相同的用户名
    if (results.length === 1) return res.output("用户名被占用");
    // 执行成功,用户名没被占用
    // 定义新语句,增加用户
    const sqlStr = "insert into user_login set ?";

    console.log("加密之前", password);
    // 对密码进行加密,第二个参数可以提高密码的安全性,几也行
    password = bcryptjs.hashSync(password, 10);
    console.log("加密过后", password);

    // 执行增加sql语句
    db.query(sqlStr, { username, password }, (err, results) => {
      // 执行sql语句失败
      if (err) return res.output(err);
      // 执行sql语句成功 但影响行数不为1
      if (results.affectedRows !== 1) return res.output("用户注册失败!");
      // 执行成功,影响行数为1
      res.output("注册成功!");
    });
  });
};

// 登录处理函数
exports.userLogin = (req, res) => {
  // 接收表单数据
  const { username, password } = req.body;
  // 先查找用户名是否在数据库中,定义sql语句
  const sql = "select * from user_login where username=?";
  // 执行语句
  db.query(sql, username, (err, results) => {
    if (err) return res.output(err);
    // 语句执行成功,但没有相应的username
    if (results.length !== 1) return res.output("登录失败");
    // 语句执行成功,也有相应的username
    // 进行密码的比较
    // 前面是客户端的密码,后面是数据库中存储经过加密的密码
    const compareResult = bcryptjs.compareSync(password, results[0].password);
    // 会返回true或false
    if (!compareResult) {
      return res.output("密码错误,登录失败!");
    }
    // 密码比对正确,在服务端生成token字段
    // 获取到用户的信息,剔除掉密码,生成token
    const user = { ...results[0], password: "" };
    // 对用户的信息进行加密,生成token字符串,参数2和参数3可以直接写,也可以抽出去
    const tokenStr = jwt.sign(user, config.jwtSecretKey, {
      expiresIn: config.expiresIn,
    });
    // 调用res.send将token响应给客户端
    res.output("登录成功", 0, "Bearer " + tokenStr);
  });
};
(1), first receive the user name and password from the client, and then look for the corresponding user name in the database, if not, the user name is incorrect and the login fails.
(2) If there is a corresponding user name, it is necessary to compare whether the password is the same. The bcryptjs package is still used to compare the password, and the compareSync() method is used. This method has two parameters, the first one is passed from the client. The password to come, the second parameter is to store the encrypted password in the database, it will return true or false according to the result, if not the same, the login will fail.
(3) If the password is the same and the login is successful, to generate a token and return it to the client, use the jsonwebtoken package, the sign() method, which generates a token based on the user's information, and the user information generally removes the password. The second parameter is the key, the third parameter is the time, how long is the validity period, and finally the token is returned to the client.
(4), the token client cannot be used directly, you need to add 'Bearer' in front, add this when returning, and the front end can be used directly.
login successful.
Three, inside and outside the login
The functions of the project are divided into functions inside and outside the login, such as a blog system, you can view the articles in it when you are not logged in, but you can publish articles only after you log in.
The interface in the login should send the token in the request header when requesting for identity authentication. There are only changes in app.js, and other files remain unchanged.
app.js
// 引入express
const express = require("express");
// 创建服务器的实例对象
const app = express();
// 引入校验规则的包,在定义错误级别的中间件时会用到
const joi = require("joi");

// 配置解析表单数据的中间件  内置中间件,只能解析application/x-www-form-urlencoded格式的数据
app.use(express.urlencoded({ extended: false }));

// 封装res.send() ,必须在路由之前封装
/**
 * 不管是输出正确的数据还是错误的信息,每次都需要写这么多东西
 * res.send({ state: 0, message: "查询成功", data: result })
 * 封装之后不需要写这么多
 */
app.use((req, res, next) => {
  // 定义一个输出的函数
  res.output = function (err, status = 1, data) {
    res.send({
      status,
      message: err instanceof Error ? err.message : err,
      data,
    });
  };
  next();
});

// 在路由之前配置解析token的中间件
const { expressjwt: jwt } = require("express-jwt");
// 解析token需要token的密钥
const config = require("./config");
// 定义中间件,需要哪个密钥解析,.unless指定哪些接口不需要进行token身份认证
app.use(
  jwt({ secret: config.jwtSecretKey, algorithms: ["HS256"] }).unless({
    path: [/^\/api/],
  })
);

// 导入并使用登录,注册的路由模块
const loginRouter = require("./router/login");
app.use("/api", loginRouter);
// 导入并使用路由模块
const inforRouter = require("./router/userInfor");
app.use(inforRouter);

// 在所有路由下面调用错误级别的中间件
app.use((err, req, res, next) => {
  // 验证失败导致的错误
  if (err instanceof joi.ValidationError) return res.output(err);

  // 未知的错误
  res.output(err);
  next();
});

// 启动服务器
app.listen(3007, () => {
  console.log("Server running at http://127.0.0.1:3007");
});
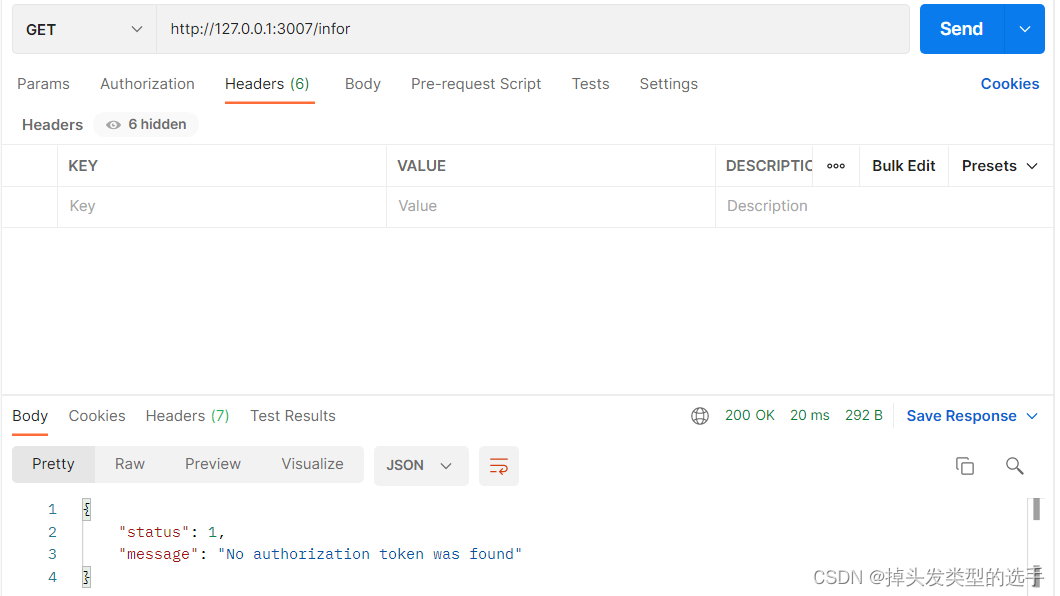
(1) A token is included in the request header, and the token needs to be parsed when the interface requests. To parse the token, a package express-jwt is required, and the same key as when generating the token is required.
(2) When the middleware for parsing tokens is not defined, all routes do not need tokens at this time. After the definition, tokens are required for all routes. unless() can specify which routes do not require tokens. The algorithms attribute, set the algorithm of jwt, for details, please refer to the express-jwt documentation.
(3), app.use("/api", loginRouter); When using routing, add '/api' before the request, and also need to add '/api' before the request path, and do not need to send it when logging in and registering token.
The token was not sent, and an error was reported.
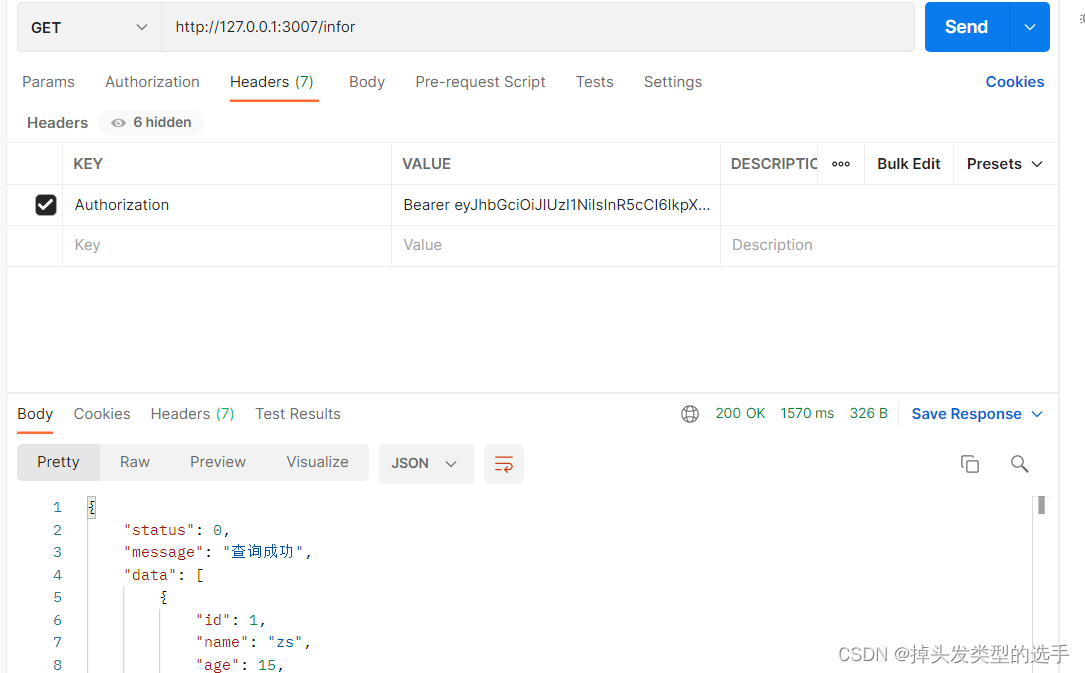
Send the token, and the query is successful.
Finally, sort out the packages used in the whole process:
express: framework
mysql: database
@escook/express-joi: Automatically validate form data
joi: field rule
bcryptjs: encrypt passwords
jsonwebtoken: generated token
express-jwt: parse the token after sending the token in the request header
You can go to the link below to get the code in the article.
Link: https://pan.baidu.com/s/1t7bX0Nv3kggyf7IFzEffcA Extraction code: 0000