Article Directory
- Preface
- 1. LVS cluster application foundation
- 2. Build LVS-NAT load balancing cluster
Preface
- In various Internet applications, as the site has higher and higher requirements for hardware performance, response speed, service stability, data reliability, etc., a single server will be unable to bear all access (that is, load balancing and high availability requirements)
- In addition to using expensive mainframes and dedicated load distribution equipment, companies have another option to solve the problem, that is, to build a cluster server-by integrating multiple pairs of cheap ordinary servers, providing the same external address with the same address service
- Next we will learn a cluster technology commonly used in enterprises-LVS (Linux Virtual Server, Linux Virtual Server)
1. LVS cluster application foundation
The name cluster (or cluster) comes from the English word "Cluster", which means a group or a bunch, and when used in the server field, it means the geometry of a large number of servers to distinguish it from a single server
1. Overview of cluster technology
- Depending on the actual environment of the enterprise, the functions provided by the cluster are also different, and the technical details used may also be different.
- However, on the whole, we need to understand some common characteristics of the cluster first, so that we can be aware of the work of constructing and maintaining the cluster, and avoid blindly going west in operation.
1.1 Classification of clusters
- No matter which type of cluster, it includes at least two node servers, and it appears as a whole externally, providing only one access entry (domain name or IP system)
- According to the target difference of the cluster, it can be divided into the following three types:
1.1.1 Load Balance Cluster
- Improve the responsiveness of the application system, handle as many access requests as possible, reduce latency as the goal, and obtain high concurrency and high load (LB) overall performance
- For example, "DNS polling", "application layer switching", and "reverse proxy" can all be used as load balancing clusters
- The load distribution of LB relies on the offloading algorithm of the master node, sharing the access requests from the client to multiple server nodes, thereby alleviating the load of the entire system
1.1.2 High Availability Cluster
- Improve the reliability of the application system, reduce the interruption time as much as possible, ensure the continuity of the service, and achieve the high availability (HA) fault tolerance effect
- For example, "failover" and "dual machine hot standby" are all highly available cluster technologies
- The working mode of HA includes duplex and master-slave modes. Duplex means that all nodes are online at the same time; master-slave means that only the master node is online, but when a failure occurs, the slave node can automatically switch to the master node
1.1.3 High Performance Computer Cluster
- With the goal of increasing the CPU computing speed of the application system, expanding hardware resources and analysis capabilities, obtaining high-performance computing (HPC) capabilities equivalent to large-scale, supercomputers
- For example, "cloud computing" and "grid computing" can also be regarded as a type of high-performance computing.
- High performance relies on "distributed computing" and "parallel computing". The CPU, memory and other resources of multiple servers are integrated through dedicated hardware and software to achieve computing capabilities that only large and supercomputers have.
Different types of clusters can be combined when necessary, such as a highly available load balancing cluster
1.2 Layered structure of load balancing
- In a typical load balancing cluster, there are three levels of components. At least one load scheduler (Load Balancer, or Director) is responsible for responding and distributing access requests from clients on the front end.
- The back-end consists of a large number of real servers to form a server pool, which provides actual application services. The scalability of the entire cluster is accomplished by adding and deleting server nodes, and these processes are transparent to clients
- In order to maintain service consistency, all nodes use shared storage devices uniformly
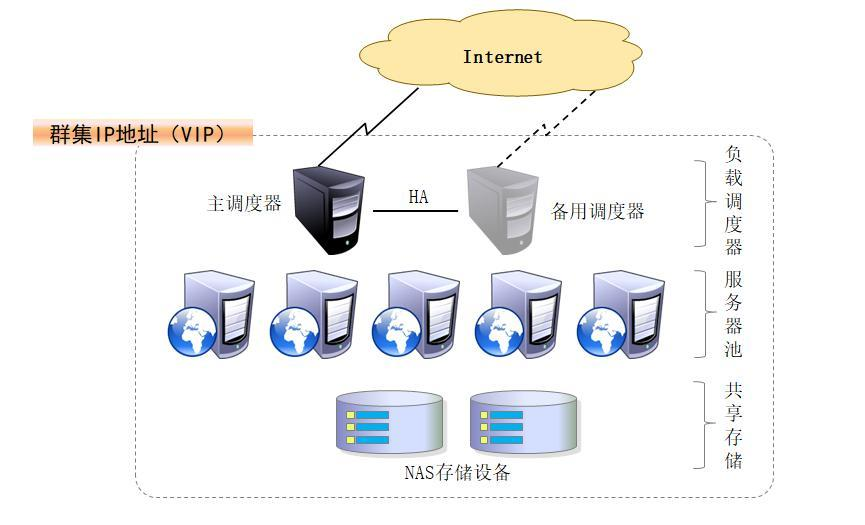
1.2.1 The first layer load scheduler
- The only entrance to access the entire cluster system, using the VIP (Virtual IP) address shared by all servers externally, also known as the cluster IP address
- Usually two schedulers, main and backup schedulers are configured to achieve hot backup. When the main scheduler fails, it can be smoothly replaced to the backup scheduler to ensure high availability
1.2.2 Second-tier server pool
- The application services (such as HTTP, FTP) provided by the cluster are borne by the server pool. Each node has an independent RIP address (Real IP), and only processes client requests distributed by the scheduler
- When a node fails temporarily, the fault-tolerant mechanism of the load scheduler will isolate it and wait for the error to be eliminated before re-entering it into the server pool
1.2.3 The third layer of shared storage
- Provide stable and consistent file access services for all nodes in the server pool to ensure the unity of the entire cluster
- Shared storage can use NAS devices, or dedicated servers that provide NFS (Network File System) shared services
1.3 Working mode of load balancing
- Regarding the cluster load scheduling technology, it can be distributed based on IP, port, content, etc., of which IP-based load scheduling is the most efficient
- In IP-based load balancing, there are three common working modes: address translation, IP tunnel, and direct routing:
1.3.1 Network Address Translation
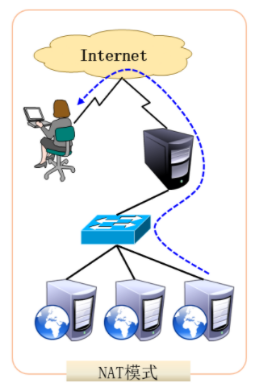
- Referred to as NAT mode, it is similar to the private network structure of a firewall. The load scheduler acts as the gateway of all server nodes, that is, as the access entrance of the client, and also the access exit of each node in response to the client
- The server node uses a private IP address and is located on the same physical network as the load scheduler, which is more secure than the other two methods
1.3.2 IP Tunnel
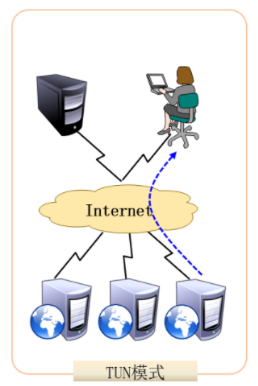
- Referred to as TUN mode, it adopts an open network structure. The load scheduler is only used as the client's access portal. Each node directly responds to the client through its own Internet connection, instead of passing through the load scheduler.
- The server nodes are scattered in different locations on the Internet, have independent public IP addresses, and communicate with the load scheduler through a dedicated IP tunnel
1.3.3 Direct Routing
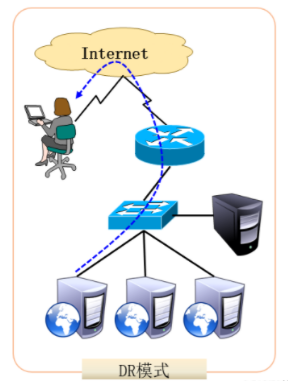
- Referred to as DR mode, it adopts a semi-open network structure, which is similar to the structure of TUN mode, but the nodes are not scattered everywhere, but are located on the same physical network as the scheduler
- The load scheduler is connected to each node server through the local network, without the need to establish a dedicated IP tunnel
Among the above three working modes, the NAT method only requires one public IP address, so it is called the most used load balancing mode with better security. Many hardware load balancing devices use this method; In other words, the load capacity of DR mode and TUN mode is stronger and the scope of use is wider, but the security of the node is slightly worse.
2. LVS Virtual Server
- Linux Virtual Server (LVS) is a load balancing solution developed for the Linux kernel. It was created by Dr. Wensong Zhang of my country in May 1998. The official website is located at http://www.linuxvirtualserver.org/
- LVS is actually equivalent to a virtualized application based on IP addresses, and proposes an efficient solution for load balancing based on IP address and content request distribution
- LVS has now become part of the Linux kernel, compiled as an ip_vs module by default, and can be called automatically when necessary
- In the CentOS 7 system, the following operations can manually load the ip_vs module and view the version information of the ip_vs module in the current system
[root@localhost ~]# modprobe ip_vs          #加载 ip_vs 模块
[root@localhost ~]# cat /proc/net/ip_vs     #查看 ip_vs 版本信息
IP Virtual Server version 1.2.1 (size=4096)
Prot LocalAddress:Port Scheduler Flags
  -> RemoteAddress:Port Forward Weight ActiveConn InActConn
2.1 LVS load scheduling algorithm
For different network service and configuration needs, LVS scheduler provides a variety of different load scheduling algorithms, among which the four most common algorithms include round-robin, weighted round-robin, least connections and weighted least connections
2.1.1 Round Robin:
- Assign the received access requests to each node (real server) in the cluster in turn in order
- Treat each server equally, regardless of the actual number of server connections and system load
2.1.2 Weighted Round Robin:
- According to the processing capacity of the real server, the received access requests are allocated in turn
- The scheduler can automatically query the load status of each node and dynamically adjust its weight
- This can ensure that servers with strong processing capabilities bear more access traffic
2.1.3 Least Connections:
- Distribution based on the number of connections established by the real server
- Prioritize the access requests received to the node with the least number of connections
- If all server nodes have similar performance, this method can better balance the load
2.1.4 Weighted Least Connections
- When the performance of server nodes differ greatly, the weight can be automatically adjusted for the real server
- Nodes with higher weights will bear a greater proportion of active connection load
2.2 Use ipvsadm management tool
- ipvsadm is an LVS cluster management tool used on the load scheduler. You can add and delete server nodes by calling the ip_vs module, and view the running status of the cluster
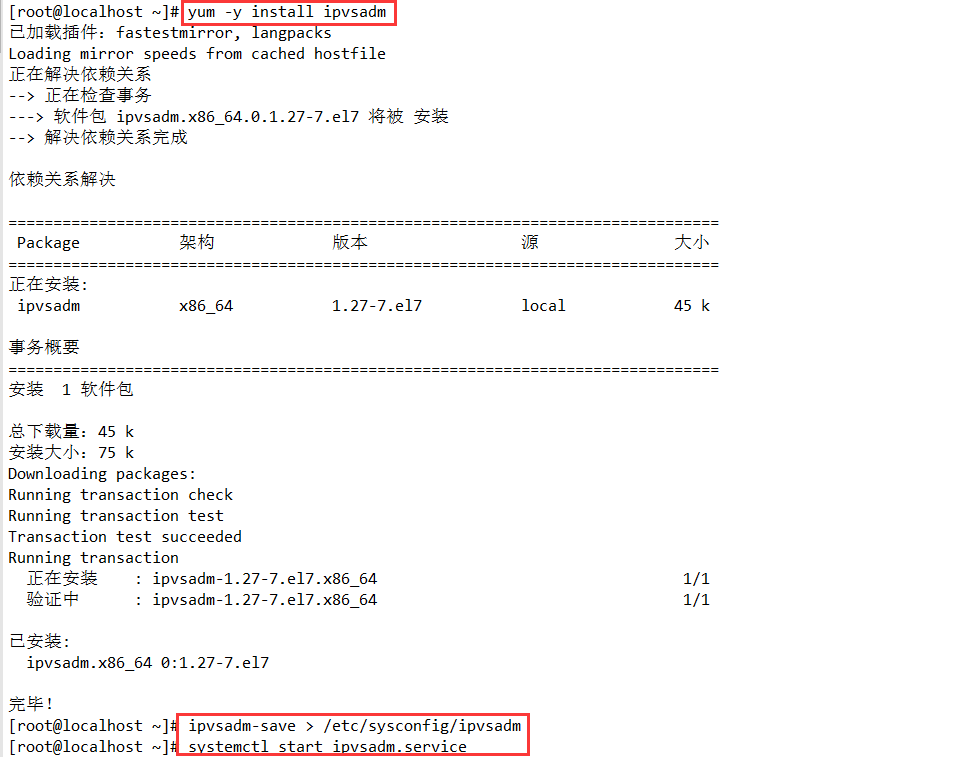
2.2.1 Installation
In CentOS 7 system, you need to install this package manually
[root@localhost ~]# yum -y install ipvsadm
...
...
已安装:
  ipvsadm.x86_64 0:1.27-7.el7

完毕!


[root@localhost ~]# ipvsadm -v
ipvsadm v1.27 2008/5/15 (compiled with popt and IPVS v1.2.1)
2.2.2 Operation method
The management of the LVS cluster mainly includes creating virtual servers, adding server nodes, viewing the status of cluster nodes, deleting server nodes, and saving load distribution strategies
| Common options | Description |
|---|---|
| -A | Add virtual server |
| -D | Delete the entire virtual server |
| -s | Specify load scheduling algorithm (polling: rr, weighted round-robin: wrr, least connections: lc, weighted least connections: wlc) |
| -a | Means to add a real server (node server) |
| -d | Delete a node |
| -t | Specify VIP address and TCP port |
| -r | Specify RIP address and TCP port |
| -m | Indicates the use of NAT cluster mode. |
| -g | Indicates the use of DR mode |
| -i | Means to use TUN mode |
| -w | Set the weight (when the weight is 0, the node is suspended) |
| -p 60 | Means to keep a long connection for 60 seconds |
| -l | List LVS virtual servers (default is to view all) |
| -n | Display address, port and other information in digital form, often used in combination with the "-l" option. ipvsadm -ln |
2.2.3 Example
- Manage virtual services
#添加一个虚拟服务192.168.1.100:80,使用轮询算法
ipvsadm -A -t 192.168.1.100:80 -s rr


#修改虚拟服务的算法为加权轮询
ipvsadm -E -t 192.168.1.100:80 -s wrr


#删除虚拟服务
ipvsadm -D -t 192.168.1.100:80
- Manage real services
#添加一个真实服务器192.168.1.123,使用DR模式,权重2
ipvsadm -a -t 192.168.1.100:80 -r 192.168.1.123 -g -w 2


#修改真实服务器的权重
ipvsadm -a -t 192.168.1.100:80 -r 192.168.1.123 -g -w 5


#删除真实服务器
ipvsadm -d -t 192.168.1.100:80 -r 192.168.1.123
- View statistics
#查看当前配置的虚拟服务和各个RS的权重
ipvsadm -Ln


#查看当前ipvs模块中记录的连接(可用于观察转发情况)
ipvsadm -lnc


#查看ipvs模块的转发情况统计

ipvsadm -Ln --stats | --rate
2. Build LVS-NAT load balancing cluster
Address translation mode (LVS-NAT)
1. Preparation
1.1 Overview
- In a NAT mode cluster, the LVS load scheduler is the gateway server for all nodes to access the Internet and also serves as the VIP address of the entire cluster
- The LVS scheduler has two network cards, which are connected to the internal and external networks respectively
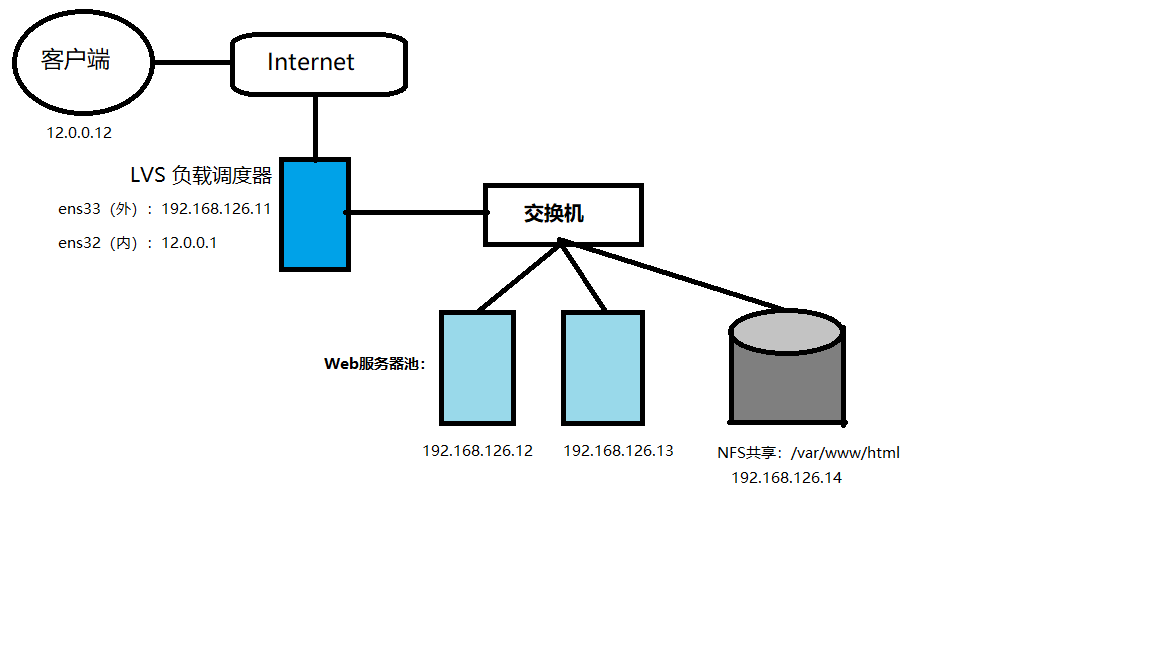
- For LVS load balancing scheduler, you need to use iptables to configure SNAT forwarding rules for outbound responses so that the node server can access the Internet
- All node servers and shared storage are located in the private network, and their default gateway is set to the internal network address of the LVS load scheduler
1.2 Environment
- In this experiment, five virtual machines are deployed. The details are as follows:
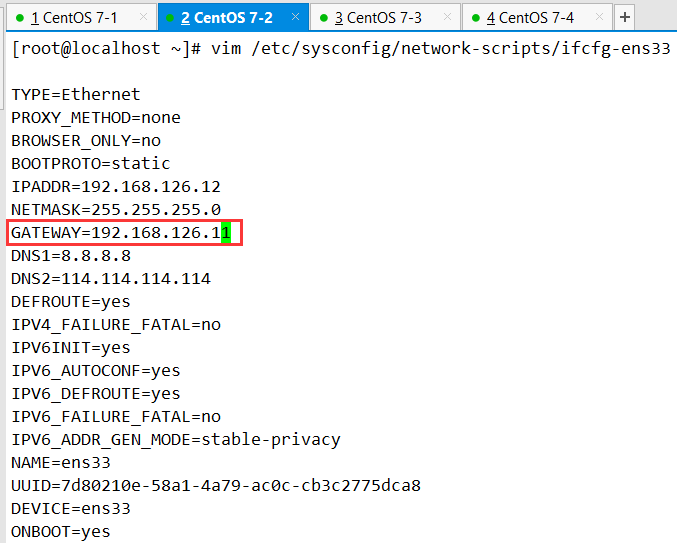
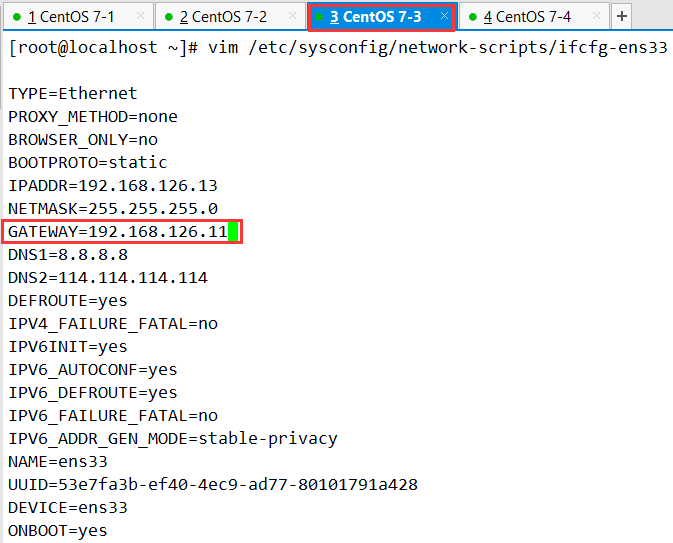
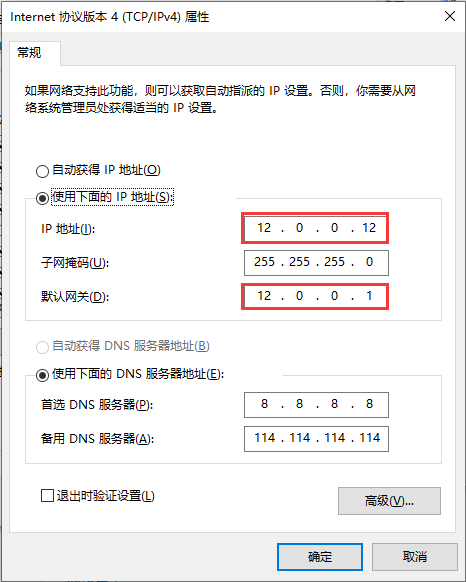
Client (Win10): 12.0.0.12
Load Scheduler (CentOS 7-1): Inner gateway ens33: 192.168.126.11, Outer gateway ens32: 12.0.0.1
Web node Server 1 (CentOS 7-2): 192.168.126.12
Web node Server 2 (CentOS 7-3): 192.168.126.13
NFS server (CentOS 7-4): 192.168.126.14Host: Windows 10 professional workstation version
VWware 16 Pro (16.1.0)
CentOS7
virtual machine network adapters are all in NAT mode,
network card configuration is obtained statically
Local YUM source warehouse
2. Deploy NFS shared storage
systemctl stop firewalld.service
systemctl disable firewalld.service
setenforce 0
#安装nfs共享所需软件包及开启nfs功能
yum install nfs-utils rpcbind -y
systemctl start nfs.service
systemctl start rpcbind.service
systemctl enable nfs.service
systemctl enable rpcbind.service
#给予共享文件最大权限
mkdir /opt/xcf /opt/zxc
chmod 777 /opt/xcf /opt/zxc
#给共享文件输出内容,以作网站首页内容
cd /opt/xcf
echo 'Hello xcf' > index.html
cd /opt/zxc
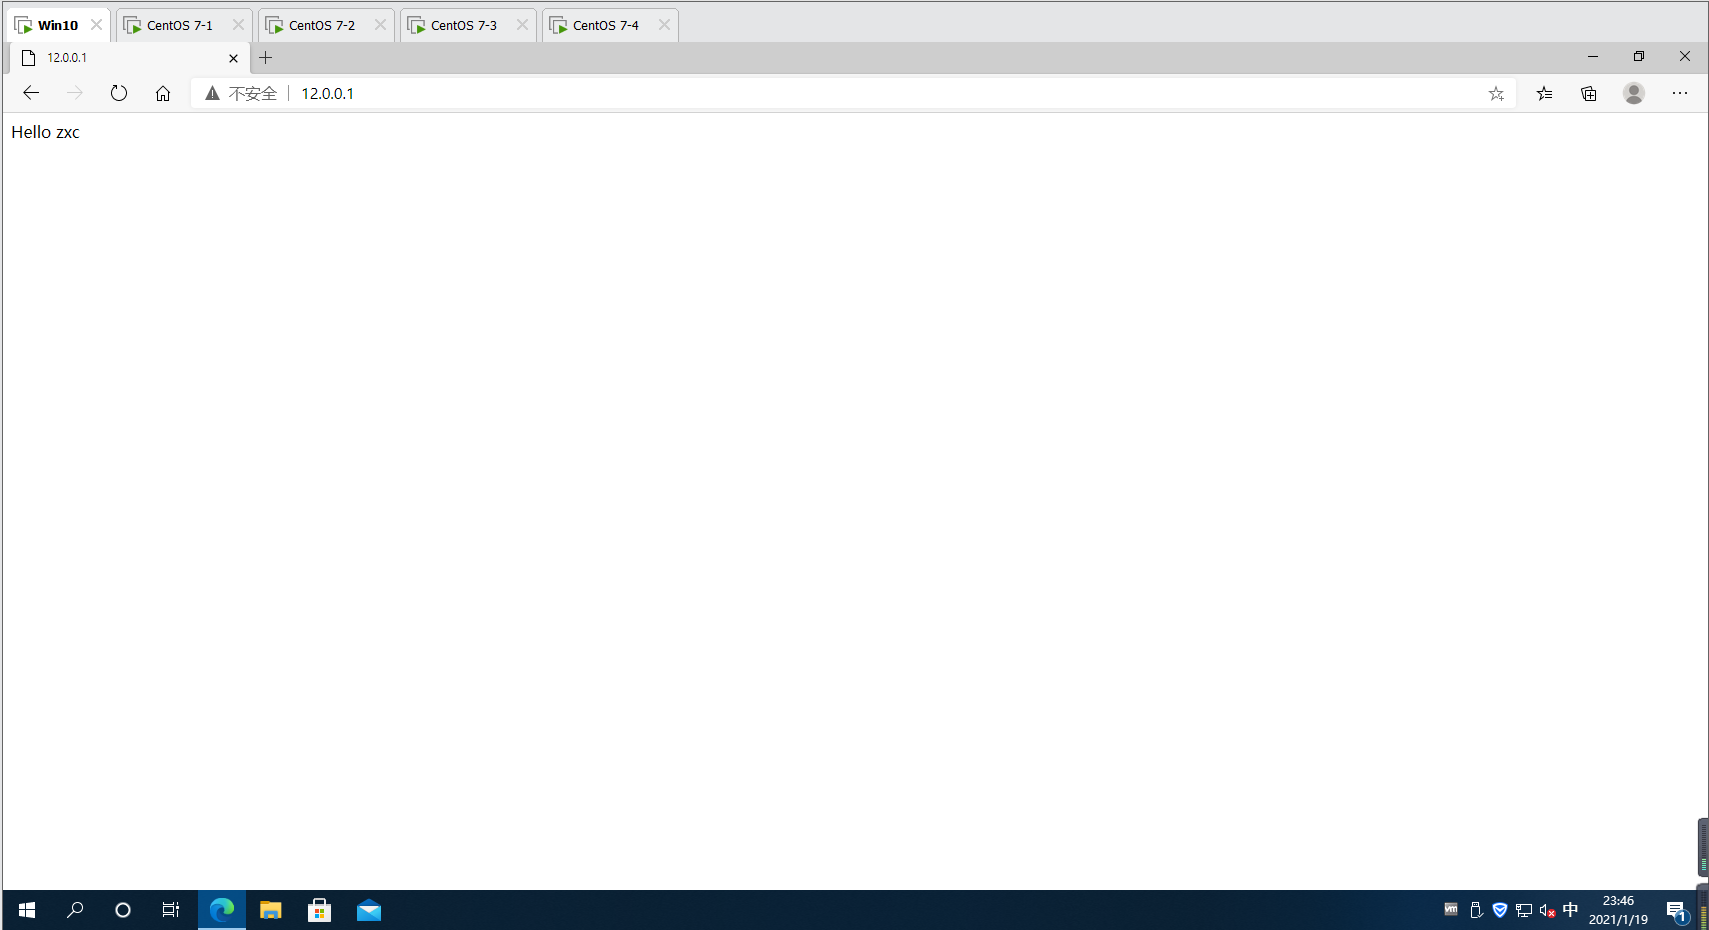
echo 'Hello zxc' > index.html
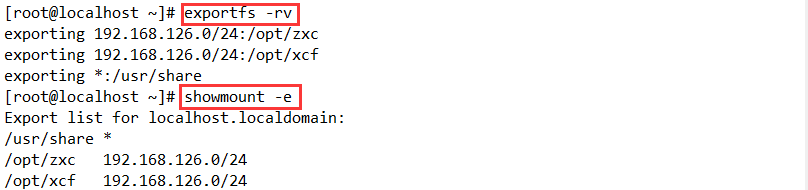
vim /etc/exports
/usr/share *(ro,sync)
/opt/xcf 192.168.126.0/24(rw,sync)
/opt/zxc 192.168.126.0/24(rw,sync)
#发布共享
exportfs -rv
showmount -e
3. Configure the node server
systemctl stop firewalld.service
systemctl disable firewalld.service
setenforce 0

yum -y install httpd
systemctl start httpd.service
systemctl enable httpd.service

yum -y install nfs-utils rpcbind
systemctl start rpcbind.service
systemctl enable rpcbind.service
systemctl start nfs.service
systemctl enable nfs.service

showmount -e 192.168.126.14

mount 192.168.126.14:/opt/xcf /var/www/html
cd /var/www/html/
ls
cat index.html

vim /etc/fstab
192.168.126.14:/opt/xcf /var/www/html nfs defaults,_netdev 0 0

mount -a
- The other node server is the same as above, pay attention to distinguish two different shared folders
4. Configure the load scheduler
systemctl stop firewalld.service
systemctl disable firewalld.service
setenforce 0
#添加一块网卡后开机
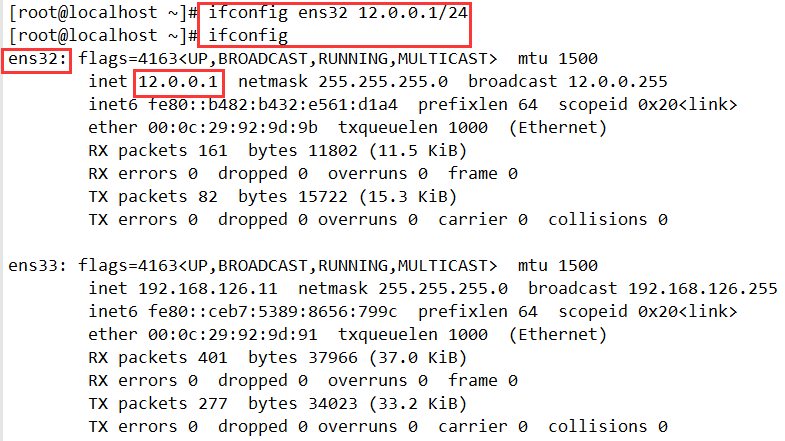
ifconfig ens32 12.0.0.1/24
4.1 Configure SNAT forwarding rules
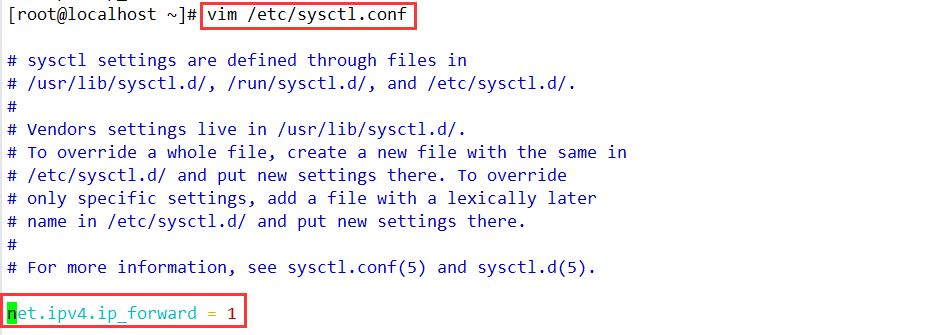
vim /etc/sysctl.conf
net.ipv4.ip_forward = 1

sysctl -p

#先清空iptables规则
iptables -t nat -F
iptables -F

iptables -t nat -A POSTROUTING -s 192.168.126.0/24 -o ens32 -j SNAT --to-source 12.0.0.1

4.2 Load LVS kernel module
#加载ip_vs模块
modprobe ip_vs

#查看ip_vs版本信息
cat /proc/net/ip_vs

4.3 Install ipvsadm management tool
yum install -y ipvsadm


#启动服务前须保存负载分配策略
ipvsadm-save > /etc/sysconfig/ipvsadm
或
ipvsadm --save > /etc/sysconfig/ipvsadm

systemctl start ipvsadm.service
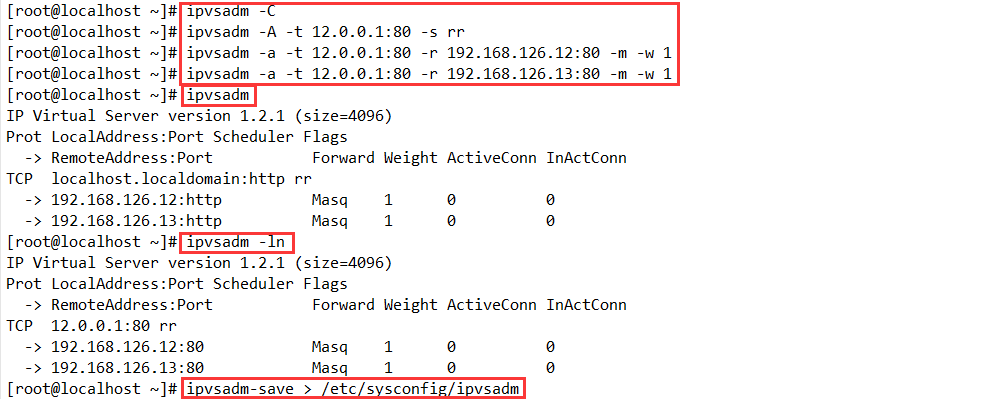
4.4 Configure load distribution strategy (NAT mode only needs to be configured on the server, and the node server does not require special configuration)
#清除原有策略
ipvsadm -C

ipvsadm -A -t 12.0.0.1:80 -s rr
ipvsadm -a -t 12.0.0.1:80 -r 192.168.126.12:80 -m -w 1
ipvsadm -a -t 12.0.0.1:80 -r 192.168.126.13:80 -m -w 1

#启用策略
ipvsadm

#查看节点状态,Masq代表 NAT模式
ipvsadm -ln

#保存策略
ipvsadm-save > /etc/sysconfig/ipvsadm
4.5 Note
Two hosts for load balancing, remember to point the gateway to the gateway of the scheduler
4.6 Supplement
#删除群集中某一节点服务器
ipvsadm -d -t 12.0.0.1:80 -r 192.168.126.12:80 -m [-w 1]

#删除整个虚拟服务器
ipvsadm -D -t 12.0.0.1:80

#停止服务(清除策略)
systemctl stop ipvsadm

#启动服务(重建规则)
systemctl start ipvsadm

#恢复LVS 策略
ipvsadm-restore < /etc/sysconfig/ipvsadm
5. Test the LVS cluster
-
Open Win10 and modify the network adapter, the gateway of the test machine should point to the gateway of the scheduler
-
Open the browser and visit http:/12.0.0.1, you will be able to see the content of the webpage provided by the real server-if the webpages of each node are different, the webpages seen by different clients may be different (you need to refresh several times , The interval needs to wait a while)

-
In the LVS load scheduler, you can observe the current load distribution by viewing the node status. For the polling algorithm, the connection load obtained by each node should be roughly the same
